
We all know that, Atmega328 IC is used in Arduino UNO board. This IC is the brain of the Arduino board. Actually, Arduino designers wanted to make a handy prototyping board for the beginners so they organized all the components in such way that anybody can access all the pins of the Atmega328 IC and can program it just by connecting it to computer. Arduino board is very popular for building hobby projects. But in industrial or consumer products its not good idea to use the complete Arduino board, so we can use standalone Atmega328 IC, which can be programmed with Arduino IDE but without using Arduino board.
In this tutorial, we will see how replace Arduino board with Atmega328 IC and with few other components. For using Atmega328 IC in place of arduino, first we have to burn Arduino Bootloader in it and then we will program it using FTDI or using Arduino Board. This tutorial will also help in replacing damaged Atmega328 IC from Arduino board. Also by using the circuit described below you can build your own Arduino board by replicating it on PCB.
Components Required
- Atmega 328 IC
- Breadboard
- LM7805
- 16 MHz Crystal
- 22pF ceramic capacitors (2)
- 10uF capacitor(2)
- 10 K resistor
- 1k resistor
- Jumper wires
Optionally, you can also use 3.3v voltage regulator LM1117-3.3v to include 3.3v rail in your circuit.
Pin Diagram of Atmega328

Circuit Diagram
Circuit Diagram for replicating Arduino on Breadboard is given below:

Component Descriptions
Power supply part-
- 5V voltage regulator: Atmega 328 IC runs on 5V power supply. So here, we are using LM7805 to get 5v output, it can handle upto 30V as input. If you have a separate 5V supply then You can leave this step.
- Capacitors: 10uF capacitor is used at the input and output part of 7805 to bypass any AC component to ground.
- LED: This will show you that your 5V output is coming.
Microcontroller part-
- Atmega 328: This is our main component on the breadboard. Its pin diagram is given above.
- Crystal oscillator: A 16MHz external crystal is connected between Pin 9 and Pin 10 of the ATmega328. This crystal is used to give clock to the microcontroller to execute the tasks faster.
- Push Button: To reset the the microcontroller a push button is connected between pin 1 and GND. Normally, it is connected with 5v using a 10k resistor.
- LED: A led is connected with digital pin 13.
This complete tutorial is divided into three parts to make your own Arduino running on breadboard:
- Building the Arduino Circuit on Breadboard
- Burning the Bootloader into Atmega328 IC
- How to Program Arduino Bootloader uploaded Atmega 328 IC on breadboard.
Now we will explain each part one by one.
Part-1: Building the Arduino Circuit on Breadboard
Step 1:- Connect the Power Supply Part as shown in circuit diagram and test it using external power supply to LM7805. It will looks like this.

Step 2:- Now, connect the Microcontroller Part as shown in circuit diagram. Make the connections carefully.

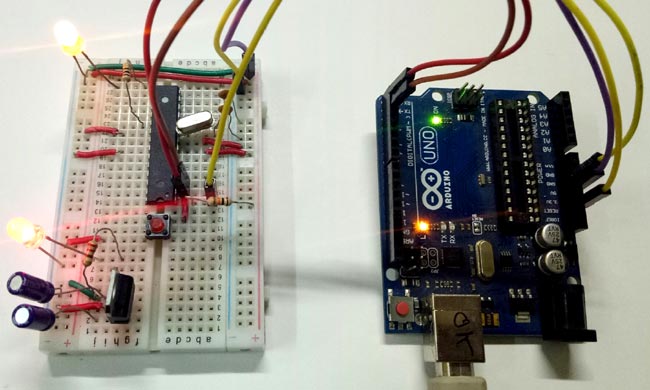
Step 3:- Now, connect the power supply and microcontroller part using jumpers. Your final circuit will looks something like this.

So, this is our Arduino on breadboard. You can implement the same circuit on PCB using simple tools like EasyEDA, etc. Now, we have to upload the bootloader to the new Atmega 328 IC so that we can start to program the IC.
Part-2: Burning the Bootloader into Atmega328 IC
What is bootloader and why we need it??
Bootloader is small piece of executable code that permanently stored in the microcontroller’s memory. This occupies less than 1Kb of memory. Bootloader allows the IC to accept the code from the computer and place it in the memory of the microcontroller.
Traditionally, all the microcontroller from Atmel are programmed with the help of programmers which has some fancy connections. Bootloaders reduces the complexity and allow us with an easy and efficient way of programming the microcontroller. This means you can program it just by using an USB cable.
When you buy a new Atmega 328 from market, it has no bootloader in it. So to program your Atmega328 using Arduino IDE you have to first upload the bootloader.
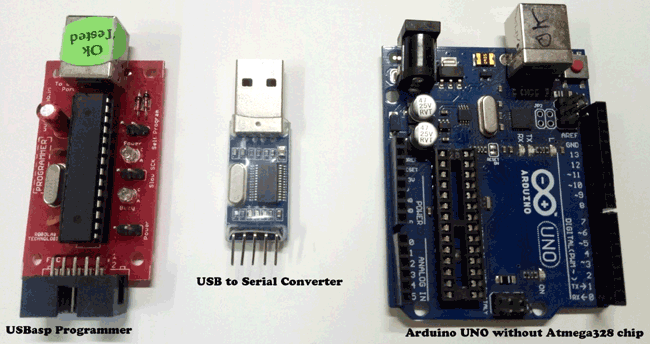
To upload the Bootloader, we have two methods:
- Using USBasp programmer
- Using Arduino UNO board
Second method is easier compared to first one. Because it requires less connections and also latest version of Arduino IDE not supports the fancy USBasp programmers.
So, in this tutorial we will upload bootloader using Arduino Uno board.
Upload the Arduino Bootloader in Atmega328 Chip
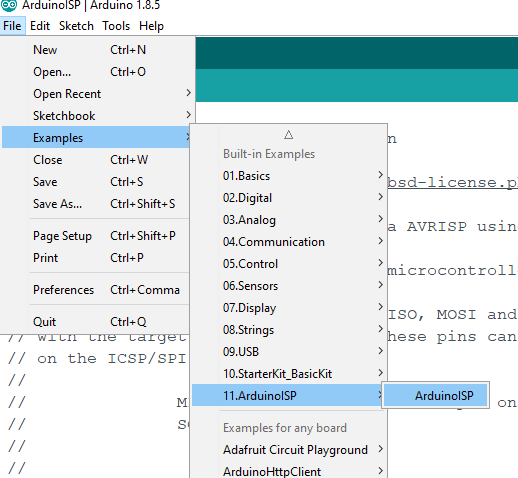
Step 1:- Open Arduino IDE. Go to File -> Examples -> ArduinoISP. Than choose ArduinoISP. As shown below.
Step 2:- Now, you have to upload this code to your Arduino board. Choose the com port and board from the tool menu and hit the upload button.
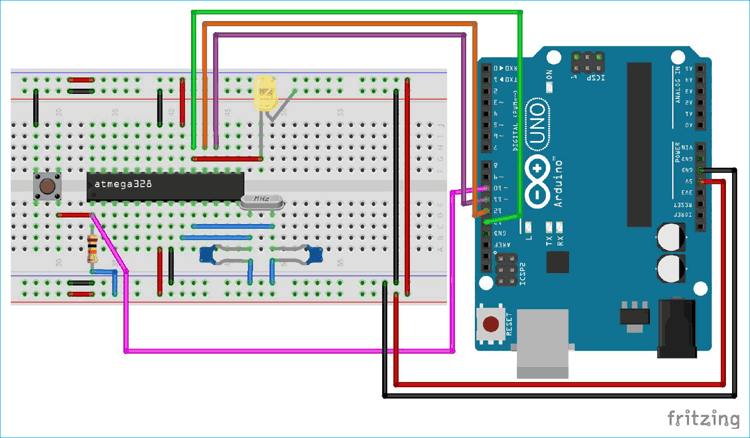
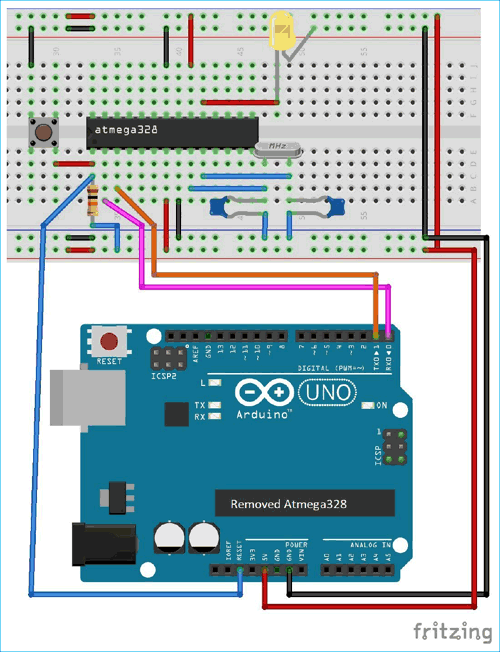
Step 3:- After ‘Done uploading’, disconnect the Arduino board from the computer and make the connections of Arduino board with Atmega 328 as shown in below diagram.
Step 4:- Now, connect the Arduino board with the computer. Open Arduino IDE.
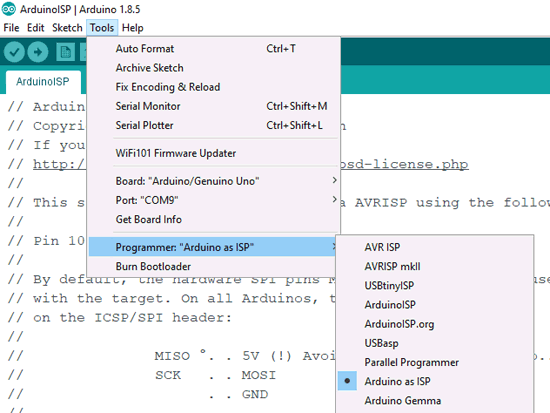
Go to Tools , Choose board as Arduino/Genuine Uno, Choose the correct Port for your board. Choose Programmer as “Arduino as ISP”. Don’t confuse it with ArduinoISP. Both are different.
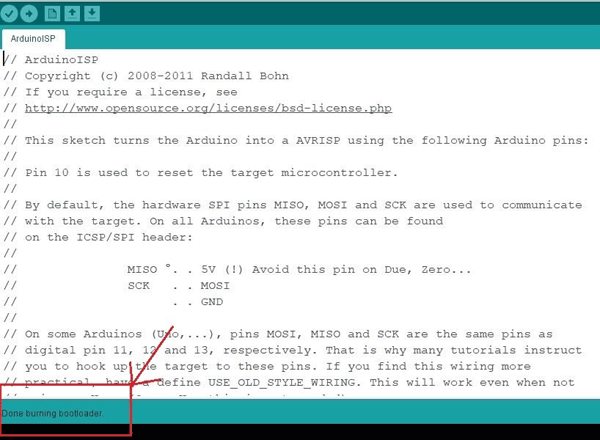
Step 5:- Now, Go to Tools again and Click on Burn Bootloader just below the Programmer option. After few seconds, bootloader is uploaded successfully. If there is any error in uploading, check the connections.
Check the below Video to understand the steps explained above to upload Bootloader in Atmega 328 IC.
Your breadboard Arduino is ready to work as real Arduino board. Now, question arises that how to program Atmega 328 IC? That we will discuss in our next section.
Part-3: How to Program Arduino Bootloader uploaded Atmega 328 IC
Standalone Arduino Atmega328 Chip can be programmed in many ways.
- Using blank Arduino board i.e. Arduino board without Atmega 328 IC in it.
- Using USB to Serial TTL converter module (FTDI module).
- Using USBasp programmer (involve many connections).
Here, we will program it using two methods: USB to serial converter and Arduino board.
Programming Atmega328 Chip using Arduino board
Step 1:- Take an Arduino board without Atmega328 chip. Make the connections of Arduino board with our breadboard Arduino as shown in this diagram.
Step 2:- Connect the Arduino board with the computer and open the Arduino IDE. Choose Arduino Uno from Board menu in Tools, Programmer as USBasp and correct com port of the board.
Step 3:- We will start by uploading the Blink program. So choose the blink program from Examples and hit Upload button.
Now, you can see led on the breadboard will start blinking.
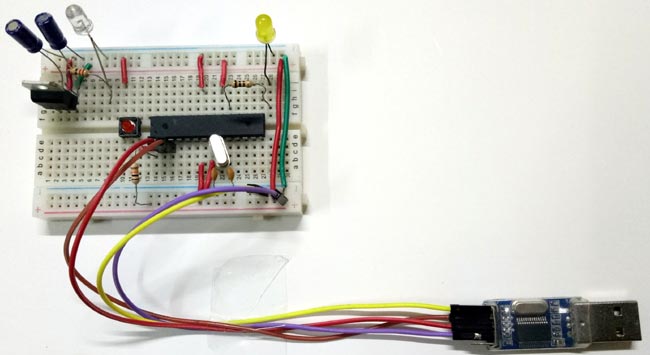
Programming Arduino Atmega328 Chip using USB to Serial converter
Step 1:- If you don’t have Arduino board. This is the best method to program your breadboard Arduino.
Make the connections as:
RXD pin of FTDI -> Tx pin of Atmega328(pin 3)
TXD pin of FTDI -> Rx pin of Atmega328 (pin 2)
GND -> GND(pin 8)
5v -> Vcc (pin 7)
Some FTDI modules has Reset pin also known as DTR pin, which needs to be connected with the Reset pin of Atmega328 (pin 1). If there is no reset pin in the module, don’t worry I’ll give the solution when we program the chip.
Step 2:- Now, connect the FTDI with computer and open Device manager in control panel. You will see Port section, Expand it. If there is an yellow mark in front of the driver then you have to update your module driver.
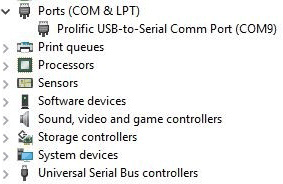
If there is no mark, then note the com port number and open Arduino IDE. Go to Tools -> Ports -> Select the com that you have noted.
Step 3:- Now, We will upload blink program to our Breadboard Arduino. Go to File -> Examples -> Basics -> Blink. Choose Arduino Uno from Board menu in tools, Programmer as USBasp and correct com port of the board.
Then hit upload button.
Note: If your FTDI module has no DTR pin, then Press the Reset button on the breadboard and hit upload button. Keep it pressed if it says Compiling sketch… Release the button as soon as it says Uploading…
Now, the program will be successfully uploaded into Arduino Bootloader Atmega328 chip.
Below is the Video for Programming Atmega 328 IC without using Arduino Board:
We have done with our DIY Breadboard Arduino Circuit. You can design this circuit on PCB to make it more compact.
