 Vedhathiri
Author

What if a device could see the world the same way humans do, seeing objects, recognizing them, and understanding what they are in real time? Just like our eyes capture visuals and our brain instantly processes them, from bottles and phones to people and everyday items. It will be pretty cool, right? That is exactly what this Raspberry Pi object detection project demonstrates. You can build a fully working object detection system on a Raspberry Pi without collecting a dataset, labelling images, or training any machine learning model.
Table of Contents
- What Is Object Detection?
- How Does Object Detection on Raspberry Pi Work?
- Components Required
- Circuit Diagram
- Step-by-Step Setup
- Setting Up the CircuitDigest Cloud Object Detection API
- Raspberry Pi Object Detection Output
- Cloud API vs. Local Inference
- Code Explanation
- Troubleshooting
- Advantages and Limitations
- GitHub
What Is Object Detection?
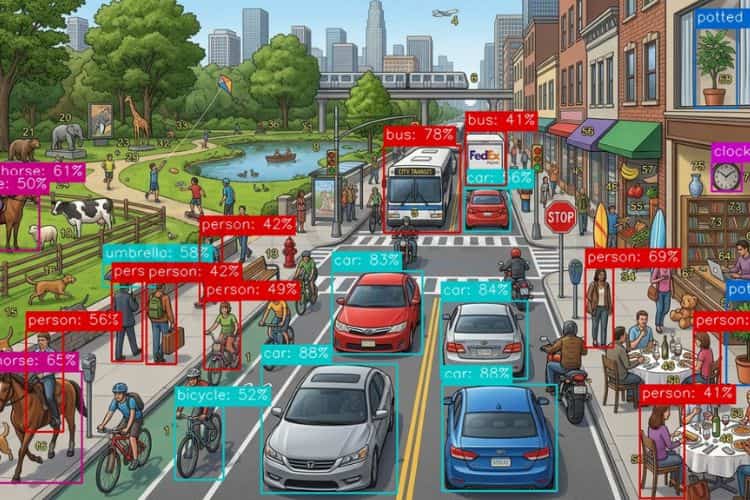
Object detection is a computer vision technique that can be used to detect objects in an image or in a video. It will detect objects in the picture, draw bounding boxes around them, show their names, and display their confidence percentages. This process enables machines to understand the visual world as humans do. Also, do know that terms like object detection, object recognition, or image recognition are often used interchangeably because they mean the same. So what if this object detection can be done in a compact system without labelling, collecting the dataset, and even creating the model? Yes, it is possible with the help of the Raspberry Pi and CircuitDigest Cloud. Let's dive in and see how to do object detection with a Raspberry Pi. You can also check out similar AI projects and Raspberry Pi projects done previously here at Circuit Digest.
| Feature | Object Detection | Image Classification |
| Output | Bounding boxes + class labels + confidence | Single class label per image |
| Multiple objects | Yes - detects all objects in one frame | No - one label for the whole image |
| Location info | Yes - x/y coordinates of each object | No |
| Typical use case | Surveillance, robotics, autonomous vehicles | Content moderation, product tagging |
| Complexity | Higher (requires YOLO, SSD, or API) | Lower (MobileNet, ResNet) |
How Does Object Detection on Raspberry Pi Work?
The architecture of this Raspberry Pi object detection system is straightforward. The project setup is too simple; we just need the Raspberry Pi, USB Camera, laptop, and an account in the CircuitDigest Cloud. First, the USB camera is connected to the Raspberry Pi’s USB port, and the Raspberry Pi is powered by the external source. Now the Raspberry Pi captures an image when the space key is pressed, or we can set it to capture an image automatically every 20 seconds.
The captured image was sent to the CircuitDigest Cloud object detection API. Then the cloud analyzes the image, and it creates the bounding boxes around the detected objects and their confidence value. The count of the detected object, the name of the object, and the confidence of the object are displayed in the Serial Monitor clearly. We also did an interesting project using Edge Impulse; refer to Object Detection using ESP32-CAM and Edge Impulse for more details.
Components Required for the Raspberry Pi Object Detection Project
The components below are the ones that are used to build the Raspberry Pi-based object detection tutorial.
| S.No | Components | Purpose |
| 1. | Raspberry pi | It is the main controller in this setup for processing. |
| 2. | USB Camera | Used to capture the image for processing |
| 3. | MicroSD Card | Stores the Raspberry Pi OS and project files |
Circuit Diagram for Raspberry Pi Object Detection
The circuit diagram below shows that the Raspberry Pi is connected to the external power supply for sufficient power, and the USB camera is connected to the Raspberry Pi board's USB port. The Raspberry Pi is remotely connected to the laptop.

Step-by-Step Setup for Object Detection with Raspberry Pi
Unlike the ESP32 or Arduino, the code cannot be directly flashed to the Raspberry Pi using the Arduino IDE. Before running the project on the Raspberry Pi, we must properly set up the board by installing the OS on the microSD card. This process is done using Raspberry Pi Imager on a laptop or PC. First, the microSD card is inserted into the system, and through the Raspberry Pi Imager, the required Raspberry Pi OS and initial configuration, such as Wi-Fi, username, password, and SSH settings, are selected and installed. After the OS installation is completed, remove the SD card and insert it into the Raspberry Pi’s SD card slot, then power the board using an external source. If you feel confused at any time, the detailed step-by-step guide for the Raspberry Pi setup can be found in the Raspberry Pi Complete Setup tutorial. The ways to get the Raspberry Pi connected are as follows,
- Direct Hardware Connection
The first method is by connecting external components such as a monitor, keyboard, and mouse directly to the Raspberry Pi. This allows the Raspberry Pi to work like a normal desktop computer and is mainly useful during the initial setup and for direct operation. - Using SSH (Secure Shell)
The second method is through SSH, where the Raspberry Pi can be accessed remotely from another computer using the same network connection. This method provides command-line control without needing a separate monitor, keyboard, or mouse connected to the Raspberry Pi. - Using VNC Viewer
The third method is by using VNC Viewer, which allows remote access to the full graphical desktop of the Raspberry Pi from another computer. This makes it possible to control the Raspberry Pi exactly like working directly on its own screen, but from a remote location. To work on the setup using VNC Viewer, you can refer to this VNC viewer for Raspberry Pi tutorial for the detailed step-by-step procedure.
Setting Up the CircuitDigest Cloud Object Detection API
Before stepping into the Thonny IDE present in the Raspberry Pi desktop, first, you need the code for flashing. For that, follow the steps below,
Step 1 ⇒ Create your account
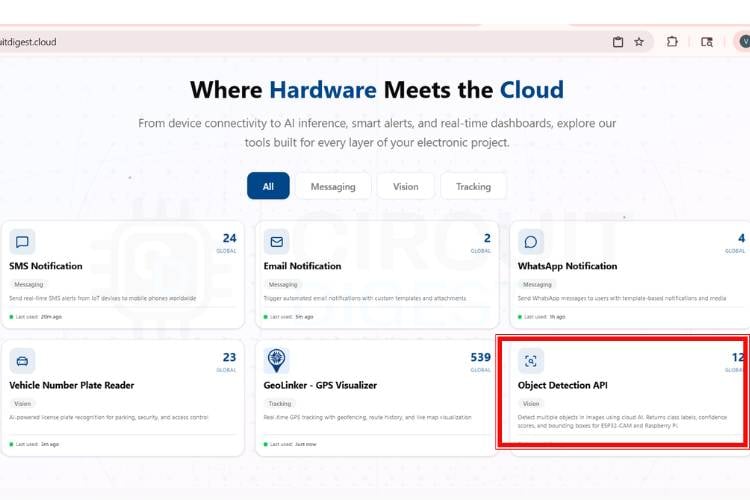
First, you need to make an account on the CircuitDigest Cloud. If you already have one, just go to the CircuitDigest Cloud website, scroll down, and there you will notice the object detection feature; click that, and enter.
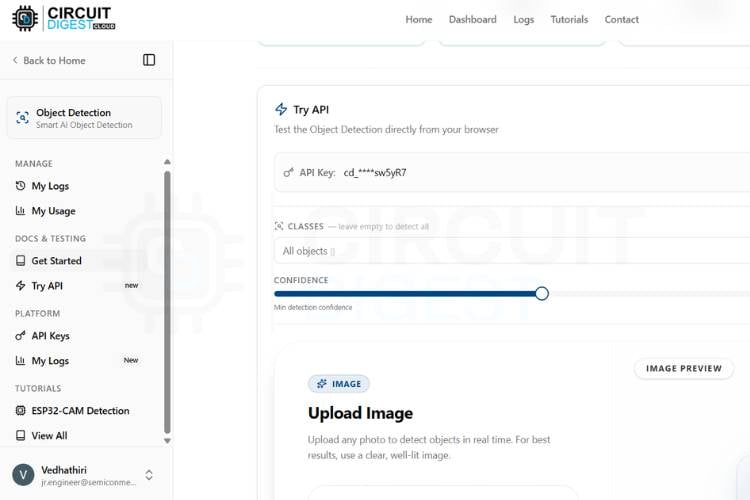
Step 2 ⇒ Set the confidence threshold
There, you will notice the try api section, various options like image, classes, confidence, result, and a board selection section with its required codes. First, you can minimize and maximize the confidence level according to your needs because the confidence value sets the minimum probability threshold for object detection. A higher value results in more accurate detections but may miss some objects, while a lower value detects more objects but with less accuracy.
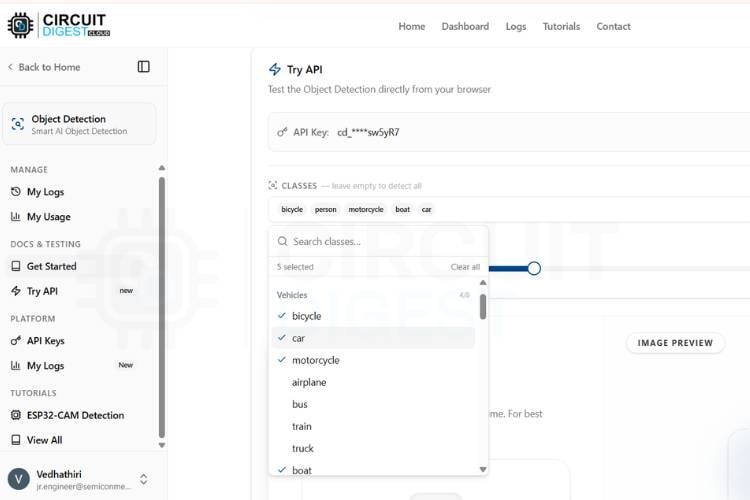
Step 3⇒ Select object classes
Next, you will be able to access all classes; you can access nearly 75+ object classes. You can set the detection for all classes or the specific classes according to your needs.
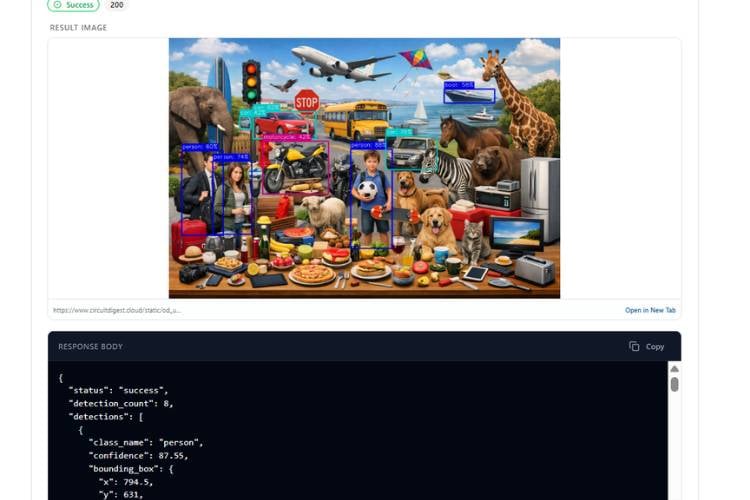
Step 4⇒ Test with a sample image
Now, to try without any microcontroller boards, you need to take a picture that has some of the classes you selected, like a picture with a dog, cat, car, bike, or anything that is available in the classes. Upload it to the image section and click Run Test. In a few seconds, you will get the result with object detection and its count also.
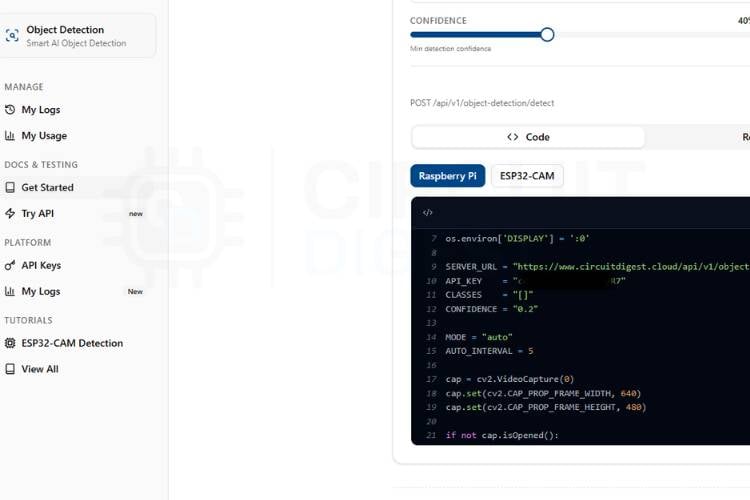
Step 5⇒ Generate and run the Raspberry Pi code
Below the page, you can see the microcontroller selection. Now, we will try this object detection system with the Raspberry Pi. Click the Raspberry Pi, and the page will give you the code. Just copy the code; now go to the Raspberry Pi desktop, click Thonny IDE for programming. In that, paste the copied code after making all connections correctly. Nothing, just connect the USB camera to the Raspberry Pi and run the code; that's it. Take any dummy picture from the internet that has the object classes that you selected, or you can test this in real time by taking a picture of the real-time objects, like a car, a bike, a dog, a cat, people, etc., using the keyboard keys, or you can set it automatically by changing the MODE = "keyboard" in the code, like,
- Keyboard Mode
In this mode, the user captures the image manually by pressing the SPACE key on the keyboard. It is mainly used when working directly with a monitor or through VNC Viewer. - Auto Mode
In this mode, the system automatically captures images after a fixed time interval without any user interaction. It is useful for continuous monitoring applications. - SSH Mode
In this mode, the program runs through terminal access using SSH and captures images automatically without using the OpenCV display window. The results are shown directly in the terminal.
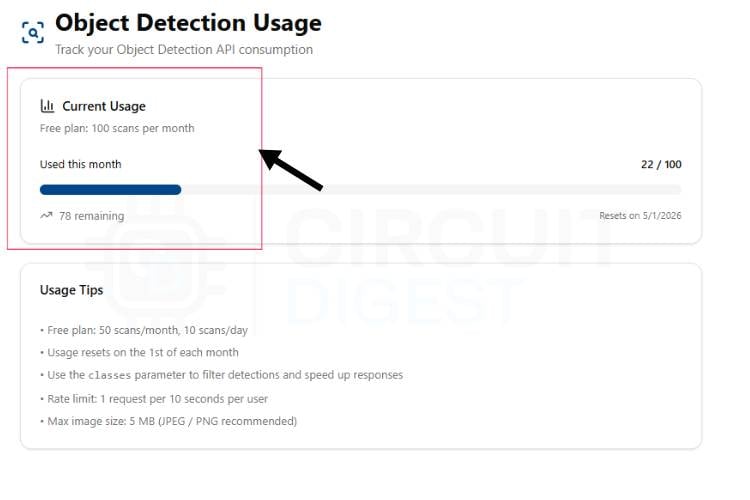
By clicking the My usage option, you can see how many scans are available for the day as well as the month.
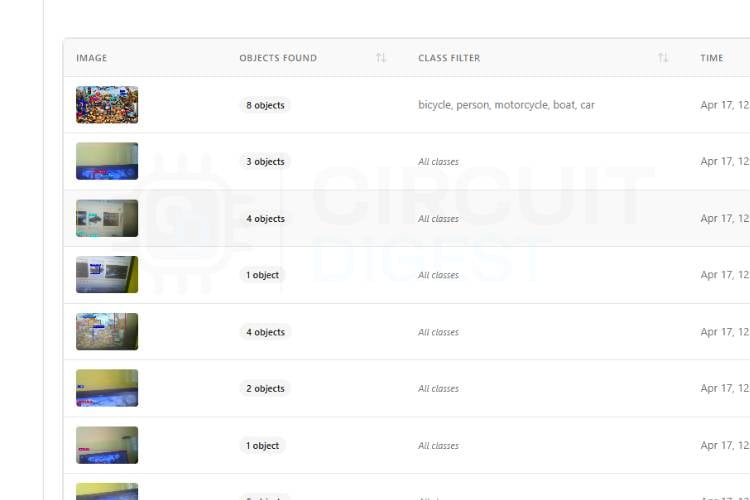
 If you need to see what detection you made with the detection count, you can visit the " My Logs " option in the manage section present on the left side of the page.
Raspberry Pi Object Detection Output
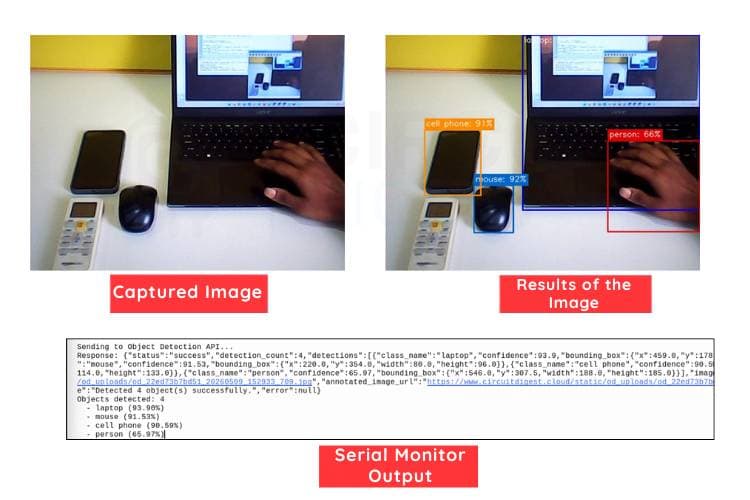
The image below shows the captured image from the Raspberry Pi. Along with it, you can see the detection results of the image, where objects such as a laptop, phone, person, and mouse are identified. Below that, the serial monitor displays the detection output, which includes the object count and the confidence value for each detected object. We have also done an innovative project using the ESP32-Cam: a Smart Car Washing System Using Edge Impulse for Object Detection, Check out the project for full details.
Cloud API vs. Local Inference for Raspberry Pi Object Detection
Deciding whether to use a cloud API or a locally hosted model is based on how much bandwidth you will have when you use them together, what your latency tolerance is, and the capabilities of your computer's equipment. Below is a chart that compares the pros and cons of using each.
| Criterion | CircuitDigest Cloud API (This Project) | Local Model (YOLOv5n TFLite / MobileNet SSD) |
| Setup time | ~15 minutes (copy, paste, run) | Hours (train, convert, optimise, deploy) |
| Internet required | Yes | No |
| Latency | 1–3 s (network dependent) | 0.5–2 s on Pi 4/5; 3–8 s on Pi 3B+ |
| Custom classes | Selectable from 75+ pre-trained classes | Fully custom with your own dataset |
| Privacy | Images leave the device to the cloud | Images stay on-device |
| Best for | Rapid prototyping, learning, low-volume use | Production, offline, privacy-critical applications |
Code Explanation for Object Detection with Raspberry Pi
The code is developed using Python on the Raspberry Pi to do real-time object detection using a USB camera and a cloud-based API. It uses OpenCV for image capture. The system supports different operating modes such as keyboard mode, auto mode, and SSH mode. You can select the mode according to your needs by changing the word in the code. The program captures images, converts them into JPEG format, and sends them securely to the API using HTTPS. The server processes the image and returns the detected object details, which are then displayed in the terminal with object names and confidence values.
1. Imports and Configuration
import cv2
import requests
import time
import os
import sys
SERVER_URL = "https://www.circuitdigest.cloud/api/v1/object-detection/detect"
API_KEY    = "YourApikey"
CLASSES    = "[]"
CONFIDENCE = "0.2"
This section imports the required Python libraries for camera access, API communication, timing control, and system handling. OpenCV (cv2) is used for capturing images from the USB camera, while requests is used to send images to the cloud API. The server URL, API key, object classes, and confidence value are also defined here for object detection processing.
2. Mode Selection and Camera Initialisation
MODE = "auto"
AUTO_INTERVAL = 5
cap = cv2.VideoCapture(0)
cap.set(cv2.CAP_PROP_FRAME_WIDTH, 640)
cap.set(cv2.CAP_PROP_FRAME_HEIGHT, 480)
This part selects the image capture mode and initializes the USB camera. The project supports keyboard mode, auto mode, and SSH mode depending on how the Raspberry Pi is accessed. The camera resolution is also set here to ensure proper image quality for accurate object detection.
3. Camera Validation
if not cap.isOpened():
print("Camera not found! Check USB camera connection.")
sys.exit()
This section checks whether the camera is properly connected and detected by the Raspberry Pi. If the camera is not available, the program prints an error message and stops execution. This prevents the system from running with invalid hardware connections.
4. Image Capture and API Request
_, img_encoded = cv2.imencode('.jpg', frame)
img_bytes = img_encoded.tobytes()
response = requests.post(SERVER_URL, headers=headers,
files=files, data=data, timeout=15)
This part captures the image from the camera and converts it into JPEG format before sending it to the cloud API. The image is sent securely using HTTPS along with the API key and detection parameters. The API processes the image and performs object detection using cloud-based AI models.
5. Parsing and Displaying Results
count = result.get("detection_count", 0)
print(f"Objects detected: {count}")
for det in result.get("detections", []):
print(f" - {label} ({conf:.2f}%)")
This section reads the response received from the API and extracts the number of detected objects along with their names and confidence values. The final result is displayed in the terminal, showing which objects were identified in the captured image. This helps the user understand the detection output clearly.
Troubleshooting: Common Issues in Raspberry Pi Object Detection
Issue 1: Camera not detected in Raspberry Pi
If the USB camera is not detected, the program may show a “Camera not found” error. This usually happens due to a loose connection or a wrong device index. Reconnect the camera properly and try changing cv2.VideoCapture(0) to cv2.VideoCapture(1). Also, check using ls /dev/video* to confirm detection.
Issue 2: API request failure or timeout error
If the image is not sent to the cloud, it may be due to a lack of internet connection or an incorrect API key. Check Wi-Fi connection first. Then, verify that the API key and server URL are correct. Increasing the timeout value may also help.
Issue 3: Low detection accuracy
Incorrect or missed detections happen due to low confidence value or poor lighting. Increase the confidence level slightly for better accuracy. Make sure the object is clearly visible. Avoid blurry images for best results.
Issue 4: Slow response from the system
If detection is slow, it may be due to high image resolution or frequent API calls. Reduce image size in OpenCV settings. Increase auto interval time if using auto mode. A stable internet connection also improves speed.
Issue 5: Program crashes or stops
Ensure all required modules, like OpenCV and requests, are installed properly. Restart the program if the camera feed breaks continuously. Also, release the camera properly when stopping the code.
Advantages and limitations of the Object Detection System with Raspberry Pi
The following table gives a clear idea about the limitations and the advantages of object detection using Raspberry Pi.
| S.No | Advantages | Limitations |
| 1. | Real-time object detection using cloud AI | Depends on the internet connection |
| 2. | Low-cost system using Raspberry Pi | Slight delay due to API processing |
| 3. | Easy to implement and upgrade | Limited accuracy in low-light conditions |
| 4. | No heavy local processing required | Camera quality affects performance |
| 5. | Supports multiple object classes | Limited API usage (scans per day/month) |
The key advantage of this setup is that we don't need to take any datasets manually or download them from the internet, don't need to label the objects, or create any model. With the help of the CircuitDigest Cloud, we are just flashing the code and using it like a ready-made model. This saves time, and with this time we can focus more on the other hardware modifications for future enhancements. This method will eliminate the use of ML training websites like Edge Impulse and TensorFlow Lite. Not only with Raspberry Pi, but we have also done the same Object Detection project using ESP32-Cam, take a look at that too.
Raspberry Pi Object Detection Project GitHub
Download the complete Raspberry Pi object detection project source code from GitHub and follow along with this tutorial. The repository includes the Python code required for real-time object detection using Raspberry Pi, a USB camera, and the CircuitDigest Cloud API.


Frequently Asked Questions - Raspberry Pi Object Detection
⇥ Does this system work without the internet?
No, the internet is required because the image is sent to CircuitDigest Cloud for processing. Without the internet, object detection will not work.
⇥ Can I use any USB camera with Raspberry Pi?
Yes, most USB webcams are supported. However, better quality cameras will improve detection accuracy and image clarity.
⇥ How many objects can it detect?
It can detect multiple objects depending on the selected classes in the API. It supports around 75+ predefined object categories.
⇥ Can I run this project on low-cost Raspberry Pi models?
Yes, it works on basic Raspberry Pi models like Pi 3 and Pi 4. However, better models give faster performance and smoother processing.
⇥ How can I improve detection accuracy in this system?
You can improve accuracy by increasing the confidence value in the code and improving proper lighting conditions. Using a good-quality camera also helps in better object detection.
Related Projects: CircuitDigest Cloud WhatsApp API-Based Alert Systems
These projects demonstrate the use of the CircuitDigest Cloud WhatsApp API to deliver real-time alerts and notifications from IoT devices. Built using platforms such as Arduino, XIAO ESP32, and Raspberry Pi Pico W, they showcase applications including motion detection, event monitoring, and automated messaging. Together, they highlight how CircuitDigest Cloud enables seamless integration of embedded systems with WhatsApp for remote monitoring and instant user notifications.

How to Send WhatsApp Messages from Arduino Uno R4 Wifi Board
In this tutorial, you will learn how to send WhatsApp messages from Arduino UNO R4 WiFi using the CircuitDigest Cloud WhatsApp API. Instead of using a GSM module, SIM card, or complex WhatsApp Business API setup, this method allows your Arduino to send alerts over WiFi using a simple HTTPS request.

Real-Time Motion Detection with XIAO ESP32 WhatsApp Alert System
This guide shows you how to build a motion detection system that sends instant WhatsApp alerts using the compact XIAO-ESP32 development board. When the IR sensor detects movement, the board immediately transmits a notification to your phone through the CircuitDigest Cloud platform.

Raspberry Pi Pico Based Rain Detection System with WhatsApp Alert
This project shows how to send instant WhatsApp alerts from a Raspberry Pi Pico W using WiFi and the CircuitDigest Cloud WhatsApp API. The Pico W reads data from a rain sensor and, when moisture is detected, sends a notification directly to your WhatsApp.
Complete Project Code
import cv2
import requests
import time
import os
import sys
os.environ['DISPLAY'] = ':0'
SERVER_URL = "https://www.circuitdigest.cloud/api/v1/object-detection/detect"
API_KEY    = "YourApikey"
CLASSES    = "[]"
CONFIDENCE = "0.2"
MODE = "auto"
AUTO_INTERVAL = 5
cap = cv2.VideoCapture(0)
cap.set(cv2.CAP_PROP_FRAME_WIDTH, 640)
cap.set(cv2.CAP_PROP_FRAME_HEIGHT, 480)
if not cap.isOpened():
   print("Camera not found! Check USB camera connection.")
   sys.exit()
print("Camera initialized.")
print(f"Running in [{MODE}] mode")
if MODE == "keyboard":
   print("Press SPACE to capture | Press ESC to quit")
elif MODE == "auto":
   print(f"Auto capturing every {AUTO_INTERVAL} seconds | Press ESC to quit")
elif MODE == "ssh":
   print("Auto capturing every 5 seconds | Press Ctrl+C to quit")
def send_image_to_api(frame):
   for _ in range(3):
       cap.read()
   ret, frame = cap.read()
   if not ret:
       print("Capture failed")
       return
   _, img_encoded = cv2.imencode('.jpg', frame, [cv2.IMWRITE_JPEG_QUALITY, 90])
   img_bytes = img_encoded.tobytes()
   headers = { "X-API-Key": API_KEY }
   files   = { "imageFile": ("photo.jpg", img_bytes, "image/jpeg") }
   data    = { "classes": CLASSES, "confidence": CONFIDENCE }
   try:
       print("\nSending to Object Detection API...")
       response = requests.post(SERVER_URL, headers=headers,
                                files=files, data=data, timeout=15)
       if response.status_code == 200:
           result = response.json()
           # ? Fixed encoding issue
           safe_response = response.text.encode('utf-8', errors='replace').decode('utf-8')
           print("Response:", safe_response)
           count = result.get("detection_count", 0)
           print(f"Objects detected: {count}")
           for det in result.get("detections", []):
               label = det.get("class_name") or det.get("class", "unknown")
               conf  = det.get("confidence", 0)
               # ? Fixed encoding for label too
               safe_label = str(label).encode('utf-8', errors='replace').decode('utf-8')
               print(f"  - {safe_label} ({conf:.2f}%)")
       else:
           print(f"HTTP error: {response.status_code}")
   except requests.exceptions.Timeout:
       print("Request timed out!")
   except Exception as e:
       print(f"Error: {str(e).encode('utf-8', errors='replace').decode('utf-8')}")
if MODE == "ssh":
   try:
       while True:
           ret, frame = cap.read()
           if ret:
               print("\nAuto capturing...")
               send_image_to_api(frame)
           time.sleep(AUTO_INTERVAL)
   except KeyboardInterrupt:
       print("Stopped by user.")
   finally:
       cap.release()
else:
   last_capture_time = 0
   while True:
       ret, frame = cap.read()
       if not ret:
           print("Failed to grab frame")
           break
       cv2.imshow("Camera - SPACE: capture | ESC: quit", frame)
       key = cv2.waitKey(1) & 0xFF
       if MODE == "keyboard":
           if key == 32:
               print("\nCapturing image...")
               send_image_to_api(frame)
       elif MODE == "auto":
           current_time = time.time()
           if current_time - last_capture_time >= AUTO_INTERVAL:
               last_capture_time = current_time
               print("\nAuto capturing...")
               send_image_to_api(frame)
       if key == 27:
           print("Quitting...")
           break
   cap.release()
   cv2.destroyAllWindows()
