 Vedhathiri
Author

This tutorial shows you how to build a real-time object detection system using the ESP32-CAM module and the CircuitDigest Cloud Object Detection API. The system captures an image on button press, sends it to the cloud via wireless or internet connection, retrieves the identified objects with name(s), how many there were and how confident (how much certainty the algorithm has) of the object identification. The results are output to the Serial Monitor of the Arduino IDE. No custom training dataset required. No model training is needed. No Edge Impulse workflow required.
What you will learn in this ESP32-CAM object detection tutorial:
- How object detection works at a high level in computer vision
- How the CircuitDigest Cloud Object Detection API processes images from the ESP32-CAM
- Circuit diagram and hardware wiring for the push-button trigger
- Step-by-step setup of the CircuitDigest Cloud dashboard, confidence threshold, and object classes
- Full ESP32-CAM object detection code explanation (Arduino IDE)
- Troubleshooting common issues: camera init failure, power instability, blurry images, and no detection
- Advantages and limitations compared with on-device inference or Edge Impulse
Table of Contents
- What is Object Detection?
- How Does This ESP32-CAM Object Detection System Work?
- Components Required
- Circuit Diagram
- Hardware Connection
- Step-by-Step Procedure to Set Up
- └ Monitor API Usage and View Detection Logs
- └ Output: Serial Monitor and Detection Results
- Code Explanation
- Troubleshooting
- Advantages and Limitations
- GitHub Repository
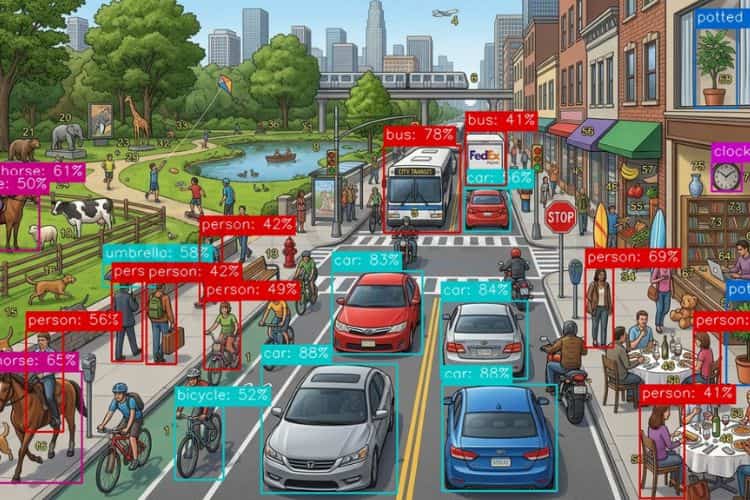
What is Object Detection?
Object detection is a computer vision technique which will identifies objects like cell phones, remotes, laptops, cars, cups, books, etc., by drawing bounding boxes and their confidence value to know their accuracy. Not only these, but we can also make it detect specific objects, such as different kinds of phones, books, bikes, etc.
In the olden days, object detection required a complex setup and a high-end microcontroller. Because for image processing, analysing and getting the result, the system required a high processing speed. But modern technology cleared the issue. With the help of CircuitDigest, now we are able to setup a object detection system in a compact ESP32-Cam. Also, the cloud eliminates the creation of a dataset, labelling and model creation. Just an ESP32-Cam, a push button, and a laptop are enough to complete this setup. Let's dive in and see how this works. We have also done an interesting project using Edge Impulse; refer to Object Detection using ESP32-CAM and Edge Impulse for more details.
How Does This ESP32-CAM Object Detection System Work?
The setup starts its processing when we press the push button. When the push button is pressed, an image will be captured by the ESP32-CAM. For testing purposes, it is not necessary to take a real-time image, but any image from the web would also suffice. While taking an image, make sure there is sufficient lighting so that the image will have better clarity, which will improve the detection accuracy. After capturing a clear image, the image will then be sent to the CircuitDigest Cloud for object detection using the API. There, the image will be processed and analyzed by the object detection feature. The result will include the number of objects detected, the names of the objects, and the confidence value for each object will then be sent back and printed in the Serial Monitor. We don't want to train a model, the labelling part, and the model creation part, as we used to do on websites like Edge Impulse. By eliminating this work, CircuitDigest Cloud saves time to focus on other changes. We have also built many similar AI projects and ESP32-CAM Projects previously here at Circuit Digest. You can also check them out if you wish to explore more.
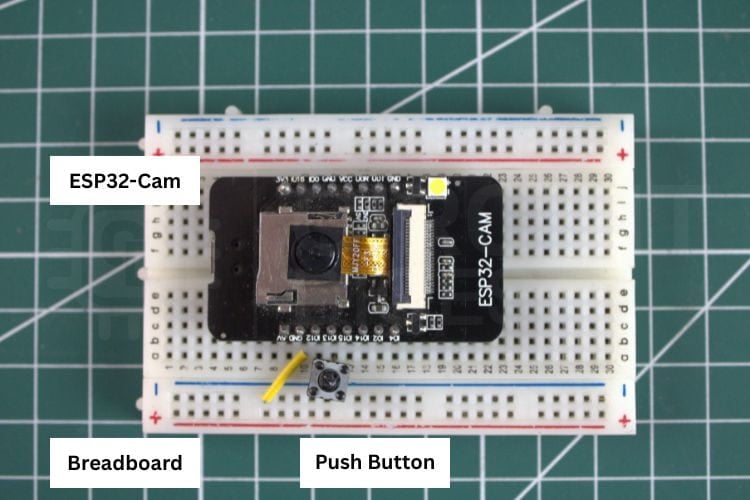
Components Required for the ESP32-CAM Object Detection Project
The list of components used in this tutorial can be found in the table below.
| S.No | Components | Purpose |
| 1. | ESP32-Cam | Used as a microcontroller and also to take photos. |
| 2. | Push Button | Used to give input to the user to the Microcontroller |
| 3. | Breadboard | Used to make the connections simple and neat |
* Important Note for ESP32-CAM Beginners: If you are using the standard ESP32-CAM (without onboard USB), you will need a USB-to-Serial (FTDI) adapter for programming. Connect FTDI TX → ESP32-CAM RX (U0R), RX → TX (U0T), GND → GND, and hold GPIO0 LOW during upload to enter flash mode. If your board already has a micro-USB port, no adapter is required. If you are just getting started with the ESP32-CAM module, we recommend checking out our guide “How to Program the ESP32-CAM?
Circuit Diagram of ESP32-CAM Object Detection Project
The following circuit diagram shows the connection between the ESP32-CAM, push button, and Breadboard. The push button is connected to GPIO13 of the ESP32-Cam for triggering the photo capture.

Hardware Connection of the ESP32-Cam Object Detection System
The image below shows the actual hardware connection, which gives a clear idea of how the components are connected in real life. To power the system, we are using the USB cable connected to the laptop's USB port.
Step-by-Step Procedure to Set Up the ESP32-CAM Object Detection System
Let's see a step-by-step procedure for building an object detection system using the CircuitDigest Cloud object detection API.
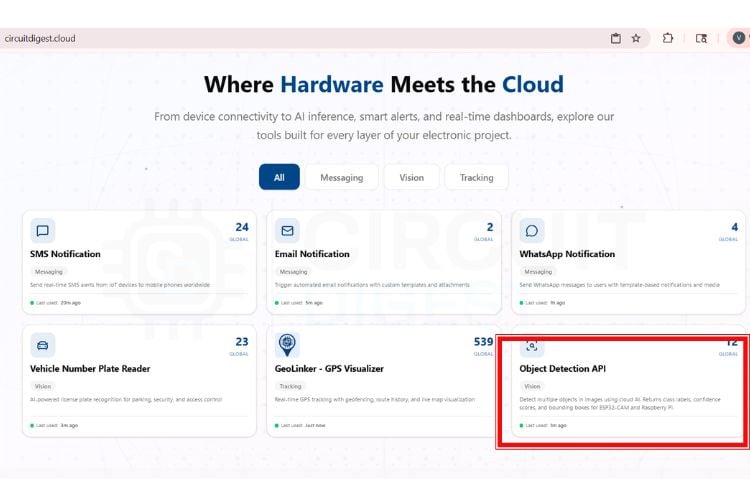
Step 1: Create or Log In to Your CircuitDigest Cloud Account
First, you need to make an account on the CircuitDigest Cloud. If you already have one, just go to the CircuitDigest Cloud website, scroll down, find the object detection feature, click it, and enter.
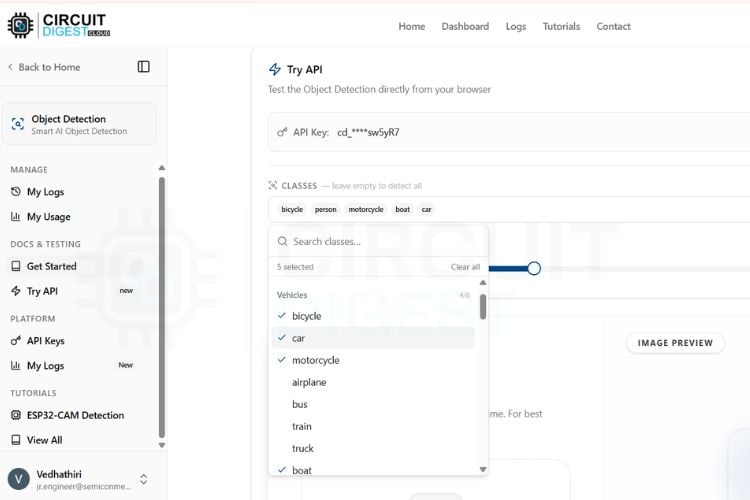
Step 2: Set the Confidence Threshold
There, you will notice the try api section, where various options like image, classes, confidence, result, and a board selection section with its required codes can be found. First, you can minimize and maximize the confidence level according to your needs because the confidence value sets the minimum probability threshold for object detection.
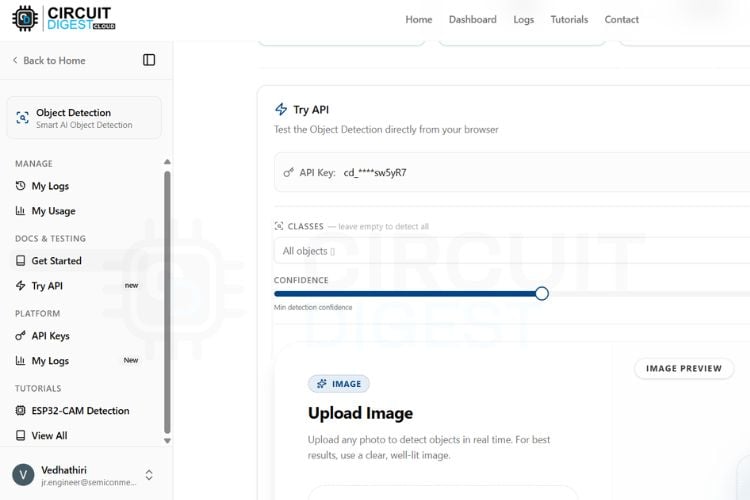
Step 3: Select Target Object Classes
Next, you will be able to select the classes. Here you can access nearly 75+ classes. You can set the detection of all classes or the specific classes according to your needs.
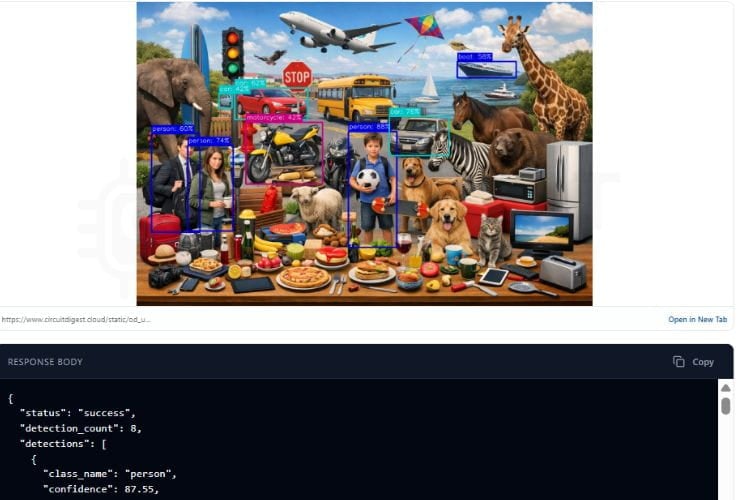
Step 4: Test the API Without Hardware
Now, to try without any microcontroller boards, you need to take a picture that has some of the classes you selected, like a picture with a dog, cat, car, bike, or anything that is available in the classes. Upload it to the image section and click Run Test. In a few seconds, you will get the result with object detection and its count also.
Step 5: Generate and Flash the ESP32-CAM Arduino Code
At the bottom of the page, you can see the microcontroller selection option; first, we try this object detection feature in the ESP32-CAM. Click the ESP32 cam, and the page will give you the code for the ESP32 CAM.
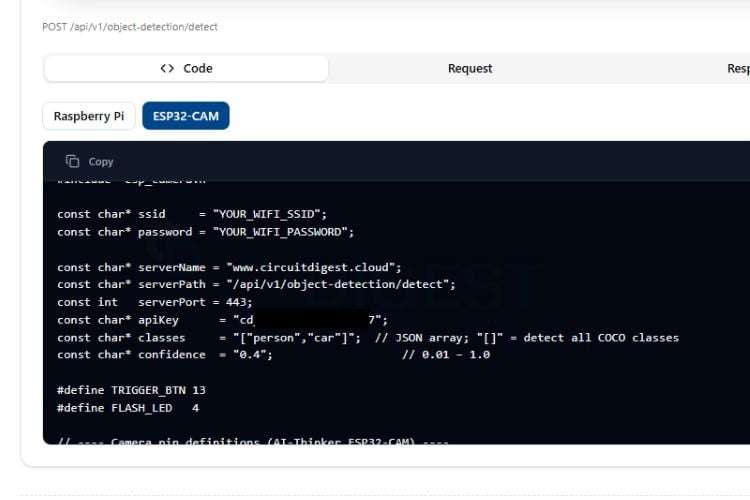
Just copy the code and paste it into the Arduino IDE, and make the connection as per the circuit diagram. Then, after flashing the code to the ESP32 Cam. Take an image of any object that belongs to the object class you have selected previously, using the push button as input. The ESP32 CAM module will then send this image to CircuitDigest Cloud for processing, and the result will be displayed on the serial monitor.
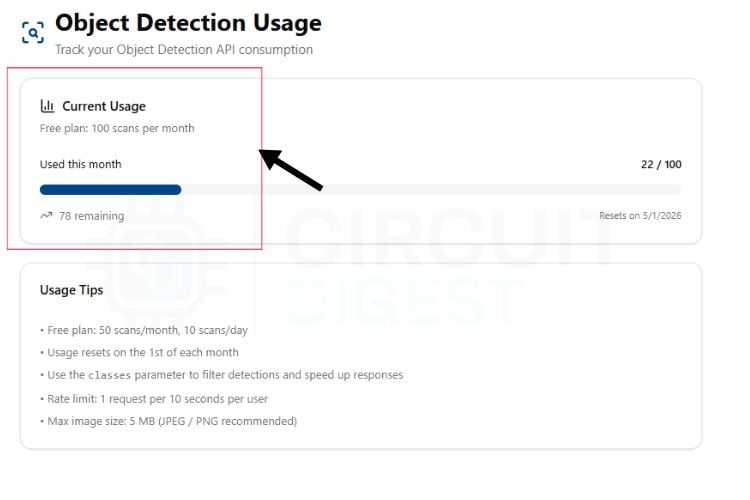
Monitor API Usage and View Detection Logs
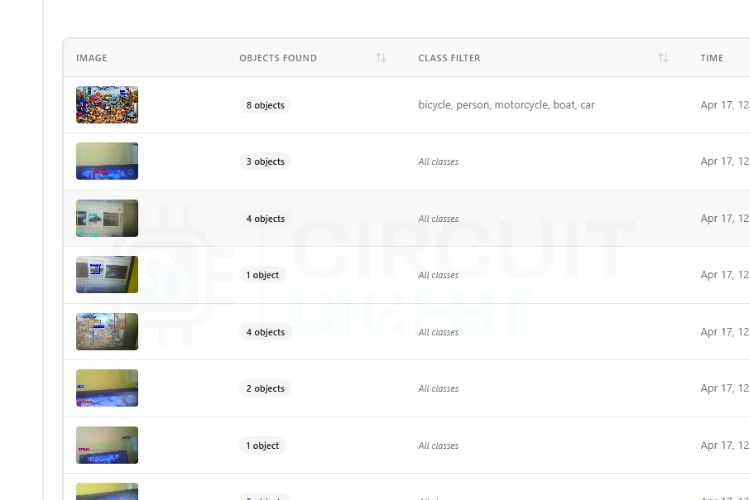
By clicking the My usage option, you can see how many scans are available for the day as well as the month.
If you need to see your previous results, you can visit the My Logs option in the manage section, present on the left side menu.
Output: Serial Monitor and Detection Results
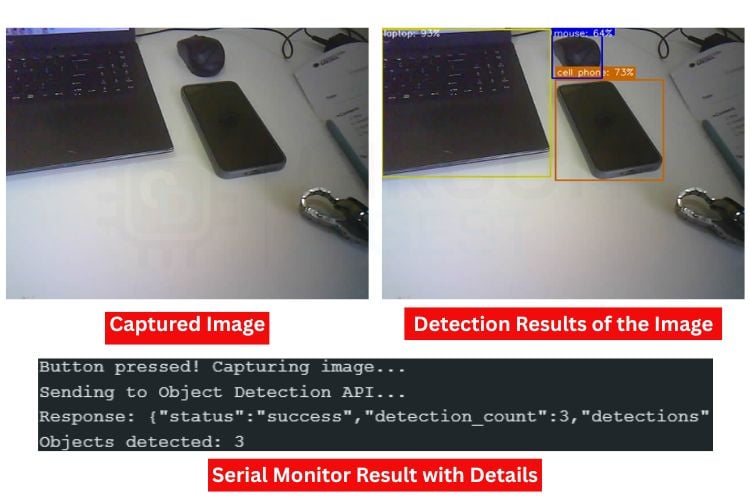
The image below shows the captured image from the ESP32-Cam. Along with it, you can see the detection results of the image, where objects such as a laptop, phone, and mouse are identified. Below that, the Serial Monitor displays the detection output, which includes the object count and the confidence value for each detected object.
ESP32-Cam Object Detection Code Explanation
1. Library Includes and Global Configuration
In the code, we start by including all the necessary libraries, which include the WiFi-related libraries and the esp_camera camera library. After that, we have defined the WiFi SSID and password along with the CircuitDigest Cloud API key. Make sure these are correct. We have also defined the GPIO pin used with the trigger button.
#include <Arduino.h>
#include <WiFi.h>
#include <WiFiClientSecure.h>
#include "esp_camera.h"
#include <WebServer.h>
const char* ssid       = "YOURSSIDNAME";
const char* password   = "YOURWIFIPASSWORD";
const char* serverName = "www.circuitdigest.cloud";
const char* serverPath = "/api/v1/object-detection/detect";
const int   serverPort = 443;
const char* apiKey     = "YourApikey";
const char* classes    = "[]";
const char* confidence = "0.2";
This section includes all required libraries for camera interfacing, WiFi communication, HTTPS requests, and browser-based live preview streaming. It also stores the WiFi credentials and cloud API information required for securely sending captured images to the Object Detection server for AI-based processing.
2. Camera Initialization and Image Sensor Tuning
config.pixel_format = PIXFORMAT_JPEG;
config.frame_size   = FRAMESIZE_SVGA;
config.jpeg_quality = 8;
config.fb_count     = 2;
esp_err_t err = esp_camera_init(&config);
sensor_t* s = esp_camera_sensor_get();
s->set_brightness(s, 1);
s->set_contrast(s, 2);
s->set_saturation(s, 0);
This function initializes the ESP32-CAM module and configures the image capture settings. The camera captures JPEG images in SVGA resolution with improved quality for both live preview and object detection. Additional image tuning parameters such as brightness, contrast, and saturation are adjusted to improve image clarity and detection accuracy.
3. MJPEG Live Preview Streaming
camera_fb_t* fb = esp_camera_fb_get();
streamClient.print("--frame\r\n");
streamClient.write(fb->buf, fb->len);
esp_camera_fb_return(fb);
vTaskDelay(pdMS_TO_TICKS(frameGap));
This section continuously captures image frames from the ESP32-CAM and streams them to the browser as an MJPEG video feed. The live preview allows users to monitor what the camera is focusing on before pressing the physical button for object detection. Small delays are added between frames to maintain stable streaming performance.
4. Camera Mutex for Thread Safety
SemaphoreHandle_t camMutex = NULL;
inline bool lockCam(TickType_t wait = portMAX_DELAY) {
 return xSemaphoreTake(camMutex, wait) == pdTRUE;
}
inline void unlockCam() {
 xSemaphoreGive(camMutex);
}
Since both the browser streaming task and image capture task use the same camera hardware, simultaneous access can cause crashes or corrupted frames. This mutex mechanism ensures that only one task accesses the camera at a time, providing stable operation during streaming and object detection.
5. HTTPS Image Upload and API Response Parsing
client.println("POST " + String(serverPath) + " HTTP/1.1");
client.println("X-API-Key: " + String(apiKey));
client.write(fb->buf, fb->len);
String result = sendImageToAPI(fb);
Serial.println("Response: " + result);
When the push button is pressed, the ESP32-CAM captures an image and securely uploads it to the cloud-based Object Detection API using an HTTPS POST request. The AI server processes the image, identifies objects present in the frame, and sends the detection results back to the ESP32 system through the HTTP response.
Troubleshooting the ESP32-CAM Object Detection System
Issue 1: Memory Allocation Failure (Capture Failed)
If the system displays “Camera capture failed,” it may be due to insufficient memory allocation in the frame buffer. High-resolution images consume more PSRAM, and if memory is not available, capture will fail. Reducing frame size, lowering JPEG quality, or ensuring that PSRAM is properly enabled in the board configuration can help resolve this issue.
Issue 2: ESP32-CAM Restarting Automatically
The ESP32-CAM restarting is one of the common issues. Sometimes, the power received by the USB port of the laptop is so if it restarts again and again, try with the external power source. Also, ensure the connection is made properly.
Issue 3: Blurry or Low-Quality Images
If the captured images appear blurry or unclear, it may be due to improper focus or lighting conditions. The ESP32-CAM lens is adjustable, so manually rotating the lens can improve focus. Additionally, ensure that the environment has sufficient lighting, as low light can introduce noise and reduce detection accuracy. Adjusting camera parameters such as brightness and contrast can also improve image quality.
Issue 4: Camera Initialization Failed
If the ESP32-CAM fails to initialize the camera, it is usually due to incorrect pin configuration, insufficient power supply, or improper board selection in the IDE. Ensure that the correct camera model, which is AI Thinker ESP32-Cam, is selected and that all the GPIOs given match the hardware configuration.
Issue 5: No Detection or Incorrect Results
If the system fails to detect objects or produces inaccurate results, it is often due to poor image quality, improper lighting, or unsuitable confidence threshold settings. Ensure that the camera is placed in a well-lit environment and properly focused on the target object. Adjusting parameters such as brightness, contrast, and confidence threshold can significantly improve detection accuracy.
Advantages and Limitations of the ESP32-CAM Object Detection System
Ok, let's talk about the advantages and limitations of the object detection project.
| S.No | Advantages | Limitations |
| 1. | Real-time object detection within a few seconds | Cannot work without cloud API access |
| 2. | Low-cost system using ESP32-CAM with built-in camera and Wi-Fi | Requires an internet connection for object detection |
| 3. | Supports the detection of multiple objects like people, cars, animals, etc. | Blurry images may give wrong results |
| 4. | Easy to change object classes and confidence settings | Limited by daily or monthly API usage limits |
| 5. | Small size and portable design | Only captures single images, not fully live video detection |
One of the main reasons for choosing this platform over alternatives such as Edge Impulse or other machine learning training frameworks is simplicity and accessibility. Platforms like Edge Impulse typically require dataset collection, model training, optimisation, and deployment, which can be time-consuming and difficult, especially for beginners. But CircuitDigest Cloud provides a ready-to-use API that eliminates the need for model training, enabling faster development and immediate results. We have also done an innovative project using the ESP32-Cam, a Smart Car Washing System Using Edge Impulse for Object Detection. Check out the project for full details.
Frequently Asked Questions
⇥ What happens if the API limit is exceeded?
If the API usage limit is reached, the server returns a " limit exceeded response, and no further detections will be done until the limit resets or a new API key is used.
⇥ Can we detect specific objects only?
Yes, by modifying the "classes" parameter in the API request, the system can be configured to detect only selected objects.
⇥ How can detection accuracy be improved?
Accuracy can be improved by:
- Ensuring good lighting conditions
- Adjusting camera settings.
- Using a correct confidence threshold
- Positioning the camera properly
⇥ What is the role of the confidence parameter in the object detection API?
The confidence value sets the minimum probability threshold for object detection. A higher value results in more accurate detections but may miss some objects, while a lower value detects more objects but with less certainty.
⇥ Why is cloud processing used instead of local processing?
The ESP32-CAM has limited processing power. Complex object detection algorithms require high computational resources, which are efficiently handled by cloud-based APIs like CircuitDigest Cloud.
⇥ Can the system work without an internet connection?
No, the current setup depends on cloud-based processing. Without internet connectivity, the ESP32 cannot send images for detection.
⇥ What Arduino IDE board setting do I need to use for the ESP32-CAM?
The ESP32-CAM is selected under the “AI Thinker ESP32-CAM” option located in the Tools/Boards menu in the Arduino IDE after downloading the ESP32 board package from Espressif. An additional requirement is to select a Partition Scheme of “Huge APP (3MB No OTA)” in order to provide ample flash memory to the camera application. The setting for “CPU Frequency” must also be set to 240 MHz to maximise Wi-Fi throughput when uploading images.
⇥ Why does my ESP32-CAM keep restarting by itself?
The cause of brownout resets (the ESP32-CAM intermittently rebooting due to too little current) while operating in Wi-Fi mode is drawing too much current. When using Wi-Fi, the ESP32-CAM can draw up to 500 mA - more than most USB ports can provide reliably! To eliminate brownouts for your ESP32-CAM, provide it with a dedicated power supply of 5 V / 1 A, add a decoupling capacitor of 100 µF near the power pins, and visually inspect all of your solder joints or breadboard contacts to ensure connectivity.
ESP32 CAM Object Detection GitHub
This GitHub repository contains the complete source code, circuit diagram, and technical documentation for building an ESP32-CAM-based object detection system capable of recognising objects in real time.


Relevant ESP32-CAM Smart Security and AI Projects
These ESP32-CAM projects include License Plate Recognition, Smart Wi-Fi Video Doorbells, and AI Face Mask Detection systems.
These projects use the ESP32-CAM module to capture images and apply intelligent security features for home and business monitoring.
")
How to use ESP32 CAM for Automatic Number Plate Recognition (ANPR)
Build a smart License Plate Recognition system using ESP32-CAM with cloud OCR for real-time vehicle number detection and display.

Smart Video Doorbell using ESP32 Cam
Build a DIY Smart Wi-Fi Video Doorbell using ESP32-CAM with live video streaming, smartphone alerts, and remote visitor monitoring.

Face Mask Detection using ESP32 CAM
Build an ESP32-CAM-based Face Mask Detection system using AI image classification for real-time mask monitoring and smart safety alerts
Complete Project Code
#include <Arduino.h>
#include <WiFi.h>
#include <WiFiClientSecure.h>
#include "esp_camera.h"
#include <WebServer.h>
const char* ssid       = "yourssidname";
const char* password   = "yourwifipassword";
const char* serverName = "www.circuitdigest.cloud";
const char* serverPath = "/api/v1/object-detection/detect";
const int   serverPort = 443;
const char* apiKey     = "yourapikey";
const char* classes    = "[]";
const char* confidence = "0.2";
#define TRIGGER_BTN 13
unsigned long lastTriggerTime = 0;
const unsigned long debounceDelay = 500;
#define PWDN_GPIO_NUM   32
#define RESET_GPIO_NUM  -1
#define XCLK_GPIO_NUM    0
#define SIOD_GPIO_NUM   26
#define SIOC_GPIO_NUM   27
#define Y9_GPIO_NUM     35
#define Y8_GPIO_NUM     34
#define Y7_GPIO_NUM     39
#define Y6_GPIO_NUM     36
#define Y5_GPIO_NUM     21
#define Y4_GPIO_NUM     19
#define Y3_GPIO_NUM     18
#define Y2_GPIO_NUM      5
#define VSYNC_GPIO_NUM  25
#define HREF_GPIO_NUM   23
#define PCLK_GPIO_NUM   22
WiFiClientSecure client;
WebServer previewServer(80);
// ── Thread-safe camera lock ────────────────────────────────────────────────
SemaphoreHandle_t camMutex = NULL;
inline bool lockCam(TickType_t wait = portMAX_DELAY) {
 return xSemaphoreTake(camMutex, wait) == pdTRUE;
}
inline void unlockCam() { xSemaphoreGive(camMutex); }
// ── Camera init ───────────────────────────────────────────────────────────
void initCamera() {
 camera_config_t config;
 config.ledc_channel = LEDC_CHANNEL_0;
 config.ledc_timer   = LEDC_TIMER_0;
 config.pin_d0 = Y2_GPIO_NUM; config.pin_d1 = Y3_GPIO_NUM;
 config.pin_d2 = Y4_GPIO_NUM; config.pin_d3 = Y5_GPIO_NUM;
 config.pin_d4 = Y6_GPIO_NUM; config.pin_d5 = Y7_GPIO_NUM;
 config.pin_d6 = Y8_GPIO_NUM; config.pin_d7 = Y9_GPIO_NUM;
 config.pin_xclk     = XCLK_GPIO_NUM;
 config.pin_pclk     = PCLK_GPIO_NUM;
 config.pin_vsync    = VSYNC_GPIO_NUM;
 config.pin_href     = HREF_GPIO_NUM;
 config.pin_sscb_sda = SIOD_GPIO_NUM;
 config.pin_sscb_scl = SIOC_GPIO_NUM;
 config.pin_pwdn     = PWDN_GPIO_NUM;
 config.pin_reset    = RESET_GPIO_NUM;
 config.xclk_freq_hz = 20000000;
 config.pixel_format = PIXFORMAT_JPEG;
 config.frame_size   = FRAMESIZE_SVGA;
 config.jpeg_quality = 8;
 config.fb_count     = 2;
 esp_err_t err = esp_camera_init(&config);
 if (err != ESP_OK) {
   Serial.printf("Camera init failed: 0x%x\n", err);
   return;
 }
 sensor_t* s = esp_camera_sensor_get();
 s->set_brightness(s, 1);
 s->set_contrast(s, 2);
 s->set_saturation(s, 0);
 s->set_whitebal(s, 1);
 s->set_exposure_ctrl(s, 1);
 s->set_gain_ctrl(s, 1);
 s->set_aec2(s, 1);
 s->set_ae_level(s, 1);
 Serial.println("Camera initialized.");
}
// ── Root page (with auto-refresh fallback JS) ─────────────────────────────
void handleRoot() {
 previewServer.send(200, "text/html",
   "<!DOCTYPE html><html><head>"
   "<meta name='viewport' content='width=device-width,initial-scale=1'>"
   "<style>body{background:#111;margin:0;display:flex;flex-direction:column;"
   "align-items:center;justify-content:center;min-height:100vh;font-family:sans-serif;}"
   "h2{color:#fff;margin:12px 0 4px}p{color:#aaa;margin:0 0 12px;font-size:13px}"
   "img{width:100%;max-width:640px;border:1px solid #333;border-radius:6px;display:block}</style>"
   "<script>"
   "var retries=0;"
   "function reloadStream(){"
   "  var img=document.getElementById('s');"
   "  retries++;"
   "  var delay=Math.min(500*retries,5000);"
   "  setTimeout(function(){img.src='/stream?t='+Date.now();},delay);"
   "}"
   "</script>"
   "</head><body>"
   "<h2>Camera Preview</h2>"
   "<p>Press the button to detect objects</p>"
   "<img id='s' src='/stream' onerror='reloadStream()'>"
   "</body></html>"
 );
}
// ── MJPEG stream handler ──────────────────────────────────────────────────
// Runs inside the web server task (Core 0). Uses a non-blocking mutex try
// so the stream yields cleanly when the API capture is in progress, then
// resumes automatically — no freeze.
void handleStream() {
 WiFiClient streamClient = previewServer.client();
 streamClient.println("HTTP/1.1 200 OK");
 streamClient.println("Content-Type: multipart/x-mixed-replace; boundary=frame");
 streamClient.println("Cache-Control: no-cache");
 streamClient.println("Connection: close");
 streamClient.println();
 const TickType_t lockWait  = pdMS_TO_TICKS(200);  // max 200 ms to wait for lock
 const uint32_t   frameGap  = 50;                  // ms between frames (SVGA ~20 fps)
 const uint32_t   yieldGap  = 80;                  // ms to wait when camera is busy
 const uint32_t   watchdog  = 8000;                // disconnect if no frame for 8 s
 uint32_t lastFrame = millis();
 while (streamClient.connected()) {
   // ── Watchdog: bail if no successful frame in 8 s ──────────────────────
   if (millis() - lastFrame > watchdog) {
     Serial.println("[stream] watchdog timeout, dropping client");
     break;
   }
   // ── Try to acquire camera; if busy yield and retry ────────────────────
   if (!lockCam(lockWait)) {
     vTaskDelay(pdMS_TO_TICKS(yieldGap));
     continue;
   }
   // Discard stale buffer, grab fresh frame
   camera_fb_t* discard = esp_camera_fb_get();
   if (discard) esp_camera_fb_return(discard);
   camera_fb_t* fb = esp_camera_fb_get();
   unlockCam();
   if (!fb) {
     vTaskDelay(pdMS_TO_TICKS(10));
     continue;
   }
   // ── Send MJPEG part ───────────────────────────────────────────────────
   streamClient.print("--frame\r\nContent-Type: image/jpeg\r\nContent-Length: ");
   streamClient.print(fb->len);
   streamClient.print("\r\n\r\n");
   size_t written = streamClient.write(fb->buf, fb->len);
   streamClient.print("\r\n");
   esp_camera_fb_return(fb);
   if (written == 0) {
     Serial.println("[stream] write failed, dropping client");
     break;
   }
   lastFrame = millis();
   vTaskDelay(pdMS_TO_TICKS(frameGap));
 }
 streamClient.stop();
 Serial.println("[stream] client disconnected");
}
// ── Web server task (Core 0) ──────────────────────────────────────────────
void webServerTask(void* param) {
 while (true) {
   previewServer.handleClient();
   vTaskDelay(1);
 }
}
// ── API call ──────────────────────────────────────────────────────────────
String sendImageToAPI(camera_fb_t* fb) {
 if (!client.connect(serverName, serverPort)) {
   return "Connection failed";
 }
 String boundary    = "----ESP32Boundary";
 String head        = "--" + boundary + "\r\n"
                      "Content-Disposition: form-data; name=\"imageFile\"; filename=\"photo.jpg\"\r\n"
                      "Content-Type: image/jpeg\r\n\r\n";
 String classesPart = "\r\n--" + boundary + "\r\n"
                      "Content-Disposition: form-data; name=\"classes\"\r\n\r\n"
                    + String(classes) + "\r\n";
 String confPart    = "--" + boundary + "\r\n"
                      "Content-Disposition: form-data; name=\"confidence\"\r\n\r\n"
                    + String(confidence) + "\r\n";
 String tail        = "--" + boundary + "--\r\n";
 int contentLen = head.length() + fb->len
                + classesPart.length() + confPart.length() + tail.length();
 client.println("POST " + String(serverPath) + " HTTP/1.1");
 client.println("Host: " + String(serverName));
 client.println("X-API-Key: " + String(apiKey));
 client.println("Content-Type: multipart/form-data; boundary=" + boundary);
 client.println("Content-Length: " + String(contentLen));
 client.println("Connection: close");
 client.println();
 client.print(head);
 client.write(fb->buf, fb->len);
 client.print(classesPart);
 client.print(confPart);
 client.print(tail);
 uint32_t timeout = millis();
 while (client.available() == 0) {
   if (millis() - timeout > 15000) {
     client.stop();
     return "Timeout";
   }
   delay(10);
 }
 String response = "";
 while (client.available()) {
   response += (char)client.read();
 }
 client.stop();
 int jsonStart = response.indexOf("\r\n\r\n");
 return (jsonStart != -1) ? response.substring(jsonStart + 4) : response;
}
// ── Setup ─────────────────────────────────────────────────────────────────
void setup() {
 Serial.begin(115200);
 pinMode(TRIGGER_BTN, INPUT_PULLUP);
 camMutex = xSemaphoreCreateMutex();
 initCamera();
 WiFi.begin(ssid, password);
 Serial.print("Connecting to WiFi");
 while (WiFi.status() != WL_CONNECTED) {
   delay(500);
   Serial.print(".");
 }
 Serial.println("\nWiFi connected: " + WiFi.localIP().toString());
 Serial.println("Preview: http://" + WiFi.localIP().toString());
 client.setInsecure();
 previewServer.on("/",       handleRoot);
 previewServer.on("/stream", handleStream);
 previewServer.begin();
 // Web server on Core 0; loop() runs on Core 1
 xTaskCreatePinnedToCore(webServerTask, "webTask", 8192, NULL, 1, NULL, 0);
}
// ── Main loop (Core 1) ────────────────────────────────────────────────────
void loop() {
 if (digitalRead(TRIGGER_BTN) != LOW) return;
 uint32_t now = millis();
 if (now - lastTriggerTime < debounceDelay) return;
 lastTriggerTime = now;
 Serial.println("Button pressed — capturing...");
 // WiFi reconnect guard
 if (WiFi.status() != WL_CONNECTED) {
   Serial.println("WiFi lost, reconnecting...");
   WiFi.begin(ssid, password);
   for (int i = 0; i < 20 && WiFi.status() != WL_CONNECTED; i++) {
     delay(500); Serial.print(".");
   }
   if (WiFi.status() != WL_CONNECTED) {
     Serial.println("Reconnect failed!");
     return;
   }
   Serial.println("WiFi back.");
 }
 // ── Acquire camera exclusively ────────────────────────────────────────
 if (!lockCam(pdMS_TO_TICKS(3000))) {
   Serial.println("Could not lock camera — try again");
   return;
 }
 // Switch to VGA for capture (sharper detail than SVGA at low quality)
 sensor_t* s = esp_camera_sensor_get();
 s->set_framesize(s, FRAMESIZE_VGA);
 s->set_quality(s, 10);
 delay(150);
 camera_fb_t* warmup = esp_camera_fb_get();
 if (warmup) esp_camera_fb_return(warmup);
 delay(80);
 camera_fb_t* fb = esp_camera_fb_get();
 if (!fb) {
   Serial.println("Capture failed");
   s->set_framesize(s, FRAMESIZE_SVGA);
   s->set_quality(s, 8);
   unlockCam();
   return;
 }
 Serial.printf("Captured %u bytes — sending to API...\n", fb->len);
 String result = sendImageToAPI(fb);
 esp_camera_fb_return(fb);
 // Restore preview resolution before releasing lock
 s->set_framesize(s, FRAMESIZE_SVGA);
 s->set_quality(s, 8);
 unlockCam();
 // ── Camera released; stream resumes automatically ─────────────────────
 Serial.println("Response: " + result);
 int idx = result.indexOf("\"detection_count\":");
 if (idx != -1) {
   int start = result.indexOf(':', idx) + 1;
   int end   = result.indexOf(',', start);
   String count = result.substring(start, end);
   count.trim();
   Serial.println("Objects detected: " + count);
 } else {
   Serial.println("No detection data in response.");
 }
}
