

Welcome to another exciting Project in which we will build a Voice Controlled Home Automation System using ESP8266 Wi-Fi module, where you can control your Home AC appliances using your Voice though an Android App from anywhere in the world. Yes, your dream of making your loads (Light/Fans) to turn ON or OFF by simply using a voice command is going to come true at the end of this project. This project is the variation of our previous project Smart Junction Box for Home Automation where we have controlled the home Appliances using Webserver over the network.
This IOT based Voice Controlled Home Automation project is super easy to build and does not cost you much since it does not require you to buy any costly voice modules. The whole project took around 500INR (8 USD) for me to build it. Also this is a microcontroller independent project, meaning you do not need any MCU/MP like Arduino or Raspberry pi. The whole project runs on the ESP8266 module. Learn more about ESP8266 here. So, let us start talking....
Previously we have covered many types of Home automations using different technologies like:
- DTMF Based Home Automation
- GSM Based Home Automation using Arduino
- PC Controlled Home Automation using Arduino
- Bluetooth Controlled Home Automation using 8051
- IR Remote Controlled Home Automation using Arduino
- home automation project using MATLAB and Arduino
- RF Remote Controlled LEDs Using Raspberry Pi
- Smart Phone Controlled Home Automation using Arduino
Pre-requisites:
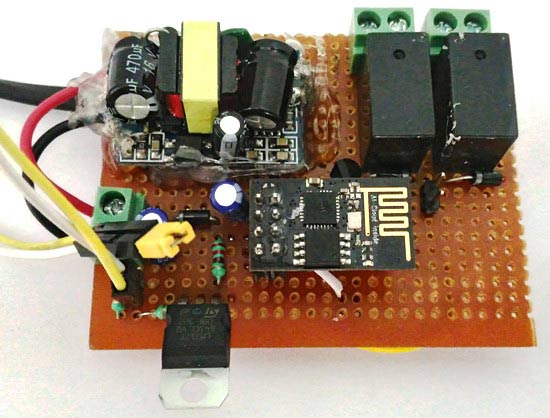
This project is a continuation of our previous project Smart Junction Box for Home Automation using ESP8266 so most of the hardware part has already been covered in that tutorial. Kindly read that before proceeding with this one since I will skip the information covered in that tutorial. To give a small recap of our previous project, we modified a Junction box (Extension Board) in that tutorial which could console a Perf board consisting of two Relays and the ESP8266 module. The two relay (AC loads) can be switched by using a webpage created by the ESP8266 (by acting as a web server). In this tutorial I am just going to add some features to it so that we can also control the AC loads by using the voice command through Smart Phone. We will not cover any Hardware part in this tutorial the hardware and the Code will remain the same as that of the previous tutorial.
Also knowing how to use www.IFTTT.com will give you an upper hand in this project. If you are not familiar with IFTTT, no worries I will explain how to use it for this particular tutorial so that you can get it working.
Working Concept:
I assume that you have read the previous tutorial, in that case now you should know how to build that junction box and how to Toggle the Loads remotely from your web browser. To make this possible we have make our IP address allocated to the ESP8266 publically available. This can be done with “Port forwarding technique”. Then install a mobile application called “Moni” on your Android/IPhone mobile device. This application will recognise our speech and communicate the information to the IFTT Applets which in turn will control the Loads through Maker Web hooks.
It might sound a bit tedious, but all these things have been explained clearly in this tutorial and trust me with few clicks all the above can be made. This tutorial will help you in the best way possible with the aid of Pictures and Videos. At the end this tutorial, you will be able to turn your home appliances on or off through your voice from anywhere in the world. Check the Full Code and Demo Video at the end of the tutorial.
Also check Voice controlled Lights using Raspberry Pi and Voice typing on 16x2 LCD.
Arduino IDE Program for ESP8266:
Just like in the previous project we are going to program our ESP8266 module with the help of the Arduino IDE. There is a slight modification made in the program. This modification is made so that your ESP8266 connects to a constant IP address every time it establishes a connection with the Router. The program is exactly the same as the previous code except for these four lines
  // Get a constant IP everytime
IPAddress ip(192, 168, 0, 104); // This should be the IP of my ESP module
IPAddress gateway(192, 168, 0, 1); // set gateway to match your network most gateway will be the same by default
Serial.print(F("Setting static ip to : "));
Serial.println(ip);
IPAddress subnet(255, 255, 255, 0); // set subnet mask to match your network
WiFi.config(ip, gateway, subnet);
Here, in the place of IPAddress ip(192, 168, 0, 104); enter you desired IP address. In this case my ESP will be connected to 192.168.0.104 all the time and I can simply access it by using this IP in my browser. The complete code given at the end of this tutorial.
Circuit Diagram and Hardware:
Schematics and hardware for this IoT based Voice controlled Home Appliances are same as our previous Smart Junction project and I have explained the schematic there so kindly go through it. Here you can see the complete schematic for reference:


Port Forwarding your ESP8266 IP:
The first step is to enable Port forwarding in your router (modem) so that you can access your ESP from anywhere in the world, just by entering your public IP. Whenever our ESP8266 connects to our home/office router it will be given a Unique IP address and this IP Address is used to access the ESP8266 through web browser. This IP address is restricted within your Home/Office Network, meaning you can’t access it globally; it can only be accessed by devices that are connected to your router. Port forwarding is the Technique through which we can make this webpage load globally. After port forwarding you can use your public IP to access this webpage from anywhere in the world. Sounds cool right!! Let see how we can get this done. To do this you know the following beforehand.
1. The manufacturer name and IP address of your Router. This can be easily found by looking at the router. The IP address will also be mentioned on a sticker. If not Google to know your Routers IP.
2. The username and password of your routers login page. Most routers will have user name as “admin” and password as “admin”.
3. The IP address allocated to your ESP8266 module. This is the address that you use to access the webpage of the ESP module.
4. The IP address of your Internet service provider (public IP address). This can be found by simply Goggling “what is my IP”.
Once you have everything in hand you can follow below steps to port forwarding, if you are stuck with finding something use the comment section below. I will help you out.
Note: I am using a TP-Link Router and hence I have explained the steps for it. It will be very similar for most routers, but the pictures shown here might differ for each router.
Step 1: Login to your Routers Web-management utility page by using the IP address of your Router, generally it is 192.168.1.1. My screen will look like this below
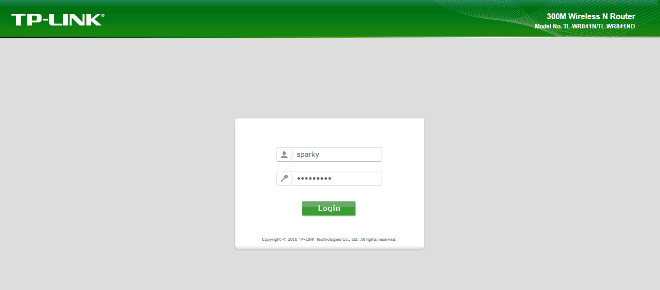
Step 2: Enter the User name “admin” by default and password “admin” by default and click on Login. You will be taken to the utility page which will look something like this below.
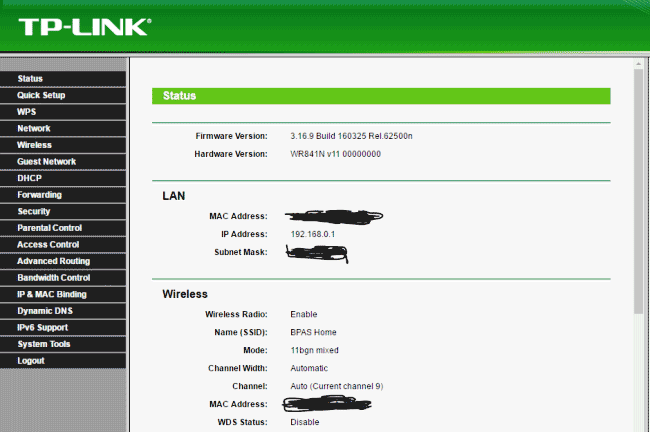
Most of the information that you see here is very confidential hence do not share them with any unknown else you might risk you internet security.
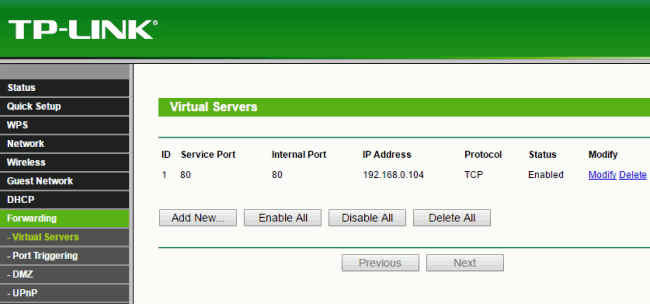
Step 3: As shown above your page will have all the options listed at the left bottom. Our aim is to find something name “Virtual Servers”. I have mine listed under the Forwarding option. Most routers will have them listed as the 6, 7 or 8th option (mostly below DHCP setting). Find it and click on it
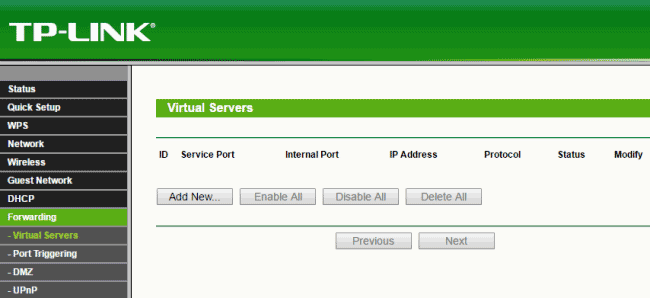
Step 4: Now you have to enter the IP address allocated to ESP module and the port number to forward our IP. In my case I have to click on Add new and enter those details. It might be slightly different for you. The IP address is the one that you use to access the webpage of your ESP module. The port number can be of your choice but let us use “80” for simplicity purpose. The IP allocated to my ESP8266 module is 192.168.0.104 and hence my forwarding will look something below:
Step 5: Now we have to know our public IP address. You can find this my Goggling for “What is my IP”. Your ISP IP should be kept highly confidential. For the sake of this tutorial let us assume that my IP address is 987:654:321:123 I will use this as my ISP IP for the rest of my tutorial.
Note: You ISP might have provided you Static/Dynamic IP, if it is a dynamic IP your IP will change with every restart of Modem/router. In that case you have to use something like DynDNS. But, that is out of the scope of this tutorial. Even if it is a Dynamic IP it will work for you as long as you don’t reset you Router.
That is it our port forwarding is successful, we can check that by entering the ISP IP: portname (987:654:321:123:80) into our browser and check if the ESP webpage loads up. If everything goes as expected you should now be able to toggle the Loads from anywhere in the world by using your ISP IP address.
Installing Moni Android Application:
Moni is an application which is available for Android, Windows, iTunes and even Skype. You can download this application to your mobile. Moni.ai has far more capabilities other than just responding to your voice commands it is highly developer friendly and you can quickly define conversations visually, and connect to services. Moni.ai uses an application called Node-Red using which you can easily create Voice channel and build your own Chabot (AI) system for your Business/Projects and automate it with your natural language. The best thing is Moni is totally free for non-commercial use.
I am using an Android phone and hence I directly download Moni from Google play store. After installing create your free account and sign into it, your app should look something like this below:
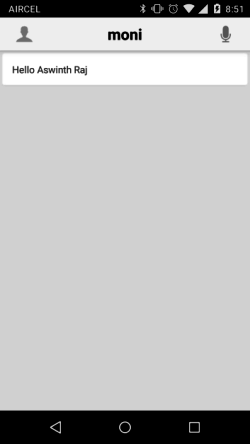
You can use this like any other Virtual assistant, like asking for weather, time etc. But what is additional is that it can respond to your applets created by your Ifttt service. Let us see how to create Applets for your Application now.
Creating Applets using IFTTT service:
We are one step away from completing this project. The last step is to create the Applets in the IFTTT website. This is where we instruct our Moni for different voice commands to control different Home appliances at home.
I am using this Voice controlled Junction box to toggle my Aquarium loads (light/Filter) as shown in the video below. Hence I am customizing the Applet for that requirement you can customize it for your purpose. Follow the steps below:
Step 1: Visit www.IFTTT.com and Login with your account. If new then Signup.
Step 2: Now click on “Search” and type in Make Webhooks. Select it and click on “Connect”. Follow the steps to connect with it.
Step 3: Now again click on “Search” and type in Moni. Select Moni and click on “Connect”. Login in with your IFTTT account to enable connection.
Step 4: We have connected to the “Maker Webhooks” and the “Moni” services. Now let you create an Applet with these services. Click on My Applets and then “New Applet”. You should see something like this:
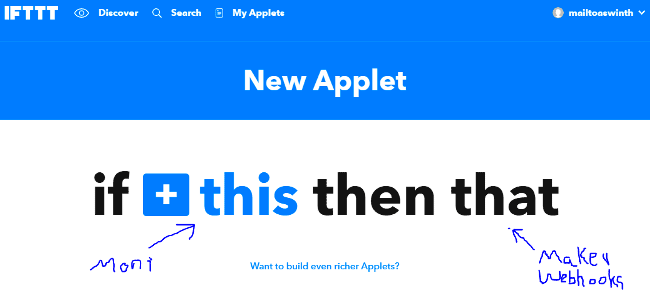
In this screen you have to click on “this” and select “Moni”. Then click on “Ask Moni to perform an action” you will be taken to below screen.
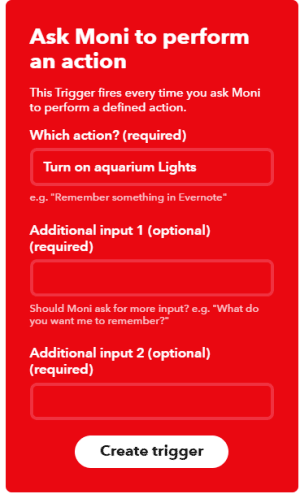
Step 5: Fill in the details as I have filled in the above image. Here my task is to turn on my Aquarium Lights (Load 1) when I say “Turn on Aquarium Lights”. Then Click on “Create Trigger”
Step 6: You will be taken back to the “IF THIS THAN THAT” screen. Now, click on “that” and type in “Maker Webhooks” and select it. Then click on “Make a web request”. You will be taken to below screen
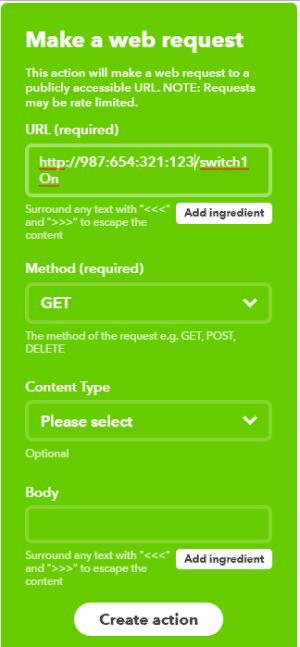
This is an important step where you are most likely to make mistakes. In this page just enter the URL that you want to load. In my case I want to turn on the load connected to switch1 hence the line http://987:654:321:123/switch1On is used you need to replace my IP with your public IP address. This will work only if you have used my code in the previous tutorial. The complete list of URL to toggle the loads is given below.
URL | Keyword from Program | Action |
Switch1On | GPIO_0 is made high, thus turning ON Load 1 | |
Switch1Off | GPIO_0 is made low, thus turning OFF Load 1 | |
Switch2On | GPIO_2 is made high, thus turning ON Load 2 | |
Switch2Off | GPIO_2 is made low, thus turning OFF Load 1 |
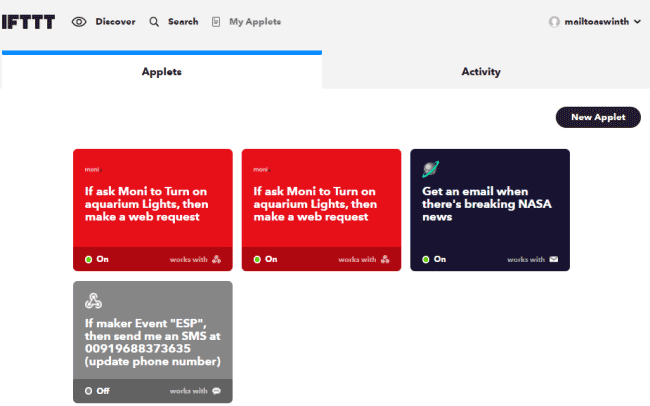
Once you have entered the desired URL click on “Create action”. Then click on Finish. Similarly you can create 4 Applets to turn ON/OFF both the loads in our Junction box.
That is it you applet is ready for action and it should appear in under “My applets” as shown below.
Time to test our code.......
Testing of Project:
Finally we are ready with our project. Let us test it. Power it on and open the Moni application in your mobile phone. Click on the Microphone icon and say the command. In my case it is “Turn on Aquarium Lights” and it should turn reply with an “OK” and turn on the lights. Check the full code and demo Video below.
Hope you liked the project and got it working. If you are stuck somewhere, use the comment section below and I will surely help you out. Will meet you with another interesting project until then stay tuned.
Also check our other IoT based Projects here.
Complete Project Code
/*Program for : Smart Junction box for Home Automation
* Program by :Aswinth Raj
* Published on : circuitdigest.com
* Dated:11-05-2017
*/
#include <ESP8266WiFi.h>
#include <WiFiClient.h>
#include <ESP8266WebServer.h>
#include <ESP8266mDNS.h>
MDNSResponder mdns;
const char* ssid = "BPAS Home"; //Enter you Wifi SSID here
const char* password = "cracksen"; //Enter your password here
ESP8266WebServer server(80);
String mainPage = ""; //The default page
String feedback = ""; //Gives staus of the switch
String currentPage = ""; //Combines main and feedback page
int GPIO_0 = 0; //Pin defanition
int GPIO_2 = 2; //Pin defanition
void setup(void){
mainPage += "<h1 align=\"center\">Aquarium controller</h1><h2 align=\"center\">powered by CircuitDigest</h2><h1 align=\"center\"><p>Light: <a href=\"switch1On\"><button>ON</button></a> <a href=\"switch1Off\"><button>OFF</button> </a></p>";
mainPage += "<p>Filter: <a href=\"switch2On\"><button>ON</button></a> <a href=\"switch2Off\"><button>OFF</button> </a></p>";
feedback = "<h3 align=\"center\">Both Light and Filter is down</h3>";
currentPage = mainPage+feedback;
// preparing GPIOs
pinMode(GPIO_0, OUTPUT);
digitalWrite(GPIO_0, LOW);
pinMode(GPIO_2, OUTPUT);
digitalWrite(GPIO_2, LOW);
delay(1000);
Serial.begin(115200);
WiFi.begin(ssid, password);
Serial.println("");
// Wait for connection
while (WiFi.status() != WL_CONNECTED) {
delay(500);
Serial.print(".");
}
// Get a constant IP everytime
IPAddress ip(192, 168, 0, 104); // This should be the IP of my ESP module
IPAddress gateway(192, 168, 0, 1); // set gateway to match your network most gateway will be the same by default
Serial.print(F("Setting static ip to : "));
Serial.println(ip);
IPAddress subnet(255, 255, 255, 0); // set subnet mask to match your network
WiFi.config(ip, gateway, subnet);
Serial.println("");
Serial.print("Connected to ");
Serial.println(ssid);
Serial.print("IP address: ");
Serial.println(WiFi.localIP());
if (mdns.begin("esp8266", WiFi.localIP())) {
Serial.println("MDNS responder started");
}
server.on("/", [](){
currentPage = mainPage+feedback;
server.send(200, "text/html", currentPage);
currentPage = "";
});
server.on("/switch1On", [](){
feedback = "<h3 align=\"center\">Light is UP ON</h3>";
currentPage=mainPage+feedback;
server.send(200, "text/html", currentPage);
currentPage="";
digitalWrite(GPIO_0, HIGH);
delay(1000);
});
server.on("/switch1Off", [](){
feedback = "<h3 align=\"center\">Light is DOWN</h3>";
currentPage=mainPage+feedback;
server.send(200, "text/html", currentPage);
currentPage="";
digitalWrite(GPIO_0, LOW);
delay(1000);
});
server.on("/switch2On", [](){
feedback = "<h3 align=\"center\">Filter is UP</h3>";
currentPage=mainPage+feedback;
server.send(200, "text/html", currentPage);
currentPage="";
digitalWrite(GPIO_2, HIGH);
delay(1000);
});
server.on("/switch2Off", [](){
feedback = "<h3 align=\"center\">Filter is DOWN</h3>";
currentPage=mainPage+feedback;
server.send(200, "text/html", currentPage);
currentPage="";
digitalWrite(GPIO_2, LOW);
delay(1000);
});
server.begin();
Serial.println("Smart Junction Box is up and running");
}
void loop(void){
server.handleClient();
}
Comments
The problem could either be with the way you created the recipe or with port forwarding.
You are awesome, Good job!
I have problem in forwarding the port.
I went to the tp-link admin page and added the ip of my ESP-8266 to the port forwarding part.
but when I use the IP which I get from google, it show me nothing.
Hmm sounds strange, did you try doing it again? was the IP still forwarded? Is it working on local address?
Hello friend in that circuit diagram you meantioned adj (3.3 v convertor) what is this device
Friend can we do this my mobile WiFi without using router pls answer me
Hi,
My problem is that PORT FORWARD is wrong when i try to find it. For example, i was searching what is my ip, but when i put on URL, the web doesn't charge like espweb. Please help me. Thanks
in ifttt we have successfully added that moni but webhooks creating problem.That it is not sending request to the webpage.And we have done portforwarding using jio router.but we could not able to access it globally.can you please provide us the solution to the above mentioned gmail
Can you please suggest a latest undergraduate project idea for electrical engineering?
Video unavailable
Dear B.Aswinth Raj,
Today, I tried: software (IFTTT, Moni.ai) , networking (Public IP + Private IP) & server side (ESP8266 on Wifi) of your Project, everything has worked as smoothly as you have explained...
Hopefully I will be able to source all the hardware electronic pieces to make the signals flow into the device side of it... I have modified the use case (Load) to fit my requirement, its a DC Motor rolling up or down my window blinds... will share my results here later once I finish the hardware side.
Thanks a Lot!
Your Project is SUPER!
And You Rock!
Hey Please post the working of the project once it is completed, we would love to take a look at it
my esp modules is showing blue light when i power it and if i want to upload d program it is showing error ,pls i need help ugently

If ask Moni to Turn on light, then make a web request
but Moni is accepting the command but not redirecting the url