
Automation is the essence of today’s world. Automation can make our life easy and secure. There are many ways to obtain automation. Automation can be achieved by Wi-Fi, IR, GSM, Bluetooth and many other technologies.
Previously we have covered many types of Home automations using different technologies like:
- DTMF Based Home Automation
- GSM Based Home Automation using Arduino
- PC Controlled Home Automation using Arduino
- Bluetooth Controlled Home Automation using 8051
- IR Remote Controlled Home Automation using Arduino
- home automation project using MATLAB and Arduino
- RF Remote Controlled LEDs Using Raspberry Pi
In this project we are to going to wirelessly Control Home Appliances using Bluetooth and Arduino. We will show here that how to control electric appliances by simply sending data from Android Smart phone to Arduino.
Required Components:
- Arduino Mega (any model)
- Android Phone
- HC05 Bluetooth Modules
- Bluetooth terminal App
- L293D IC
- Two 6V relays
- Two bulbs
- Breadboards
- 12 v,1A Adapter
- 16x2 LCD
Circuit Diagram:
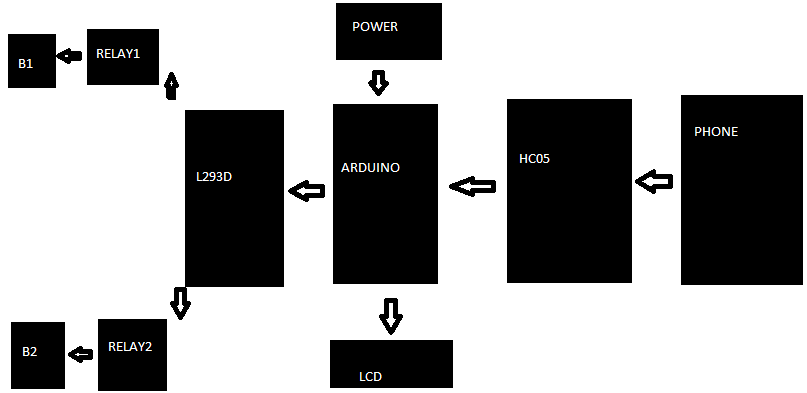
Circuit diagram of this Bluetooth controlled Home Automation is simple and connections can be made easily. LCD, Bluetooth Module HC05 and L293D Driver IC are connected to Arduino.

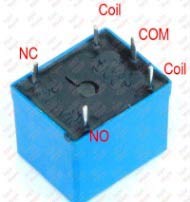
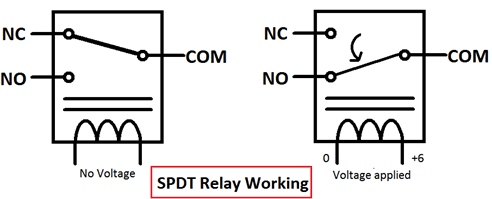
Two Relays are connected to L293D to operate two AC appliances. Relay has total five pins, in which two pins (around the COM pin) are connected to L293D and GND. And COM (common) Pin is connected to AC mains Live terminal and NO (Normally Open) pin of Relay is connected to one terminal of the Bulb. Other terminal of the bulb is connected to Neutral of AC mains. Check here the working of Relay.
L293D driver IC is generally used to increase the current. The Vcc2 or VS pin of L293D should be connected to VIN pin (input voltage pin or Vcc) of Arduino. Input 1 and Input 2 pins of IC are connected to 10 and 11 pin of Arduino and output pins are connected to relays pins.
Working Explanation:
First we need to download and install the Bluetooth Terminal App in our Android Phone from the Play Store and then pair it with Bluetooth Module HC05 like we normally pair two Bluetooth Devices. Further check this article Configuring Bluetooth Terminal App for Arduino.
Now we have Bluetooth Terminal App installed in our Android phone through which we can send data to Bluetooth Module HC05. HC05 Bluetooth Module is connected to Arduino Mega to serially receive the data sent by Bluetooth terminal App through Android Smart Phone. A 16x2 LCD is used to display the On and Off status of Electronic Appliances. And L293D IC is used to drive two Relay which are directly connected to two Bulbs. 12v Adapter is used to power the Arduino and the circuit.
Whenever we send data by Android phone, Arduino checks for the character sent and puts appropriate pins high or low according to Code. These pins control the relays which in turns control the Appliances. The operation of our project is as follows:
- If we send ‘a’ through Bluetooth Terminal App then Bulb1 will be On and Bulb2 will be off.
- If we send ‘b’ through Bluetooth Terminal App then Bulb2 will be On and Bulb1 will be off.
- If we send ‘c’ through Bluetooth Terminal App then both the bulbs will be switched On.
- If we send ‘d’ through Bluetooth Terminal App then both the bulbs will be switched Off. character ‘d’ can be used to switch off individual bulbs too.
You can learn here more about Arduino relay control. Check out the complete operation in Demonstration Video at the end.
Programming Explanation:
Program for this Project is very simple and can be easily understandable.
Include LiquidCrystal.h header file in your Arduino Code, it is necessary for working of LCD.
#include <LiquidCrystal.h>
LiquidCrystal lcd(7, 6, 5, 4, 3, 2);
Configure pin 11 and 10 as output pins of Arduino as below in void setup() function and use Serial.begin(9600) for communication between Arduino and Android phone via Bluetooth Module HC05.
void setup() {
  pinMode(11, OUTPUT);
  pinMode(10, OUTPUT);
  Serial.begin(9600);
  lcd.begin(16, 2);
  lcd.print("**AUTOMATION**");
}
In void loop() function, check for the presence of any serial data and put that data in a variable char c.
void loop() {
  if (Serial.available() > 0)
  {
    char c = Serial.read();
    if (c == 'a')
    {
     Serial.print("in a code");
     ..... .......
     ....... ......
Then compare that serial data (char c) with character ‘a’ ,’b’, ’c’, ’d’, which is sent by Android Smart Phone by user. After comparing, Arduino will switch on or off the Appliances according to our various conditions in our Code. You can alter the code according to your requirement. Check the full code below.
Complete Project Code
#include <LiquidCrystal.h>
LiquidCrystal lcd(7, 6, 5, 4, 3, 2);
void setup() {
  pinMode(11, OUTPUT);
  pinMode(10, OUTPUT);
  Serial.begin(9600);
  lcd.begin(16, 2);
  lcd.print("**AUTOMATION**");
}
void loop() {
  if (Serial.available() > 0)
  {
    char c = Serial.read();
    if (c == 'a')
    {
     Serial.print("in a code");
     digitalWrite(10,HIGH);
     digitalWrite(11,LOW);
     Serial.print("10 HIGH");
     lcd.clear();
     lcd.print("**BULB1 ON**");
    }

    if(c=='b')
    {
     digitalWrite(11,HIGH);
     digitalWrite(10,LOW);
     Serial.print("11 HIGH");
     lcd.clear();
     lcd.print("**BULB2 ON**");
    }

    if(c=='c')
    {
     digitalWrite(10,HIGH);
     digitalWrite(11,HIGH);
     lcd.clear();
     lcd.print("**BULB 1,2 ON**");
    }

    if(c=='d')
    {
     digitalWrite(10,LOW);
     digitalWrite(11,LOW);
     lcd.clear();
     lcd.print("**BULB 1,2 OFF**");
    }
  }
}
Comments
Yes you can.
hey dear, it's amazing home automation, i have seen you profile you have a great experience of engineering projects what cost you bear on this project?
Not much, the most expensive part of this project is Arduino Mega which comes for Rupees 750,bluetooth module costs around Rupees 350 .Cost of other components is very less.
How to store output state into EEPROM?
sir i want to model a home automation system using wifi module please guide me.
Where i wanted to run 8 different loads.
i dont have knowledge of iot programming.
Hey avinash thank you for such a great project... mean while i have a question can we increase the number of load, may be 8 load, by adding some more lines in code..
what app did you use?
Hi,
I'm new to IOT projects, Can I please know how many applications can we control using the above configuration?
And if needed how can we increase the no of applications.
I have done this project as my final year project in college. But I'm having few problems.
When I type and send on the Bluetooth terminal app. It will display in a code10 High 11 but nothing shows on lcd screen. Does this mean that the codes are coprating with the arduino if the Bluetooth terminal app displays that but nothing is happening on the lcd screen.
2
What is Ac neutral or ac main live that one of the bulb wire is connected to.
Please can you give me more information about wiring the bulb to relay and ac main live.
I hope to hear from you soon.
Thank you.

i want do this project..Can i use arduino uno change with arduino mega..Are the code change?