
With growing popularity of Smart Cities, there is always a demand for smart solutions for every domain. The IoT has enabled the possibility of Smart Cities with it’s over the internet control feature. A person can control the devices installed in his home or office from anywhere in the world by just using a smartphone or any internet connected devices. There are multiple domains in a smart city and Smart Parking is one of the popular domain in the Smart City.
The Smart Parking industry has seen a number of innovations such Smart Parking Management System, Smart Gate Control, Smart Cameras which can detect types of vehicle, ANPR (Automatic Number Plate Recognition), Smart Payment System, Smart Entry System and many more. Today similar approach will be followed and a smart parking solution will be built which will use an ultrasonic sensor to detect vehicle presence and trigger the gate to open or close automatically. The ESP8266 NodeMCU will be used here as the main controller to control all the peripherals attached to it.
ESP8266 is the most popular controller to build IoT based applications as it has inbuilt support for Wi-Fi to connect to internet. We previously used it build many IoT projects like:
- IOT based Security System
- Smart Junction Box for Home Automation
- IOT based Air Pollution Monitoring System
- Send data to ThingSpeak
Check all the ESP8266 based Project here.
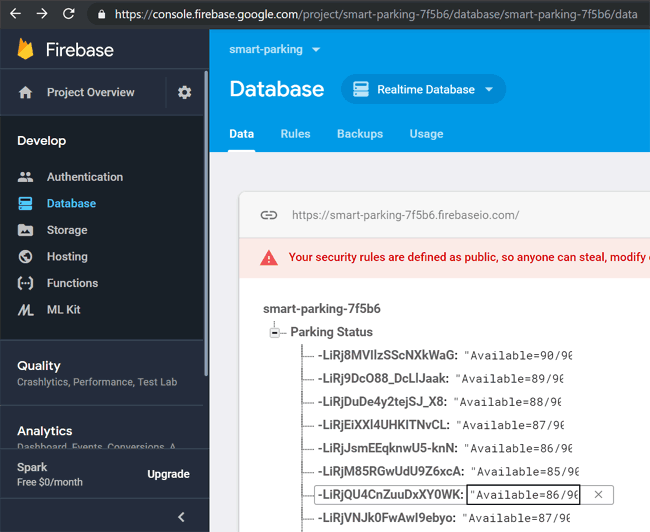
In this IoT Smart Parking System, we will send data to webserver for looking up the availability of space for vehicle parking. Here we are using firebase as Iot database to get the parking availability data. For this we need to find the Firebase host address and the secret key for authorization. If you already know using firebase with NodeMCU then you can move ahead else you should first learn to use Google Firebase Console with ESP8266 NodeMCU to get the host address and secret key.
Components Required
- ESP8266 NodeMCU
- Ultrasonic Sensor
- DC Servo Motor
- IR Sensors
- 16x2 i2c LCD Display
- Jumpers
Circuit Diagram
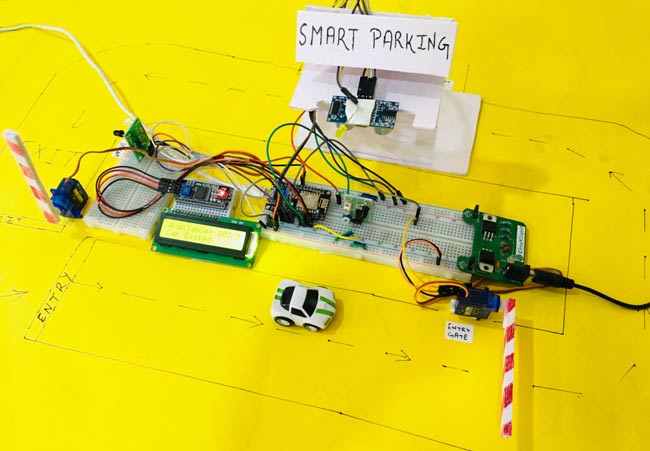
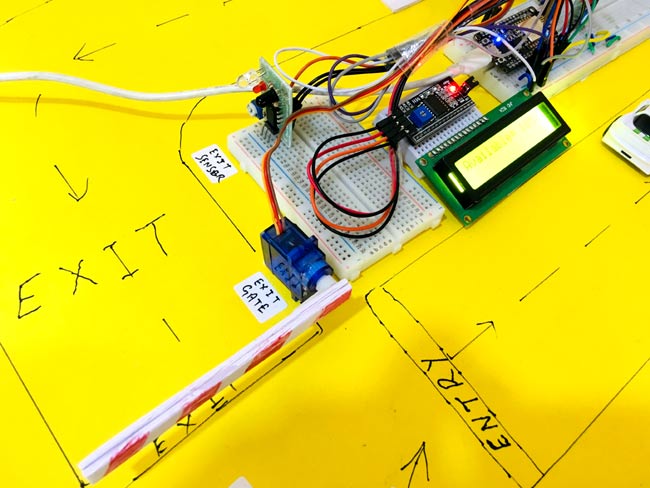
Circuit diagram for this IoT based vehicle parking system is given below. It involves two IR sensor, two servo motors, one ultrasonic sensor and one 16x2 LCD.
Here the ESP8266 will control the complete process and also send the parking availability information to Google Firebase so that it can be monitored from anywhere in the world over the internet. Two IR sensors are used at entry and exit gate to detect the presence of car and automatically open or close the gate. IR Sensor is used to detect any object by sending and receiving the IR rays, learn more about IR sensor here. We have also covered a detailed tutorial on Arduino IR sensor interfacing, which you can check to learn more the working of IR sensor module and how to connect it with the Arduino uno.
Two servos will act as entry and exit gate and they rotate to open or close the gate. Finally an Ultrasonic sensor is used to detect if the parking slot is available or occupied and send the data to ESP8266 accordingly. Check the video given at the end of this tutorial to understand the complete working of the project.

This is how this complete Smart parking system Prototype will look:
Programming ESP8266 NodeMCU for Smart Parking Solution
Complete code with a working video is given at the end of this tutorial, here we are explaining the complete program to understand the working of the project.
For programming NodeMCU, just plug the NodeMCU to Computer with a Micro USB Cable and open Arduino IDE. The libraries are required for I2C Display and Servo Motor. The LCD will display the availability of Parking Spaces and the Servo motors will be used to open and close the Entry and Exit gates. The Wire.h library will be used to interface LCD in i2c protocol. The Pins for I2C in the ESP8266 NodeMCU are D1 (SCL) and D2 (SDA). The database here used will be Firebase so here we are also including the library (FirebaseArduino.h) for the same.
#include <ESP8266WiFi.h>
#include <Servo.h>
#include <LiquidCrystal_I2C.h>
#include <Wire.h>
#include <FirebaseArduino.h>
Then include the firebase credentials got from Google Firebase. These will include the Host name containing your project name and a secret key. To find these values follow the previous tutorial on Firebase.
#define FIREBASE_HOST "smart-parking-7f5b6.firebaseio.com"
#define FIREBASE_AUTH "suAkUQ4wXRPW7nA0zJQVsx3H2LmeBDPGmfTMBHCT"
Include the Wi-Fi Credentials such as WiFi SSID and Password.
#define WIFI_SSID "CircuitDigest"
#define WIFI_PASSWORD "circuitdigest101"
Initialise I2C LCD with device address (Here it is 0x27) and type of LCD. Also include the Servo Motors for entry and exit gate.
LiquidCrystal_I2C lcd(0x27, 16, 2);
Servo myservo;
Servo myservo1;
Start the I2C communication for I2C LCD.
Wire.begin(D2, D1);
Connect the Entry and Exit Servo Motor to the D5, D6 Pins of the NodeMCU.
  myservo.attach(D6);
  myservos.attach(D5);
Select the Trigger Pin of Ultrasonic sensor as Output and Echo Pin as Input. The ultrasonic sensor will be used to detect the parking spot availability. If Car has occupied the space then it will glow else it will not glow.
  pinMode(TRIG, OUTPUT);
  pinMode(ECHO, INPUT);
The two pins D0 and D4 of the NodeMCU are used to take the IR sensor reading. The IR sensor will act as Entry and Exit gate sensor. This will detect car presence.
 pinMode(carExited, INPUT);
 pinMode(carEnter, INPUT);
Connect to WiFi and wait for some time till it gets connected.
  WiFi.begin(WIFI_SSID, WIFI_PASSWORD);
  Serial.print("Connecting to ");
  Serial.print(WIFI_SSID);
  while (WiFi.status() != WL_CONNECTED) {
    Serial.print(".");
    delay(500);
  }
Begin connection with Firebase with Host and Secret Key as credentials.
Firebase.begin(FIREBASE_HOST, FIREBASE_AUTH);
Begin i2c 16x2 LCD and set cursor position at 0th row 0th column.
lcd.begin();
lcd.setCursor(0, 0);
Take the Distance from Ultrasonic sensor. This will be used to detect the vehicle presence in the particular spot. First send the 2 microsecond pulse and then read the received pulse. Then convert it to the ‘cm’. Learn more about measuring distance using ultrasonic sensor here.
  digitalWrite(TRIG, LOW);
  delayMicroseconds(2);
  digitalWrite(TRIG, HIGH);
  delayMicroseconds(10);
  digitalWrite(TRIG, LOW);
  duration = pulseIn(ECHO, HIGH);
  distance = (duration / 2) / 29.1;
Digitally read the IR sensor pin as entry sensor and check if it is high. If it is high then increment entry count and print it to 16x2 LCD display and also to serial monitor.
  int carEntry = digitalRead(carEnter);
  if (carEntry == HIGH) {
    countYes++;
    Serial.print("Car Entered = " ); Serial.println(countYes );
    lcd.setCursor(0, 1);
    lcd.print("Car Entered");
Also move the servo motor angle to open entry gate. Change the angle according your use case.
    for (pos = 140; pos >= 45; pos -= 1) {
      myservos.write(pos);
      delay(5);
    }
    delay(2000);
    for (pos = 45; pos <= 140; pos += 1) {
      // in steps of 1 degree
      myservos.write(pos);
      delay(5);
    }
And send the reading to firebase by using pushString function of Firebase library.
Firebase.pushString("/Parking Status/", fireAvailable );
Do similar steps as above for Exit IR sensor and Exit servo motor.
  int carExit = digitalRead(carExited);
  if (carExit == HIGH) {
    countYes--;
    Serial.print("Car Exited = " ); Serial.println(countYes);
    lcd.setCursor(0, 1);
    lcd.print("Car Exited");
    for (pos1 = 140; pos1 >= 45; pos1 -= 1) {
      myservo.write(pos1);
      delay(5);
    }
    delay(2000);
    for (pos1 = 45; pos1 <= 140; pos1 += 1) {
      // in steps of 1 degree
      myservo.write(pos1);
      delay(5);
    }
    Firebase.pushString("/Parking Status/", fireAvailable );
    lcd.clear();
  }
Check if the car has come to the parking spot and if it has arrived then glow led giving the signal that the spot is full.
  if (distance < 6) {
        Serial.println("Occupied ");
    digitalWrite(led, HIGH);
  }
Else show that the spot is available.
  if (distance > 6) {
        Serial.println("Available ");
    digitalWrite(led, LOW);
  }
Calculate the total empty space inside the parking lot and save it in the string to send the data to firebase.
Empty = allSpace - countYes;
  Available = String("Available= ") + String(Empty) + String("/") + String(allSpace);
  fireAvailable = String("Available=") + String(Empty) + String("/") + String(allSpace);
Also print the data to the i2C LCD.
  lcd.setCursor(0, 0);
  lcd.print(Available);

This is how the availability of parking can be tracked online on Firebase as shown in the snapshot below:
This finishes the complete smart parking system using the ESP8266 NodeMCU Module and different peripherals. You can use other sensors also in replacement of Ultrasonic and IR sensor. There is a vast application of Smart Parking System and different products can be added to make it more smart. Comment below if you have any doubt or reach to our forum for more support.
Complete Project Code
#include <ESP8266WiFi.h>
#include <Servo.h>
#include <LiquidCrystal_I2C.h>
#include <Wire.h>
#include <FirebaseArduino.h>
#define FIREBASE_HOST "smart-parking-7f5b6.firebaseio.com"                 // the project name address from firebase id
#define FIREBASE_AUTH "suAkUQ4wXRPW7nA0zJQVsx3H2LmeBDPGmfTMBHCT"            // the secret key generated from firebase
#define WIFI_SSID "CircuitDigest"                                             // input your home or public wifi name
#define WIFI_PASSWORD "circuitdigest101"                                    //password for Wifi
String Available = "";                                                  //availability string
String fireAvailable = "";
LiquidCrystal_I2C lcd(0x27, 16, 2);         //i2c display address 27 and 16x2 lcd display
Servo myservo;                          //servo as gate
Servo myservos;                               //servo as gate
int Empty;                            //available space integer
int allSpace = 90;
int countYes = 0;
int carEnter = D0;                      // entry sensor
int carExited = D4;                   //exi sensor
int TRIG = D7;                  //ultrasonic trig  pin
int ECHO = D8;                // ultrasonic echo pin
int led = D3;                 // spot occupancy signal
int pos;
int pos1;
long duration, distance;
void setup() {
  delay(1000);
  Serial.begin (9600);     // serial debugging
  Wire.begin(D2, D1);       // i2c start
  myservo.attach(D6);      // servo pin to D6
  myservos.attach(D5);       // servo pin to D5
  pinMode(TRIG, OUTPUT);      // trig pin as output
  pinMode(ECHO, INPUT);         // echo pin as input
  pinMode(led, OUTPUT);         // spot indication
  pinMode(carExited, INPUT);    // ir as input
  pinMode(carEnter, INPUT);     // ir as input
  WiFi.begin(WIFI_SSID, WIFI_PASSWORD);                                     //try to connect with wifi
  Serial.print("Connecting to ");
  Serial.print(WIFI_SSID);                          // display ssid
  while (WiFi.status() != WL_CONNECTED) {
    Serial.print(".");                          // if not connected print this
    delay(500);
  }
  Serial.println();
  Serial.print("Connected to ");
  Serial.println(WIFI_SSID);
  Serial.print("IP Address is : ");
  Serial.println(WiFi.localIP());                                            //print local IP address
  Firebase.begin(FIREBASE_HOST, FIREBASE_AUTH);        // begin firebase authentication
  lcd.begin();                           //begin lcd
  lcd.home();
  lcd.setCursor(0, 0);                      // 0th row and 0thh column
  lcd.print("Smart Parking");
}
void loop() {
  digitalWrite(TRIG, LOW);         // make trig pin low
  delayMicroseconds(2);
  digitalWrite(TRIG, HIGH);        // make trig pin high
  delayMicroseconds(10);
  digitalWrite(TRIG, LOW);
  duration = pulseIn(ECHO, HIGH);
  distance = (duration / 2) / 29.1;      // take distance in cm
    Serial.print("Centimeter: ");
    Serial.println(distance);
  int carEntry = digitalRead(carEnter);      // read ir input
  if (carEntry == HIGH) {                     // if high then count and send data
    countYes++;                             //increment count
    Serial.print("Car Entered = " ); Serial.println(countYes );
    lcd.setCursor(0, 1);
    lcd.print("Car Entered");
    for (pos = 140; pos >= 45; pos -= 1) {        // change servo position
      myservos.write(pos);
      delay(5);
    }
    delay(2000);
    for (pos = 45; pos <= 140; pos += 1) {       // change servo position
      // in steps of 1 degree
      myservos.write(pos);
      delay(5);
    }
    Firebase.pushString("/Parking Status/", fireAvailable );    // send string to firebase
    lcd.clear();
  }
  int carExit = digitalRead(carExited);              //read exit ir sensor
  if (carExit == HIGH) {                            //if high then count and send
    countYes--;                                    //decrement count
    Serial.print("Car Exited = " ); Serial.println(countYes);
    lcd.setCursor(0, 1);
    lcd.print("Car Exited");
    for (pos1 = 140; pos1 >= 45; pos1 -= 1) {         // change servo position
      myservo.write(pos1);
      delay(5);
    }
    delay(2000);
    for (pos1 = 45; pos1 <= 140; pos1 += 1) {            // change servo position
      // in steps of 1 degree
      myservo.write(pos1);
      delay(5);
    }
    Firebase.pushString("/Parking Status/", fireAvailable );  // send string to firebase
    lcd.clear();
  }
  if (distance < 6) {                      //if distance is less than 6cm then on led
        Serial.println("Occupied ");
    digitalWrite(led, HIGH);
  }
  if (distance > 6) {                        //if distance is greater than 6cm then off led
        Serial.println("Available ");
    digitalWrite(led, LOW);
  }
  Empty = allSpace - countYes;         //calculate available data

  Available = String("Available= ") + String(Empty) + String("/") + String(allSpace);       // convert the int to string
  fireAvailable = String("Available=") + String(Empty) + String("/") + String(allSpace);
  lcd.setCursor(0, 0);
  lcd.print(Available);                 //print available data to lcd

}
Comments
Good morning sir I think sir smart parking ka project banane ke liye project material ka kya kya name hai bhata diye
Please sir

Hi , the work that you have done above is wonderful . It is really helpfull and thanks for making these projects. I am facing errorrs regarding the library of firebase and servo . I had replaced #include FirebaseArduino.h as
#include <FirebaseESP8266.h>
#include <FirebaseESP8266HTTPClient.h>
since the firebase objects were not detected and the firebase works perfectly . The problem with the servo is that , it shows
#error "This library only supports boards with an AVR, SAM, SAMD, NRF52 or STM32F4 processor."
I have no idea how to solve this . The best i could do was able to find sevo library for esp32 and not for esp8266..
i really hope that you help me this library
plss contact as soon as possible