
Combining the dual-core processing capabilities of the ESP32 with the reliability of GSM connectivity, the ESP32 GPS tracker with SIM800L is the perfect solution for real-time position tracking. Unlike Wi-Fi-only solutions, this ESP32 GSM GPS system will work anywhere there is cellular coverage, because it does not rely on Wi-Fi. The NEO 6M GPS module with ESP32, in conjunction with the ESP32, will provide reliable and accurate position data via satellites within view of the receiver, while the SIM800L will transmit information in real-time over the mobile data network via GPRS. The result is a powerful and robust GPS module for ESP32 applications. Our complete ESP32 GPS navigation project uses the GeoLinker cloud platform for you to visualise your data reliably and quickly, without having to set up complex servers.
Tracking the geolocation of something in real time might sound complicated, but with a few basic parts and the right tools, it's easier than you think. Today, in this project, we are going to build a compact, easy-to-use ESP32 GPS tracker with our free, stunning Cloud Dashboard.
What makes this ESP32 GPS Tracker with SIM800L and NEO6M Module special is how easily it connects with our custom GeoLinker platform, which handles the location data and displays it on the cloud in real time. Whether you want to track your vehicle, monitor a delivery, or just explore how the GPS works, this project gives you a hands-on way to bring location tracking to life. Feel free to explore our other GPS tracker projects, like an Arduino GPS tracker using SIM800L and Neo-6M, a GPS tracker using ESP32 and a Raspberry Pi Pico GPS tracker.
Table of Contents
ESP32 GPS Tracker Overview: How It Works
This GPS tracker ESP32 GeoLinker project is straightforward to recreate, both in terms of hardware and software. To build an ESP32 GPS tracker, we need some essential hardware like a GPS or GNSS module to fetch the location data, and a GSM/GPRS, Wi-Fi, or any internet connectivity medium to share our data with GeoLinker.
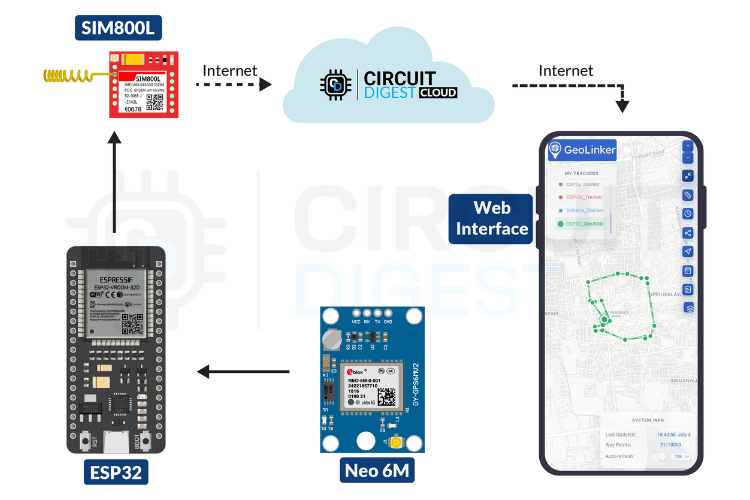
Finally, you need to know that we are using our latest platform, GeoLinker, for visualising the GPS data. This simplifies the process of handling the data, plotting it on a map, and routing it. As you already know, we are using the ESP32 module as the main processing unit for this ESP32 GPS navigation system.
The reason behind this ESP32 with GSM and GPS project is that Wi-Fi might not be reliable in some remote applications, so now, using the SIM800L solves that problem.
Required Components for ESP32 GPS Tracker with SIM800L and NEO-6M
This ESP32 GPS tracker project requires only a few basic components, but you can add sensors or extra modules to meet your specific requirements. Still, to keep things simple, we will focus on the GPS and internet connectivity parts.
- ESP32 Development Board – 1 (Main Processing Unit)
- SIM800L Module – 1 (For GPRS Connectivity)
- Neo6M GPS Module – 1 (Standalone GPS Module for Getting Current Location Data)
- LED 5mm – 2 (For Status Indication)
- Resistor 470Ω – 2 (For Current Limiting for LEDs)
- Breadboard – 1 (For Connecting All Components)
- Connecting Wires – Required Quantity
There is no specific reason for selecting each of the above components. It’s simply because they are commonly used, inexpensive, and also supported by the GPS tracker ESP32 GeoLinker library.
ESP32 GPS Tracker Component Comparison Table
Component | Purpose | Voltage |
|---|---|---|
ESP32 Development Board | Main processing unit & Wi-Fi | 3.3V (5V input) |
SIM800L GSM Module | GPRS cellular connectivity | 3.7-4.2V |
NEO-6M GPS Module | Satellite location tracking | 3.3-5V |
Setting Up GeoLinker Cloud Platform for GPS Tracking
Like most CircuitDigest Cloud APIs, GeoLinker also requires an API key for authorisation. Follow the steps below to receive your free API key for your ESP32 GPS navigation project.
Visit Circuit Digest.Cloud and in the top right corner, click Sign in.
If you are new to CircuitDigest Cloud, you need to register a new account by following the steps below.
Registering a New Account in Circuit Digest Cloud
⇒ Step 1:
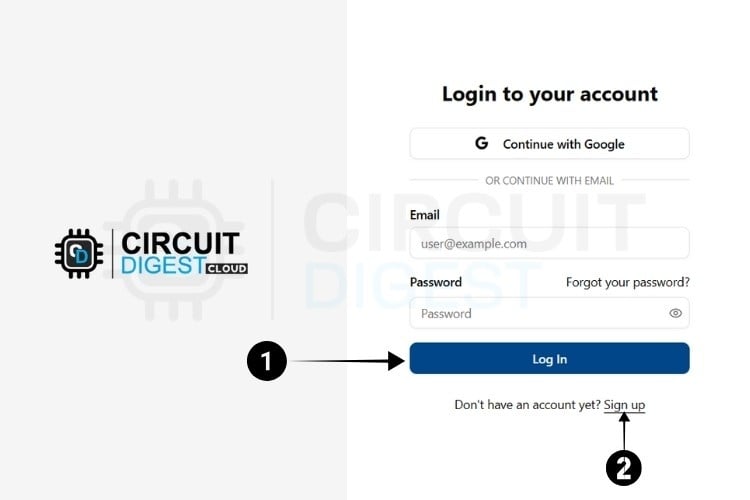
Visit the Circuit Digest. Cloud Home Page. Click the "Login" button located at the bottom, which redirects to the login page.
⇒ Step 2:
If you already have an account, log in using your existing credentials. If not, go to the registration page to create an account by filling in the required details. Once completed, click "Register Now" to sign up.
⇒ Step 3:
After registering, use your email ID and password to log in on the login page. Once logged in, click on "My Account" at the top right corner, where you click the API Keys from the Dropdown options.
The next step is to generate the API Key.

Generating API Key
⇒ Step 4: You will be directed to a page where you can generate your API Key.
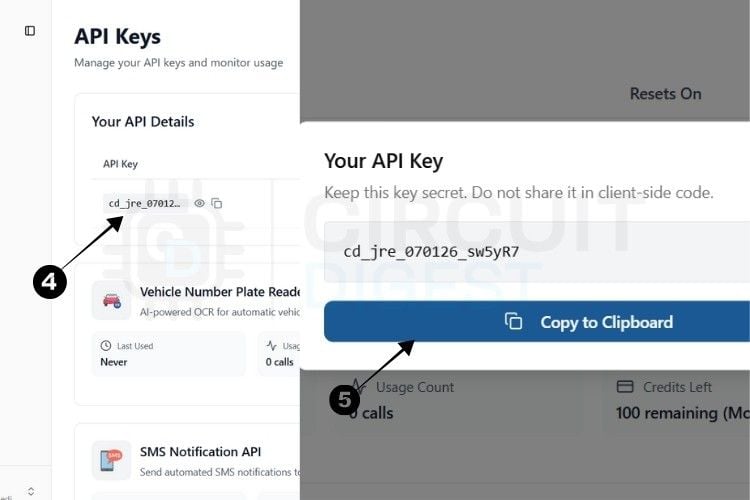
⇒ Step 5: By pressing the copy icon near the API Key, your key gets instantly copied to the clipboard.
Currently, there is a usage limit of 100 requests per API key for both the SMS and ANPR APIs and 10,000 data points for GPS tracking. Once you reach this limit, you can generate another key, which provides an additional 100 uses.
This usage limit is in place to prevent server overload.
With this, we are ready to move to hardware.
With this, we are ready to move to hardware for our ESP32 GPS Tracker with SIM800L.
*Note: A 10-second rate limit applies to all API calls, allowing one request every 10 seconds.
ESP32 GPS Tracker Circuit Diagram: Wiring SIM800L and NEO-6M
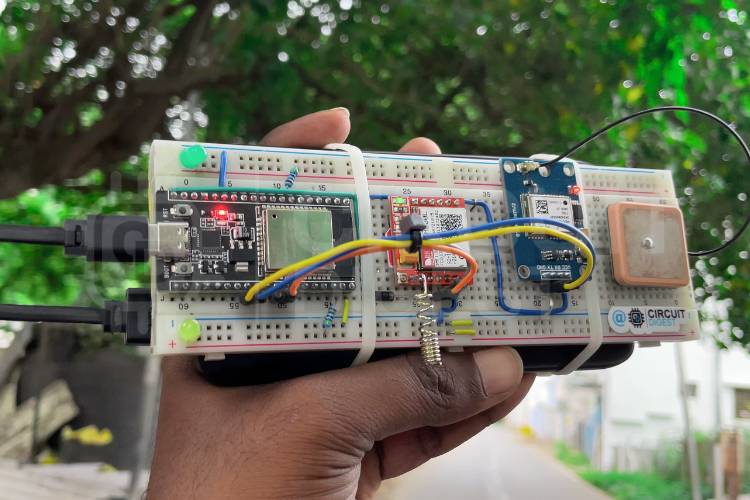
The circuit diagram for the ESP32 GPS tracker with SIM800L project might look a little complex, but believe me, it's so simple to understand and easy to replicate.
Let's start with the ESP32, which is the main microcontroller used here. I selected a breadboard-friendly development board for this project. The next two main components are the GSM and GPS modules.

Here, the SIM800L was used for ESP32 with GSM and GPS setup. With this, we get GPRS, and using that, we can implement the TCP/IP protocol. Powering it might be a little tricky, as its optimal operating voltage is around 3.7 to 4.2V. So, using a separate Lithium-Ion or LiPo battery works great. But a quick and simple way is to use a diode that drops around 0.7V when forward-biased, providing about 4.3V to the SIM800L. It still works without any issue. However, the most recommended method is to use a separate buck converter, LDO, or battery.
Now, the communication is established using one of the hardware UARTs in the ESP32 (TX → GPIO18, RX → GPIO19).
The GPS module used here was the Neo6M GPS module with ESP32, which is a simple and cost-efficient module. This module communicates with the ESP32 via one of its hardware serial ports (TX → GPIO16, RX → GPIO17). It is powered via the 3.3V supply pin from the ESP32 development board. In my case, it works well with 3.3V. If this doesn’t work for you, you can power it with 5V as well. But remember to shift the voltage level in the communication lines (TX and RX), or else it may cause potential damage to the GPIO.
Lastly, there are two LEDs for status indication. The yellow LED, connected to GPIO23, indicates GPS status. The green LED, connected to GPIO32, indicates data sent status.
With this, the circuit connections are complete. Below, you can see the fully assembled image of this project.
Important: While assembling the components, carefully check for proper connections between the components and the breadboard, as improper wiring might cause unidentified issues.
Next, we can move on to the coding part for the ESP32 with GSM and GPS implementation.
Programming ESP32 GPS Tracker: Complete Arduino Code Guide
The coding part is simple and straightforward for this project. There’s not much to work out.
Thanks to our newly launched GeoLinker Official Arduino Library, coding is made easy with all the required features. So let’s begin the explanation.
1. Libraries and Dependencies
#include <GeoLinker.h>Purpose: Primary library for GPS tracking, data handling, and cloud communication.
Core Functions:
- Parses NMEA data from the GPS module.
- Manages GSM/GPRS communication via SIM800L.
- Handles cloud uploads to the GeoLinker dashboard.
- Buffers data when offline and syncs when back online.
- Handles auto-reconnect, time offsets, and debug output.
2. Neo 6M GPS module with ESP32 Configuration
HardwareSerial gpsSerial(1);
#define GPS_RX 16
#define GPS_TX 17
#define GPS_BAUD 9600- A second hardware serial (UART1) is configured to talk with the Neo 6M GPS module with ESP32.
- GPIO16 (RX) receives data from GPS, and GPIO17 (TX) sends (though TX is often unused).
- The standard GPS baud rate is 9600, perfect for continuous data like NMEA sentences.
3. GSM Module Configuration
HardwareSerial gsmSerial(2);
#define GSM_RX 18
#define GSM_TX 19
#define GSM_BAUD 9600
#define GSM_PWR_PIN -1
#define GSM_RST_PIN -1- The third hardware serial (UART2) connects the SIM800L GSM module.
- RX/TX pins are assigned as GPIO18 and GPIO19, respectively.
- Optional power/reset pins are declared but set to -1 since not used here.
4. Cellular Network Configuration
const char* apn = "yourAPN";
const char* gsmUser = nullptr;
const char* gsmPass = nullptr;- These credentials allow your GSM module to access the internet via mobile data.
- Most SIM cards work without a username/password, hence nullptr is used.
5. GeoLinker Cloud Configuration
const char* apiKey = "xxxxxxxxxxxx";
const char* deviceID = "ESP32_Sim800l";- Your API Key links the device to your GeoLinker account.
- Device ID helps you track this specific unit on the dashboard.
Data Transmission and Buffer Settings:
const uint16_t updateInterval = 30;
const bool enableOfflineStorage = true;
const uint8_t offlineBufferLimit = 20;- Sends location every 30 seconds.
- If the network drops, it stores up to 20 records offline.
- Old records get replaced once the buffer is full.
Connection & Timezone Settings:
const bool enableAutoReconnect = true;
const int8_t timeOffsetHours = 5;
const int8_t timeOffsetMinutes = 30;- Auto reconnects if GSM drops.
- Adjusts timestamps to Indian Standard Time (IST).
6. LED Status Indicators
const int DataSent_LED = 32;
const int GPSFix_LED = 23;
Two LEDs help visualise what’s happening
- DataSent_LED blinks when the location is successfully uploaded.
- GPSFix_LED lights up when GPS is getting valid location data.
7. GeoLinker Initialisation
GeoLinker geo;One powerful object, geo, manages all tracking, GSM, and cloud operations.
8. Setup Function
a) Serial Communication
Serial.begin(115200);
gpsSerial.begin(GPS_BAUD, SERIAL_8N1, GPS_RX, GPS_TX);
gsmSerial.begin(GSM_BAUD, SERIAL_8N1, GSM_RX, GSM_TX);- Debug serial is initialised at 115200 baud.
- GPS and GSM are assigned to hardware serial with correct UARTs and standard 8N1 format.
b) LED Setup
pinMode(DataSent_LED, OUTPUT);
pinMode(GPSFix_LED, OUTPUT);
LEDs are set to LOW initially and later toggled based on device behaviour.
c) GeoLinker Core Setup
geo.begin(gpsSerial);
geo.setApiKey(apiKey);
geo.setDeviceID(deviceID);
geo.setUpdateInterval_seconds(updateInterval);
geo.setDebugLevel(DEBUG_BASIC);
Binds the GPS to GeoLinker and configures everything, from API key to debug level.
d) Enable Additional Features
geo.enableOfflineStorage(enableOfflineStorage);
geo.enableAutoReconnect(enableAutoReconnect);
geo.setOfflineBufferLimit(offlineBufferLimit);
geo.setTimeOffset(timeOffsetHours, timeOffsetMinutes);
Makes the device fault-tolerant, memory-efficient, and time-accurate.
e) Configure GSM Network
geo.setNetworkMode(GEOLINKER_CELLULAR);
geo.setModemCredentials(apn, gsmUser, gsmPass);
geo.beginModem(gsmSerial, GSM_PWR_PIN, GSM_RST_PIN, true);
geo.setModemTimeouts(5000, 15000);- Sets the module to cellular mode, provides APN settings, and initiates the modem.
- Customizable timeouts ensure graceful recovery from network issues.
9. Loop Function
uint8_t status = geo.loop();This function continuously handles reading GPS data, validating GPS fix, checking GSM network, uploading to the cloud, and storing offline if needed.
a) Status Handling & Debug Output
 switch (status) {
     case STATUS_SENT:
       Serial.println("Data sent successfully!");
       break;

     case STATUS_GPS_ERROR:
       Serial.println("GPS connection error!");
       break;

     case STATUS_NETWORK_ERROR:
       Serial.println("Network error (buffered).");
       break;

     case STATUS_BAD_REQUEST_ERROR:
       Serial.println("Bad request error!");
       break;

     case STATUS_PARSE_ERROR:
       Serial.println("GPS data format error!");
       break;

     case STATUS_CELLULAR_NOT_REGISTERED:
       Serial.println("GSM: Not registered to network!");
       break;

     case STATUS_CELLULAR_CTX_ERROR:
       Serial.println("GPRS Context Error!");
       break;

     case STATUS_CELLULAR_DATA_ERROR:
       Serial.println("GSM HTTP POST Failed!");
       break;

     case STATUS_CELLULAR_TIMEOUT:
       Serial.println("GSM Module Timeout!");
       break;

     case STATUS_INTERNAL_SERVER_ERROR:
       Serial.println("Internal Server Error!");
       break;

     default:
       Serial.println("Unknown status code.");
   }
Each case is decoded and printed to help diagnose issues.
b) LED Control Logic
if ((status != STATUS_GPS_ERROR) && (status != STATUS_PARSE_ERROR)) {
 digitalWrite(GPSFix_LED, HIGH);
} else {
 digitalWrite(GPSFix_LED, LOW);
}
if (status == STATUS_SENT) {
 digitalWrite(DataSent_LED, HIGH);
 delay(1000);
 digitalWrite(DataSent_LED, LOW);
}- GPSFix_LED: On if GPS is functioning.
- DataSent_LED: Blinks on successful data upload.
No delay is added in the loop except for LED blinking. The GeoLinker library internally handles timings and interval management.
Technical Summary and GitHub Repository
Explore the complete technical breakdown of this ESP32 GPS Tracker project, including circuit design, code explanation, and functionality. Access the full GitHub repository to download, modify, and implement the project easily.


ESP32 GPS Navigation System: Testing and Real-World Performance
After uploading the code to the ESP32, it's time to verify the working of the ESP32 with the GSM and GPS system. The primary things that need to be remembered are: the API Key (you get it from Circuit Digest Cloud), powering the device (as it uses 5V as the maximum input voltage, USB power is sufficient), antenna type & position (sometimes signals are harder to receive), and the SIM card (based on our observation, Airtel and VI work well). If all these are okay, then the system will work without any issues.
After powering up the device, you need to check two status indicators — one is the NETLIGHT indication on the SIM800L, and the other is the status LED on the Neo6M.
The SIM800L LED has multiple blink patterns:
- Blinks every 1 second: The chip is running, but hasn’t connected to the cellular network yet.
- Blinks every 2 seconds: The GPRS data connection you requested is active and working.
- Blinks every 3 seconds: The module has successfully connected to a cellular network and is ready to send/receive text messages and phone calls.
Fast blinking: GPRS is currently working, and a connection is established.
In the Neo 6M GPS module with ESP32, the LED won’t blink until the GPS position is fixed.
If these two indicators are working correctly, then the system is functioning properly. Below, you can see the hardware setup we made:
As we planned to do outdoor testing, we used a power bank to power the module. We used a zip tie to securely hold the breadboard and the power bank. And finally, we began our test journey. Below you can see the first updated value.
The location values are updated live in the GeoLinker UI, as shown screenshot below, taken at the end of the journey. To learn more about this UI, you can find details in the Free IoT-based GPS Tracking Map for ESP32, NodeMCU, and Arduino article.
For your reference, I’ve added a GIF video taken during the ride. It shows the actual hardware while travelling, along with a screen recording of the received data in the GeoLinker UI.
With that, we finally come to the end of this project. I hope you liked it and that you’ve learned something important through it. Happy Engineering!!
Frequently Asked Questions: ESP32 GPS Tracker with SIM800L
⇥ Q1 Why use SIM800L instead of ESP32's built-in Wi-Fi for GPS tracking?
A: SIM800L provides cellular connectivity, which works in remote areas where Wi-Fi isn't available. This makes it ideal for vehicle tracking, outdoor applications, or areas with poor Wi-Fi coverage.
⇥ Q2 Can I use a SIM808 or SIM868 module instead of a separate SIM800L and NEO-6M?
A: Yes, you can use a SIM808/SIM868, which combines both GSM and GPS. However, to use it reliably, you must use two separate UART channels in SIM808/SIM868. The GeoLinker library's core logic remains the same, but your hardware wiring and code initialisation must be adapted to use these two independent serial interfaces.
⇥ Q3 How do I troubleshoot GPS fix issues when the NEO-6M won't get a satellite lock?
A: GPS fix troubleshooting steps:
- Ensure clear sky view (avoid indoor testing)
- Wait 2-15 minutes for cold start acquisition
- Check antenna connection and positioning
- Verify power supply (3.3V or 5V depending on module)
- Check UART connections and baud rate (9600)
- Verify NMEA sentence parsing in the serial monitor
⇥ Q4 How do I optimise power consumption for battery-powered applications?
A: Power optimisation strategies:
» Use the ESP32 deep sleep mode between transmissions
»Reduce GPS update frequency
»Turn off the SIM800L between transmissions
»Use lower-power GPS modules
»Implement smart wake-up based on motion sensors
»Use efficient voltage regulators
»Optimise code to reduce processing time
⇥ Q5: Which SIM cards can I use with the SIM800L module in 2025?
It’s important to note that the SIM800L requires a 2G GSM network in order to work. If you are located in India, the SIM cards to use are from Airtel, Vodafone-Idea (Vi), or BSNL with an active data plan associated with it. We do not recommend Jio or any other 4G-only planned SIM card. Before purchasing a SIM card, check with your carrier to see if they still have 2G access/plans available.
⇥ Q6: How do I resolve my "SIM800L not registered to network" issues?
First of all, make sure the SIM card is working by trying it in a regular phone. Secondly, make sure that you are using a proper power supply of 3.7-4.2V and can deliver enough current, preferably a 2A peak current. Thirdly, check the antenna. Fourthly, confirm there is 2G access in your area. Look for support online to confirm if your area receives 2 G. Finally, make sure the LED blinks approximately every 3 seconds or so; that is an indication that the SIM card has registered to the network.
⇥ Q7: What is the GPS tracking accuracy around the NEO-6M module?
The NEO-6M module provides about 2.5-meter horizontal positional accuracy under ideal conditions. In real life, there can be positional accuracies of 3-10 meters in actual practice based on satellite visibility, atmospheric and weather conditions, antenna efficiency or quality, and interference in the environmental conditions. Accuracy increases significantly once the GPS gets a lock after the first 2-3 minutes.
⇥ Q8: Will the ESP32's Wi-Fi function take the place of the SIM800L?
Yes, but in that case, you would be limited to tracking only in locations where there is coverage of the known Wi-Fi network. The SIM800L provides cellular coverage for tracking vehicles from remote regions, tracking outdoor assets, or mobile use cases where Wi-Fi is not available. Use Wi-Fi for stationary or indoor use only.
⇥ Q9: How much cellular data will this GPS tracker use?
If you are tracking the coordinates every 30 seconds, you could expect approximately 10-20 megabytes of monthly data usage. Each time you transmit the GPS coordinates, it will consume about 500 bytes to transmit the coordinates. So, if you reduce the tracking to every 60 seconds, you will keep your data usage down to approximately 5-10 MB monthly. It is very cheap to do continuous tracking like this.
Conclusion: Building Your ESP32 GPS Tracker
This guide has described the process to build a full-featured ESP32 GPS tracker with SIM800L, along with a NEO-6M GPS. You learned about adding cellular connectivity and satellite positioning into ESP32, getting registered and set up on the GeoLinker cloud platform, and some general troubleshooting. An ESP32 GPS navigation system can provide real-time tracking when within GPS and cellular range and can provide solutions for vehicle tracking, asset tracking and personal protection.
The ESP32 processing power, combined with cellular connectivity using the SIM800L, and GPS accuracy and availability with the NEO-6M GPS module, is a good tracking solution anywhere where there is 2G connectivity. If you are building a fleet management solution or tracking high-value assets, this GPS module for ESP32 project is a good entry point for developing your application, and there is unlimited potential for scaling and expanding with experience using additional sensors and features.
Ready to take your GPS tracking further? learn about GPS data visualisation techniques for different application requirements.
This tutorial was created by the Circuit Digest engineering team. All circuits were verified with actual hardware, and the code was tested across multiple ESP32 variants to ensure reliability. Our experts focus on creating practical, hands-on tutorials that help makers and engineers master Raspberry Pi projects, Arduino, Electronic Projects, ESP32 Projects and IoT development projects.
I hope you liked this article and learned something new from it. If you have any doubts, you can ask in the comments below or use our forum for a detailed discussion.
NEO-6M GPS Module Tutorials
These tutorials explain NEO-6M GPS basics, troubleshooting, and interfacing with Arduino and ESP32. Learn setup, wiring, and coding to integrate GPS into your projects.

How Does a NEO-6M GPS Module Work and How to Interface it with ESP32
In this tutorial, we discussed how a NEO-6M GPS Module Works and how to interface it with ESP32. Here you can find Circuit and Code, along with the complete guide

How to Interface Arduino with NEO 6M GPS Module?
Learn how to connect the Neo-6M GPS module to your Arduino for real-time location tracking. This beginner-friendly guide walks through wiring, serial communication, and parsing NMEA sentences to display latitude and longitude.

NEO-6M GPS Module Not Working? Complete Troubleshooting Guide
Explore common problems and troubleshooting techniques for the U-blox NEO-6M GPS module. Learn how to fix issues with connections, data output, and satellite reception, and understand NMEA data formats for accurate GPS readings.
Complete Project Code
/*
* GeoLinker Library
* Copyright (C) 2025 Jobit Joseph, Semicon Media Pvt Ltd (Circuit Digest)
* Author: Jobit Joseph
* Project: GeoLinker Cloud API Library
*
* Licensed under the MIT License
* You may not use this file except in compliance with the License.
*
* You may obtain a copy of the License at:
* https://opensource.org/license/mit/
*
* Permission is hereby granted, free of charge, to any person obtaining a copy
* of this software (the "Software") and associated documentation files, to deal
* in the Software without restriction, including without limitation the rights
* to use, copy, modify, merge, publish, distribute, sublicense, and/or sell
* copies of the Software, subject to the following additional conditions:
* 1. All copies or substantial portions must retain:
*    - The original copyright notice
*    - A prominent statement crediting the original author/creator
* 2. Modified versions must:
*    - Clearly mark the changes as their own
*    - Preserve all original credit notices
*
* THE SOFTWARE IS PROVIDED "AS IS", WITHOUT WARRANTY OF ANY KIND, EXPRESS OR
* IMPLIED, INCLUDING BUT NOT LIMITED TO THE WARRANTIES OF MERCHANTABILITY,
* FITNESS FOR A PARTICULAR PURPOSE AND NONINFRINGEMENT. IN NO EVENT SHALL THE
* AUTHORS OR COPYRIGHT HOLDERS BE LIABLE FOR ANY CLAIM, DAMAGES OR OTHER
* LIABILITY, WHETHER IN AN ACTION OF CONTRACT, TORT OR OTHERWISE, ARISING FROM,
* OUT OF OR IN CONNECTION WITH THE SOFTWARE OR THE USE OR OTHER DEALINGS IN THE
* SOFTWARE.
*/

#include <GeoLinker.h>
// ==================================================================
//                   GPS SERIAL CONFIGURATION
// ==================================================================
/* ----- Option 1: Hardware Serial with Custom Pins ----- */
HardwareSerial gpsSerial(1);  // Using Serial1
#define GPS_RX 16       // GPIO16 for RX
#define GPS_TX 17       // GPIO17 for TX
/* ----- Option 2: Standard Hardware Serial (for Uno R4 WiFi, Pico W) ----- */
// HardwareSerial& gpsSerial = Serial1;  // Uses default pins:
                                 // Uno R4 WiFi: RX= D0, TX= D1
                                 // Pico W/2W: TX= 0, RX= 1
/* ----- Option 3: Software Serial (for ESP8266 etc) ----- */
// #include <SoftwareSerial.h>
// #define GPS_RX 14      // Custom RX pin
// #define GPS_TX 12      // Custom TX pin
// SoftwareSerial gpsSerial(GPS_RX, GPS_TX);  // RX, TX pins (avoid conflict pins)
// Common GPS Settings
#define GPS_BAUD 9600   // Standard NMEA baud rate
// ==================================================================
//                   GSM SERIAL CONFIGURATION
// ==================================================================
/* ----- Option 1: Hardware Serial with Custom Pins ----- */
HardwareSerial gsmSerial(2);  // Using Serial2
#define GSM_RX 18       // GPIO18 for RX
#define GSM_TX 19       // GPIO19 for TX
/* ----- Option 2: Standard Hardware Serial (for Uno R4 WiFi, Pico W) ----- */
// HardwareSerial& gsmSerial = Serial2;  // Uses default pins where available
/* ----- Option 3: Software Serial (for basic boards) ----- */
// #include <SoftwareSerial.h>
// #define GSM_RX 5       // Custom RX pin
// #define GSM_TX 6       // Custom TX pin
// SoftwareSerial gsmSerial(GSM_RX, GSM_TX);
// Common GSM Settings
#define GSM_BAUD 9600   // Standard modem baud rate
#define GSM_PWR_PIN -1  // Modem power pin (-1 if not used)
#define GSM_RST_PIN -1  // Modem reset pin (-1 if not used)

// ==================================================================
//                   NETWORK CONFIGURATION
// ==================================================================
/*-------------------------- For WiFi ------------------------------*/
//const char* ssid = "WiFi_SSID";       // Your network name
//const char* password = "WiFi_Password"; // Your network password
/*-------------------------- For GSM ------------------------------*/
const char* apn = "your.apn";         // Cellular APN
const char* gsmUser = nullptr;        // APN username if required
const char* gsmPass = nullptr;        // APN password if required
// ==================================================================
//                   GeoLinker CONFIGURATION
// ==================================================================
const char* apiKey = "FhBxxxxxxxxx";  // Your GeoLinker API key
const char* deviceID = "GeoLinker_tracker"; // Unique device identifier
const uint16_t updateInterval = 10;   // Data upload interval (seconds)
const bool enableOfflineStorage = true; // Enable offline data storage
const uint8_t offlineBufferLimit = 20;  // Max stored offline record, Keep it minimal for MCUs with less RAM
const bool enableAutoReconnect = true;  // Enable auto-reconnect Only for WiFi, Ignored with GSM
const int8_t timeOffsetHours = 5;      // Timezone hours offset
const int8_t timeOffsetMinutes = 30;   // Timezone minutes offset
// ==================================================================
//                   Create GeoLinker instance
// ==================================================================
GeoLinker geo;
// ==================================================================
//                   SETUP FUNCTION
// ==================================================================
void setup() {
 Serial.begin(115200);
 delay(1000);
 // Initialize GPS Serial (select one method)
 gpsSerial.begin(GPS_BAUD, SERIAL_8N1, GPS_RX, GPS_TX);  // Custom pins
 // gpsSerial.begin(GPS_BAUD);  // Default pins
 // Initialize GSM Serial (select one method)
 gsmSerial.begin(GSM_BAUD, SERIAL_8N1, GSM_RX, GSM_TX);  // Custom pins
 // gsmSerial.begin(GSM_BAUD);  // Default pins
 // Core GeoLinker Configuration
 geo.begin(gpsSerial);
 geo.setApiKey(apiKey);
 geo.setDeviceID(deviceID);
 geo.setUpdateInterval_seconds(updateInterval);
 geo.setDebugLevel(DEBUG_BASIC); // Debug verbosity Options: DEBUG_NONE, DEBUG_BASIC, DEBUG_ VERBOSE
 geo.enableOfflineStorage(enableOfflineStorage);
 geo.enableAutoReconnect(enableAutoReconnect);
 geo.setOfflineBufferLimit(offlineBufferLimit); // for small MCUs
 geo.setTimeOffset(timeOffsetHours, timeOffsetMinutes);
 // ===================== Choose Network Backend =====================
 // --- WiFi Example (uncomment to use) ---
  //geo.setNetworkMode(GEOLINKER_WIFI);
  //geo.setWiFiCredentials(ssid, password);
  //if (!geo.connectToWiFi()) Serial.println("WiFi connection failed!");
 // --- SIM800L/Cellular Example (default) ---

 geo.setNetworkMode(GEOLINKER_CELLULAR);
 geo.setModemCredentials(apn, gsmUser, gsmPass);
 geo.beginModem(gsmSerial, GSM_PWR_PIN, GSM_RST_PIN, true);
 geo.setModemTimeouts(5000, 15000);

 Serial.println("GeoLinker setup complete.");
}
// ==================================================================
//                   MAIN PROGRAM LOOP
// ==================================================================
void loop() {
 // Example sensor payloads (optional - up to 5 payloads)
 geo.setPayloads({
   {"temperature", 27.2},
   {"humidity", 53.1}
 });
 // Example battery level (optional)
 geo.setBatteryLevel(89);

 // ==========================================
 //         GEO LINKER OPERATION
 // ==========================================
 uint8_t status = geo.loop();
 if (status > 0) {
   Serial.print("GeoLinker Status: ");
   switch(status) {
     case STATUS_SENT: Serial.println("Data sent successfully!"); break;
     case STATUS_GPS_ERROR: Serial.println("GPS connection error!"); break;
     case STATUS_NETWORK_ERROR: Serial.println("Network error (buffered)."); break;
     case STATUS_BAD_REQUEST_ERROR : Serial.println("Bad request error!"); break;
     case STATUS_PARSE_ERROR: Serial.println("GPS data format error!"); break;
     case STATUS_CELLULAR_NOT_REGISTERED: Serial.println("GSM: Not registered to network!"); break;
     case STATUS_CELLULAR_CTX_ERROR: Serial.println("GPRS Context Error!"); break;
     case STATUS_CELLULAR_DATA_ERROR: Serial.println("GSM HTTP POST Failed!"); break;
     case STATUS_CELLULAR_TIMEOUT: Serial.println("GSM Module Timeout!"); break;
     case STATUS_INTERNAL_SERVER_ERROR: Serial.println("Internal Server Error!"); break;
     default: Serial.println("Unknown status code.");
   }
 }
}
