 Vedhathiri
Author

Stressful day? Deadlines, noise, overthinking, endless scrolling… sometimes the best thing you can do is pause everything and play a game. Games have always been more than just entertainment; they refresh the mind, shift our focus, and quietly reset our mood. When we play, stress doesn’t just reduce… it bursts. And let’s be honest, gaming isn’t just for kids anymore. Even today, adults smile when someone mentions Duck Hunt, Mario, Contra, Mortal Kombat, NFS, or the legendary GTA Vice City. Those were golden days sitting close to the screen, holding that black or white joystick, smashing buttons, pushing the stick up, down, left, right…pure joy, zero tension.
Now take a moment and think about that joystick. Simple, Physical, Direct, No touchscreens, no gestures, just your hands and the game. What if we build our own game controller, inspired by those classic days, but powered by modern hardware? That’s where this project begins. In this project, we’re going to see how to make a game controller using the Arduino Uno R4. So if you’ve ever missed those joystick days, or if you’re looking for a relaxing, satisfying project that blends nostalgia with creativity, you’re in the right place. Let’s stop the stress, bring back the joy, and build a game controller from scratch. If you are looking for more projects in Arduino, take a look at our Arduino Projects.
Introduction to the Arduino Game Controller Project
| Section | What You'll Learn |
| Components Required | Complete parts list for building your DIY Arduino game controller |
| Circuit Diagram | Detailed wiring schematic for Arduino game controller setup |
| Code & Library | Arduino game controller code with Keyboard.h library implementation |
| Working Principle | How the Arduino game controller communicates with your PC |
| Troubleshooting | Common issues and solutions for your Arduino game controller project |
Table of Contents
Components Required for Arduino Game Controller
Building a DIY Arduino game controller requires specific hardware components. The table below lists all the components required to build the Arduino Uno game controller project. These components are used to capture user input and interface the controller with the system.
| S.No | Component | Quantity | Purpose |
| 1. | Arduino Uno R4 | 1 | Acts as the main controller that reads joystick and button inputs and sends control signals to the computer. |
| 2. | Push button | 4 | Used to perform different actions in the game when pressed. |
| 3. | Joystick module | 1 | Used to control movement directions such as up, down, left, and right in the game. |
| 4. | Vero board | 1 | Used to mount and connect all components neatly for a stable setup. |
Why You Should Use These Parts in Your Arduino Game Controller Project?
∗ Arduino Uno R4: It's going to be a great choice since this board has built-in USB HID support via the Arduino Game Controller Library (Keyboard.h), which allows you to create the type of Arduino game controller that computers will automatically recognise when they are present on the computer via USB connection.
∗ Analog Joystick: This will provide you with an accurate and smooth directional input, as well as two-axis inputs (X & Y), which can then be processed into arrow key commands by the Arduino game controller code.
∗ Tactile Push Buttons: They will give you a reliable physical feedback response for gaming purposes, and since they have an internal pull-up resistor support built into the Arduino, you don't have to worry about adding that yourself.
∗ Veroboard: Using this to build your DIY Arduino game controller will give you a more permanent and professional-looking result compared to using a breadboard-type prototype.
Arduino Game Controller Circuit Diagram and Wiring
The circuit diagram shown below provides a clear understanding of how all the components are connected in the Arduino Uno game controller setup. In this setup, the Arduino Uno R4 is used as the main controller, in which the push buttons are connected to the digital pins of the controller, and the joystick module is connected to the analog pins of the Arduino Uno. The circuit diagram below shows the complete wiring schematic for this Arduino game controller project.

Arduino Game Controller Pin Configuration
| Component | Arduino Pin | Function |
| Joystick X-Axis | A0 (Analog) | Reads horizontal movement (Left/Right arrow keys) |
| Joystick Y-Axis | A1 (Analog) | Reads vertical movement (Up/Down arrow keys) |
| Button 1 | Digital Pin 2 | Mapped to 'W' key (with INPUT_PULLUP) |
| Button 2 | Digital Pin 3 | Mapped to 'A' key (with INPUT_PULLUP) |
| Button 3 | Digital Pin 4 | Mapped to 'S' key (with INPUT_PULLUP) |
| Button 4 | Digital Pin 5 | Mapped to 'D' key (with INPUT_PULLUP) |
| Joystick VCC | 5V | Power supply for joystick module |
| Joystick GND | GND | Ground connection |
Step-by-Step Instructions for DIY Arduino Game Controller Wiring
∗ Connect your joystick module to the Arduino using the following method: Joystick Module Connections: Connect the VCC of the joystick module to the 5V pin on the Arduino; Connect the GND of the joystick module to Ground (GND) pin on the Arduino; Connect VRx (X-Axis) of the joystick module to Analog Pin 0 (A0) of the Arduino; Connect VRy (Y-axis) of the joystick module to Analog Pin 1 (A1) of the Arduino. After the connections have been made, you will be able to send commands to the Game Controller to read the Analog position values of both the x and y axis of the Joystick Module.
∗ The Wiring of button switches: Connect each switch's first terminal to Digital pin 2,3,4, and 5, respectively. Connect the other terminal of all switches back to ground(GND) on the Arduino. When you include the Arduino Game Controller Library Code, it will enable internal pull-up resistances on all buttons, so no need for external pull-up resistances!
∗ Power up the Arduino: Use a USB cable to connect your Arduino to your computer. This will provide power and data connections for the Game Controller to function properly.
∗ Secure the enclosure or mount for your Arduino veroboard after you solder all connections to provide a permanent, reliable DIY Arduino Game Controller. Proper soldering will provide stability throughout intense gaming sessions.
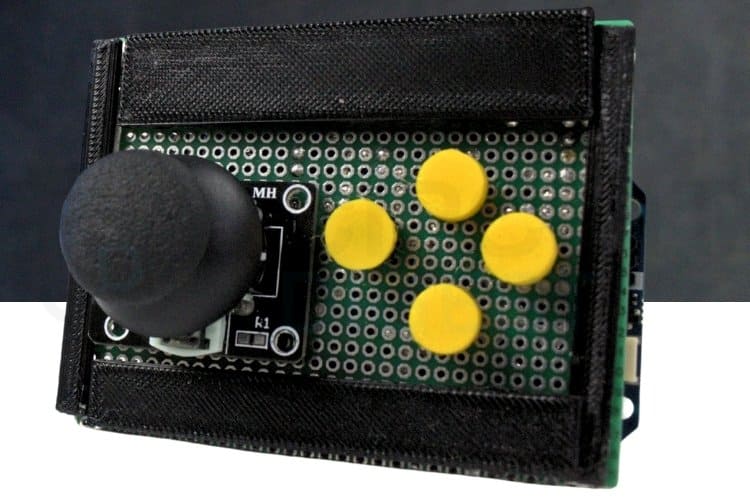
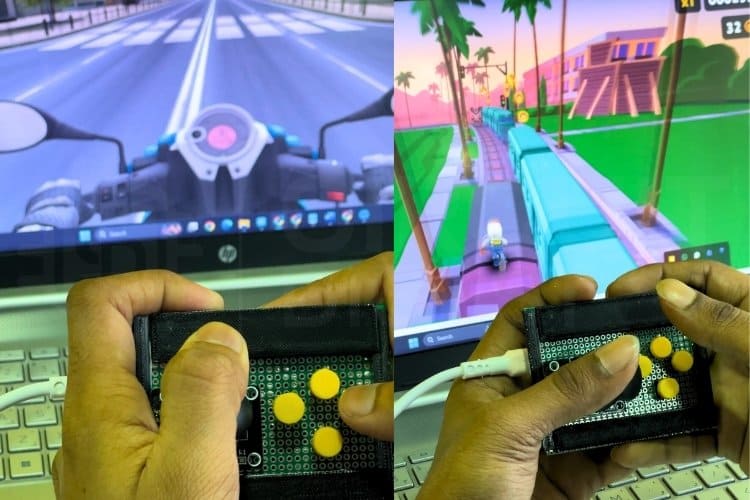
Hardware Setup: Building Your Arduino Game Controller
The hardware setup demonstrates the real-world assembly of this Arduino game controller project. The hardware setup shows how all the components are connected in real time to form a fully working system. It illustrates the practical wiring between the Arduino Uno R4, joystick module, and push buttons, allowing the controller to interact with the computer as a game input device.

How the Arduino Game Controller Works: Technical Explanation
To be able to create an Arduino game controller, one must understand USB HID (Human Interface Device) communication. When you connect the Arduino Uno R4 to your PC with a USB cable, it shows up as a standard keyboard device because of the Arduino game controller library (Keyboard.h). This means that the board can send key presses and releases directly to your PC, and there are no drivers or apps that need to be installed for this to work.
USB HID Initialization Process
Once the Arduino Uno R4 is connected to the computer using a USB cable, it is recognised as a standard keyboard device. This allows the board to send key press and release commands directly to the system. After the initial USB detection, the Arduino continuously monitors the joystick module and push buttons to capture user input in real time.
Joystick Input Processing
The joystick module provides analog values based on its position along the X and Y axes. When the joystick is at the center, the values remain within a predefined dead-zone range, preventing unintended movement. As the joystick is pushed in any direction, the analog values move beyond the threshold limits. The Arduino compares these values and accordingly sends the corresponding arrow key inputs (up, down, left, or right) to the computer, enabling smooth directional control in games.
Button Input Handling
The push buttons are configured using internal pull-up resistors, meaning they remain in a HIGH state when not pressed. When a button is pressed, it connects the input pin to ground, changing the state to LOW. The Arduino detects this change and sends the mapped keyboard key to the computer. When the button is released, the key input is also released, ensuring precise and responsive action control. Button Input Handling
Real-Time Input Loop
Through this continuous process of reading inputs and sending keyboard signals, the Arduino Uno R4 converts physical joystick movements and button presses into digital commands. This allows the diy arduino game controller to behave like a real game controller, providing an interactive and enjoyable gaming experience while demonstrating practical human-interface device communication.
Why This Approach Works for Gaming
The Universal-Controller Arduino Game Controller does not use the standard Game Controller interface (gamepad/joystick HID) for the game input device; instead, it uses the keyboard interface, which gives it universal compatibility, as about 99% of PC games support keyboard as an input device; therefore, you can use this DIY Arduino Game Controller with thousands of PC games with no special configuration. However, the downside to this implementation is that digital inputs do not support analog trigger inputs (create a difference between pushing and holding the trigger), but since many of the genres that will use this device are platform, fighting and retro arcade type games, the digital buttons are consistent with the type of controller that will be used.
The Arduino Uno R4 will process the input signals continuously by reading the inputs and sending out keyboard signals, and as a result, the Arduino game controller will convert the analog movements and button presses of the physical joystick into digital commands that the DIY Arduino Game Controller will have the same function as a real game input device and provide a pleasurable and interactive gaming experience, as well as demonstrate an example of how an Arduino can be used as a human interface device. Let’s take some time to explore our electronics projects and discover more in the field of electronics.
Arduino Game Controller Code: Complete Programming Guide
This section provides the complete Arduino game controller code with detailed explanations. This code enables the Arduino Uno R4 to function as a simple USB game controller using a joystick module and push buttons. By emulating a keyboard device, this DIY Arduino game controller allows seamless interaction with PC games using basic hardware components. The joystick controls directional movement through keyboard arrow keys, while the buttons trigger predefined keyboard inputs. If you have seen the Mr Bean series in your childhood days, check out this fun project: Make a Buzz Wire Game with an Arduino.
Arduino Game Controller Library Setup and Pin Definitions
#include <Keyboard.h>
const int joyX = A0;
const int joyY = A1;
const int buttonPins[4] = {2, 3, 4, 5};
The Keyboard.h library allows the Arduino Uno R4 to behave like a USB keyboard. The joystick’s X and Y axes are connected to analog pins A0 and A1, while four push buttons are connected to digital pins 2 to 5 to act as game control inputs.
Threshold Values and Key Mappings
const int LOW_TH = 350;
const int HIGH_TH = 670;
const char buttonKeys[4] = {'w', 'a', 's', 'd'};
The dead-zone thresholds prevent unwanted joystick movement when it is near the center position. Each push button is mapped to a keyboard key commonly used in games, allowing simple button presses to trigger in-game actions.
Setup Function: Initializing the Arduino Game Controller
void setup() {
 for (int i = 0; i < 4; i++) {
   pinMode(buttonPins[i], INPUT_PULLUP);
 }
 delay(3000);
 Keyboard.begin();
}
Push buttons are configured using internal pull-up resistors, reducing external components. A short delay ensures proper USB detection before initializing the keyboard interface, allowing the computer to recognize the Arduino as an input device.
if (x < LOW_TH) Keyboard.press(KEY_LEFT_ARROW);
if (x > HIGH_TH) Keyboard.press(KEY_RIGHT_ARROW);
if (y < LOW_TH) Keyboard.press(KEY_UP_ARROW);
if (y > HIGH_TH) Keyboard.press(KEY_DOWN_ARROW);
The joystick position is continuously monitored, and corresponding arrow keys are pressed based on movement direction. Button states are also checked in real time, sending mapped keyboard inputs when pressed and releasing them when not pressed, enabling smooth game control.
Arduino Game Controller Troubleshooting Guide
Issue 1: Arduino is not detected as a keyboard
Ensure that the correct board (Arduino Uno R4) is selected in the Arduino IDE and that the Keyboard.begin() function is used properly. The USB enumeration delay is significant, so do not remove the delay before initializing the keyboard. Also, try reconnecting the USB cable or using a different USB port.
Issue 2: Joystick movement is detected even when untouched
This happens due to small variations in analog readings. Adjust the dead-zone threshold values (LOW_TH and HIGH_TH) based on the joystick’s resting position. Increasing the dead zone will prevent unwanted movement.
Issue 3: Buttons trigger actions without being pressed
Check whether the buttons are connected correctly with one side to ground. Make sure the INPUT_PULLUP mode is enabled in the code. Loose wiring or floating inputs can also cause this issue, so ensure firm connections on the Vero board.
Issue 4: Keys remain pressed after releasing the joystick or button
This usually occurs when the corresponding Keyboard.release() function is not executed. Ensure that every Keyboard.press() has a matching release condition in the code. Adding a small delay also helps stabilise key press behaviour.
Issue 5: The game does not respond to controller inputs
Some games require custom key mapping. Open the game’s control settings and assign movement and actions to the arrow keys and the chosen button keys (W, A, S, D). Also, confirm that the game supports keyboard-based controls.
Conclusion: Your Journey with Arduino Game Controller Development
The Arduino game controller project demonstrates how joystick and push-button inputs can be effectively used to control computer-based applications through keyboard emulation. By converting physical movements and button presses into digital key commands, the system provides a responsive and intuitive control interface. This Arduino game controller highlights the practical implementation of human-computer interaction using simple hardware components. The implementation also shows the reliability of real-time input processing and USB communication without the need for additional drivers. Overall, the system serves as a compact and efficient solution for understanding input device design, control logic, and interactive application development. If you are interested in exploring more projects related to gaming, you can refer to projects such as the Arduino-based Angry Bird Game Controller using a Flex Sensor and Potentiometer, and the Joystick Game Controller using Arduino Leonardo. This tutorial was created by the CircuitDigest engineering team. Our experts focus on creating practical, hands-on tutorials. We hope this comprehensive guide on how to make an Arduino game controller has been helpful and inspiring. Happy building, and enjoy your custom-made gaming experience!
Key Takeaways from This Arduino Game Controller Project
The Arduino Uno R4 is great for creating input devices with the Arduino game controller library.
» Real-Time Processing: Continuous polling in the loop() function allows real-time response times for gaming applications.
» Dead-Zone Implementation: Setting threshold values prevents possible false input and joystick drift when making your Arduino game controller.
» Universal Compatibility: Keyboard emulation works across tens of thousands of games without needing special drivers or configuration.
» Expandability: The Arduino game controller code can have additional features, such as LED feedback, multiple control modes, and/or wireless capabilities, developed as required.
Frequently Asked Questions: Arduino Game Controller
⇥ Can this controller be used with any PC game?
Most PC games that support keyboard controls can be used. The joystick and buttons work by sending keyboard key inputs, so games with customizable control settings are ideal. Games that require only keyboard input will work best.
⇥ Why is a delay added before starting the keyboard function?
The delay allows the computer to properly detect the board as a USB input device. Without this delay, the keyboard interface may not initialise correctly. This ensures stable and reliable communication with the system.
⇥ What is the purpose of the joystick dead zone?
The dead zone prevents unwanted movement when the joystick is in its neutral position. Small variations in analog readings can cause false inputs. Setting a dead zone helps maintain smooth and accurate control.
⇥ Can the button functions be changed?
Yes, the button functions can be easily modified in the code. Different keyboard keys can be assigned based on user preference or game requirements. This makes the control setup flexible and customizable.
⇥ What are the various types of Arduino boards that can use the Arduino Game Controller Library (Keyboard.h)?
If you’re using an Arduino board with native USB capabilities, then your Arduino Game Controller library can utilise (where by a similar term means that they work with all the same keys as) Arduino Uno R4S (WiFi & Minima), Arduino Leonardo, Arduino Micro, Arduino Due Boards without another piece of hardware. Alternatively, the Arduino Uno R3 will not work with the Keyboard.h library until [upon completing] appropriate hardware modifications are made.
⇥ What are the distinctions between writing a keyboard emulator when using Game Controller Users, with emulators?
Using “keyboard emulation” with the Arduino Game Controller (using Keyboard.h library) provides a greater selection of games to play than trying to run games on the Game Pad HID, as keyboard emulators only have on and off positions set with no analog movement.
⇥ Why does it take my Arduino Game Controllers three seconds before they are operational?
The three-second delay between the start-up routine of the Arduino Game Controller and your computer being able to locate/identify the Arduino Game Controller via USB is necessary as part of the USB initialization process and cannot be eliminated.
Arduino Game Controller GitHub Repository
Access the complete Arduino game controller code, circuit diagrams, and additional resources for this project in our GitHub repository. The repository includes the full Arduino game controller library implementation, wiring schematics, and troubleshooting documentation to help you build your own DIY Arduino game controller successfully.


Similar DIY Gaming Projects
Explore hands-on gaming and interactive tech projects, including retro consoles, Arduino games, and smart fitness controllers.

DIY Raspberry Pi Gaming Console using RetroPie
This project shows how to turn a Raspberry Pi into a full-fledged retro gaming console using RetroPie - a software platform that runs on Raspberry Pi and lets you emulate classic video game systems. RetroPie is built on top of the Raspberry Pi’s Raspbian (Raspberry Pi OS) and includes a collection of emulators and the EmulationStation interface so you can play retro games in one place.

Creating Tetris Game with Arduino and OLED Display
This project shows you how to build your own Tetris game using an Arduino Nano and a small OLED display. The idea is to program the classic block-dropping game so it runs directly on a microcontroller, with button controls and on-screen graphics - all powered by simple, affordable components.

Snake Game on 8x8 Matrix using Arduino
Snake game has become a very popular DIY project for electronics hobbyists and Students. So today we are going to demonstrate the Arduino Snake Game, with all its basic functionalities, while keeping it simple at the same time.
Complete Project Code
#include <Keyboard.h>
// Joystick pins
const int joyX = A0;
const int joyY = A1;
// Button pins
const int buttonPins[4] = {2, 3, 4, 5};
// Dead zone
const int LOW_TH = 350;
const int HIGH_TH = 670;
// Button key mapping
const char buttonKeys[4] = {'w', 'a', 's', 'd'};
void setup() {
 // Buttons
 for (int i = 0; i < 4; i++) {
   pinMode(buttonPins[i], INPUT_PULLUP);
 }
 delay(3000);        // USB enumeration delay (VERY IMPORTANT)
 Keyboard.begin();
}
void loop() {
 // -------- JOYSTICK --------
 int x = analogRead(joyX);
 int y = analogRead(joyY);
 if (x < LOW_TH) Keyboard.press(KEY_LEFT_ARROW);
 else Keyboard.release(KEY_LEFT_ARROW);
 if (x > HIGH_TH) Keyboard.press(KEY_RIGHT_ARROW);
 else Keyboard.release(KEY_RIGHT_ARROW);
 if (y < LOW_TH) Keyboard.press(KEY_UP_ARROW);
 else Keyboard.release(KEY_UP_ARROW);
 if (y > HIGH_TH) Keyboard.press(KEY_DOWN_ARROW);
 else Keyboard.release(KEY_DOWN_ARROW);
 // -------- BUTTONS --------
 for (int i = 0; i < 4; i++) {
   if (digitalRead(buttonPins[i]) == LOW) {
     Keyboard.press(buttonKeys[i]);
   } else {
     Keyboard.release(buttonKeys[i]);
   }
 }
 delay(10);
}
