

It’s all started with a small game from the dark ages called “Mario”, right from the time of being a tiny little guy jumping on ducks to save my princess till being a masculine handsome Prince roaming in Persia (Prince of Persia) fighting against darkness to save my world behind I have been a great fan of playing video games and I grew up playing them. But they do get bored up sometimes and I feel less involved into it. Today, the advanced gaming consoles enables virtual gaming and helps us to feel the game a lot more better than a keyboard or a mouse can do.
Being an Arduino Enthusiast I tired playing the famous game called “Angry Birds” using keyboard & mouse and decided to build my own Game Controller using a Flex Sensor and a Potentiometer. When the flex sensor is pulled the bird on the catapult will also be pulled and you can use the potentiometer to set the direction in which it should be launched. Then when you release the flex sensor the bird will be launched. I pretty much enjoyed doing it, so if you are up to building something very similar then this tutorial will be a helpful. This tutorial will also be helpful in Controlling Mouse Cursor using Potentiometer.
Software and Hardware Requirements:
Software:
- Arduino IDE
- Processing IDE
- Angry Birds Game on Computer
Hardware:
- Arduino (Any Version)
- Potentiometer
- Flex Sensor
- 47K ohm Resistor
- Connecting Wires
- Breadboard

Concept Behind:
The Arduino Board reads the values from the Potentiometer and Flex Senor and Transmits them to the Laptop/PC through USB COM port via normal Serial.write() function. We then read this information using Processing and control the mouse cursor using the Robot class in Java which is supported by processing IDE. We have programmed the processing IDE in such a way that when the Flex sensor is pulled a mouse click will be made and based on how much it is pulled the mouse pointer will move in X direction. Then based on the value from potentiometer we will move the mouse cursor in Y direction, this way we can set the direction in which bird should be launched.
Circuit Diagram:
The circuit for playing the Angry Bird using Flex Sensor and Potentiometer is easy.
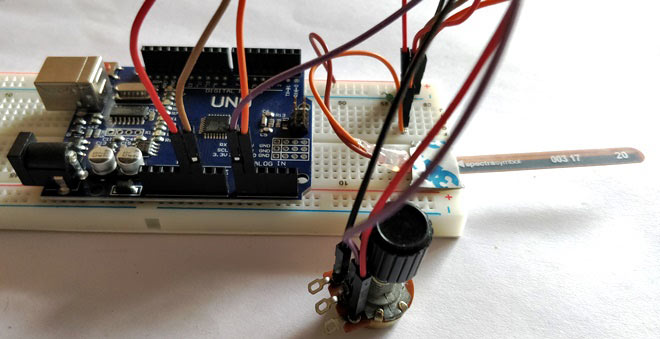
We have simple connected a potentiometer and a flex sensor to the Analog inputs (A0,A1) of the Arduino. The output of the Flex sensor is also pulled down using a 47K pull down resistor.
You can directly connect it on breadboard or solder them to a Perf board and assemble it on a gloves or something to make it more creative. I have simply used a breadboard to do my connections as shown below:

Arduino Program:
The complete Arduino code is given at the end of the tutorial. Few important lines are explained below.
We initialize the program to work with 9600 baud rate and start reading the values from Flex sensor and Potentiometer. As we know serial.write() function can send only one byte of data at a time. Since One byte is 8 bits and 2^8 = 256. We will be able to send values from 0 to 256. So we have to compress the values of Flex sensor output and Potentiometer Output into 0 to 256.
To do that we use the map() function in Arduino. All the values from the flex sensor are converted from 5 to 100, so when we bend the sensor it will increment from 5 and when released it will go back to 5. To mention the mouse clicks the value 1 and 0 is used. When 1 is sent the mouse is pressed and when 0 is sent the mouse is released.
  if (FlexValue>=65 && FlexValue<=120) //my flex sensor varies from 65 to 120, your might be different
  {
  FlexValue = map (FlexValue,120,65,0,100);  //based on bending convert to 0 to 100
  if (FlexValue>=5) // 1 and 0 is used for mouse click so start from 5
   {
   Mclick=true;
   Serial.write(1);  //1 is sent to make mouse left click
   Serial.write(FlexValue); //Flex value is the distance to move mouse in X direction
   }
  else
  {
  Mclick=false;
  Serial.write(0);}
  }
Similarly the values form the potentiometer is converted from 101 to 200 sing the map() function and is send to the Laptops COM port suing the Serial.write() function as shown below.
if (potValue<=200)
 {
  potValue = map(potValue,0,200,101,201); //Based in turn convert to 101 to 201
  Serial.write(potValue); //Pot value is the distance to move mouse in Y direction
 }
The rest of the program is explained using the comments.
Processing Code:
Processing is an Open-Source development application and can be easily downloaded and put to use for developing interesting projects using Arduino or other Microcontrollers. We have already done few projects using Processing and you can check them out by clicking on the links below.
- DIY FM Radio Using Processing
- Virtual Reality/ Gesture control using Arduino
- Private Chat room using Arduino.
- Arduino Radar System using Processing APP and Ultrasonic Sensor
- Real Time Face Detection and Tracking using Arduino
- DIY Speedometer using Arduino and Processing
- Ping Pong Game using Arduino Accelerometer
- Biped Robot Using Arduino
- DIY Arduino Thermal Imaging Camera
In this project we have used the processing IDE to read the COM port values and control the mouse pointer based on the values received via the COM port. The complete Processing Code for this Angry Bird Game Controller can be downloaded from the below link:
- Processing Code for this Angry Bird Game Controller (right Click and 'Save link as')
Arduino Program can be found at the end of this tutorial. The Processing code was modified to fit for our purpose from the code given by yoggy on his GitHub page.
The data coming from the COM port should be read in the same baud rate in which it was sent from Arduino. Also check which COM port your Arduino is connected by using the device manager. My Arduino was connected to COM3 and it was the 0th Port in my computer and the baud rate in Arduino was 9600 so the code is as follows
port = new Serial(this,Serial.list()[0],9600);
Once we start reading the values we distinguish it by recognizing it based on its value on how we sent from Arduino. The values are again mapped from 0 to 100 so that we will be able to control the mouse based in that value.
if (port.available()>0)
  {
    data=port.read();
    println(data); //Read the data from COM port and save it in data
  }
  if (data>=101 && data<=201) //If the value if from 101 to 201 then it must be from Potentiometer
  {
    Turn = int (map (data,101,201,0,100)); //Use that value to turn the catapullt
  }
  if (data>=5 && data <=100)  //If the value if from 5 to 100 then it must be from Flex Sensor
  { Pull = int (map(data,5,100,0,100));} //Use that value to pull the catapult
  if (data == 1)
  click = true; //Use that value to press the mouse button
  if (data == 0)
  click = false; //Use that value to release the mouse button
Once we categorize the data we can then control the mouse using the Robot Java Class in Processing. The command robot.mouseMove(crntX-Pull, crntY+Turn); can be used to move the mouse to any desired position and the lines robot.mousePress(InputEvent.BUTTON1_DOWN_MASK); and robot.mouseRelease(InputEvent.BUTTON1_DOWN_MASK); can be used to press or release the mouse button respectively.
  if (click == false) //when Flex Sesnor is not pulled
  {
  crntX = (int)p.getX() ; crntY = (int)p.getY() ;
  if (Pull>50)
  robot.mouseRelease(InputEvent.BUTTON1_DOWN_MASK); //Release the mouse button
  }
  if (click == true) //when Flex Sesnor is pulled
  {
   robot.mousePress(InputEvent.BUTTON1_DOWN_MASK); //Press the mouse Button
   robot.mouseMove(crntX-Pull, crntY+Turn); //Move the mouse based on the Flex and POT value
  }
}
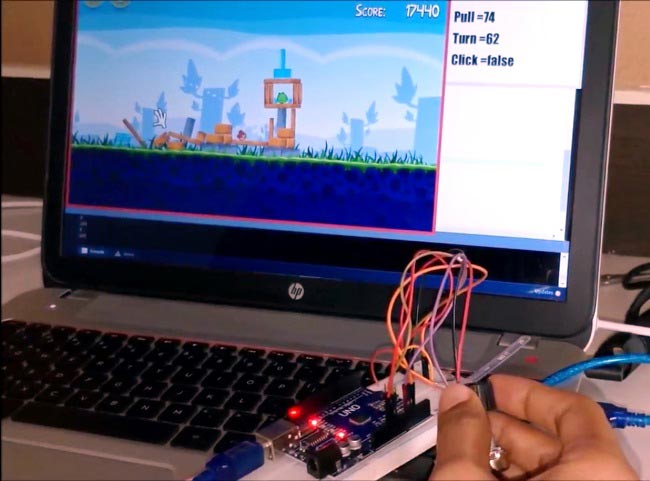
The processing IDE when launched will also display a small dialog Box on which you can find the values of Pull, Turn and status of Mouse Click as shown below

This detail can be used to debug the Program or correct any data required.
Working:
To make this Angry Bird Project work using the code provided, assemble your hardware according to the circuit diagram and upload the given Arduino Code. Then Note which COM port your Arduino is connected to and make the necessary changes in the Processing code and launch the processing sketch.
Now, simply launch the angry bird game and place you cursor near the catapult and pull the flex sensor to pull the bird and set the direction using the potentiometer. Once the direction is set release the Flex sensor
EEEEWWWWWEEEEEEEEEE!!!!!!!!!!...............
You bird will be tossed right into the air and BOOMM!! On the piggies. The complete working can be found in the Video given below.
Hope you enjoyed the project and were able to build something similar. If you have any doubts you can reach me on the comment section or post your question on the forum for technical questions.
Now, time to crash into those piggy boxes and get back our birds eggs!!!!
Complete Project Code
/*
 * Angry Bird Game Controller Program
 * Code by : B.Aswinth Raj
 * Dated : 3-8-2017
 */

void setup() {
  Serial.begin(9600); //Transmit at 9600 Baud Rate
}
boolean Mclick = false;
void loop() {
  int potValue = analogRead(A0); //variable to store potValue
  int FlexValue = analogRead(A1); //variable to store Flex Value
 // Serial.println(FlexValue);
 // Serial.print("POT: ");
 // Serial.println(potValue);
 // Serial.print("Flex: ");
  if (FlexValue>=65 && FlexValue<=115) //my flex sensor varies from 65 to 120, your might be different
  {
  FlexValue = map (FlexValue,120,65,0,100);  //based on bending convert to 0 to 100

  if (FlexValue>=5) // 1 and 0 is used for mouse click so start from 5
   {
   Mclick=true;
   Serial.write(1);  //1 is sent to make mouse left click
   Serial.write(FlexValue); //Flex value is the distance to move mouse in X direction
   }
  else
  {
  Mclick=false;
  Serial.write(0);}
  }
  else
   {
  Mclick=false;
  Serial.write(0);}

 if (potValue<=200)
 {
  potValue = map(potValue,0,200,101,201); //Based in turn convert to 101 to 201
  Serial.write(potValue); //Pot value is the distance to move mouse in Y direction
 }
  delay(500);     //stability delay
}
Comments
If the dialog box is launched. It means that the program itself has not launched.
You should have received a error on the console (black color areas at the bottom of the Processing IDE). Post the error here so that I can help you with it.
Hello, from where do I download the angry birds game online for my PC, does it work through bluestacks? Thanks. The project is amazing :)
how can i manipulate the value of flex sensor in the code???
The variable flexValue is compared with some know values in the program. You can directly manipulate these values in the program, the comment lines also state the same
Hiiii,where can i get reference paper for this controller.if any one had any reference paper,pls send to me.
By "controller" are you referring to Arduino?. You can find details about arduino all over the internet
Turn and pull values are fastly oscillating when processing ide program is runed???i cant control the turn and pull...help me plzz!
everything is working fine but the problem is that pull function is not working.iam pulling the flex sensor but the output is not coming.
please help me soon.
i have only one day to make this project in working condition
iam getting tis error help me please
Type String[] of the last argument to method println(Object...) doesn't exactly match the vararg parameter type. Cast to Object[] to confirm the non-varargs invocation, or pass individual arguments of type Object for a varargs invocation. mouse_control_using_flex_sensor 25

processing ide doesn't launching the dialogue box for pull, turn and mouse position