

Flying a drone manually requires constant attention to throttle control. One moment of distraction and your drone either crashes into the ground or flies away into the ceiling. If you're building your LiteWing from scratch, check out our detailed step-by-step LiteWing assembly guide to get started with your build. This is where Drone height hold mode becomes a game-changer for drone pilots of all skill levels. Height hold drone automatically maintains your drone at a specific height, letting you focus on horizontal movement while the flight controller handles the vertical stability.
The LiteWing drone, an open-source ESP32-powered drone that evolved from our popular DIY WiFi-controlled drone project, makes implementing altitude hold mode drone surprisingly straightforward. Unlike expensive commercial drones that come with this feature built in, height hold mode in LiteWing allows you to understand and build this functionality yourself. In this tutorial, we'll walk you through adding height hold capability to your LiteWing using the VL53L1X Time-of-Flight (ToF) sensor using both the cfclient software and our updated LiteWing mobile App. The LiteWing includes dedicated solder pads on the bottom side of the PCB frame to attach the off-the-shelf VL53L1X module directly.
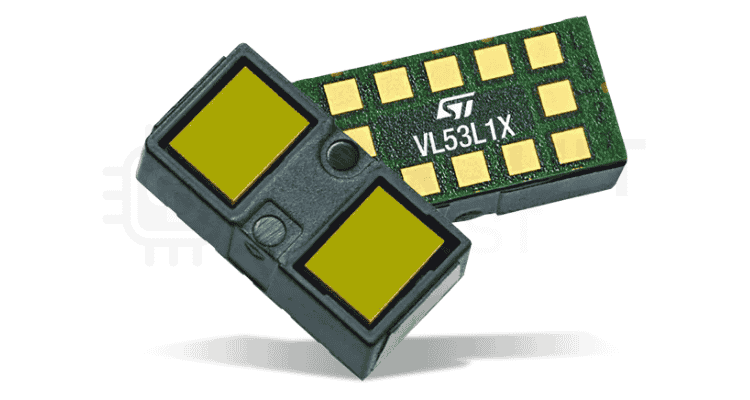
This laser-ranging sensor provides millimetre-accurate distance measurements up to 4 meters, making it perfect for indoor flight applications and precise altitude control drone operations. The VL53L1X communicates over I2C and integrates seamlessly with LiteWing's existing flight control firmware. Once connected, the sensor continuously measures the distance to the ground, and the flight controller uses this data to adjust motor speeds and maintain your desired height automatically.
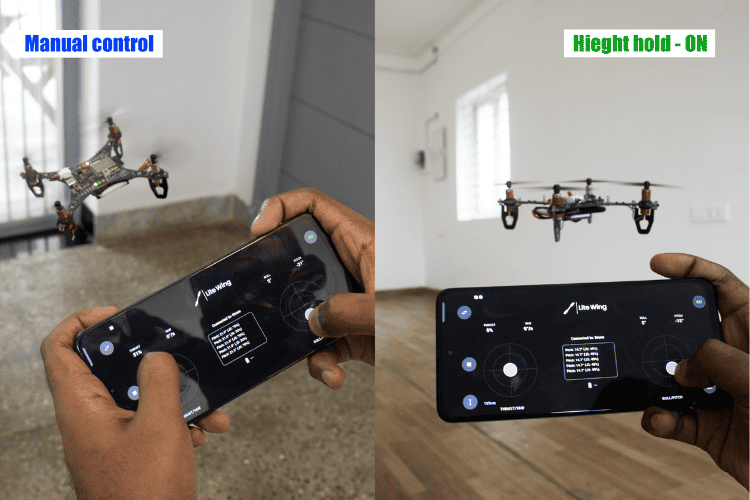
Table of Contents
Manual Control vs Height Hold Mode
| Feature | Manual Control | Height Hold Mode |
| Throttle Management | Constant pilot input required | Automatic altitude maintenance |
| Skill Level Required | Intermediate to advanced | Beginner-friendly |
| Stability | Depends on pilot skill | Consistent hovering height |
| Battery Efficiency | Variable (pilot-dependent) | Optimized for longer flight time |
| Best Use Case | Acrobatic flying, racing | Aerial photography, surveying, learning |
What is Height Hold Mode in Drones?
Height hold mode will convert your drone from being operated manually on your behalf to an autonomous height-holding platform. This mode uses multiple sensors along with advanced algorithms to hold a set height without input from the user, which is necessary for reliable operations.
The Significance of Height Hold:
- Hands-free hover: Can maintain an altitude and gives the operator the ability to concentrate on video capture or avoiding obstacles.
- Decreased workload: Relieves the pilot from frequent throttle control, particularly important for less experienced pilots.
- More time in the air: Allows for optimal performance of the motors to gain more time in the air by not using unnecessary power to gain or lose height.
- Increased safety: Prevents unintended loss of controlled altitude that could cause a crash or fly-away.
- Better Aerial Photography: A stable platform allows for smoother video and pictures, and will produce higher quality.
- Increased accuracy: A must for indoor pilots and for inspection work and confined spaces.
How Height Hold Mode Works
Height hold in drone mode transforms your drone from a manually controlled aircraft into an autonomous hovering platform. This advanced altitude control drone uses multiple sensors and sophisticated algorithms to maintain a constant height without pilot intervention.
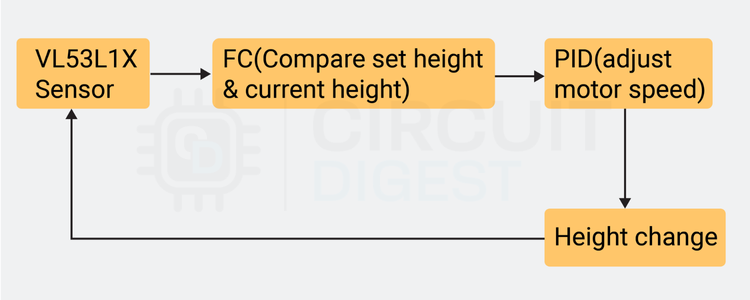
Drone's height hold operates as a closed-loop feedback control system that continuously compares the drone's actual height with a predetermined target height. When you activate height hold mode, the flight controller captures the current height as the reference point and works to maintain this position regardless of external disturbances.
The height hold in drone systems consists of several interconnected components working in perfect harmony:
- Sensor Array: Multiple height measurement devices provide redundant height data
- Flight Controller: The central processing unit that interprets sensor data and makes control decisions
- PID Controller: A mathematical algorithm that calculates precise motor adjustments
- Motor Control System: Electronic speed controllers that modify rotor speeds based on flight controller commands
- Feedback Loop: Continuous sensor readings create a responsive system that adapts to changing conditions
Types of Sensors Used for Altitude Control in Drones
Modern altitude hold mode drone systems employ various sensor technologies for height measurement, each with distinct advantages and limitations. Understanding these differences helps you choose the right sensor for your specific altitude control drone application.
| Sensor Type | Range | Accuracy | Best For | Limitations |
| Barometric Pressure | Unlimited altitude | ±1-3 meters | Outdoor high-altitude flight | Weather-dependent, measures altitude not ground distance |
| Ultrasonic | 0-8 meters | ±2-5 cm | Low-cost indoor applications | Affected by soft surfaces, wind interference |
| ToF Laser (VL53L1X) | 0-4 meters | ±1 mm | Precision indoor hovering | Limited range, bright sunlight interference |
| GPS + Barometer | Unlimited | ±2-5 meters | Outdoor navigation, waypoints | No indoor functionality, GPS dependency |
Barometric Pressure Sensors for Height Hold
Barometric Pressure Sensors measure atmospheric pressure changes to determine altitude. These sensors work well for maintaining height over large areas, but can be affected by weather changes and air currents. They're particularly useful for outdoor flight at higher altitudes where pressure differences are more pronounced.
Technically, this is altitude hold rather than height hold, since barometric sensors measure altitude above sea level (absolute altitude) rather than distance from the ground below (relative height). A drone using only barometric sensors will maintain the same pressure altitude even if flying over terrain that rises or falls, potentially resulting in varying distances from the ground. For this reason, barometric sensors are often combined with ground-relative sensors like ToF or ultrasonic for comprehensive altitude control drone systems.
Ultrasonic Sensors for Height Hold
Ultrasonic Sensors emit sound waves and measure the time for echoes to return from the ground. While cost-effective and reliable at close range (typically under 8 meters), they can struggle with soft surfaces like grass or carpet that absorb sound waves. Wind can also deflect the sound waves, causing inaccurate readings and affecting drone height hold performance.
Time-of-Flight (ToF) Laser Sensors for Precision Height Hold
Time-of-Flight (ToF) Laser Sensors use infrared laser pulses to measure distance with high precision. These sensors offer excellent accuracy across various surface types and lighting conditions, making them ideal for indoor flight and precise hovering applications. ToF sensors are the preferred choice for height hold mode in LiteWing and similar DIY drone projects.
PID Controller: The Brain Behind Height Hold Mode
The heart of height hold in drone functionality lies in the PID controller algorithm, just as with other flight controller functionalities that utilise PID. This mathematical system doesn't just react to height errors—it predicts and prevents them. The PID controller continuously adjusts motor speeds dozens of times per second to maintain the desired height.
VL53L1X ToF Sensor for Implementing Drone Height Hold
The VL53L1X Time-of-Flight sensor represents cutting-edge technology specifically designed for precise distance measurement in drone measurement in drone height hold applications. This laser-ranging sensor provides the accuracy and reliability essential for effective altitude hold mode drone functionality. The VL53L1X operates using Class 1 laser safety standards, emitting infrared light at a 940nm wavelength.
VL53L1X Technical Specifications for Height Hold
| Measurement Range: | 4cm to 4 meters with high accuracy |
| Update Rate: | Up to 50Hz for real-time altitude feedback |
| Accuracy: | ±3% at 1 meter distance under optimal conditions |
| Field of View: | Narrow 27° cone for precise ground targeting |
| Supply Voltage: | 2.6V to 3.5V operation |
| Interface: | I2C communication protocol |
| Current Consumption: | 20mA active, 5μA standby |
The VL53L1X uses Direct Time-of-Flight measurement, where the sensor emits short infrared laser pulses and measures the precise time required for light to travel to the target and return. Unlike indirect ToF methods that measure phase differences, direct ToF provides absolute distance measurements independent of surface reflectivity variations.
The sensor incorporates a Vertical Cavity Surface Emitting Laser (VCSEL) array and a Single Photon Avalanche Diode (SPAD) detector array. This combination enables the detection of individual photons, allowing measurements even from surfaces with low reflectivity. For optimal flight time with height hold enabled, selecting the right battery is essential, learn more in our comprehensive guide on how to choose the right battery for your LiteWing drone.
Limitations of VL53L1x ToF Sensor
While highly effective, the VL53L1X has operational limitations:
- Bright Light Interference: Intense sunlight or bright artificial lighting can saturate the photon detector, reducing accuracy
- Maximum Range: A 4-meter limit requires alternative sensors for higher altitude operations
- Power Consumption: Active laser operation draws more current than passive sensors
- Reflective Surfaces: Highly reflective surfaces may cause measurement errors due to specular reflection
VL53L1X Module

For ease of use, we have used an off-the-shelf VL53L1x module with the LiteWing. We have connected it to the LiteWing drone using SMD male pin headers. Keep in mind that there are different modules with different boards and pin layouts in the market. So, choose the one that looks similar to the one shown in the above picture if you are planning to attach it to the bottom pads of the LiteWing.
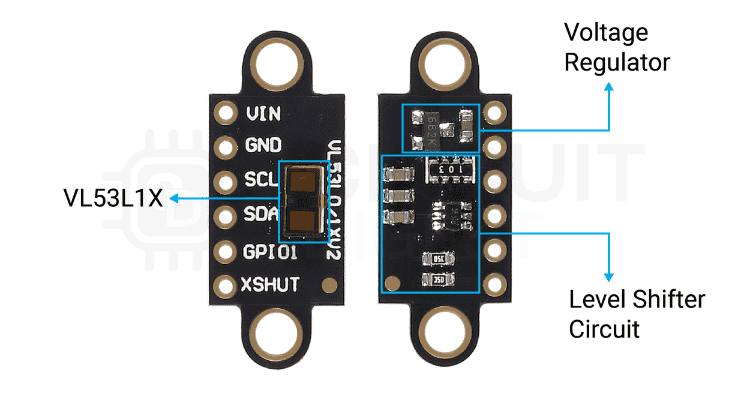
VL53L1X Module Parts Marking
The image below shows the typical component arrangement in a VL53L1x module. As you can see, the module has a bare minimum of components. Apart from the VL53L1x sensor itself, the module has a 3.3V regulator along with level-shifting circuitry and some bypass capacitors. The inbuilt voltage regulator and the level-shifting circuit ensure that the module can be used with either 5V or 3.3V circuits.
VL53L1X Module Pinout and Connections
Standard breakout modules feature the following pin configuration:
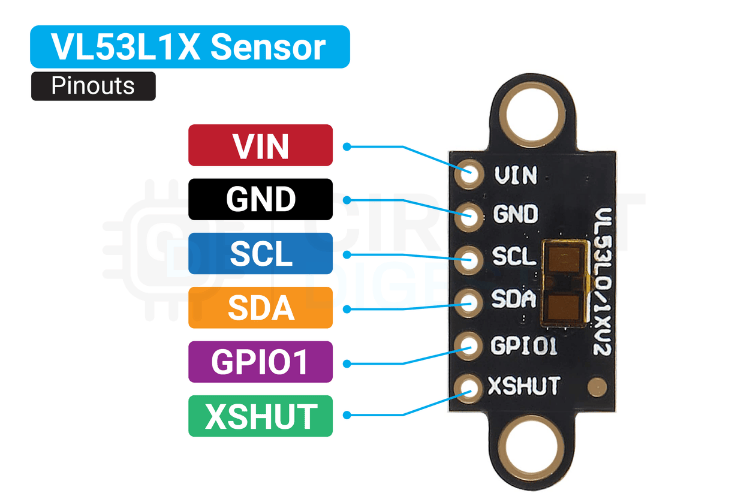
VIN - Positive Voltage Input Pin.
GND - Ground Voltage Input Pin.
SCL - I2C Serial Clock Pin.
SDA - I2C Serial Data Pin.
GPIO1 - Interrupt output.
XSHU - Shutdown Pin, Active Low.
The VIN pin is used to supply power to the module. It typically accepts a regulated input voltage such as 3.3V or 5V, depending on the board design. The GND pin serves as the electrical ground, providing a common reference point for the power supply and signal levels. Communication with the module is achieved via the I2C interface, which uses two pins: SCL for synchronising data transfer, and SDA for sending and receiving data between the sensor and the microcontroller. In addition to these, the module includes a GPIO1 pin, which can be configured as an interrupt output to notify the host system when new ranging data is available or when a specific condition is met. Lastly, the XSHUT pin functions as a hardware shutdown control. It is an active low input, meaning the module enters a low power state when this pin is pulled to ground, and resumes normal operation when driven high.
Installing VL53L1X Sensor for Height Hold Mode in LiteWing
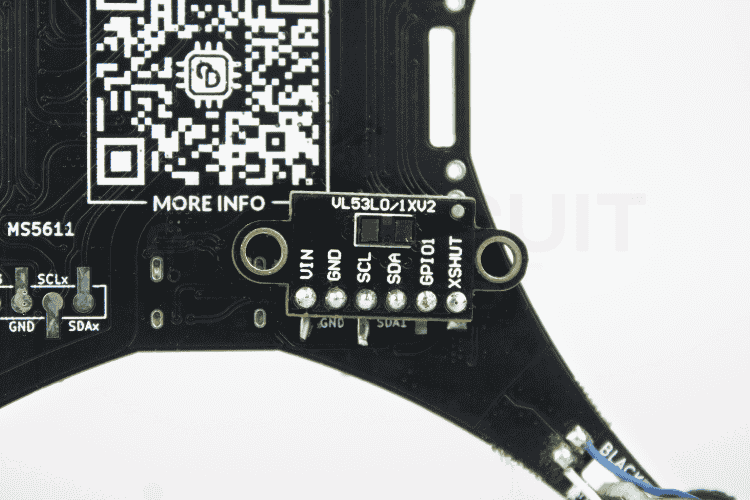
In the LiteWing platform, the VL53L1X connects to the flight controller via the secondary I2C interface, since the primary I2C in LiteWing is used to connect with the IMU onboard. The sensor mounts on the drone's underside with the laser aperture facing downward. You can either use the dedicated pads on the bottom side of the LiteWing or the SDA1 and SCL1 pins available on the GPIO header to interface the VL53L1x sensor module with LiteWing, streamlining the drone height hold setup process.
.
Flying LiteWing in Height Hold Mode
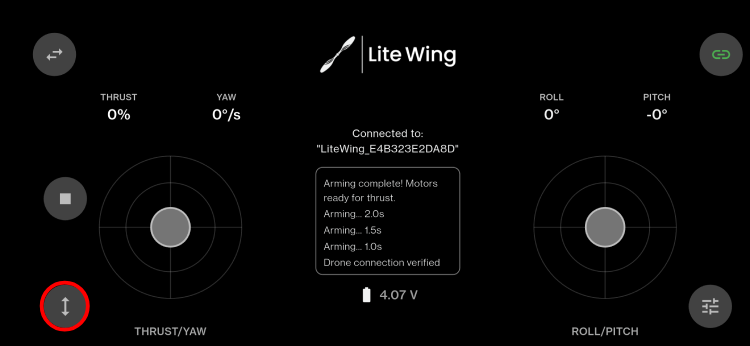
Now that we are familiar with how the drone height hold works, let's look at how to use it. Flying the LiteWing drone is pretty easy. For that, make sure to attach the VL531X sensor module securely to the LiteWing drone. Once done, all you have to do is first install the latest version of the LiteWing App from the Google Play Store or the Apple App Store. To know more details about configuring and using the LiteWing app, please check out our LiteWing app tutorial( hyperlink). Once the app is configured properly, open the app and connect to the drone. Once it's connected, click on the height hold button. Flying the LiteWing with height hold mode in LiteWing activated transforms your piloting experience, making stable hovering as simple as pressing a button.
Now, when the set target height option is shown, set your desired height for the drone and click on the start button.
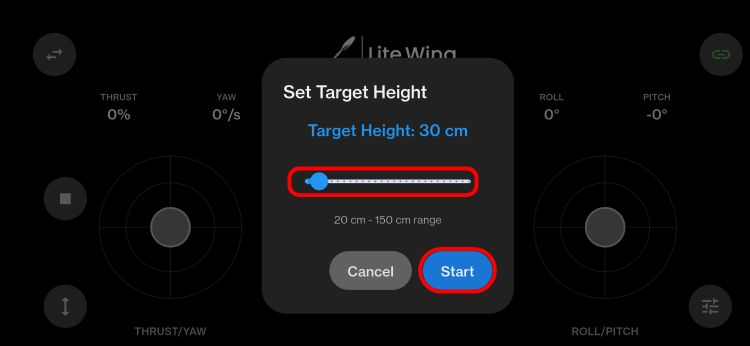
The drone will count down to three and take off on its own. Once the set height is reached, the LiteWing will automatically hold the height and hover at that. Now you can start flying the LiteWing drone by simply using the roll and pitch controls.
Using cfClient Software for Advanced Height Hold Control
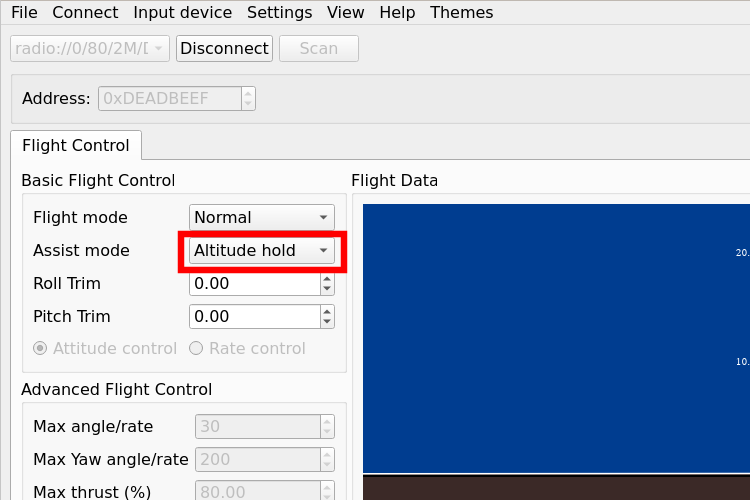
To use the height hold in drone in cfClient, make sure to install and configure the cfClient following the instructions in the How to use Crazyflie cfClient with Litewing tutorial. One thing to keep in mind that to don’t forget to configure the assist control button in the input device configuration. You can also find detailed instructions to do that in the previously linked tutorial. Once everything is configured correctly, turn on the LiteWing drone with the ToF sensor installed and connect to its WiFi. Once the WiFi is connected, connect to the LiteWing using the connect button in the cfClient. Once connected, you can see that the height hold mode in the Assist mode menu is now active.
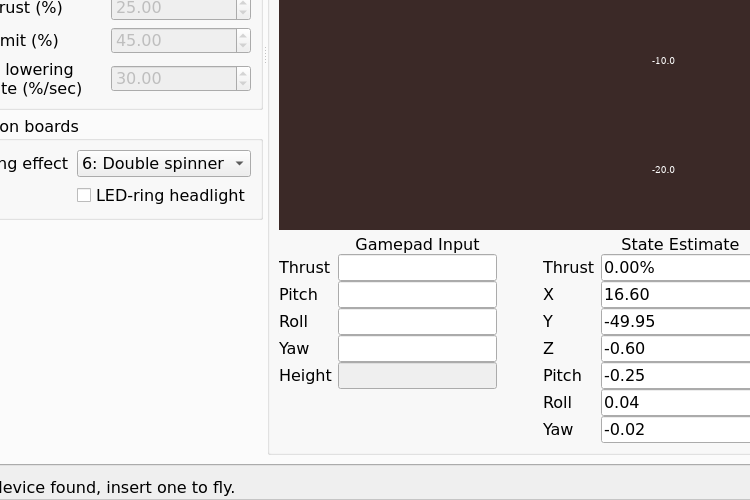
Now, to use the height hold mode, make sure to select the height hold mode in the Assist mode dropdown menu. You can set your preferred height at which the LiteWing drone needs to be hovering in the gamepad input menu. You can see the default value is around 0.4 meters. Make sure this value is between 0.1 and 3meters for the best result.
Once the desired height is set, press and hold the assist control button in the controller. The drone will automatically take off and hover at the set height. To keep flying the drone, you must keep pressing the assist control button, and to land, just release the button; the drone will reduce the motor speed and land. Here is a demo showcasing the height hold functionality of the LiteWing drone.
FAQ - Height Hold Mode in LiteWing
⇥ 1. Why does the height hold not work with the LiteWing drone?
Make sure to attach the VL53L1X sensor module to the drone.
⇥ 2. Even after connecting the ToF sensor, the height hold mode is not working with the LiteWing.
Make sure all the connections are correct. And you can check if the sensor is detected or not in the boot log.
⇥ 3. The height hold is working fine indoors, but not outdoors. Why?
Since the Vl53L1X sensor is an optical sensor, bright light can affect its functionality. If the outdoors is too sunny, it can affect the sensor. We would recommend using the height hold mode indoors.
⇥ 4. Height hold is working fine with the app, but not with cfclient. Why?
In the cfClient, the assist mode must be set to height hold. Also, you should use the assist control button for takeoff.
Other LiteWing Related Projects & Tutorials
Ready to take your LiteWing drone to the next level? Check out these related projects and tutorials that expand your drone's capabilities with gesture control, mobile apps, and advanced flight features.

DIY Gesture Control Drone using Python with LiteWing and ESP32
In this article, we are going to show you how you can build a gesture control drone using the ESP32 dev module along with an MPU-6050.

LiteWing-ESP32 Drone gets New Mobile App
Fly your LiteWing ESP32 drone with the new mobile app. Enjoy height hold, battery alerts, smooth landing, and easy controls on both Android and iOS

How to Program LiteWing Drone using Python with Crazyflie Cflib Python SDK
In this article, we will focus only on Cflib, which is a Python SDK from Crazyflie that allows you to write your own Python code to control your LiteWing drone. If you are not a fan of Python programming, you can also program your LiteWing using Arduino and directly reflash your ESP32, but that is for a different tutorial.
