

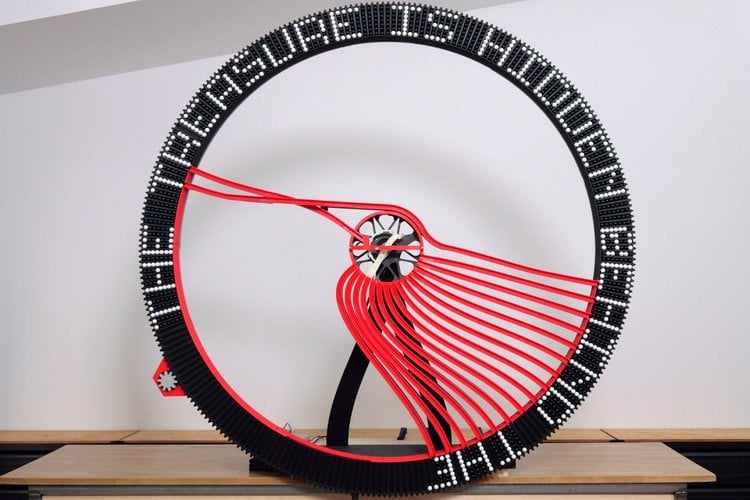
Marble machines usually stop at clocks, with a fixed number of digits and a fixed amount of space. Ivan Miranda wanted a display that never runs out of room. His new Marble Scroller is a huge 3D-printed wheel that writes text in black and white marbles using a 7x5 pixel font, lets each line roll off the other side and then recycles the same marbles to write the next one. It can do uppercase, lowercase and symbols. Ivan says it is the project he underestimated the most, and getting it working took more than 30 hours of testing alone. The video had about 397,000 views within three days of going up.
How the marbles find their place
The first idea was a row of vertical channels with marbles dropped in from the top. A straight row would need more and more slots to keep writing, but a wheel can spin forever, so Ivan bent the slots into a ring. Then he hit a readability problem: on a small wheel, the letter A is just a blob. To make the text readable, the ring had to be enormous. It is made of 3D-printed slot plates held together with big red connectors and runs on rails filled with steel balls (they act as one giant ring bearing so the wheel can turn).
In the middle sits a fast selector arm. Marbles arrive in a random mix of black and white through one input channel. Under the pickup point, an infrared LED and two infrared sensors check whether a marble is present and what colour it is. The arm then swings it into whichever of the 15 output channels needs that colour, filling the channels on the right first because those leave the drawing area first. Marbles that nobody needs go to an overflow channel and get recycled when a gap opens. A large NEMA 34 stepper motor (a big, high-torque stepper size, 3.4 inches across) turns the main wheel through a 3D-printed gear, and an infrared sensor reading white marks on the back of the wheel tells the code when the channels line up.
Everything that went wrong
The build is an honest catalogue of failures. The wheel jammed because the rail clearances were too tight, so Ivan had to strip out all the marbles, reprint every fence and rebuild it more than once. In the end the steel balls were swapped for the 16 mm display marbles, slightly bigger than the 15 mm steel balls, and that freed everything up. The infrared sensors randomly misread marbles until he worked out that sunlight from the window was changing the infrared level. He fixed it with a second sensor and a reflector taken from a bicycle trouser clip. Even with the right number of marbles for the text, the machine sometimes couldn't keep up, so he changed the code: when no current slot needs the marble it is holding, the wheel spins backwards to look for an earlier gap.
Key details
- Font: 7x5 pixels in black and white marbles, uppercase, lowercase and symbols
- Channels: 15 output channels, one input channel and one overflow/recycling channel
- Marbles: 16 mm display marbles
- Sensing: infrared LED plus two sensors for marble presence and colour, infrared sensor and white marks for wheel alignment
- Drive: large NEMA 34 stepper motors, with the main wheel turned through a 3D-printed gear
- Testing: more than 30 hours
Our take
The clever part is not the size but the scheduling logic. With a random stream of colours and only one selector, the machine wins by placing each marble wherever it fits soonest, prioritising the channels that will leave the drawing area next, and looking backwards when it runs out of options. Lowercase letters are harder because their tops are solid black, so the selector has to do a lot more back and forth. One problem Ivan refused to fix is homing (moving to a known reference position at start-up): the white alignment marks wore away during all the rebuilds, so he now homes the wheel by hand with two buttons. His advice to himself, and to anyone building something similar, is to print the marks straight into the plates so they cannot rub off.
Image credit: Ivan Miranda, YouTube thumbnail, resized.
About the author: Aswinth Raj is an electronics engineer and the editor of CircuitDigest, where he has published more than 150 hands-on projects and tutorials across Arduino, PIC, ESP32, Raspberry Pi and EV battery systems. He selects the stories on this page for what engineers and makers can actually learn or build from. Connect on LinkedIn

Add a comment
No account needed. Your comment appears once a moderator has reviewed it.