

Today, we are building a simple Arduino-based project: a light-following robot. This project is perfect for beginners, and we'll use LDR sensor modules to detect light and an MX1508 motor driver module for control. By building this simple light following robot you will learn the basics of robotics and how to use a microcontroller like Arduino to read sensor data and control motors. With this knowledge, you can build other similar projects like line following robot, maze solving robot etc easily by using almost the same components but different logic and programming.
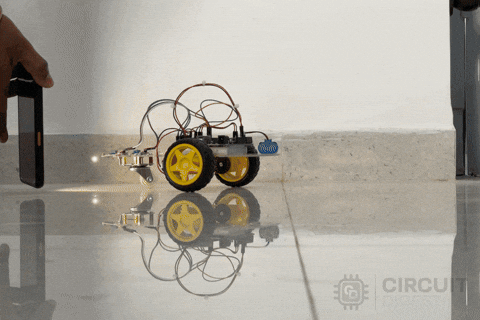
Above, you can see the working GIF video of our project. Without further delay, let's start building the Light Following Robot.
Light Following Robot-Working Principle
Our objective is to make the robot to follow the light. So, let's look a clear overview of the project.
Motor Control
We are using a Two-wheeled chassis car, and controlling it is straightforward as shown in the table below:
| Left Motor | Right Motor | State |
| Stop | Stop | Idle |
| Stop | Forward Rotate | Turn Left |
| Forward Rotate | Stop | Turn Right |
| Forward Rotate | Forward Rotate | Move Forward |
By following the table, you can clearly see how to drive the motors in the desired direction. Although using backward rotation has advantages for turning the robot, we'll keep things simple. You can control the motor's direction (forward or reverse) using an H-Bridge, Motor Driver, which is easily programmable with the Arduino board.
Sensor Control
To control the motors based on light detection, we'll use LDR (Light Dependent Resistor) sensor modules. Although using more sensors increases possibilities, we’ll use two LDR sensors: one to detect light on the right side and one on the left.
Here’s the simple logic:
If the right sensor detects light, the robot turns right.
If the left sensor detects light, the robot turns left.
If both sensors detect light, the robot moves straight.
If no light is detected, the robot stops.
| Left Sensor | Right Sensor | Motor State | Robot State | |
| Left Motor | Right Motor | |||
| Dark | Dark | Stop | Stop | Idle |
| Light | Dark | Stop | Forward Rotate | Turn Left |
| Dark | Light | Forward Rotate | Stop | Turn Right |
| Light | Light | Forward Rotate | Forward Rotate | Move Forward |
This table should give you a clear understanding of the working principle. Next, let’s move on to the component requirements.
Components Required for Building the Light Following Robot
Arduino UNO R3 x1
LDR Sensor Module x2
2WD- Two Wheel Drive Robot Car kit (includes the acrylic frame, Wheels, BO Motors, Castor Wheel, Screws and nuts, etc.) x1
MX1508 Motor Driver Module x1
9v Battery or 4 AA Battery holder x1
Breadboard Small x1
Note: You are not limited to the provided components, especially for the car chassis kit. You can also create your own chassis using cardboard or other materials.
Light Following Robot Circuit Diagram
We're diving into the hardware side of the Light Following Robot project, and things are getting exciting. Below is the circuit diagram for this project:

The LDR Sensor Module we're using has three pins: VCC, GND, and DO. This module outputs a digital signal, which is sufficient for our needs. We connect the DO pins to the digital pins 8 and 9 on the Arduino UNO.
For motor control, we’ve chosen the MX1508 Motor Driver for its simplicity. For more details on Interfacing the MX1508 with Arduino, check out our dedicated article on this topic, which provides all the essential information.
The MX1508 Motor Driver features two control pins per motor: one for forward rotation and one for reverse. Since we only need forward movement, we connect the INT1 pin (forward control for Motor A) and the INT3 pin (forward control for Motor B) to pins 10 and 11 on the Arduino, which also support PWM. This allows us to control the motor speed.
The power inputs for the sensor (VCC & GND) and the motor driver (+ & -) are connected to the 5V and GND pins on the Arduino UNO.

Above, you can see the image of the hardware assembly. Identifying which motor or sensor is on the left or right might be a bit confusing initially. However, this can be clarified through a process of trial and error with both hardware and software.
That wraps up the hardware setup—let’s move on to the coding!
Light Following Robot Code
We've already discussed the key concepts behind the code, so let's break down the implementation into two main parts.
Setup Part:
In this section, we define the pins and initialize functions. For this project, we need four I/O pins, which we declare as follows:
#define LeftLDR 8
#define RightLDR 9
#define LeftMotor 10
#define RightMotor 11
// Define the motor speed (0-255)
#define MotorSpeed 255
void setup() {
  // Set LDR pins as input
  pinMode(LeftLDR, INPUT);
  pinMode(RightLDR, INPUT);
  // Set motor pins as output
  pinMode(LeftMotor, OUTPUT);
  pinMode(RightMotor, OUTPUT);
}
Here, LeftLDR and RightLDR are assigned to digital pins 8 and 9 for the light sensors, while LeftMotor and RightMotor are assigned to pins 10 and 11 for controlling the motors. The MotorSpeed variable is used to set the PWM signal’s duty cycle for controlling motor speed. The pinMode function configures each pin as either an input or output as required.
Loop Part:
The loop function contains the logic for controlling the motors based on the sensor readings:
  if (!digitalRead(LeftLDR) && !digitalRead(RightLDR)) {
    digitalWrite(LeftMotor, MotorSpeed);
    digitalWrite(RightMotor, MotorSpeed);
  }
  else if (!digitalRead(LeftLDR)) {
    digitalWrite(LeftMotor, 0);
    digitalWrite(RightMotor, MotorSpeed);
  }
  else if (!digitalRead(RightLDR)) {
    digitalWrite(LeftMotor, MotorSpeed);
    digitalWrite(RightMotor, 0);
  }
  else {
    digitalWrite(LeftMotor, 0);
    digitalWrite(RightMotor, 0);
  }
In this section, an if-else statement is used to determine the motor actions based on the sensor readings:
Both LDRs detect light: Move forward by setting both motors to MotorSpeed.
Only the left LDR detects light: Turn right by stopping the left motor and running the right motor.
Only the right LDR detects light: Turn left by stopping the right motor and running the left motor.
No LDRs detect light: Stop both motors.
This logic ensures that the robot effectively follows the light source by adjusting its direction based on sensor input. Next, let's upload the code and observe the results.
Working Demonstration of Light Following Robot
With all the hardware setup completed, connect the Arduino UNO via USB cable and upload the code.
Powering it might be a bit tricky. You have multiple options like powering the Arduino board using the VIN pin with a voltage greater than 6V using any batteries, powering the Arduino board via DC jack which supports up to 12V, or powering it via USB using a power bank.
To keep it simple, I'm using a 9V battery.
Don’t forget to adjust the potentiometer on the LDR sensor module to set the desired sensitivity of the sensor. With some trial and error, you will find the optimal position on the potentiometer. That’s how I was able to capture the video and pictures in a bright environment.
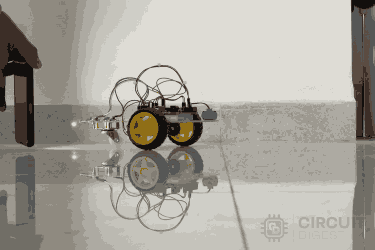
Above, you can see the working demonstration of the project. The robot successfully follows light, although it's not perfect due to various factors that I'll leave for you to explore. If you're looking to improve this light-following robot, here are some ideas:
Adding additional sensors to increase the detection range of the robot.
Using sensors with analog output can be useful, particularly for controlling the speed of the robot based on the intensity of the light.
Using speed sensors to create a feedback network to adjust the motors precisely.
That's it! We've successfully built another exciting project.
Application of Light Following Robot
Even though the application of this light following robot solely depends on your imagination, still iam adding my ideas. The concept of light following robot could be helpful in some project like below,
Solar Tracking System: A light-following robot can be used to adjust the position of solar panels, ensuring they are always facing the strongest light source, typically the sun, to maximize energy capture.
Interactive Toys: The robot can be used as an engaging toy that follows a flashlight or any light source, providing entertainment and education for children.
Security Systems: It can serve as a mobile surveillance device that follows a light source, potentially detecting and tracking intruders in low-light conditions.
Automatic Lighting Systems: The robot can be integrated into smart home systems to follow and illuminate areas where light is needed, such as guiding people in the dark.
Obstacle Avoidance in Dark Environments: Equipped with a light source, the robot can be used in dark or poorly lit areas to detect and avoid obstacles while following the light.
Projects in Similar Domain
1) Arduino Robotics Projects: From Basics to Advanced
Arduino projects are popular among makers of all levels, offering an easy-to-use interface and extensive community support. With endless possibilities, from robotics to home automation, Arduino empowers users to bring their creative ideas to life with flexibility and customization. Whether you’re a beginner or experienced, Arduino makes innovation accessible and fun.
2) Human Following Robot Using Arduino and Ultrasonic Sensor
Building a human-following robot with Arduino and three ultrasonic sensors simplifies the design by eliminating unnecessary components like servo motors and IR sensors. This approach enhances accuracy and ease of navigation, making the project more efficient and streamlined. Below is a general outline of the steps involved.
3) Obstacle Avoiding Car Using Arduino
Obstacle avoidance is crucial in robotics, enabling autonomous robots to navigate without collisions. A real-time Arduino obstacle-avoiding car is an advanced solution that detects obstacles and adjusts its path accordingly. In this guide, I'll walk you through building an obstacle-avoiding car using Arduino, a servo-mounted ultrasonic sensor, an L298N motor driver, and a car kit, ensuring smooth navigation and control.
4) Bluetooth Controlled Pick and Place Robotic Arm Car using Arduino
In robotics and automation, precision-controlled movements have transformed industries like manufacturing and healthcare. With accessible microcontrollers like Arduino, enthusiasts can now build a Bluetooth-controlled robotic arm using an Arduino board, servo motors, and a motor driver. This tutorial guides you in creating an Arduino-powered robotic arm mounted on a 2WD car, offering both wireless control through a custom Android app and dual functionality—navigating as a car and operating the robotic arm, all enhanced by a 3D-designed model and physical assembly.
5) Build your own Mars Rover Robot using Arduino
Mars has long fascinated us, and building a Mars rover is an exciting way to explore robotics. In this project, we'll construct an Arduino-based Mars rover that can navigate various terrains. This guide covers everything from assembling the rover chassis to programming it with C or C++, enabling precise control via Bluetooth. For more Arduino robotics projects, including line followers, fire-fighting robots, and robotic arms, check out our dedicated section on Arduino robotics.


Complete Project Code
#define LeftLDR 8
#define RightLDR 9
#define LeftMotor 10
#define RightMotor 11
// Define the motor speed (0-255)
#define MotorSpeed 255
void setup() {
  // Set LDR pins as input
  pinMode(LeftLDR, INPUT);
  pinMode(RightLDR, INPUT);
  // Set motor pins as output
  pinMode(LeftMotor, OUTPUT);
  pinMode(RightMotor, OUTPUT);
}

  if (!digitalRead(LeftLDR) && !digitalRead(RightLDR)) {
    digitalWrite(LeftMotor, MotorSpeed);
    digitalWrite(RightMotor, MotorSpeed);
  }
  else if (!digitalRead(LeftLDR)) {
    digitalWrite(LeftMotor, 0);
    digitalWrite(RightMotor, MotorSpeed);
  }
  else if (!digitalRead(RightLDR)) {
    digitalWrite(LeftMotor, MotorSpeed);
    digitalWrite(RightMotor, 0);
  }
  else {
    digitalWrite(LeftMotor, 0);
    digitalWrite(RightMotor, 0);
  }
