
DHT11 is a Temperature and humidity sensor which as the name implies is used to measure the atmospheric temperature and humidity in a particular environment or in a confined closed space. The sensor is commonly used in monitoring environmental parameters in many applications like Agriculture, Food Industries, Hospitals, Automobile, Weather Stations etc.
The sensor could measure the temperature from 0°C to 50°C with an accuracy of 1°C. It is commonly used in controlled environments such as Heat ventilation systems, temperature chambers etc to monitor temperature and take corrective measures. The measuring range of humidity is from 20% to 90% with an accuracy of 1%. Humidity indicates the amount of water vapor present in the air. The value of humidity has to be kept within a controlled range in many scenarios like in manufacturing and storing of tea powders the correct humidity must be maintained in the room or the tea will lose its taste and smell. The level of humidity in living rooms should also be maintained within a comfortable range. The ideal value of humidity for maximum comfort is between 50% to 65%.
Today in this tutorial we will learn how to interface the popular DHT11 Temperature and Humidity sensor with STM32 microcontroller. We have already learnt the basics of STM32 board and how to use it Arduino IDE. For those who are new, the STM32 a.k.a BluePill development board, consists of the STM32F103C8T6 microcontroller from ST Microelectronics. It is a 32-bit ARM Cortex M3 controller with high clock frequency suitable for high speed and power constraint application. Check all the STM32 related Tutorials here.
DHT11 Temperature & Humidity Sensor
Before proceeding with the interface procedure lets learn few things about the DHT11 sensor. As discussed earlier, the DHT11 sensor is used to measure Temperature and humidity. The sensor comes with a dedicated in-built NTC to measure temperature. It has an 8-bit microcontroller on-board to output the values of temperature and humidity as serial data through one-wire protocol. Meaning, the sensor has only one data pin through which both the temperature and humidity values can be read, thus saving pins on the microcontroller side. The sensor is also factory calibrated and hence easy to interface with other microcontrollers.
DHT11 Specifications:
- Operating Voltage: 3.5V to 5.5V
- Operating current: 0.3mA (measuring) 60uA (standby)
- Output: Serial data
- Temperature Range: 0°C to 50°C
- Humidity Range: 20% to 90%
- Resolution: Temperature and Humidity both are 16-bit
- Accuracy: ±1°C and ±1%
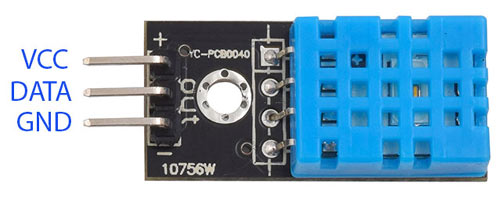
| No | Pin Name | Use |
| 1 | Vcc | Power supply 3.5V to 5.5V |
| 2 | Data | Outputs both Temperature and Humidity through serial Data |
| 3 | Ground | Connected to the ground of the circuit |
We interfaced DHT11 sensor with many other microcontrollers to build application like:
- Interfacing DHT11 Temperature and Humidity Sensor with Raspberry Pi
- MATLAB Data Logging, Analysis and Visualization: Plotting DHT11 Sensor readings on MATLAB
- Automatic AC Temperature Controller using Arduino, DHT11 and IR Blaster
- IoT Weather Station using NodeMCU: Monitoring Humidity, Temperature and Pressure over Internet
Components Required
- STM32F103C8
- DHT11 Temperature & Humidity Sensor
- 16x2 LCD Display
- IIC/I2C Serial Interface Adapter Module
- Breadboard
- Connecting Wires
Circuit Diagram
The complete circuit diagram to connect DHT11 with STM32 Microcontroller is shown below. The circuit was drawn using Fritzing software.

As you can see, we have used an I2C interface module to connect the LCD module to STM32. This makes the connections simple and further reduces the number of pins used on the controller side. However if you do not have this module you can also interface LCD directly STM32 by following the link.
If you have an interface module, then the circuit Connections between I2C Serial Interface Module (Fixed with 16X2 LCD Display) & STM32F103C8 is tabulated below:
| I2C Serial Interface Module | STM32F103C8 |
| VCC | 5V |
| GND | GND |
| SDA | PB7 |
| SCL | PB6 |
Similarly the circuit Connections between STM32F103C8 and DHT11 Sensor is tabulated below.
| DHT11 | STM32F103C8 |
| VCC | 5V |
| GND | GND |
| Data | PA1 |
Once the connections are done my hardware looks something like this below.
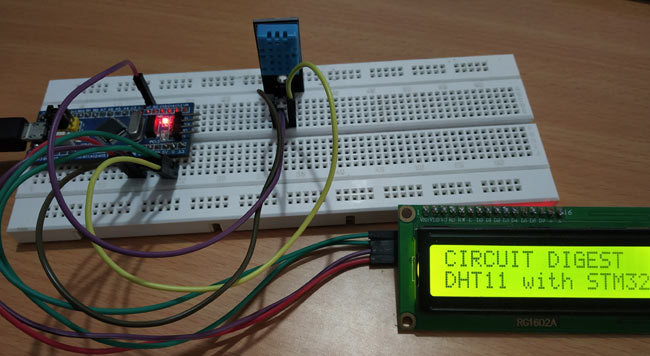
The entire set-up is powered by the USB port of STM32 from my laptop. Now that our hardware is ready, lets get into the coding part.
Preparing the Arduino IDE for STM32F103C8
We have to write a program to read the temperature and humidity value from the DHT11 senor and display it on the LCD module. Here the LCD display is connected through I2C adapter, hence we have first find the I2C address of this adapter to communicate with LCD.
Interfacing I2C Serial LCD Interface Adapter Module with STM32F103C8:
From circuit diagram we can notice that the STM32F103C8 I2C pins PB6 and PB7 are connected with the SCL and SDA pins of I2C Serial Interface Module. To find the address of the I2C Serial Interface module we have to scan for available addresses.
Scanning the Address of the I2C Serial Interface Module:
Follow the below steps to find the I2C address of your LCD I2C interface module.
1. First check the STM32 package for Arduino IDE is installed. If not follow the link Programming your STM32 in ARDUINO IDE.
2. While installing packages for programming STM32 using Arduino IDE by above link the wire library is installed in default.
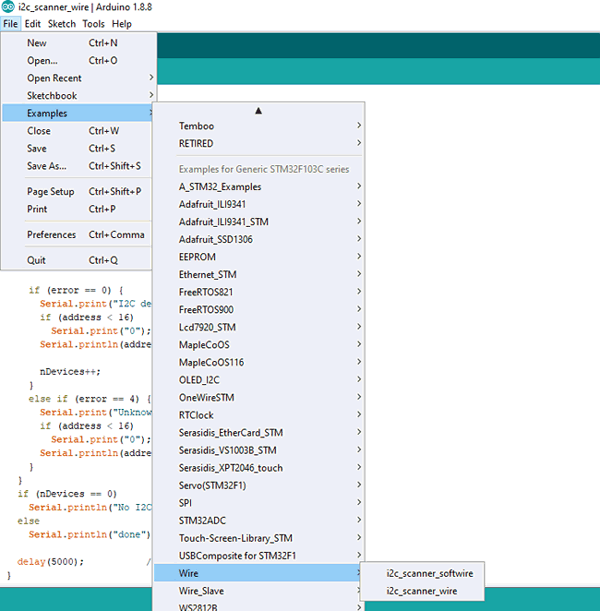
3.Program for scanning the I2C device connected is present in the examples (In Arduino IDE: Files->Examples->Wire->I2C scanner wire). Before that select the board in Tools->Board->Generic STM32F103C8 Series as shown below.
4. After then upload the code to the STM32F103C8 and the open serial monitor.
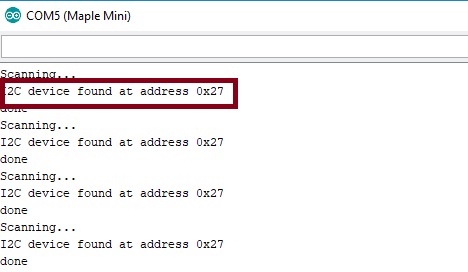
Now note the I2C address of the I2C 16x2 LCD display as (0x27).
Installing Library for I2C 16x2 Display Module and DHT11 Sensor:
Now that we know the I2C address we need to download a library for communicating to the LCD display through I2C. The I2C LCD display library can be downloaded from this link. After downloading the zip file install I2C LCD library in the Arduino IDE by sketch->import library.This library can also be used with Arduino boards for communicating with I2C LCD display modules.
Similarly in order to read the serial data from DHT11 sensor we will use the DHT11 library. Download the library as a ZIP file using the link provided and after downloading, install DHT library in the Arduino IDE by using sketch->import library. Again the same library can also be used with Arduino boards.
Coding Explanation
The complete code for this article can be found at the bottom of this page, the explanation for the same is as follows. Initially include the required libraries. Include Wire.h library for using I2C in STM32F103C8, LiquidCrystal_I2C.h for using I2C type LCD display and DHT.h for using DHT sensor functions
#include <Wire.h>
#include <LiquidCrystal_I2C.h>
#include <DHT.h>
Now the pin name of DHT11 (OUT pin) that is connected with the PA1 of STM32F103C8 is defined
#define DHTPIN PA1
And also, the DHTTYPE is defined as DHT11.
#define DHTTYPE DHT11
Next the object lcd for class LiquidCrystal_I2C with I2C address of 0x27 and 16x2 type LCD display is initialized.
LiquidCrystal_I2C lcd(0x27, 16, 2);
And also, object dht for class DHT with DHT pin with STM32 and DHT type as DHT11 is initialized
DHT dht(DHTPIN, DHTTYPE);
Next in void setup ():
First initialize the LCD using following
lcd.begin();
And then use below statement to begin to receive Temperature and humidity values from DHT11 sensor.
dht.begin();
Turn on the blacklight and print a welcome message and clear them after three seconds.
lcd.backlight();
lcd.setCursor(0,0);
lcd.print("CIRCUIT DIGEST");
lcd.setCursor(0,1);
lcd.print("DHT11 with STM32");
delay(3000);
lcd.clear();
Next in the void loop():
The value is received from the DHT11 sensor continuously. In order to get the separate values of temperature and humidity and store it in a variable following statement is used.
To get only the Humidity value
float h = dht.readHumidity();
To get only the Temperature value
float t = dht.readTemperature();
And finally print those in the 16X2 LCD display
  lcd.setCursor(0,0);
  lcd.print("Temp: ");
  lcd.print(t);
  lcd.print(" C");
  lcd.setCursor(0,1);
  lcd.print("Humid: ");
  lcd.print(h);
  lcd.print(" %");
Working of STM32 based Thermometer
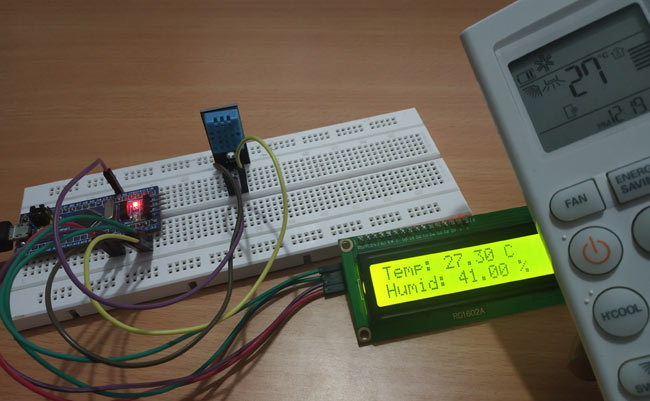
Once your hardware and code is ready, just the code to your hardware and you should notice your LCD displaying the welcome screen followed by the real time Temperature and Humidity values as shown below
If your displays shows nothing you can check adjusting the contrast potentiometer at the back of the I2C module. I tried varying my room temperature using an Air conditioner and found the sensor value to also vary accordingly. The AC also has an option to measure room temperature and as you can see in below image my remote displays the room temperature to be 27°C and our sensors also displays 27.3°C on the LCD which is pretty much close.
The complete working of the project can be found in the video linked at the bottom of this page. Hope you understood the project and enjoyed building it. If you have any problem in getting it to work, leave a comment below or use the forums for other technical quires.
Complete Project Code
#include <Wire.h>      //Library for using I2C

#include <LiquidCrystal_I2C.h>  //Library for using I2C type LCD display

#include <DHT.h>                    //Library for using DHT sensor
#define DHTPIN PA1
#define DHTTYPE DHT11
LiquidCrystal_I2C lcd(0x27, 16, 2);  //initilize object lcd for class LiquidCrystal_I2C with I2C address of 0x27 and 16x2 type LCD display
DHT dht(DHTPIN, DHTTYPE);     //initilize object dht for class DHT with DHT pin with STM32 and DHT type as DHT11
void setup()

{

  // initialize the LCD

  lcd.begin();

  dht.begin();          //Begins to receive Temperature and humidity values.

  lcd.backlight();      // Turn on the blacklight and print a welcome message.

  lcd.setCursor(0,0);

  lcd.print("CIRCUIT DIGEST");

  lcd.setCursor(0,1);

  lcd.print("DHT11 with STM32");

  delay(3000);

  lcd.clear();

}
void loop()

{

  float h = dht.readHumidity();       //Gets Humidity value

  float t = dht.readTemperature();    //Gets Temperature value

  lcd.setCursor(0,0);

  lcd.print("Temp: ");

  lcd.print(t);

  lcd.print(" C");

  lcd.setCursor(0,1);

  lcd.print("Humid: ");

  lcd.print(h);

  lcd.print(" %");

}

Hello Mr. Thangavel, how are you?
I'm trying to obtain the I2C address, but I didin't get. I followed the instructions in the link https://circuitdigest.com/microcontroller-projects/programming-stm32f10…, but I didn't get success, because the serial monitor doesn't show any character. Can you help me with a technical support?
Best Regards