

Temperature and Humidity are the most common parameters that are being monitored in any environment. There are tons of sensors to choose from for measuring temperature and humidity, but the most used one is the DHT11 due to its decent measuring range and accuracy. It also works with one pin communication and hence is very easy to interface with Microcontrollers or Microprocessors. In this tutorial we are going to learn how to interface the popular DHT11 sensor with Raspberry Pi and display the value of temperature and humidity on a 16x2 LCD screen. We already used it to build IoT Raspberry Pi Weather Station.
Overview of DHT11 Sensor:
The DHT11 sensor can measure relative humidity and temperature with the following specifications
Temperature Range: 0-50°C
Temperature Accuracy: ±2 °C
Humidity Range: 20-90% RH
Humidity Accuracy: ±5 %

The DHT11 sensor is available either in module form or in sensor form. In this tutorial we are using the module form of the sensor, the only difference between both is that in module form the sensor has a filtering capacitor and a pull up resistor attached to the output pin of the sensor. So if you are using the sensor alone make sure you add these two components. Also learn DHT11 interfacing with Arduino.
How DHT11 Sensor works:
The DHT11 sensor comes with a blue or white colour casing. Inside this casing we have two important components which help us to sense the relative humidity and temperature. The first component is a pair of electrodes; the electrical resistance between these two electrodes is decided by a moisture holding substrate. So the measured resistance is inversely proportional to the relative humidity of the environment. Higher the relative humidity lower will be the value of resistance and vice versa. Also note that Relative humidity is different from actual humidity. Relative humidity measures the water content in air relative to the temperature in the air.
The other component is a surface mounted NTC Thermistor. The term NTC stands for Negative temperature coefficient, for increase in temperature the value of resistance will decrease
Pre-Requisites:
It is assumed that your Raspberry Pi is already flashed with an operating system and is able to connect to the internet. If not, follow the Getting started with Raspberry Pi tutorial before proceeding.
It is also assumed that you have access to your pi either through terminal windows or through other application through which you can write and execute python programs and use the terminal window.
Installing the Adafruit LCD library on Raspberry Pi:
The value of the temperature and humidity will be displayed on a 16*2 LCD display. Adafruit provides us a library to easily operate this LCD in 4-bit mode, so let us add it to our Raspberry Pi by opening the terminal window Pi and following the below steps.
Step 1: Install git on your Raspberry Pi by using the below line. Git allows you to clone any project files on Github and use it on your Raspberry pi. Our library is on Github so we have to install git to download that library into pi.
apt-get install git
Step 2: The following line links to the GitHub page where the library is present just execute the line to clone the project file on Pi home directory
git clone git://github.com/adafruit/Adafruit_Python_CharLCD
Step 3: Use the below command to change directory line, to get into the project file that we just downloaded. The command line is given below
cd Adafruit_Python_CharLCD
Step 4: Inside the directory there will be a file called setup.py, we have to install it, to install the library. Use the following code to install the library
sudo python setup.py install
That is it the library should have been installed successfully. Now similarly let’s proceed with installing the DHT library which is also from Adafruit.
Installing the Adafruit DHT11 library on Raspberry Pi:
DHT11 Sensor works with the principle of one-wire system. The value of temperature and humidity is sensed by the sensor and then transmitted through the output pin as serial data. We can then read these data by using I/O pin on a MCU/MPU. To understand how these values are read you would have to read through the datasheet of the DHT11 sensor, but for now to keep things simple we will use a library to talk with the DHT11 sensor.
The DHT11 library provided by Adafruit can be used for DHT11, DHT22 and other one wire temperature sensors as well. The procedure to install the DHT11 library is also similar to the one followed for installing LCD library. The only line that would change is the link of the GitHub page on which the DHT library is saved.
Enter the four command lines one by one on the terminal to install the DHT library
git clone https://github.com/adafruit/Adafruit_Python_DHT.git
cd Adafruit_Python_DHT
sudo apt-get install build-essential python-dev
sudo python setup.py install
Once it is done you will have both the libraries successfully installed on our Raspberry Pi. Now we can proceed with the hardware connection.
Circuit Diagram:
The complete circuit diagram Interfacing DH11 with Raspberry pi is given below, it was built using Fritzing. Follow the connections and make the circuit

Both the LCD and DHT11 sensor works with +5V supply so we use the 5V pins on the Raspberry Pi to power both. A pull up resistor of value 1k is used on the output pin of the DHT11 sensor, if you are using a module you can avoid this resistor.
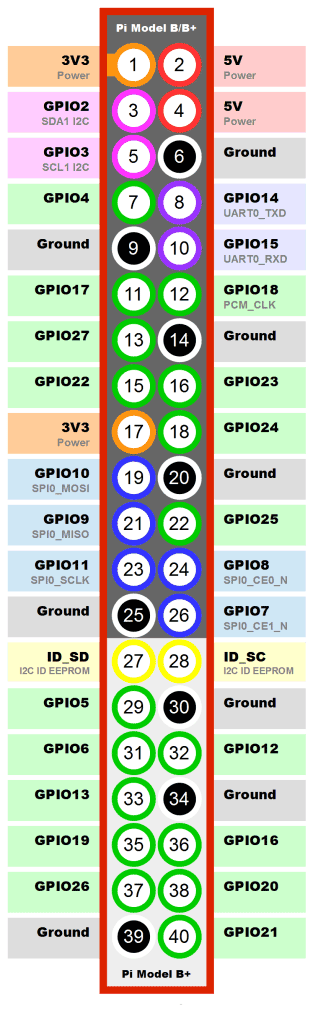
A trimmer pot of 10k is added to the Vee pin of the LCD to control the contrast level of the LCD. Other than that all the connections are pretty straight forward. But make a note of which GPIO pins you are using to connect the pins since we will need in our program. The below chart should allow you to figure out the GPIO pin numbers.
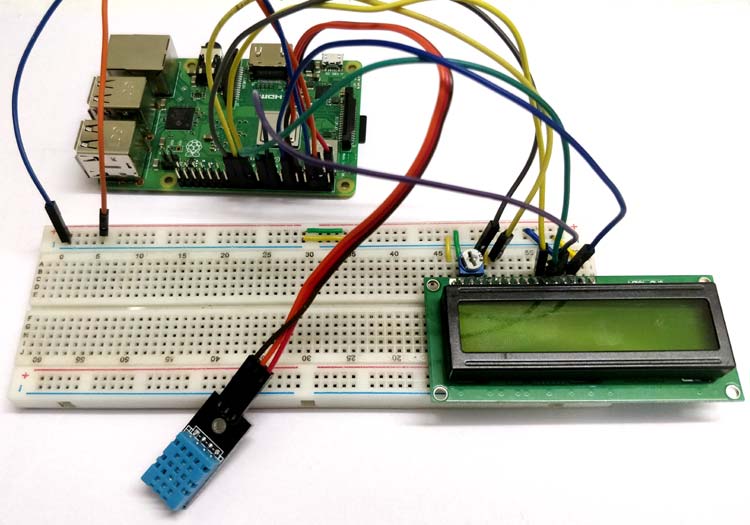
Use the chart and make your connections according to the circuit diagram. I used a breadboard and jumper wires to make my connections. Since I used DHT11 module I wired it directly to Raspberry Pi. My hardware looked like this below
Python Programming for DHT11 sensor:
We have to write a program to read the value of temperature and humidity from the DHT11 sensor and then display the same on the LCD. Since we have downloaded libraries for both LCD and DHT11 sensor the code should be pretty much straight forward. The python complete program can be found at the end of this page, but you can read further to understand how the program works.
We have to import the LCD library and DHT11 library into our program to use the functions related to it. Since we have already downloaded and installed them on our Pi we can simply use the following lines to import them. We also import the time library to use the delay function.
import time #import time for creating delay
import Adafruit_CharLCD as LCD #Import LCD library
import Adafruit_DHT #Import DHT Library for sensor
Next, we have to specify to which pins the sensor is connected to and what type of temperature sensor is used. The variable sensor_name is assigned to Adafruit_DHT.DHT11 since we are using the DHT11 sensor here. The output pin of the sensor is connected to GPIO 17 of the Raspberry Pi and hence we assign 17 to sensor_pin variable as shown below.
sensor_name = Adafruit_DHT.DHT11 #we are using the DHT11 sensor
sensor_pin = 17 #The sensor is connected to GPIO17 on Pi
Similarly, we also have to define to which GPIO pins the LCD is connected to. Here we are using the LCD in 4-bit mode hence we will have four data pins and two control pins to connect to the GPIO pins of the pi. Also, you can connect the backlight pin to a GPIO pin if we wish to control the backlight also. But for now I am not using that so I have assigned 0 to it.
lcd_rs        = 7  #RS of LCD is connected to GPIO 7 on PI
lcd_en        = 8  #EN of LCD is connected to GPIO 8 on PI
lcd_d4        = 25 #D4 of LCD is connected to GPIO 25 on PI
lcd_d5        = 24 #D5 of LCD is connected to GPIO 24 on PI
lcd_d6        = 23 #D6 of LCD is connected to GPIO 23 on PI
lcd_d7        = 18 #D7 of LCD is connected to GPIO 18 on PI
lcd_backlight =  0  #LED is not connected so we assign to 0
You can also connect LCD in 8-bit mode with Raspberry pi but then free pins will be reduced.
The LCD library from Adafruit that we downloaded can be used for all types of characteristic LCD displays. Here in our project we are using a 16*2 LCD display so we are mentioning the number of Rows and Columns to a variable as shown below.
lcd_columns = 16 #for 16*2 LCD
lcd_rows    = 2 #for 16*2 LCD
Now, that we have declared the LCD pins and the number of Rows and Columns for the LCD we can initialize the LCD display by using the following line which sends all the required information to the library.
lcd = LCD.Adafruit_CharLCD(lcd_rs, lcd_en, lcd_d4, lcd_d5, lcd_d6, lcd_d7,
lcd_columns, lcd_rows, lcd_backlight)   #Send all the pin details to library
To start the program, we display a small intro message using the lcd.message() function and then give a delay of 2 second to make the message readable. For printing on the 2nd line the command \n can be used as shown below
lcd.message('DHT11 with Pi \n -CircuitDigest') #Give a intro message
time.sleep(2) #wait for 2 secs
Finally, inside our while loop we should read the value of temperature and humidity from the sensor and display it on the LCD screen for every 2 seconds. The complete program inside the while loop is shown below
while 1: #Infinite Loop
humidity, temperature = Adafruit_DHT.read_retry(sensor_name, sensor_pin) #read from sensor and save respective values in temperature and humidity varibale
    lcd.clear() #Clear the LCD screen
    lcd.message ('Temp = %.1f C' % temperature) # Display the value of temperature
    lcd.message ('\nHum = %.1f %%' % humidity)  #Display the value of Humidity

    time.sleep(2) #Wait for 2 sec then update the values
We can easily get the value of temperature and humidity from the sensor using this single line below. As you can see it return two values which is stored in the variable humidity and temperature. The sensor_name and sensor_pin details are passed as parameters; these values were updated in the beginning of the program
humidity, temperature = Adafruit_DHT.read_retry(sensor_name, sensor_pin)
To display a variable name on the LCD screen we can use the identifiers like &d, %c etc. Here since we are displaying a floating point number with only one digit after the decimal point we use the identifier %.1f for displaying the value in the variable temperature and humidity
lcd.message ('Temp = %.1f C' % temperature)
lcd.message ('\nHum = %.1f %%' % humidity)
Measuring Humidity and Temperature using Raspberry Pi:
Make the connections as per the circuit diagram and install the required libraries. Then launch the python program given at the end of this page. Your LCD should display an intro message and then display the current temperature and humidity value as shown in the image below.
If you find nothing being displayed the LCD, check if the python shell window is displaying any erros, if no error is displayed then check your connections once more and adjust the potentiometer to vary the contrast level of the LCD and check if you get anything on the screen.
Hope you understood the project and enjoyed building it, if you has faced any problem in getting this done report it on the comment section or use the forum for technical help. I will try my best to respond to all comments.
You can also check our other projects using DHT11 with other microcontroller.
Complete Project Code
#Program to read the values of Temp and Hum from the DHT11 sensor and display them on the LCD

import time #import time for creating delay
import Adafruit_CharLCD as LCD #Import LCD library
import Adafruit_DHT #Import DHT Library for sensor
sensor_name = Adafruit_DHT.DHT11 #we are using the DHT11 sensor
sensor_pin = 17 #The sensor is connected to GPIO17 on Pi

lcd_rs        = 7  #RS of LCD is connected to GPIO 7 on PI
lcd_en        = 8  #EN of LCD is connected to GPIO 8 on PI
lcd_d4        = 25 #D4 of LCD is connected to GPIO 25 on PI
lcd_d5        = 24 #D5 of LCD is connected to GPIO 24 on PI
lcd_d6        = 23 #D6 of LCD is connected to GPIO 23 on PI
lcd_d7        = 18 #D7 of LCD is connected to GPIO 18 on PI
lcd_backlight =  0  #LED is not connected so we assign to 0
lcd_columns = 16 #for 16*2 LCD
lcd_rows    = 2 #for 16*2 LCD
lcd = LCD.Adafruit_CharLCD(lcd_rs, lcd_en, lcd_d4, lcd_d5, lcd_d6, lcd_d7,
                           lcd_columns, lcd_rows, lcd_backlight)   #Send all the pin details to library
lcd.message('DHT11 with Pi \n -CircuitDigest') #Give a intro message
time.sleep(2) #wait for 2 secs
while 1: #Infinite Loop

    humidity, temperature = Adafruit_DHT.read_retry(sensor_name, sensor_pin) #read from sensor and save respective values in temperature and humidity varibale
    lcd.clear() #Clear the LCD screen
    lcd.message ('Temp = %.1f C' % temperature) # Display the value of temperature
    lcd.message ('\nHum = %.1f %%' % humidity)  #Display the value of Humidity
    time.sleep(2) #Wait for 2 sec then update the values

Hello Circuit Digest,
I've really enjoyed follwoing along, and have to admit its been years since I built circuits on Motorola HC11's and now I'm stepping into Raspberry Pi. I followed all the directions above.
I copied the python code into temp-lcd.py with the following directory structure:
I get the following error in Thonny Python IDE:
Thank you for your instructions and your help,
Matt