
Humidity, Temperature and Pressure are three basic parameters to build any Weather Station and to measure environmental conditions. We have previously built a mini Weather Station using Arduino and this time we are extending the weather station with Raspberry Pi. This IoT based Project aims to show the current Humidity, Temperature and Pressure parameters on the LCD as well on the Internet server using Raspberry Pi, which makes it a Raspberry Pi Weather Station. You can install this setup anywhere and can monitor the weather conditions of that place from anywhere in the world over the internet, it will not only show the current data but can also show the past values in the form of Graphs.
We have used DHT11 Humidity & temperature sensor for sensing the temperature and BM180 Pressure sensor module for measuring barometric pressure. This Celsius scale Thermometer and percentage scale Humidity meter displays the ambient temperature and humidity through a LCD display and barometric pressure is displayed in millibar or hPa (hectopascal). All this data is sent to ThingSpeak server for live monitoring from anywhere in the world over internet. Do check the Demonstration Video and Python Program, given at the end of this tutorial.

Working and ThingSpeak Setup:
This IoT based project has four sections. Firstly DHT11 sensor senses the Humidity & Temperature Data and BM180 sensor measures the atmospheric pressure. Secondly Raspberry Pi reads the DHT11 sensor module’s output by using single wire protocol and BM180 pressure sensor’s output by using I2C protocol and extracts both sensors values into a suitable number in percentage (humidity), Celsius scale (temperature), hectoPascal or millibar (pressure). Thirdly, these values are sent to ThingSpeak server by using inbuilt Wi-Fi of Raspberry Pi 3. And finally ThingSpeak analyses the data and shows it in a Graph form. A LCD is also used to display these values locally.

ThingSpeak provides very good tool for IoT based projects. By using ThingSpeak website, we can monitor our data and control our system over the Internet, using the Channels and webpages provided by ThingSpeak. ThingSpeak ‘Collects’ the data from the sensors, ‘Analyze and Visualize’ the data and ‘Acts’ by triggering a reaction. We have previously explained about sending data to ThingSpeak in detail, you can check there. Here we are briefly explaining to use ThingSpeak for this Raspberry Pi Weather station.
First you need to create account on ThingSpeak website and create a ‘New channel’ in it. In new channel you have to define some fields for the data you want to monitor, like in this project we will create three fields for Humidity, Temperature and Pressure data.
Now click on ‘API keys’ tab and save the Write and Read API keys, here we are only using Write key. You need to Copy this key in ‘key’ variable in the Code.
After it, click on ‘Data Import/Export’ and copy the Update Channel Feed GET Request URL, which is:
https://api.thingspeak.com/update?api_key=30BCDSRQ52AOI3UA&field1=0
Now we need this ‘Feed Get Request URL’ in our Python code to open “api.thingspeak.com” and then send data using this Feed Request as query string. And Before sending data user needs to enter the temperature, humidity and pressure data in this query String using variables in program, check in the Code at the end this article.
URL = 'https://api.thingspeak.com/update?api_key=%s' % key
finalURL = URL +"&field1=%s&field2=%s"%(humi, temp)+"&field3=%s" %(pressure)
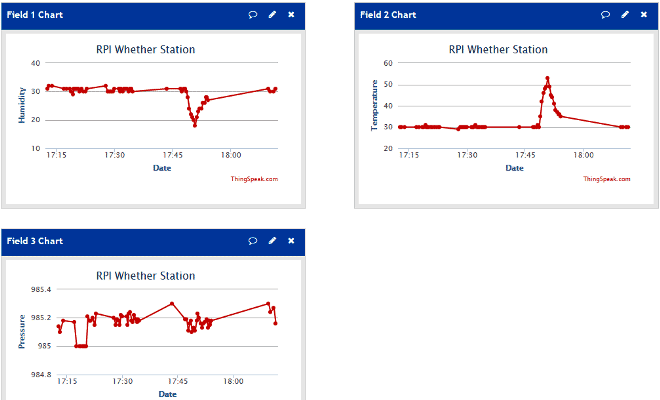
Working of DHT11 is based on single wire serial communication for fetching data from DHT11. Here we have used AdaFruit DHT11 library for interfacing DHT11 with Raspberry Pi. Raspberry Pi here collects the Humidity and temperature data from DHT11 and atmospheric pressure from BMP180 sensor and then sends it to 16x2 LCD and ThingSpeak server. ThingSpeak displays the Data in form of Graph as below:

You can learn more about DHT11 Sensor and its Interfacing with Arduino here.
Circuit Diagram:

Raspberry Pi Configuration and Python Program:
We are using Python language here for the Program. Before coding, user needs to configure Raspberry Pi. You can check our previous tutorials for Getting Started with Raspberry Pi and Installing & Configuring Raspbian Jessie OS in Pi.
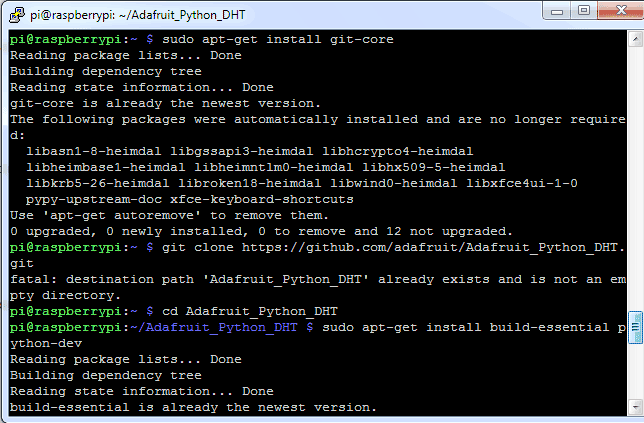
First off all we need to install Adafruit Python DHT Sensor Library files to run this project on Raspberry Pi. To do this we need to follow given commands:
sudo apt-get install git-core
sudo apt-get update
git clone https://github.com/adafruit/Adafruit_Python_DHT.git
cd Adafruit_Python_DHT
sudo apt-get install build-essential python-dev
sudo python setup.py install
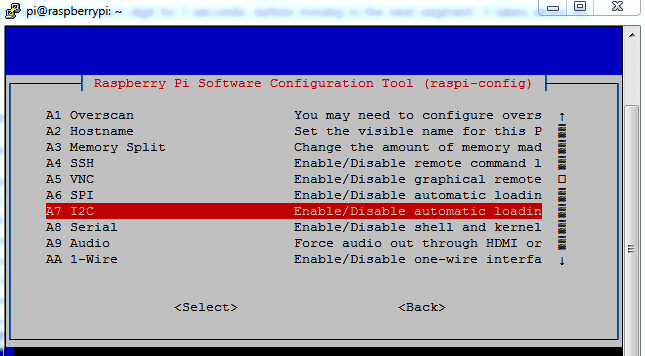
After this, user needs to enable Raspberry Pi I2C by going into RPi Software Configuration Too:
sudo raspi-config
Then go to ‘Advance Options’, select ‘I2C’ and ‘Enable’ it.
Programming part of this project plays a very important role to perform all the operations. First of all we include all required libraries, initiaze variables and define pins for LCD and DHT11.
import sys
import RPi.GPIO as GPIO
import os
import Adafruit_DHT
import urllib2
import smbus
import time
from ctypes import c_short
#Register Address
regCall   = 0xAA
... ......
 ..... ...
In def main(): function, below code is used for sending the data to the server and display it over the LCD, continuously in while loop.
def main():

    print 'System Ready...'
    URL = 'https://api.thingspeak.com/update?api_key=%s' % key
    print "Wait...."
    while True:
            (humi, temp)= readDHT()
            (pressure) =readBmp180()

            lcdcmd(0x01)
            lcdstring("Humi#Temp#P(hPa)")
            lcdstring(humi+'%'+"  %sC  %s" %(temp, pressure))
            finalURL = URL +"&field1=%s&field2=%s"%(humi, temp)+"&field3=%s" %(pressure)
            print finalURL
            s=urllib2.urlopen(finalURL);
            print  humi+ " " + temp + " " + pressure
            s.close()
            time.sleep(10)
For LCD, def lcd_init() function is used to initialize LCD in four bit mode, def lcdcmd(ch) function is used for sending command to LCD, def lcddata(ch) function is used for sending data to LCD and def lcdstring(Str) function is used to send data string to LCD. You can check all these functions in Code given afterwards.
Given def readDHT() function is used for reading DHT11 Sensor:
def readDHT():
    humi, temp = Adafruit_DHT.read_retry(Adafruit_DHT.DHT11, DHTpin)
    return (str(int(humi)), str(int(temp)))
def readBmp180 function is used for reading pressure from the BM180 sensor. BM180 sensor can also give temperature but here we have only used it for calculating pressure.
def readBmp180(addr=deviceAdd):
  value = bus.read_i2c_block_data(addr, regCall, 22)  # Read calibration data
  # Convert byte data to word values
  AC1 = convert1(value, 0)
  AC2 = convert1(value, 2)
  AC3 = convert1(value, 4)
  AC4 = convert2(value, 6)
  ..... .......
  ........ ......
So this is the basic Raspberry Pi Weather Station, you can further extend it to measure various weather related parameters like wind speed, soil temperature, illuminance (lux), rainfall, air quality etc.
Complete Project Code
import sys
import RPi.GPIO as GPIO
import os
import Adafruit_DHT
import urllib2
import smbus
import time
from ctypes import c_short
#Register Address
regCall   = 0xAA
regMean   = 0xF4
regMSB    = 0xF6
regLSB    = 0xF7
regPres   = 0x34
regTemp   = 0x2e
DEBUG = 1
sample = 2
deviceAdd =0x77
humi=""
temp=""
#bus = smbus.SMBus(0)  #for Pi1 uses 0
I2cbus = smbus.SMBus(1) # for Pi2 uses 1
DHTpin = 17
key="30BCDSRQ52AOI3UA"       # Enter your Write API key from ThingSpeak
GPIO.setmode(GPIO.BCM)
# Define GPIO to LCD mapping
LCD_RS = 18
LCD_EN  = 23
LCD_D4 = 24
LCD_D5 = 16
LCD_D6 = 20
LCD_D7 = 21
GPIO.setwarnings(False)
GPIO.setmode(GPIO.BCM)
GPIO.setup(LCD_E, GPIO.OUT)
GPIO.setup(LCD_RS, GPIO.OUT)
GPIO.setup(LCD_D4, GPIO.OUT)
GPIO.setup(LCD_D5, GPIO.OUT)
GPIO.setup(LCD_D6, GPIO.OUT)
GPIO.setup(LCD_D7, GPIO.OUT)
def convert1(data, i):   # signed 16-bit value
  return c_short((data[i]<< 8) + data[i + 1]).value

def convert2(data, i):   # unsigned 16-bit value
  return (data[i]<< 8) + data[i+1]

def readBmp180(addr=deviceAdd):
  value = bus.read_i2c_block_data(addr, regCall, 22)  # Read calibration data
  # Convert byte data to word values
  AC1 = convert1(value, 0)
  AC2 = convert1(value, 2)
  AC3 = convert1(value, 4)
  AC4 = convert2(value, 6)
  AC5 = convert2(value, 8)
  AC6 = convert2(value, 10)
  B1  = convert1(value, 12)
  B2  = convert1(value, 14)
  MB  = convert1(value, 16)
  MC  = convert1(value, 18)
  MD  = convert1(value, 20)
    # Read temperature
  bus.write_byte_data(addr, regMean, regTemp)
  time.sleep(0.005)
  (msb, lsb) = bus.read_i2c_block_data(addr, regMSB, 2)
  P2 = (msb << 8) + lsb

  # Read pressure
  bus.write_byte_data(addr, regMean, regPres + (sample << 6))
  time.sleep(0.05)
  (msb, lsb, xsb) = bus.read_i2c_block_data(addr, regMSB, 3)
  P1 = ((msb << 16) + (lsb << 8) + xsb) >> (8 - sample)
   # Refine temperature
  X1 = ((P2 - AC6) * AC5) >> 15
  X2 = (MC << 11) / (X1 + MD)
  B5 = X1 + X2
  temperature = (B5 + 8) >> 4

  # Refine pressure
  B6  = B5 - 4000
  B62 = B6 * B6 >> 12
  X1  = (B2 * B62) >> 11
  X2  = AC2 * B6 >> 11
  X3  = X1 + X2
  B3  = (((AC1 * 4 + X3) << sample) + 2) >> 2

  X1 = AC3 * B6 >> 13
  X2 = (B1 * B62) >> 16
  X3 = ((X1 + X2) + 2) >> 2
  B4 = (AC4 * (X3 + 32768)) >> 15
  B7 = (P1 - B3) * (50000 >> sample)

  P = (B7 * 2) / B4

  X1 = (P >> 8) * (P >> 8)
  X1 = (X1 * 3038) >> 16
  X2 = (-7357 * P) >> 16
  pressure = P + ((X1 + X2 + 3791) >> 4)

  return (str(pressure/100.0))
def readDHT():
    humi, temp = Adafruit_DHT.read_retry(Adafruit_DHT.DHT11, DHTpin)
    return (str(int(humi)), str(int(temp)))
def lcd_init():
  lcdcmd(0x33)
  lcdcmd(0x32)
  lcdcmd(0x06)
  lcdcmd(0x0C)
  lcdcmd(0x28)
  lcdcmd(0x01)
  time.sleep(0.0005)

def lcdcmd(ch):
  GPIO.output(RS, 0)
  GPIO.output(D4, 0)
  GPIO.output(D5, 0)
  GPIO.output(D6, 0)
  GPIO.output(D7, 0)
  if ch&0x10==0x10:
    GPIO.output(D4, 1)
  if ch&0x20==0x20:
    GPIO.output(D5, 1)
  if ch&0x40==0x40:
    GPIO.output(D6, 1)
  if ch&0x80==0x80:
    GPIO.output(D7, 1)
  GPIO.output(EN, 1)
  time.sleep(0.0005)
  GPIO.output(EN, 0)
  # Low bits
  GPIO.output(D4, 0)
  GPIO.output(D5, 0)
  GPIO.output(D6, 0)
  GPIO.output(D7, 0)
  if ch&0x01==0x01:
    GPIO.output(LCD_D4, 1)
  if ch&0x02==0x02:
    GPIO.output(LCD_D5, 1)
  if ch&0x04==0x04:
    GPIO.output(LCD_D6, 1)
  if ch&0x08==0x08:
    GPIO.output(LCD_D7, 1)
  GPIO.output(EN, 1)
  time.sleep(0.0005)
  GPIO.output(EN, 0)

 def lcddata(ch):
  GPIO.output(RS, 1)
  GPIO.output(D4, 0)
  GPIO.output(D5, 0)
  GPIO.output(D6, 0)
  GPIO.output(D7, 0)
  if ch&0x10==0x10:
    GPIO.output(D4, 1)
  if ch&0x20==0x20:
    GPIO.output(D5, 1)
  if ch&0x40==0x40:
    GPIO.output(D6, 1)
  if ch&0x80==0x80:
    GPIO.output(D7, 1)
  GPIO.output(EN, 1)
  time.sleep(0.0005)
  GPIO.output(EN, 0)
  # Low bits
  GPIO.output(D4, 0)
  GPIO.output(D5, 0)
  GPIO.output(D6, 0)
  GPIO.output(D7, 0)
  if ch&0x01==0x01:
    GPIO.output(LCD_D4, 1)
  if ch&0x02==0x02:
    GPIO.output(LCD_D5, 1)
  if ch&0x04==0x04:
    GPIO.output(LCD_D6, 1)
  if ch&0x08==0x08:
    GPIO.output(LCD_D7, 1)
  GPIO.output(EN, 1)
  time.sleep(0.0005)
  GPIO.output(EN, 0)

def lcdstring(Str):
  l=0;
  l=len(Str)
  for i in range(l):
    lcddata(ord(message[i]))
lcd_init()
 lcdcmd(0x01)
lcdstring("Circuit Digest")
lcdcmd(0xc0)
lcdstring("Welcomes you")
time.sleep(3) # 3 second delay

# main() function
def main():

    print 'System Ready...'
    URL = 'https://api.thingspeak.com/update?api_key=%s' % key
    print "Wait...."
    while True:
            (humi, temp)= readDHT()
            (pressure) =readBmp180()

            lcdcmd(0x01)
            lcdstring("Humi#Temp#P(hPa)")
            lcdstring(humi+'%'+"  %sC  %s" %(temp, pressure))
            finalURL = URL +"&field1=%s&field2=%s"%(humi, temp)+"&field3=%s" %(pressure)
            print finalURL
            s=urllib2.urlopen(finalURL);
            print  humi+ " " + temp + " " + pressure
            s.close()
            time.sleep(10)


if __name__=="__main__":
   main()
Comments
Traceback (most recent call last):
File "temp2.py", line 185, in <module>
lcd_init()
File "temp2.py", line 104, in lcd_init
lcdcmd(0x33)
File "temp2.py", line 113, in lcdcmd
GPIO.output(RS, 0)
NameError: global name 'RS' is not defined
pls update your code there are lots of mistakes in python code.....pls update it..its not working for raspberry pi 3
Please tell me how is this project is different from the weather station which you built on arduino? And how raspberry pi is utilized in this project?
Raspberry is completely different from Arduino. Pi is almost like a computer which has inbuilt Wifi, Bluetooth etc.. To put it simple Pi is a microprocessor which can be used for complex applications. On the other hand Arduino requires an external Wi-Fi module like ESP8266 to connect to internet and Arduino is just an Microcontroller.
Whenever i run this code i get error this error,
import Adafruit_DHT
ImportError: No module named 'Adafruit_DHT'
Although i have already installed the adafruit from commad line. What should I do? please tell me.
Installed from command line? Are you using Linux
I am getting this error
Traceback (most recent call last):
File "/home/pi/weather.py", line 43, in <module>
GPIO.setup(LCD_E, GPIO.OUT)
NameError: name 'LCD_E' is not defined
This is because you did not install all the required libraries. Also make sure you copy the complete program
Hello, I have entered the code for this project and triple checked for errors. Also "executed" Python Updates etc. I am happy with those results. Also had no issues connecting to ThingSpeak and getting that set up.
However, there seem to be many errors in the Code section, most of which I have corrected but:
addr to be defined! urllib or urrlib2? which is it? Is i2Cbus the same as I2cbus? GPIO.setup(LCD_E,GPIO.OUT) surely should be GPIO.setup(LCD_EN,GPIO.OUT) ???
What is the purpose of the ".value" at the end of the second line of the first def statement ???
At the end of the CODE section, the - if_name_=="_main_":
main()
throws up errors! Whats that all about.
Please enlighten me Saddam. Thanks

pls provide me images of circuit and video of how to coonect it and detailed information about circuit diagram on email id....pls