Humidity and Temperature are very common parameters for measuring at many places like farm, green house, medical, industries home and offices. We have already covered Humidity and Temperature Measurement using Arduino and displayed the data on LCD.
In this IoT project we are going to Monitor Humidity and Temperature over the internet using ThingSpeak where we will show the current Humidity & Temperature data over the Internet using the ThingSpeak server. It is accomplished by the data communications between Arduino, DHT11 Sensor Module, ESP8266 WIFI module and LCD. Celsius scale thermometer and percentage scale humidity meter displays the ambient temperature and humidity through a LCD display and also sends it to ThingSpeak server for live monitoring from anywhere in the world.
Working and ThingSpeak Setup:
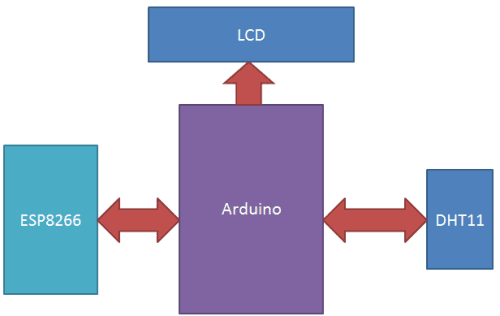
This IoT based project having four sections, firstly Humidity and Temperature Sensor DHT11 senses the Humidity and Temperature Data. Secondly Arduino Uno extracts the DHT11 sensor’s data as suitable number in percentage and Celsius scale, and sends it to Wi-Fi Module. Thirdly Wi-Fi Module ESP8266 sends the data to ThingSpeak’s Sever. And finally ThingSpeak analyses the data and shows it in a Graph form. Optional LCD is also used to display the Temperature and Humidity.
ThingSpeak provides very good tool for IoT based projects for Arduino. By using ThingSpeak site, we can monitor our data over the Internet from anywhere, and we can also control our system over the Internet, using the Channels and webpages provided by ThingSpeak. ThingSpeak ‘Collects’ the data from the sensors, ‘Analyze and Visualize’ the data and ‘Acts’ by triggering a reaction. Here we are explaining about How to send Data to ThingSpeak server by using ESP8266 WIFI Module:
1. First of all, user needs to Create a Account on ThingSpeak.com, then Sign In and click on Get Started.

2. Now go to the ‘Channels’ menu and click on New Channel option on the same page for further process.
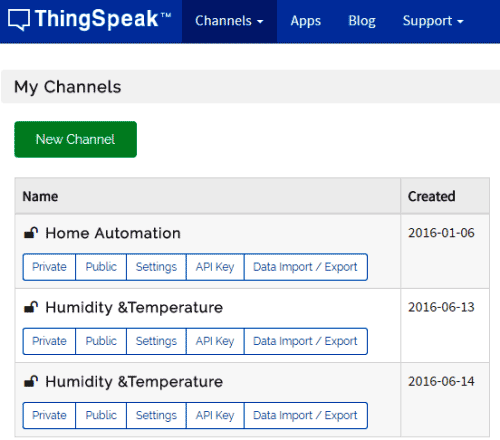
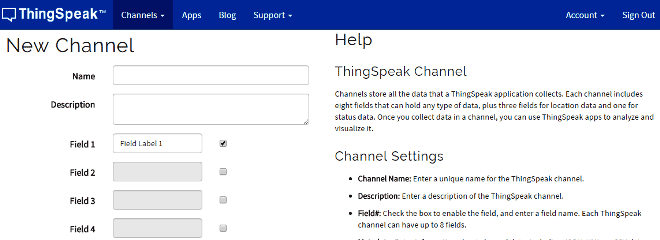
3. Now you will see a form for creating the channel, fill in the Name and Description as per your choice. Then fill ‘Humidity’ and ‘Temperature’ in Field 1 and Field 2 labels, tick the checkboxes for both Fields. Also tick the check box for ‘Make Public’ option below in the form and finally Save the Channel. Now your new channel has been created.
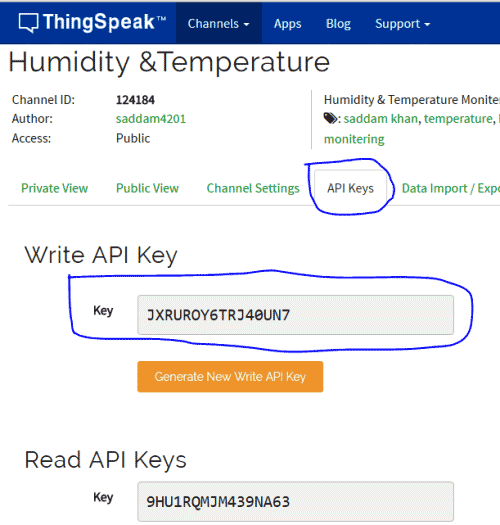
4. Now click on ‘API keys’ tab and save the Write and Read API keys, here we are only using Write key. You need to Copy this key in char *api_key in the Code.
5. After it, click on ‘Data Import/Export’ and copy the Update Channel Feed GET Request URL, which is:
https://api.thingspeak.com/update?api_key=SIWOYBX26OXQ1WMS&field1=0
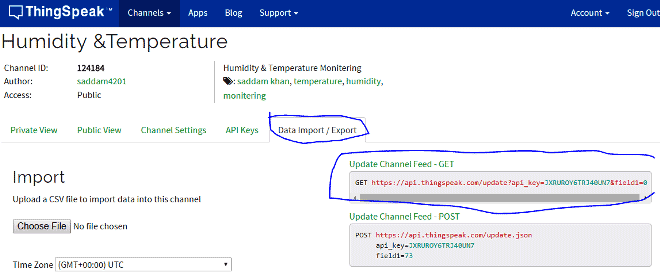
6. Now user need to open “api.thingspeak.com” using the httpGet function with the postUrl as “update?api_key=SIWOYBX26OXQ1WMS&field1=0” and then send data using data feed or update request address.
Before sending the data, user needs to edit this query string or postUrl with temperature and humidity data fields, like shown below. Here we have added both parameters in the string that we need to send via using GET request to server, after it we have used httpGet to send the data to server. Check the full Code Below.
sprintf(postUrl, "update?api_key=%s&field1=%s&field2=%s",api_key,humidStr,tempStr);
httpGet("api.thingspeak.com", postUrl, 80);
The whole process is demonstrated in the Video section, at the end of this Article.
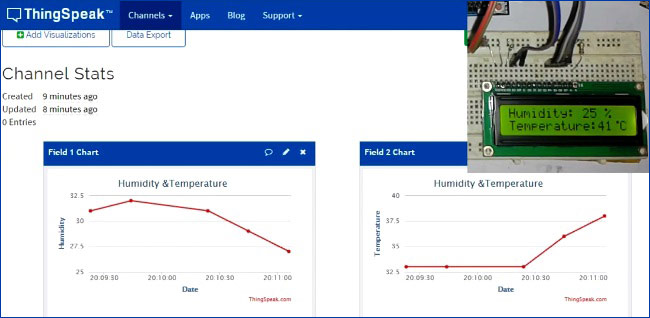
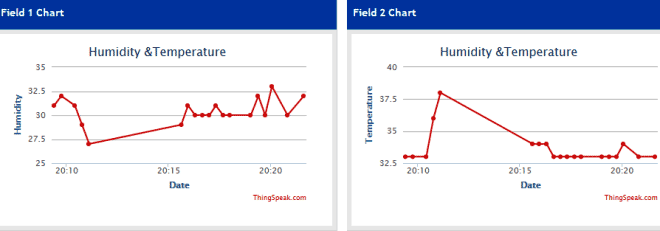
Working of this project is based on single wire serial communication for fetching data from DHT11. First Arduino sends a start signal to DHT module and then DHT gives a response signal with containing data. Arduino collects and extracts the data in two parts first is humidity and second is temperature and then send it to 16x2 LCD and ThingSpeak server. ThingSpeak displays the Data in form of Graph as below:
You can learn more about DHT11 Sensor and its Interfacing with Arduino here.
Circuit Description:
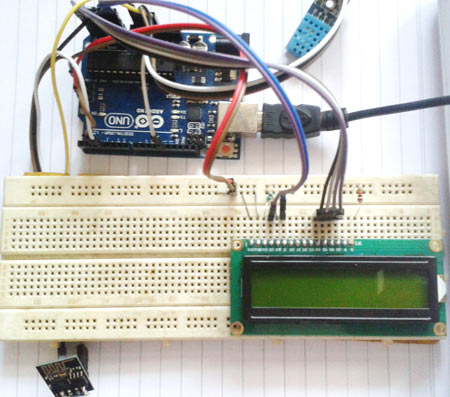
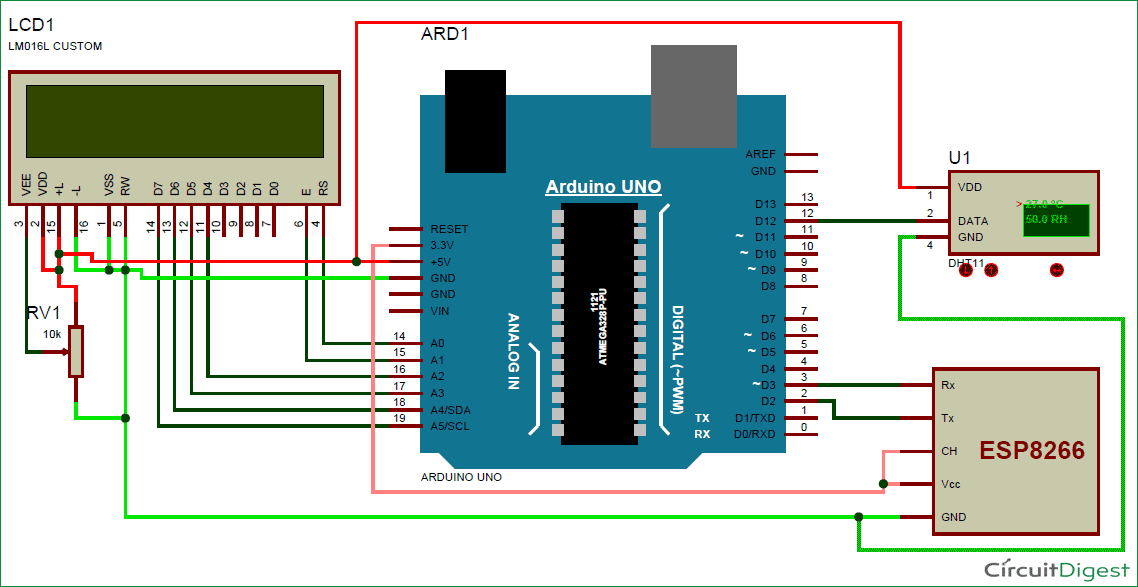
Connections for this ThingSpeak Temperature and Humidity Monitoring Project are very simple. Here a Liquid Crystal Display is used for displaying Temperature and Humidity, which is directly connected to Arduino in 4-bit mode. Pins of LCD namely RS, EN, D4, D5, D6 and D7 are connected to Arduino digital pin number 14, 15, 16, 17, 18 and 19. This LCD is optional.
DHT11 Sensor Module is connected to digital pin 12 of Arduino. Wi-Fi module ESP8266’s Vcc and GND pins are directly connected to 3.3V and GND of Arduino and CH_PD is also connected with 3.3V. Tx and Rx pins of ESP8266 are directly connected to pin 2 and 3 of Arduino. Software Serial Library is also used here to allow serial communication on pin 2 and 3 of Arduino. We have already covered the Interfacing of ESP8266 Wi-Fi module to Arduino in detail.
Programming Part:
Programming part of this project plays a very important role to perform all the operations. First of all we include required libraries and initialize variables.
#include"dht.h"      // Including library for dht
#include<LiquidCrystal.h>
LiquidCrystal lcd(14,15,16,17,18,19);
#include<Timer.h>
Timer t;
#include <SoftwareSerial.h>
SoftwareSerial Serial1(2, 3);
After it enter your Write API key and take some strings.
char *api_key="SIWOYBX26OXQ1WMS";     // Enter your Write API key from ThingSpeak
static char postUrl[150];
int humi,tem;
void httpGet(String ip, String path, int port=80);
In void loop() function we reads temperature and humidity and then show those readings on the LCD.
void send2server() function is used to send the data to server. Send2server function is a timer interrupt service routine, calling in every 20 seconds. When we call update function, timer interrupt service routine is called.
void send2server()
{
  char tempStr[8];
  char humidStr[8];
  dtostrf(tem, 5, 3, tempStr);
  dtostrf(humi, 5, 3, humidStr);
  sprintf(postUrl, "update?api_key=%s&field1=%s&field2=%s",api_key,humidStr,tempStr);
  httpGet("api.thingspeak.com", postUrl, 80);
}
Complete Project Code
#include"dht.h"                      // Including library for dht
#include<LiquidCrystal.h>
LiquidCrystal lcd(14,15,16,17,18,19);
#include<Timer.h>
Timer t;
#include <SoftwareSerial.h>
SoftwareSerial Serial1(2, 3);

#define dht_dpin 12
#define heart 13
dht DHT;
char *api_key="SIWOYBX26OXQ1WMS";     // Enter your Write API key from ThingSpeak
static char postUrl[150];
int humi,tem;
void httpGet(String ip, String path, int port=80);

void setup()
{
 lcd.begin(16, 2);
 lcd.clear();
 lcd.print("   Humidity   ");
 lcd.setCursor(0,1);
 lcd.print("  Measurement ");
 delay(2000);
 lcd.clear();
 lcd.print("Circuit Digest ");
 lcd.setCursor(0,1);
 lcd.print("Welcomes You");
 delay(2000);
 Serial1.begin(9600);
 Serial.begin(9600);
 lcd.clear();
 lcd.print("WIFI Connecting");
 lcd.setCursor(0,1);
 lcd.print("Please wait....");
 Serial.println("Connecting Wifi....");
 connect_wifi("AT",1000);
 connect_wifi("AT+CWMODE=1",1000);
 connect_wifi("AT+CWQAP",1000);
 connect_wifi("AT+RST",5000);
 connect_wifi("AT+CWJAP=\"1st floor\",\"muda1884\"",10000);
 Serial.println("Wifi Connected");
 lcd.clear();
 lcd.print("WIFI Connected.");
 pinMode(heart, OUTPUT);
 delay(2000);
 t.oscillate(heart, 1000, LOW);
 t.every(20000, send2server);
}
void loop()
{
  DHT.read11(dht_dpin);
  lcd.setCursor(0,0);
  lcd.print("Humidity: ");
  humi=DHT.humidity;
  lcd.print(humi);   // printing Humidity on LCD
  lcd.print(" %    ");
  lcd.setCursor(0,1);
  lcd.print("Temperature:");
  tem=DHT.temperature;
  lcd.print(tem);   // Printing temperature on LCD
  lcd.write(1);
  lcd.print("C   ");
  delay(1000);
  t.update();
}
void send2server()
{
  char tempStr[8];
  char humidStr[8];
  dtostrf(tem, 5, 3, tempStr);
  dtostrf(humi, 5, 3, humidStr);
  sprintf(postUrl, "update?api_key=%s&field1=%s&field2=%s",api_key,humidStr,tempStr);
  httpGet("api.thingspeak.com", postUrl, 80);
}
//GET https://api.thingspeak.com/update?api_key=SIWOYBX26OXQ1WMS&field1=0
void httpGet(String ip, String path, int port)
{
  int resp;
  String atHttpGetCmd = "GET /"+path+" HTTP/1.0\r\n\r\n";
  //AT+CIPSTART="TCP","192.168.20.200",80
  String atTcpPortConnectCmd = "AT+CIPSTART=\"TCP\",\""+ip+"\","+port+"";
  connect_wifi(atTcpPortConnectCmd,1000);
  int len = atHttpGetCmd.length();
  String atSendCmd = "AT+CIPSEND=";
  atSendCmd+=len;
  connect_wifi(atSendCmd,1000);
  connect_wifi(atHttpGetCmd,1000);
}
void connect_wifi(String cmd, int t)
{
  int temp=0,i=0;
  while(1)
  {
    lcd.clear();
    lcd.print(cmd);
    Serial.println(cmd);
    Serial1.println(cmd);
    while(Serial1.available())
    {
      if(Serial1.find("OK"))
      i=8;
    }
    delay(t);
    if(i>5)
    break;
    i++;
  }
  if(i==8)
  {
   Serial.println("OK");
        lcd.setCursor(0,1);
      lcd.print("OK");
  }
  else
  {
   Serial.println("Error");
         lcd.setCursor(0,1);
      lcd.print("Error");
  }
}
Comments
What about the Timer.h library
please send me link for that
Plz tell me how to configure ESP8266 with route.
There is no need of Configuration???
No need to give AT command on blank sketch?
If yes then tell me what is a procedure??
can anyone pls tell me how to restore the original firmware in the node mcu. the problem is i have flashed it once and would like to restore it again... any suggestions
can anyone please tell me why heart variable is used?
hi can u provide the link for the library because i downloaded some DHT library but its not working
https://github.com/adafruit/DHT-sensor-library
Here you go.
Download as as ZIP and add to your Arduino IDE
Hi, I've been wondering if it could work without wifi module ? I explain, I'm working on a project and I wish to send my ear heart rate monitor data to my thingspeak account but I don't have WiFi Shield with my arduino so I was wondering if you had any idea on how I could do it ? Because my arduino is connected to my computer so i can receive the data and print my heart rate on my screen but do you have any idea to send it to my account ? I will appreciate your answer ! Thanks you !
hi i did all the steps u explained in the video but i am getting error in the transmission and i am not able to connect to thingspeak server though i gave correct API key in program
Perhaps if you posted the error someone could help?
"Getting an error" provides no basis for a diagnosis.
The author does not seem to check back here....anyways....
For me....It just does this endlessly.....hope you have better luck.
Noone here reports success with this so far.
Connecting Wifi....
AT
AT
OK
AT+CWMODE=1
AT+CWMODE=1
OK
AT+CWQAP
AT+CWQAP
OK
AT+RST
Connecting Wifi....
AT
AT
OK
AT+CWMODE=1
AT+CWMODE=1
OK
AT+CWQAP
AT+CWQAP
OK
AT+RST
Connecting Wifi....
AT
AT
OK
AT+CWMODE=1
AT+CWMODE=1
OK
AT+CWQAP
AT+CWQAP
Yes asking question is a kind of art, many people here post questions with insufficient details. It would also be better if the author could step in to resolve the problems here. May be using the forum could get his attention
Once you figure out the nuances, this sketch works well.
The connection problem I was having was due to the assumption in the sketch that noone sets up static IP's on their routers.
Here is the code you will need if you turned off DHCP on your router and instead use static IP addresses....
Serial.println("Connecting Wifi....");
connect_wifi("AT",1000);
connect_wifi("AT+CWMODE=1",1000);
connect_wifi("AT+CIPSTA=\"192.168.003.2\",\"192.168.003.001\",\"255.255.255.000\"",10000); //(obviously use your own IP addresses for router,gateway and mask)
connect_wifi("AT+CWQAP",1000);
connect_wifi("AT+RST",5000);
connect_wifi("AT+CWJAP=\"YourSSIName\",\"yourpassword\"",10000);
Serial.println("Wifi Connected");
Note that this sketch will run just fine even if you do not physically connect an LCD. I opted not to and it works fine.
Very well done Project. This is actually the first one out of many Temp and Humidity over the Internet using WiFi Projects that I tried that works.
hi. can you share your arduino coding. because the provided coding are having some errors. tq
Help me to do the same with wifi shield
while execution it shows error compiling code for arduino uno can you help for dis project
i had include all libray files for dht sensor bt error in include<dht.h>
what can i do for it
my project is esp8266 wifi module wheather station
i want to include Adraxx Arduino compatible MQ2 Gas Sensor - Methane, Butane, LPG, smoke Sensor in my arduino program pls help
my program is
// Robo India Tutorial
// Simple code upload the tempeature and humidity data using thingspeak.com
// Hardware: NodeMCU,DHT11
#include <DHT.h> // Including library for dht
#include <ESP8266WiFi.h>
String apiKey = "VR8F5R51P4INKW86"; // Enter your Write API key from ThingSpeak
const char *ssid = "AndroidAP"; // replace with your wifi ssid and wpa2 key
const char *pass = "appus123";
const char* server = "api.thingspeak.com";
#define DHTPIN 0 //pin where the dht11 is connected
DHT dht(DHTPIN, DHT11);
WiFiClient client;
void setup()
{
Serial.begin(115200);
delay(10);
dht.begin();
Serial.println("Connecting to ");
Serial.println(ssid);
WiFi.begin(ssid, pass);
while (WiFi.status() != WL_CONNECTED)
{
delay(500);
Serial.print(".");
}
Serial.println("");
Serial.println("WiFi connected");
}
void loop()
{
float h = dht.readHumidity();
float t = dht.readTemperature();
if (isnan(h) || isnan(t))
{
Serial.println("Failed to read from DHT sensor!");
return;
}
if (client.connect(server,80)) // "184.106.153.149" or api.thingspeak.com
{
String postStr = apiKey;
postStr +="&field1=";
postStr += String(t);
postStr +="&field2=";
postStr += String(h);
postStr += "\r\n\r\n";
client.print("POST /update HTTP/1.1\n");
client.print("Host: api.thingspeak.com\n");
client.print("Connection: close\n");
client.print("X-THINGSPEAKAPIKEY: "+apiKey+"\n");
client.print("Content-Type: application/x-www-form-urlencoded\n");
client.print("Content-Length: ");
client.print(postStr.length());
client.print("\n\n");
client.print(postStr);
Serial.print("Temperature: ");
Serial.print(t);
Serial.print(" degrees Celcius, Humidity: ");
Serial.print(h);
Serial.println("%. Send to Thingspeak.");
}
client.stop();
Serial.println("Waiting...");
// thingspeak needs minimum 15 sec delay between updates, i've set it to 30 seconds
delay(10000);
}
I have tried 3 dht libraries but none of them are working. I am a newbie so kindly help me with this.
Error message: fatal error: dht.h: No such file or directory.
In main code file replace #include <dht.h> with #include"dht.h" it works for me.
You need to download/install the libraries you need for the .h header files. Sometimes you can do a websearch in and get it (remember: it has to be in the same folder as your Arduino code file that requires that header file).
avrdude: stk500_recv(): programmer is not responding
what can i do with code if i want to use gsm module instead of esp8266
Hello what is the U1 shown in the wiring pic?
I am getting this error message from line 7 of the code. I am confused on how to handle this. Can someone help me, please?
Please can DHT-22 be used in stead of DHT-11? if yes what would change in the codes?



hi,
congrats! very well organized, perfect system :)
i am planning to use it in my little greenhouse.
i have a question, could you help me please;
i am also want to add this system a "soil humidity sensor(let say SHS)
i need to follow temp+humidity on air also humidity on soil.
but i can not add the function of seeing SHS on lcd and via internet. which code should we add?
please help, my tomatoes are dying :)