

Gas leaks can pose serious safety risks, especially in homes, kitchens, and small commercial spaces. In this project, you'll learn how to build a simple and budget-friendly gas leakage detector using Arduino. This LPG gas leak detector uses an Arduino Uno and MQ-5 gas sensor to detect gas levels in the air and activates a buzzer and LED to alert users when a leak is present.
This is a beginner-friendly Arduino project that’s both practical and educational. It requires only a few basic components and offers a great way to apply electronics in real-life safety applications. Without further delay, let’s get started on building it!
Table of Contents
Gas Leakage Detector Using Arduino Project
This project is built around the MQ-5 gas sensor, which is designed to detect gases like LPG, propane, and methane. The sensor constantly monitors the air, and if it detects gas levels above a safe limit, it sends a signal to the Arduino to take action.
When the Arduino receives this signal, it immediately turns on a buzzer to sound an alarm and lights up an LED to give a visual warning. This helps alert anyone nearby about the gas leak. Once the gas levels drop back to normal, the system automatically turns off both the buzzer and the LED, making it a fully automated safety solution.
Although we’re using the MQ-5 sensor in this project, other options like the MQ-2 and MQ-6 also work well for detecting LPG gas. If you’re curious about how these sensors work and want to explore more, check out a detailed article called "Introduction to Gas Sensors: Construction, Types, and Working". It’s a great resource to understand how gas sensors function and the differences between them.
MQ-5 vs MQ-2 vs MQ-6: Choosing the Right Gas Sensor
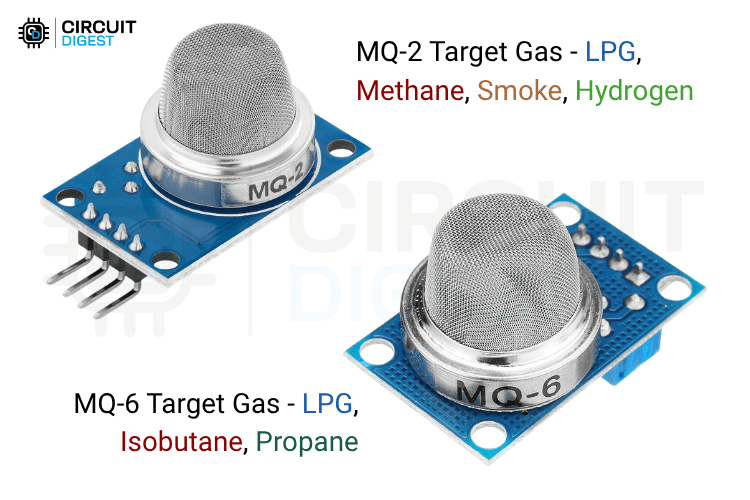
While this gas leakage detector using Arduino uses the MQ-5 sensor, understanding the differences between gas sensors helps you choose the best option for your specific needs. The MQ-2 sensor detects LPG, propane, hydrogen, and smoke, making it suitable for multi-gas detection applications. The MQ-6 sensor is specifically designed for LPG and butane detection, offering higher sensitivity to these gases compared to MQ-5.
For this Arduino gas leak detector project, MQ-5 provides the perfect balance of sensitivity and reliability for residential LPG detection applications.
Components Required for Arduino Gas Leakage Detector Project
Below, you can see the required components list.
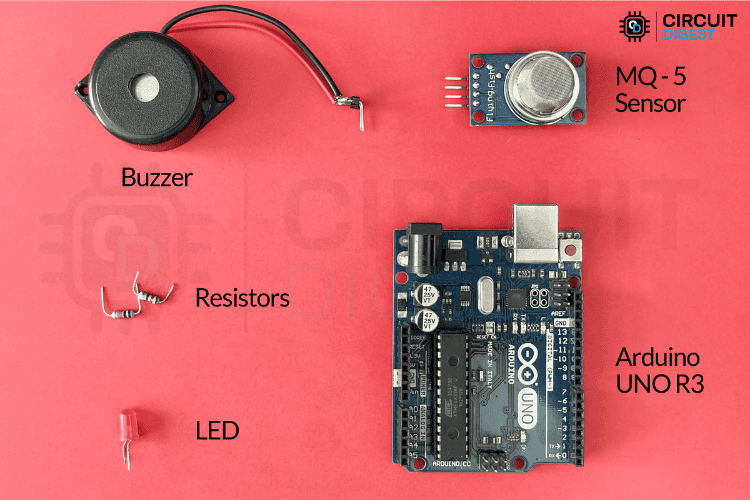
Arduino Uno – 1 (The Brain of the system)
MQ-5 Gas Sensor – 1 (Detects gas presence in the environment)
Buzzer – 1 (Audible alert when gas is detected)
LED – 1 (Visual indicator)
220Ω resistor – 1 (Used with the LED)
Breadboard & jumper wires – Required Quantity(For quick prototyping)
9V battery or USB–1 (Powering the Circuit)
Circuit Diagram of Gas Leakage Detector Using Arduino
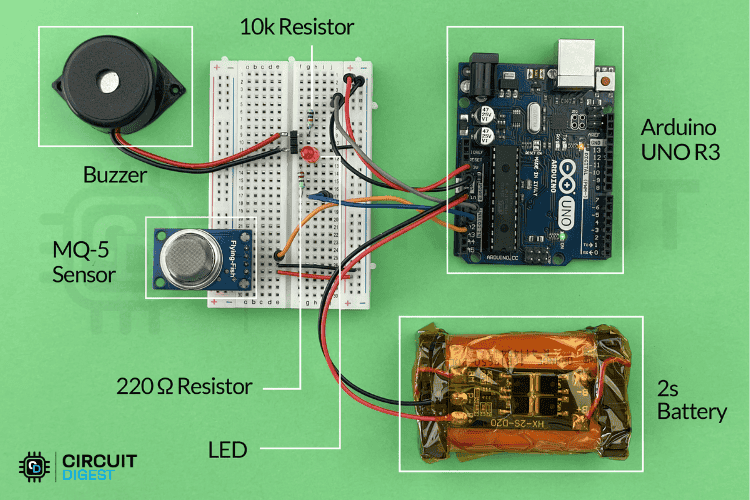
The circuit diagram for the gas leakage detector is simple and straightforward. Below, you can see the circuit diagram used in this project.

The system is powered using a 7.2V 18650 battery, which is connected to the Arduino's power input (Vin). The Arduino then supplies 5V to power the MQ-5 gas sensor and other connected components. A common ground (GND) line is used to ensure all components share the same electrical reference.
The digital output of the MQ-5 gas sensor is connected to Arduino pin A2. This setup allows the Arduino to continuously read and monitor the presence of LPG gas in the environment.
For alerts, a buzzer is connected to Arduino pin A0 with a 10kΩ resistor, providing an audible warning when gas is detected. In your case, you can connect the buzzer with or without a resistor based on your sound requirements. For testing purposes, we preferred lower sound, so we used a higher resistance of 10kΩ.
Additionally, an LED connected to pin A1 through a 220Ω resistor serves as a visual indicator during a gas leak.
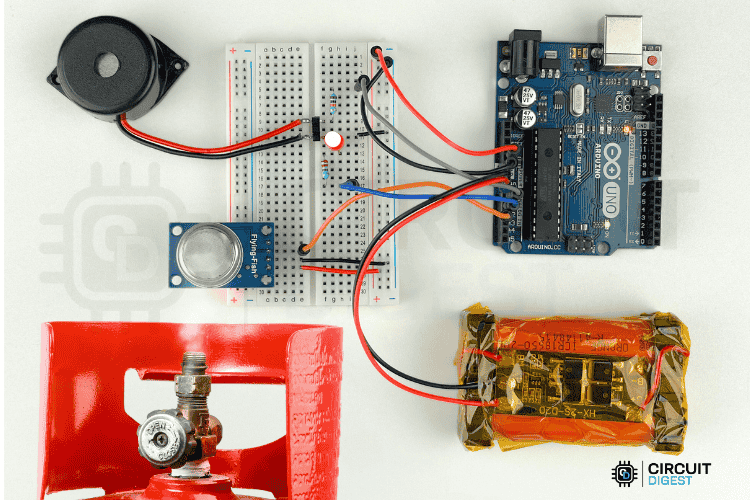
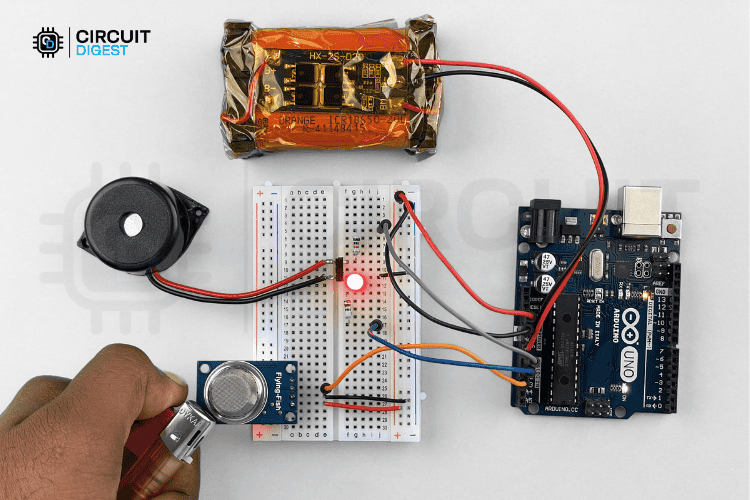
Above, you can see the fully assembled image of the project as per the circuit diagram. You can use other voltage sources like a power adapter or USB power for powering the system, using a 2S battery is not the only option.
Arduino Code for Gas Leakage Detector Project
For this project, we simply chose the digital output of the MQ-5 sensor, which can be easily tuned via the built-in potentiometer on the sensor module. This eventually makes the code simple to understand. If you are completely new to arduino, check out our tutorial on Arduino IDE and Arduino Programming to understand the basics. The complete code for this project can be found at the bottom of this page, in this section lets understand the code section by section.
Variables and Pin Definitions
const int gasSensorDigitalPin = A2;
const int ledPin = A1;
const int buzzerPin = A0;
The code starts by defining three constant variables that specify which Arduino pins connect to each component. The gas sensor's digital output connects to pin A2, the warning LED connects to pin A1, and the buzzer connects to pin A0. These constants make the code easy to read and modify, if you need to change a pin connection, you only need to update it in one place, and that's here.
Setup Function
pinMode(gasSensorDigitalPin, INPUT);
pinMode(ledPin, OUTPUT);
pinMode(buzzerPin, OUTPUT);
The setup function runs exactly once when the Arduino powers on or resets. This function configures the three pins for their specific roles, it sets pin A2 as an input to read signals from the gas sensor, while pins A1 and A0 are set as outputs to control the LED and buzzer, respectively.
Serial.begin(9600);
Serial.println("Gas Detection System Initialized (Digital Mode)");
The setup function also initializes serial communication at 9600 baud rate, which allows the Arduino to send status messages to your computer. Finally, it prints an initialization message to confirm the system has started successfully.
Loop Function
int gasState = digitalRead(gasSensorDigitalPin);The loop function contains the core logic and runs continuously while the Arduino is powered. It starts by reading the digital state of the gas sensor using the digitalRead function. The sensor outputs either HIGH (normal conditions) or LOW (gas detected).
if (gasState == LOW) {
  digitalWrite(ledPin, HIGH);
  digitalWrite(buzzerPin, HIGH);
  Serial.println("!! Gas Leak Detected !!");
} else {
  digitalWrite(ledPin, LOW);
  digitalWrite(buzzerPin, LOW);
  Serial.println("Environment Normal");
}
The code uses an if-else statement to handle two scenarios. When gas is detected (sensor reads LOW), it activates both alarm systems by turning on the LED and buzzer, then prints an alarm message to the serial monitor. When no gas is present (sensor reads HIGH), it turns off both the LED and buzzer, then prints a normal status message.
delay(800);The loop ends with an 800-millisecond delay before repeating. This delay prevents the serial monitor from being flooded with messages and gives the system time to process each reading properly.
This Arduino code for gas leakage detection can be easily modified for different requirements. You can adjust the delay time, add multiple sensors, or integrate with other Arduino projects. The simple digital read approach makes this gas detector Arduino code perfect for beginners learning embedded programming.
GitHub Repository with Code and Circuit


Working of the Arduino Gas Leakage Detector
Once the code is successfully uploaded to the Arduino, you can begin testing the system. Since we are using the digital output of the MQ-5 gas sensor, it is essential to correctly tune the sensor's threshold using the onboard potentiometer to ensure accurate gas detection.
Tuning the Sensor Threshold
The gas sensor module has a small blue knob called a potentiometer that controls how sensitive the sensor is to gas. In digital mode, the sensor only gives two signals: HIGH means no gas detected, and LOW means gas detected. The potentiometer sets the "trigger point", determining how much gas is needed before the sensor switches from HIGH to LOW.
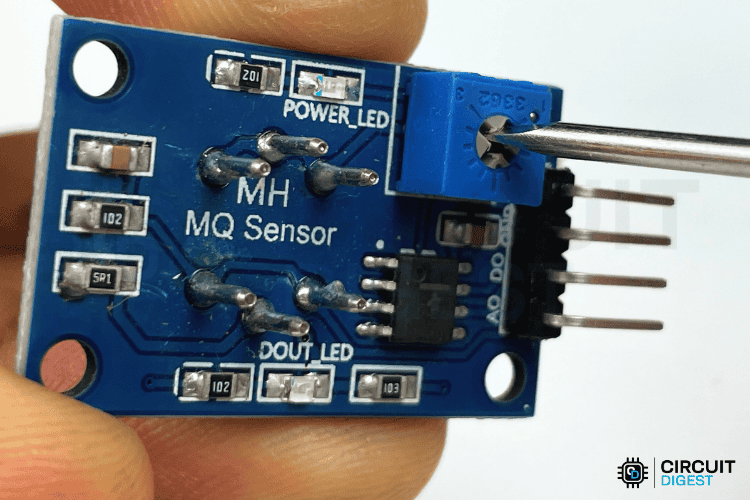
To adjust it properly, first turn the potentiometer clockwise in clean air until the sensor's onboard LED turns OFF. Then bring some gas near the sensor (like from a lighter), and the LED should turn ON. If it doesn't turn ON, turn the potentiometer counter-clockwise to make it more sensitive. If it turns ON too easily, even in clean air, turn it clockwise to make it less sensitive.
This adjustment requires a trial-and-error method. If the sensor is too sensitive, turn the potentiometer clockwise to reduce sensitivity. If it's not sensitive enough, turn it counter-clockwise to increase sensitivity. Keep adjusting until it only triggers when actual gas is present, ensuring reliable detection without false alarms.
Remember, this behavior might be completely reversed in some sensor modules.
Working Demo
After successfully tuning the sensor, our system is ready to deploy. For testing purposes, I am using a small cigarette lighter, which contains the same components as LPG. Below you can see the image of the system where the warning signal is activated in the presence of gas from the cigarette lighter.
Advanced features such as SMS alert systems and IoT integration can also be incorporated into the project to enhance its functionality. These additions enable remote monitoring and real-time notifications, making the system more reliable and suitable for critical safety applications.
Troubleshooting Common Issues
If your Arduino-based gas leakage detector isn't working properly, ensure the MQ-5 gas sensor has warmed up for at least 24 hours for accurate readings, verify all connections match the circuit diagram, and confirm the potentiometer is properly tuned for your environment. You can also check out our dedicated tutorial on how to use mq5 gas sensor with arduino to understand the basics. If you are still facing problems, write them in the comment section below or us the ask the community option at the bottom of this page.
Safety Considerations and Limitations
This DIY gas leakage detector is designed for educational and basic monitoring purposes. For critical safety applications, always use certified commercial gas detectors as primary safety devices. This Arduino gas sensor project should serve as a supplementary monitoring system rather than a replacement for professional safety equipment.
Applications and Uses of Arduino Gas Leakage Detector
The gas leakage detector using Arduino offers versatile applications across various environments where gas safety is crucial. This Arduino-based gas detection system can be deployed in multiple settings to provide reliable safety monitoring.
Home and Kitchen Safety: Install the detector near gas stoves, water heaters, and LPG cylinders to monitor cooking areas and utility rooms. The system provides immediate alerts when gas concentrations exceed safe levels, protecting families from potential gas poisoning or explosion risks.
Commercial Applications: Small restaurants, food trucks, and commercial kitchens can benefit from this Arduino gas sensor project for continuous monitoring. The low-cost solution makes it accessible for small businesses that need reliable gas detection without expensive commercial systems.
Industrial Monitoring: Warehouses storing LPG cylinders, gas distribution centers, and small manufacturing units can implement this system for basic gas leak detection. The MQ-5 sensor effectively detects propane, butane, and methane leaks in industrial environments.
Educational Projects: This project serves as an excellent learning tool for students studying electronics, embedded systems, and safety engineering. It demonstrates practical applications of Arduino programming and sensor interfacing in real-world safety scenarios.
RV and Camping Safety: Recreational vehicles and camping setups using portable gas stoves or heaters can benefit from this portable gas detection system. The battery-powered operation makes it ideal for outdoor activities where gas safety monitoring is essential.
Laboratory and Workshop Use: Research labs and workshops using gas-powered equipment can implement this system as a backup safety measure. The digital output mode provides simple on/off detection suitable for basic safety requirements.
Frequently Asked Questions About Gas Leakage Detector Using Arduino
Which gas sensor is best for Arduino gas leak detection?
The MQ-5 gas sensor is ideal for LPG detection in this Arduino gas leakage detector project. However, MQ-2 works for multiple gases, while MQ-6 offers higher LPG sensitivity. Choose based on your specific gas detection requirements.
How accurate is an Arduino-based gas leakage detector?
This DIY gas detector provides reliable detection for educational and supplementary monitoring purposes. While effective for basic gas leak detection, it should not replace certified commercial detectors for critical safety applications.
Can I use this gas detector for other gases besides LPG?
Yes, by replacing the MQ-5 sensor with other MQ series sensors, you can detect different gases. MQ-2 detects smoke and multiple gases, while MQ-7 detects carbon monoxide in your Arduino gas sensor project.
How long does the MQ-5 sensor last in this Arduino project?
The MQ-5 gas sensor typically lasts 2-5 years with continuous operation. Regular calibration and proper handling extend sensor life in your gas leakage detector using Arduino.
Conclusion
Building a gas leakage detector using Arduino is an excellent way to learn electronics while creating a practical safety device. This Arduino-based gas detection system demonstrates how simple components like the MQ-5 gas sensor, buzzer, and LED can create an effective monitoring solution. Whether you're a student learning Arduino programming or someone interested in home safety automation, this gas detector Arduino project provides hands-on experience with sensor interfacing and embedded programming. Remember to always use this as a supplementary safety measure alongside certified commercial gas detectors.
This gas leakage detector using Arduino project can be further enhanced with wireless connectivity, smartphone notifications, or data logging capabilities. The modular design makes it easy to expand and customise for specific applications, making it a perfect foundation for advanced Arduino gas sensor projects. Get inspired by creative Arduino projects with code, schematics and real component-level explanations.
Similar Gas Leakage Detector Projects
Previously, we have built many interesting gas leakage detector projects. If you want to know more about those projects, the links are given below.

Arduino Air Quality Monitoring System
Learn how to build an Arduino-based Air Quality Monitoring System using the MQ-135 sensor. This project helps track air pollution levels with real-time data display, ideal for home and environmental monitoring applications.

Measuring CO2 Concentration in Air using Arduino and MQ-135 Sensor
Discover how to interface the MQ135 gas sensor with Arduino to measure CO2 levels in PPM. This project offers a simple way to monitor indoor air quality and detect harmful gases using a cost-effective setup.

Gas Detection and PPM Measurement using PIC Microcontroller and MQ Gas Sensors
Learn how to build a gas detection and PPM measurement system using a PIC microcontroller and an MQ gas sensor. This tutorial covers circuit design, sensor interfacing, and real-time gas concentration monitoring for safety applications.
