

The ESP32-CAM is one of the most popular development modules, featuring built-in Wi-Fi and a camera. With its robust 32-bit processor, it’s widely used in countless projects by hobbyists around the world! Thanks to its ability to capture images and videos, the possibilities in the Internet of Things are endless, from monitoring and surveillance to automation.
In this ESP32 CAM Telegram bot tutorial, we’re going to take a look at one of its IoT applications: its ability to communicate via a Telegram bot to send and receive messages from a Telegram user. This comprehensive guide demonstrates sharing images in Telegram using ESP32 CAM and how we can further extend this project to remote monitoring and surveillance. We'll explore how to create a powerful Telegram camera bot that enables remote image capture and video recording. By following this ESP32 CAM Telegram bot example, you'll learn to build a professional-grade system for wireless camera control.
Without any further ado, let’s get started!
Table of Contents
What is a Telegram Bot?
For total beginners, the term “bot” might be a bit confusing at first. So, let me clear it up!
A Telegram camera bot is not a real person, but it is capable of sending messages, attaching files, sending images and videos, and much more. It can even reply to our messages. Beyond that, bots can answer queries, show information, set reminders, manage groups, play games, translate text, or even connect to other services like weather updates or news feeds. They’re like mini-apps inside Telegram, but everything is run by code instead of a human.
This is possible because Telegram provides a special set of tools (called an API) that lets programmers teach bots how to perform almost any function or service they want. Bots are flexible and can be programmed to handle simple jobs or carry out complex tasks, all within the Telegram app.
This ESP32 CAM Telegram bot serves as an excellent starting point for IoT security applications. For more advanced implementations, you might want to explore our AIoT Security System with GSM WiFi Enabled Remote Monitoring, which adds cellular connectivity for areas without reliable Wi-Fi coverage.
Types of Telegram Bots and Their Applications
You can interact with most bots by searching for their name or username in Telegram, starting a chat, and typing commands or tapping on buttons they provide.
Getting started with a bot involves these simple steps:
- First, find the bot – In Telegram, tap the search bar and type a bot’s username (for example, @myidbot or @BotFather).
- Next, start a chat – Open the bot and tap “Start.” Most bots will send you a welcome message with instructions.
- Send commands – Bots usually respond to commands (these start with /, like /start or /help) or even simple messages.
By doing this, you can easily use bots in your Telegram app.
With this, I’d also like to mention: be responsible with how you use bots. Even though they’re meant for good and educational purposes, they can be misused depending on the user's intent. We even conducted dedicated research on one such misuse, Telegram Bots Exposing Vehicle Owners Data Rising Privacy Concerns. So, please be cautious about your actions.
Overview of ESP32-CAM Telegram Bot Project
In this ESP32 CAM Telegram bot example, as you already know, we’ll be using a Telegram bot. So, how does this work? What exactly do we do? I’ll answer all of that here.
The steps involved in this project tutorial can be viewed in two different parts,
Hardware Configuration
On the hardware side, we’ll be using the AI-Thinker ESP32-CAM module. That’s it! There’s nothing else complex on the circuit side; just the ESP32-CAM module and a programming cable are all you need. This single-board solution includes everything needed for sharing images in Telegram using ESP32 CAM using Arduino.
- ESP32-CAM Module: The main development board with integrated camera and Wi-Fi
- USB Programming Cable: For uploading code (either built-in USB or FTDI adapter)
Software Implementation Steps
Before diving into the implementation, it's worth noting that this basic Telegram camera bot can be enhanced with AI capabilities. Our Automated Security System with Telegram Bot and Facial Recognition demonstrates how to add intelligent person detection to your surveillance setup.
Now, when it comes to software, there’s a bit more to work on:
⇒ Step 1: First, we need to create our own bot using @BotFather. The credentials of this newly created bot are what the ESP32 will use; it will basically act as this bot itself.
⇒ Step 2: Next, we get our Chat ID using @myidbot. With this ID, the ESP32 bot knows who it's chatting with. This Chat ID is important to identify the user. This identifier tells the ESP32 CAM Telegram bot which Telegram user is authorised to communicate with it. It can be from any Telegram user. Think of it like the bot's contact number for you.
⇒ Step 3: Then, we upload the code to the ESP32-CAM, which includes the bot token and Chat ID. This uploaded code acts as the brain of the bot running on the ESP32.
⇒ Step 4: Now, you need to send an initial message, /start, from your Telegram account (must be an authorised user) to initiate communication.
⇒ Step 5: From this point onward, you can request images or videos. It’s just like chatting with another person on Telegram; you send a message, and the ESP32 replies!
This architecture enables seamless sharing images in Telegram using ESP32 CAM, making it an ideal solution for remote monitoring, security applications, and IoT projects.
So, this is how the working of our project looks.
Essential Components
Here, the circuit diagram is nothing but the ESP32-CAM module itself. Whatever the type of module, it’s enough to work with this project and perfectly act as the Telegram bot. The only extra things needed apart from the ESP32-CAM module are the serial interface for programming purposes and the power input. it will perfectly function as your Telegram camera bot. Beyond the main module, you'll need:
- Serial Programming Interface: For uploading code (USB-to-TTL converter or integrated USB)
- 5V Power Supply: Stable power source for reliable operation
- MicroSD Card (Optional): For video recording and storage capabilities
- External Antenna (Recommended): Improves Wi-Fi signal strength and reduces latency
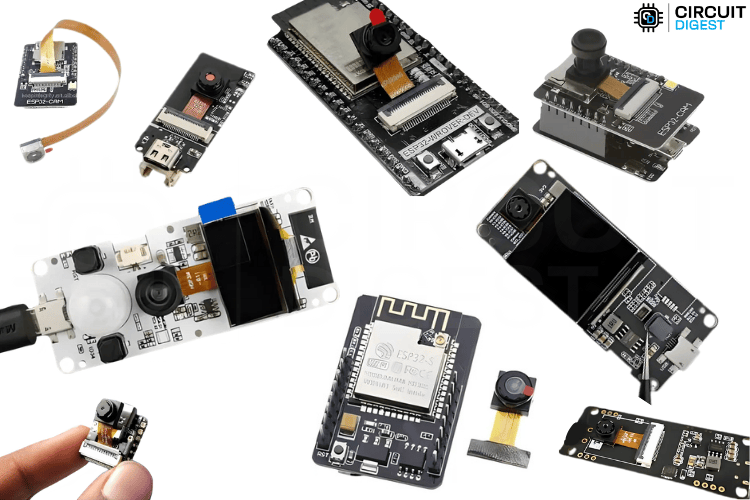
ESP32-CAM Module Variants
Several ESP32-based camera modules are compatible with this ESP32 CAM Telegram bot tutorial. There are a lot of module types available that are similar to the ESP32-CAM model by AiThinker. Either module will work fine; the only thing you need to update is the camera pins in the code according to your module’s model. In my case, I am using only the AiThinker model. This module has no built-in USB interface, though there are some versions that have a built-in USB option for easier programming. I will be using such a module.
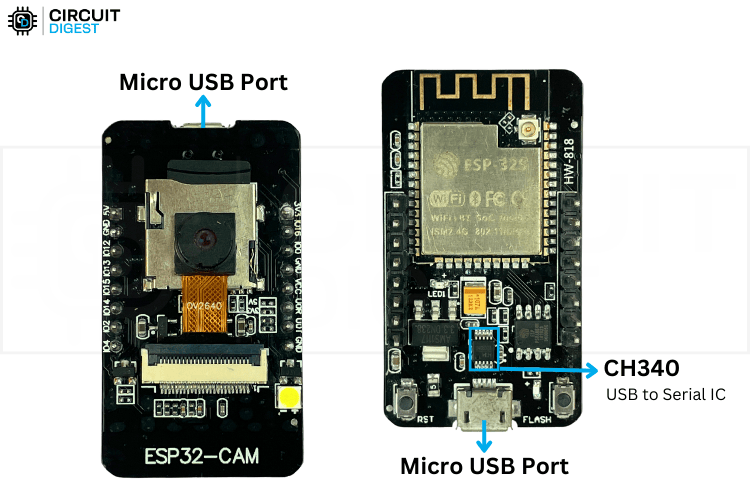
But if you don’t have such a model, you can always use a separate programmer or a USB-to-TTL converter. In that case, you can refer to the following article to know more about programming the ESP32-CAM using a TTL-to-USB converter and its circuit diagram. For detailed programming instructions using a TTL-to-USB converter, refer to our comprehensive guide: How to Program ESP32 CAM using Arduino.
Circuit Diagram of the ESP32-CAM Telegram Bot Project

With this, let’s move to the software side, starting with Telegram.
Creating Your Telegram Bot: Step-by-Step Guide
To create your own Telegram Camera bot, first, you need to log in to Telegram using your mobile phone number. After your account is created, log in either on mobile or desktop.
Now, in the search bar, type “@BotFather”; this is the username of the bot. If you search for just “botfather,” you may find multiple results with the same name and profile picture. The thing is, people can create bots with the same name, but the username must be unique. So it’s better to find the required bot using the username. The original BotFather account also has a verified badge, making it easier to identify. You can see all these details in the image below.
When you select BotFather, you will first see the welcome screen. Unlike other bots, the first message you need to send is “/start,” or simply click the Start button. Instantly, you will receive another message showing all the available commands.
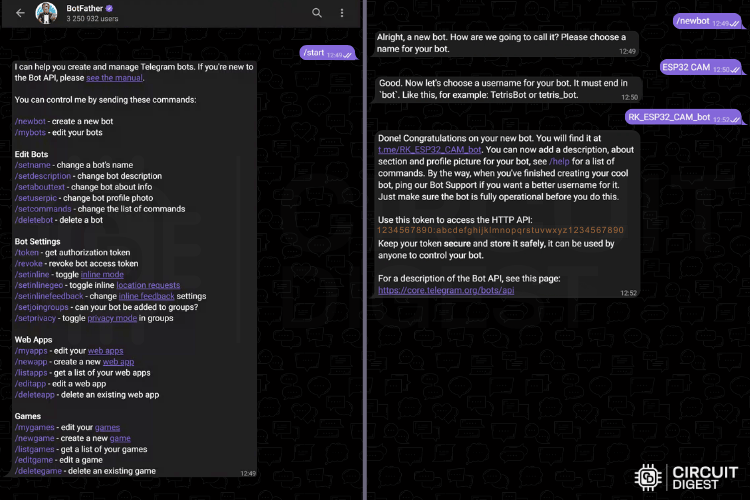
From here, the next steps are simple. First, you need to enter the bot's name (can be anything) and the username (must be unique). After providing these details, your bot will be created, and its HTTP API access token will be shared with you.
Bot Creation Process:
» Send /newbot command to BotFather
» Choose a display name for your bot (can be anything descriptive, e.g., "My Camera Bot")
» Select a unique username ending in "bot" (e.g., "my_esp32_camera_bot")
» Receive your HTTP API token – this critical credential enables sharing images in Telegram using ESP32 CAM using Arduino
This API token is essential for the ESP32-CAM module to function as a bot, and with the help of Telegram, it transforms into the ESP32 CAM Telegram Bot.
Getting Chat ID
Getting the chat ID is important because the bot needs to know the destination, or, in simple terms, the contact that the bot is authorised to send or receive messages from. This can be any profile you choose to use with the bot. For my application, I created it in my own profile.
Similar to BotFather, this bot can be found only using its username, which is “myidbot.” Below, you can see the bot details and its welcome message.
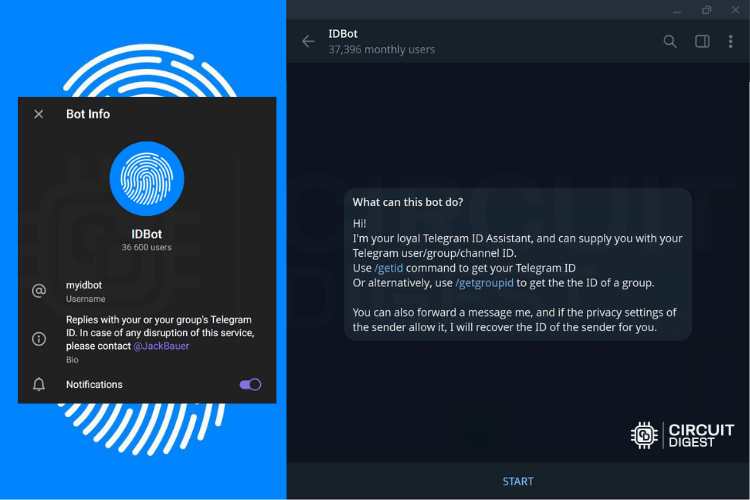
Now click the Start button or send the “/start” command. In the welcome message, the instructions are clear. It expects only two commands, /getid and /getgroupid.
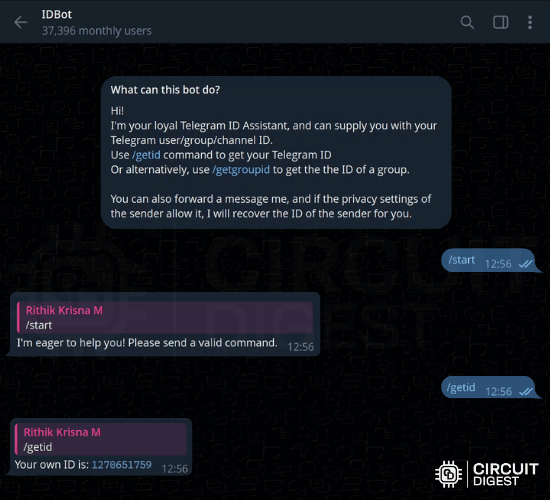
By sending the “/getid” command, you will receive your Telegram ID, which is the chat ID we need.
Programming the ESP32-CAM as a Telegram Bot
We created a comprehensive ESP32 CAM Telegram bot tutorial that can capture images and record custom-duration AVI videos, which can be stored locally and sent to Telegram for viewing. As you might already know, an SD card is mandatory if you wish to record or send videos. However, images can be processed without an SD card.
Now, let’s take a deeper dive into the code, starting with the libraries included.
Required Libraries and Installation
Below is the complete list of libraries needed for sharing images in Telegram using ESP32 CAM, along with installation instructions:
| Arduino.h | Provides core Arduino functions like setup(), loop(), digitalWrite(), delay(), and data types. [Built-in Library] |
| WiFi.h | Handles Wi-Fi network connection, scanning, and management for internet connectivity. [Built-in Library] |
| WiFiClientSecure.h | Enables secure SSL/TLS HTTPS connections for encrypted communication with Telegram servers. [Built-in Library] |
| soc/soc.h | Low-level system-on-chip register access and hardware control functions. [Built-in Library] |
| soc/rtc_cntl_reg.h | Real-time clock control registers, used here to disable the brownout detector. [Built-in Library] |
| esp_camera.h | Complete camera control library for the ESP32-CAM module (sensor configuration, frame capture, quality settings). [Built-in Library] |
| esp_task_wdt.h | Watchdog timer management to prevent system freezes and handle task monitoring. [Built-in Library] |
| UniversalTelegramBot.h | Complete Telegram Bot API implementation for sending/receiving messages, photos, and documents. [External Library] |
| ArduinoJson.h | JSON parsing and serialization library for handling Telegram API responses. [External Library] |
| FS.h | File system operations interface for reading/writing files. [Built-in Library] |
| SD_MMC.h | SD card interface using the MMC protocol for storing photos and videos. [Built-in Library] |
| EEPROM.h | Non-volatile storage for saving persistent data like settings. [Built-in Library] |
| esp_timer.h | High-precision microsecond timing functions for accurate video frame timing. [Built-in Library] |
Some built-in libraries will only be available after selecting the correct board. In our case, it’s the AI-Thinker ESP32-CAM board. Only after selecting this board are these libraries linked. I have also added links to the external libraries.
Configuration Constants
Before uploading the code for your ESP32 CAM Telegram bot example, configure these essential parameters:
Network Configuration
const char *ssid = "yyyy"; // WiFi network name
const char *password = "xxxx"; // WiFi password
These constants store your home Wi-Fi credentials needed for the device to connect to the internet. Replace "yyyy" and "xxxx" with your own credentials.
∗Note: ESP32 basic models can only connect to a 2.4 GHz network, not 5 GHz.
Telegram Bot Configuration
String BOTtoken = "123456789:ABCdefGHIjkLMNopQRstUVwxyZ";
String CHAT_ID = "987654321";
Replace these random values with your actual details. BOTtoken is the unique identifier for your bot (get it from @BotFather on Telegram), and CHAT_ID is your personal Telegram user ID (get it from @myidbot on Telegram).
Video Recording Limits
const int MIN_VIDEO_DURATION = 1;
const int MAX_VIDEO_DURATION = 120;
const int TARGET_FPS = 5; - MIN_VIDEO_DURATION – Shortest video you can record (1 second minimum).
- MAX_VIDEO_DURATION – Longest video allowed (2 minutes = 120 seconds)
- TARGET_FPS – Frames per second captured by the camera (5 FPS = smooth but moderate file size).
ESP32-CAM Hardware Pin Definitions
#define PWDN_GPIO_NUM     32
#define RESET_GPIO_NUM    -1
#define XCLK_GPIO_NUM      0
#define SIOD_GPIO_NUM     26
#define SIOC_GPIO_NUM     27
// Camera data pins (8-bit parallel interface)
#define Y9_GPIO_NUM       35
#define Y8_GPIO_NUM       34
#define Y7_GPIO_NUM       39
#define Y6_GPIO_NUM       36
#define Y5_GPIO_NUM       21
#define Y4_GPIO_NUM       19
#define Y3_GPIO_NUM       18
#define Y2_GPIO_NUM        5
#define VSYNC_GPIO_NUM    25
#define HREF_GPIO_NUM     23
#define PCLK_GPIO_NUM     22
These pin definitions are specifically for the AI-Thinker ESP32-CAM module. Different boards may have different pin assignments.
Do not change these unless you are using a different ESP32-CAM variant.
Global Variables and State Management
Global variables store the system’s state and control various features,
bool sendPhoto = false;
bool videoMode = true;
bool sdCardMode = true;
bool sdCardAvailable = true;
int pictureNumber = 0;
bool isRecording = false;
int videoFrameCount = 0;
String currentVideoFile = "";
unsigned long videoStartTime = 0;
unsigned long lastFrameTime = 0;
int customVideoDurationSec = 10;
unsigned long VIDEO_DURATION_MS = 10000; | sendPhoto | True when a photo request is active. |
| videoMode | Enables/disables video recording. |
| sdCardMode | Enables/disables SD card saving. |
sdCardAvailable | Detects if SD card is working. |
| pictureNumber | Tracks photo filenames (photo_0.jpg, photo_1.jpg, etc.). |
| isRecording | True during video recording. |
| videoFrameCount | Counts captured frames. |
| currentVideoFile | Stores the video filename. |
| videoStartTime | Start time of recording |
| lastFrameTime | Time of last captured frame |
| customVideoDurationSec | User-selected recording time in seconds. |
| VIDEO_DURATION_MS | Same duration in milliseconds for precision. |
WiFiClientSecure clientTCP;
UniversalTelegramBot bot(BOTtoken, clientTCP);| clientTCP | Secure HTTPS connection to Telegram servers. |
| bot | Interface for sending/receiving messages via Telegram. |
struct AVIHeader {
 uint32_t riff;
 uint32_t size;
 uint32_t fourcc;
} __attribute__((packed));
struct AVIMainHeader {
 uint32_t fcc;
 uint32_t size;
 uint32_t microSecPerFrame;
 uint32_t maxBytesPerSec;
 uint32_t paddingGranularity;
 uint32_t flags;
 uint32_t totalFrames;
 uint32_t initialFrames;
 uint32_t streams;
 uint32_t suggestedBufferSize;
 uint32_t width;
 uint32_t height;
 uint32_t reserved[4];
} __attribute__((packed));
struct AVIStreamHeader {
 uint32_t fcc;
 uint32_t size;
 uint32_t type;
 uint32_t handler;
 uint32_t flags;
 uint16_t priority;
 uint16_t language;
 uint32_t initialFrames;
 uint32_t scale;
 uint32_t rate;
 uint32_t start;
 uint32_t length;
 uint32_t suggestedBufferSize;
 uint32_t quality;
 uint32_t sampleSize;
 uint16_t left;
 uint16_t top;
 uint16_t right;
 uint16_t bottom;
} __attribute__((packed));
struct BitmapInfoHeader {
 uint32_t size;
 uint32_t width;
 uint32_t height;
 uint16_t planes;
 uint16_t bitCount;
 uint32_t compression;
 uint32_t sizeImage;
 uint32_t xPelsPerMeter;
 uint32_t yPelsPerMeter;
 uint32_t clrUsed;
 uint32_t clrImportant;
} __attribute__((packed));
The code includes structures for AVI (Audio Video Interleave) format headers to ensure compatibility with video players like VLC and Windows Media Player.
The __attribute__((packed)) directive ensures the exact byte structure needed for proper playback.
Setup Function
The setup() function runs once when the ESP32-CAM starts and prepares the system in a specific order. First, it disables the brownout detector to prevent random resets during high camera power use.
void setup() {
 WRITE_PERI_REG(RTC_CNTL_BROWN_OUT_REG, 0); // Disable brownout detector

 Serial.begin(115200);
 Serial.println("\n=== ESP32-CAM Telegram Bot with ENHANCED AVI Video Recording ===");

 Serial.println("Initializing camera for enhanced AVI video recording...");
 configInitCamera();

 initSDCard();

 WiFi.mode(WIFI_STA);
 Serial.println();
 Serial.print("Connecting to ");
 Serial.println(ssid);
 WiFi.begin(ssid, password);
 clientTCP.setInsecure();

 while (WiFi.status() != WL_CONNECTED) {
   Serial.print(".");
   delay(500);
 }
 Serial.println();
 Serial.print("ESP32-CAM IP Address: ");
 Serial.println(WiFi.localIP());

 String startupMsg = "ESP32-CAM Bot with ENHANCED AVI Video Recording!\n\n";
 startupMsg += "Network: " + String(ssid) + "\n";
 startupMsg += "IP: " + WiFi.localIP().toString() + "\n";
 startupMsg += "SD Card: " + String(sdCardAvailable ? "DETECTED " : "NOT DETECTED ") + "\n";
 startupMsg += "Resolution: " + String(videoWidth) + "x" + String(videoHeight) + "\n";
 startupMsg += "Format: Enhanced AVI with MJPEG codec\n";
 startupMsg += "Photos Taken: " + String(pictureNumber) + "\n";
 startupMsg += "Video Mode: OFF \n";
 startupMsg += "SD Storage: " + String(sdCardMode ? "ON " : "OFF ") + "\n\n";
 startupMsg += "NEW: Enhanced AVI video files with proper structure!\n";
 startupMsg += "Type /start for all commands";

 bot.sendMessage(CHAT_ID, startupMsg, "");
 Serial.println("=== Setup Complete - Ready for ENHANCED AVI Video Recording ===");
}
Next, it starts serial communication for debugging, then initialises the camera with the right settings. It sets up the SD card for storage, connects to Wi-Fi in station mode, and waits until the connection is established, showing progress in the Serial Monitor. Once connected, it sends a startup message to Telegram with system details like IP address, SD card status, and camera settings. This order ensures each step works correctly before moving to the next, giving a stable and reliable startup.
Loop Function
The loop() function continuously checks and handles tasks.
void loop() {
 // Handle photo requests
 if (sendPhoto) {
   Serial.println("Processing photo request...");
   sendPhotoTelegram();
   sendPhoto = false;
 }

 // PRIORITY: Video frame capture with minimal interference
 if (isRecording && videoMode) {
   captureVideoFrame();
   // Skip other processing during active recording to maintain timing
   return;
 }

 // Only process Telegram messages when not recording
 if (millis() > lastTimeBotRan + botRequestDelay) {
   int numNewMessages = bot.getUpdates(bot.last_message_received + 1);
   while (numNewMessages) {
     Serial.println("Got Telegram response");
     handleNewMessages(numNewMessages);
     numNewMessages = bot.getUpdates(bot.last_message_received + 1);
   }
   lastTimeBotRan = millis();
 }
}
If a photo request is active (sendPhoto), it sends the photo to Telegram and resets the flag. If video recording is active (isRecording and videoMode), it captures a video frame and skips other tasks to keep recording smoothly. When not recording, it checks for new Telegram messages at set intervals, processes them, and updates the last check time. This ensures photos, videos, and message handling all run efficiently without interfering with each other.
Essential Custom Functions
- configInitCamera() - This function sets up the ESP32-CAM with optimal settings for video recording. It configures the camera pins, sets the resolution (VGA if PSRAM is available, otherwise QVGA), adjusts JPEG quality, and applies various sensor settings like brightness, contrast, and white balance. It also determines the actual video dimensions that will be used.
- initSDCard() - This function initialises the SD card for storage. It checks if a card is present, mounts it, and verifies its type and capacity. If successful, it sets a flag indicating the SD card is available for use.
- handleNewMessages() - This function processes all incoming Telegram commands. It handles photo requests, video recording controls (start/stop), storage management, and system information requests. It validates user input (like video duration) and provides appropriate responses for each command.
- sendPhotoTelegram() - captures a photo (discarding the first frame for better quality), optionally saves it to the SD card, and uploads it to Telegram. It uses chunked transfer to handle large files efficiently and provides status updates.
- startVideoRecording() - begins a new recording with a custom duration, creates a unique filename, and initialises the AVI file structure.
- writeAVIHeaders() - writes all necessary headers for a proper AVI file, including video stream information and frame rate details.
- captureVideoFrame() - grabs individual frames at the target frame rate (5fps), maintains timing precision, and writes them to the AVI file with proper formatting.
- stopVideoRecording() - finalises the AVI file by updating headers with actual frame counts and file size, then initiates the Telegram upload.
- sendVideoToTelegram() - handles uploading the completed video to Telegram. It verifies the file, checks size limits, and performs a chunked upload with progress tracking. It provides success/failure feedback to the user.
- saveToSD() - is a general-purpose function to save data to the SD card.
- checkStorage() - reports SD card status, capacity, and usage.
- sendSystemStatus() - gives a comprehensive overview of the system, including network, camera, and recording status.
Technical Summary and GitHub Repository
Explore the complete technical details, source code, and implementation insights of the project through the GitHub repository, providing an in-depth understanding of the design and working principles.


Testing and Demonstration of the Telegram Bot Device
This ESP32 CAM Telegram bot tutorial is straightforward to demonstrate, as it primarily involves practical testing. The first thing to remember is that the chat ID you use is the only authenticated device for the bot. Any other chat IDs will be considered unauthorised access.
From the authorised device, search for the bot you created and start the first communication. In most cases, this step is not needed, as the bot can initialise the conversation by itself. Otherwise, you’ll need to send the first message to start it. After that, the communication works as usual.
In terms of hardware, you can see the whole setup below.
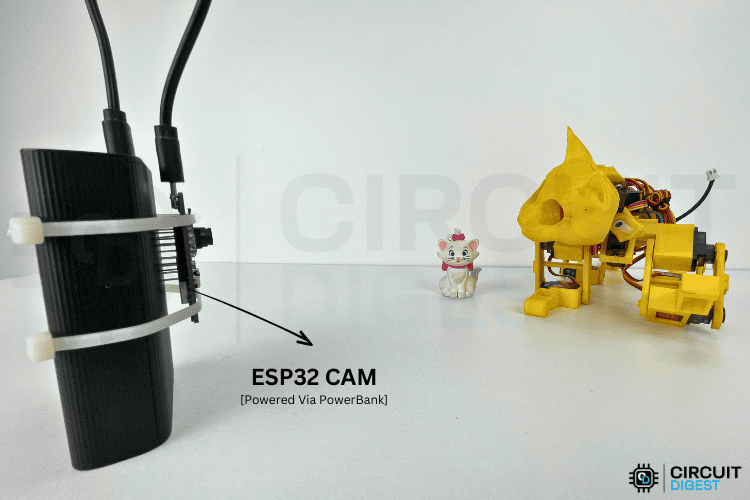
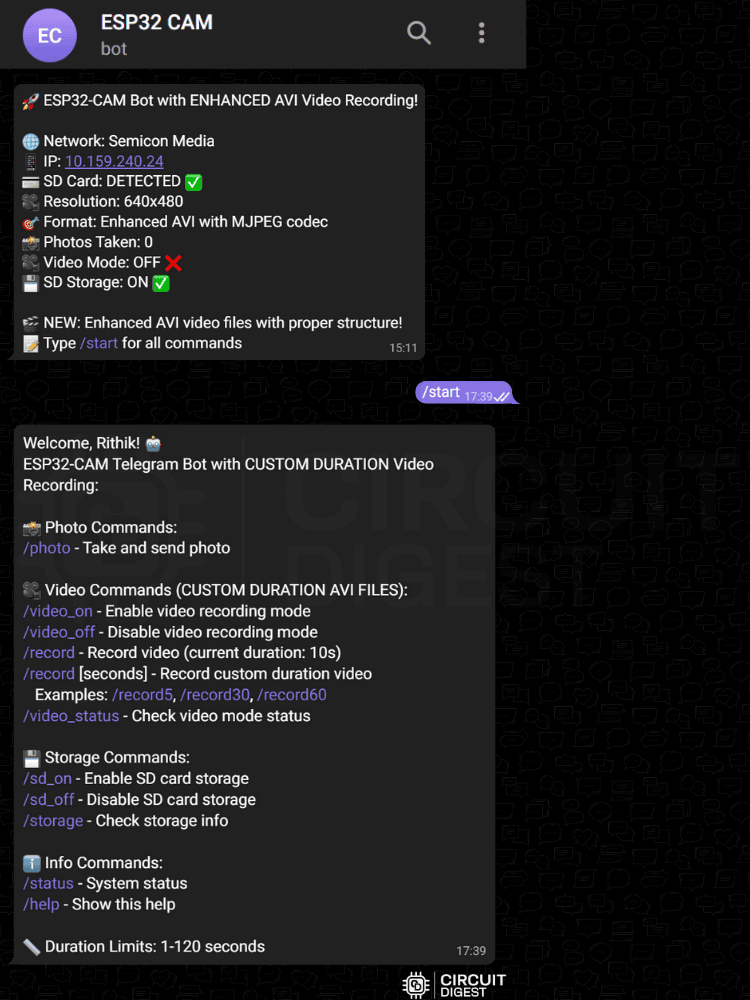
After successfully uploading the code, on the initial boot, it will connect to the specified Wi-Fi network and start sending the welcome message to Telegram.
Below, you can see the welcome message and the list of commands available for our bot. You can modify these anytime in the code.
Testing Photo Capture Functionality
Feel free to check all the commands. The main ones I want to discuss are /photo and /record.
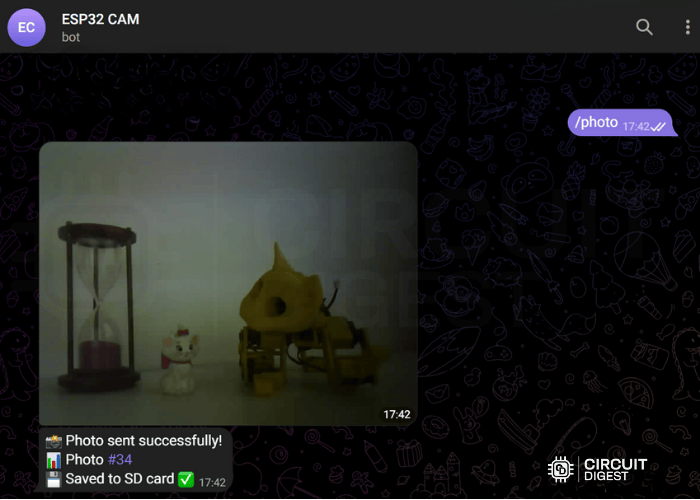
The /photo command is perfect for sharing images in Telegram using ESP32 CAM, making it ideal for remote monitoring applications. When you send the /photo command, you’ll receive a new image captured by the ESP32-CAM. The speed depends on the network and antenna quality. From my testing, I found that using an external antenna works best for this setup.
Testing Video Recording Capability
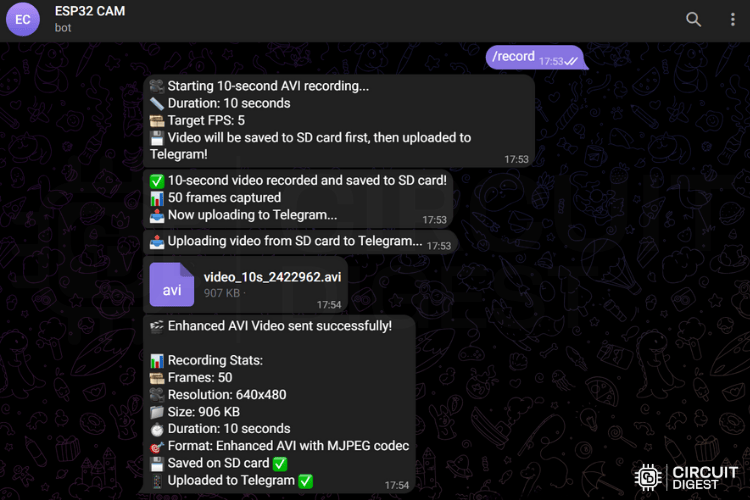
Similarly, the /record command captures a 10-second video and sends it to you. However, this requires an active SD card connected to the module. Without it, the video feature will not work due to the memory limitations of the ESP32-CAM.
After inserting the SD card, restart the ESP32-CAM to ensure it detects the hardware change. Then, you can send the /record command to receive approximately 10 seconds of footage. You can then download the received file to view the video. Below, I’ve added the recorded video for reference.
With this, I’m ending the demonstration section. Feel free to explore the other features and code. It takes barely an hour to set up this amazing IoT project.
This ESP32 CAM Telegram bot project is a great example of how IoT can be used to create simple yet powerful tools for remote monitoring and control. With just an ESP32-CAM, a Telegram bot, and a few lines of code, you can capture images or videos from anywhere in the world. The setup is quick & often takes less than an hour, and is highly customizable to fit different use cases.
However, as with all IoT projects, it’s important to keep security and privacy in mind. Use strong authentication methods, avoid exposing your bot to unauthorised users, and never deploy it in sensitive environments without proper safeguards.
This project is intended for educational purposes, but with the right improvements, it can be adapted for real-world applications like home security, remote inspection, and automation. Explore, experiment, and most importantly, build responsibly.
Troubleshooting Common Issues
| Issue | Solution |
| Bot not responding to commands | Verify Bot Token and Chat ID are correct; check Wi-Fi connection; restart ESP32-CAM |
| Wi-Fi connection fails | Confirm SSID and password are accurate; check 2.4GHz band support; move closer to router |
| Slow image transmission | Install external antenna; reduce image quality setting; improve Wi-Fi signal strength |
| Unauthorized access message | Verify you're using the correct Telegram account matching configured Chat ID |
Project Applications and Use Cases
This ESP32 CAM Telegram bot project demonstrates how IoT technology creates powerful tools for remote monitoring and control.
∗ Home Security: Monitor entry points, detect motion, receive instant alerts with visual confirmation
∗ Baby Monitoring: Check on infants remotely without disturbing sleep, capture photos or video clips
∗ Pet Surveillance: Observe pets while away, ensure their safety and well-being
∗ Workshop Monitoring: Keep tabs on 3D prints, CNC operations, or other long-running processes
∗ Remote Inspection: Access hard-to-reach locations, inspect equipment without physical presence
∗ Wildlife Observation: Capture nature photography, study animal behaviour unobtrusively
Conclusion
This guide has shown how to set up a working ESP32 CAM Telegram bot for taking photos and recording video from afar. By following this ESP32 CAM Telegram bot tutorial, you've learned to leverage Telegram's API for sharing images in Telegram using ESP32 CAM using Arduino, creating a powerful IoT surveillance and monitoring system. Whether providing a security feature for the home, monitoring remote sites or just a brainstorm for an automation project, this is a basic yet effective Telegram camera bot that can be expanded and tailored to suit. With proper dedication to thinking through the implementation of the stages discussed, the ESP32 CAM Telegram bot example can be developed from a learning exercise into a reliable, world-class working application.
This tutorial was created by the Circuit Digest engineering team. Our experts focus on creating practical, hands-on tutorials that help makers and engineers master Raspberry Pi projects, ESP32 Projects, Arduino projects, and IoT development projects. If you have any doubts, you can ask in the comments below or use our forum for a detailed discussion.
Frequently Asked Questions on Telegram Camera Bot
⇥ 1. What is a Chat ID, and why is it important?
The Chat ID is your unique identifier for Telegram users that allows you to communicate with the ESP32 CAM Telegram bot. You can obtain it by messaging the Telegram bot @myidbot and issuing the command /getid. The Chat ID is a security feature that secures the bot so that commands and images can only be sent to the bot from the user with the authorised Chat ID. If you do not have the Chat ID configured correctly in the bot code, your bot will simply ignore all commands from any user that does not have the Chat ID configured; therefore, this feature is very important for managing who has access to your IoT security system.
⇥ 2. Can I use ESP32 CAM for Arduino IDE?
Yes, the ESP32-CAM is fully supported with Arduino IDE as long as you install the ESP32 board support package. To enable this, you would open File → Preferences in the IDE, and enter the ESP32 boards manager URL (https://dl.espressif.com/dl/package_esp32_index.json) into the section called Additional Boards Manager URL. Then you would go to Tools → Board → Boards Manager and install the board called "ESP32". If you create the project for sending images on Telegram using the ESP32-CAM board in the IDE, you need to simply switch the board type from "ESP32" to "AI Thinker ESP32-CAM". After that, you can code the ESP32-CAM, and it will work using standard Arduino syntax.
⇥ 3. What are the common problems when sending images in Telegram using ESP32 CAM?
The common problems are slow image transmission (solution: wire in an external antenna or improve Wi-Fi signal), failing connections (check WIFI credentials and bot token), brownout detector (use a practical 5V 2A power supply), and camera initialisation error (check pin configuration according to your module model). If images appear too dark or are exposed, manually set brightness levels in the configInitCamera() function. Most of the issue is fixed at this stage with a stable power supply and the right credentials.
⇥ 4. How secure is an ESP32 CAM Telegram bot?
Security relies on proper installation. Telegram encrypts every piece of information transferred with HTTPS, while your bot token and the Chat ID provide two layers of authentication. The token authenticates the identity of the bot, while the Chat ID authenticates the authorised user. If someone can get their hands on either of these details, then they can access and interact with your bot. In order to maintain good security or risk management practice, use a strong Wi-Fi password, don't hardcode your credentials in a public GitHub repository, change the bot token regularly, and most importantly, if you're going to use the bot in a sensitive environment, add more authentication to your code.
⇥ 5. What is the maximum length of video for the ESP32 CAM Telegram bot?
Video length is limited by the capacity of your SD card and the maximum allowed file size of 50MB per file when uploading from a bot to Telegram. Based on default settings (which is VGA resolution at 5 FPS) you can expect between 40 - 50 seconds of video will likely be uploaded in the maximum file allotment of 50MB. If you want to record longer, you'll have to adjust the resolution or frame rate down. The duration can be set by the /record commands in the Arduino code and set to custom durations. You could test your own limitations with the recording codes while tracking the file size after you take your recordings. Just try modifying some of the parameters related to camera_config to get a sense of possible durations for your own use case quality requirements.
⇥ 6. Is it possible for multiple users to use the same ESP32 CAM Telegram bot?
Yes, it is possible, but changes to the code will be required. The default implementation is based on only allowing one Chat ID for access/security reasons. To have multiple users, you can edit the handleNewMessages() function to check incoming messages against an array of valid Chat IDs, rather than just using a single value. Alternatively, you can utilise a group telegram functionality. Use the command /getgroupid with @myidbot for the group Chat ID so that any group member can use the bot, which will allow one member to retain access control and monitoring/audit trail.
⇥ 7. What are the alternatives for ESP32 CAM for Telegram camera bots?
Alternatives could include a Raspberry Pi with a camera module (better processing and can use Python), an Arduino with a camera shield (more complex wiring), an M5Stack camera module (with display built-in and less intimidating programming), and ESP32-S3 boards with cameras (better performance). The ESP32-CAM is still the most popular of all of the above options due to its great price points ($8-15), its integrated specifications (Wi-Fi, camera, flash), low power usage, and large community support. Other options to follow along with this ESP32 CAM Telegram bot tutorial will require a good deal of changes to the code to be somewhat remotely similar.
Projects using Telegram Bots
To know more about bots or explore useful ones, feel free to browse the internet. We've also done a few projects involving bots, such as,

Controlling Raspberry Pi GPIO Pins using Telegram App
How can we control the GPIO pins on Raspberry Pi using Telegram, so that we provide some hardware support for our bot? In this tutorial, we will connect four LEDs to Raspberry Pi GPIO pins and toggle them using natural language from Telegram.

Using Telegram Bot with Raspberry Pi: Sharing Text and Files
In this tutorial, we will build and use a Raspberry Pi telegram bot to share data between the Raspberry Pi and our Mobile phone through a popular chat application called Telegram.

This is a project of a wearable device for real-time stress monitoring using an Arduino R4 Wi-Fi board to track heart rate, skin conductivity (GSR) and body temperature.
You can check out these projects to better understand and explore how bots work.
