
This intruder detection system combines Artificial Intelligence of Things (AIoT) and edge computing to create a smart, autonomous security solution. Using face detection on the microcontroller, the device processes and analyzes images locally. Edge computing allows this system to work with minimal latency and lower data transmission needs, sending only essential information over WiFi or GSM.
Impact Statement
Camvisiotech has been a journey from a simple ESP32 CAM to a powerful Edge AI system. Starting as a third-semester project, it began with a basic human detection system on an ESP32 microcontroller, paired with a WiFi camera app and MediaPipe to send Telegram alerts. Recognizing its potential, I teamed up with a friend to develop Camvisiotech 2.0, running on an ESP32 CAM with optimized synchronization and improved ML models. This version won us Bytecraft at IIIT Nagpur TechFest 2023. Inspired by the CircuitDigest IoT Challenge and the Maixduino’s AI capabilities, I started Camvisiotech 3.0—a standalone, AI-driven face detection and recognition solution. With WiFi and GSM connectivity, it now operates autonomously on EDGE, suitable for rural and remote areas with limited connectivity, making edge AI accessible in low-resource environments.
Components Required
Maixduino Kit for RISC-V AI + IoT ( 2.4" TFT LCD Screen + OV2640 Camera )
Gsm Module: Quectel 7Semi EC200U-CN LTE 4G
Antenna for GSM Module: Quectel YT-2102-B
Working 4G SIM Card with active internet validity
Connecting wires: Generic 20cm Male-to-Female Jumper Wires
Breadboard: MB-102 Solderless Breadboard
Buzzer: KY-012 Active Buzzer Module
Navigate to this YouTube Video for Full Demonstration of the Project
Objectives
Use a robust AI model to differentiate between known individuals and intruders.
Implement real-time alerts and actuator controls for immediate response.
Third Party Software Integration like Telegram.
Ensure reliable remote access and control using GSM via AT Commands.
System Architecture
The system consists of several key components that work together to deliver a seamless security experience:
AI Model Training and Deployment: The Maixduino Kit, which includes an AI-capable microcontroller and camera, functions as the primary processing unit. It utilizes three core .smodel files trained via MaixHub.com—a model for Face(s) Detection, a model for Face Landmark Detection, and Feature Extraction. These models process and identify known faces, storing features as recognized persons (e.g., "Person 1," "Person 2") in arrays for rapid matching. The setup allows for the simultaneous recognition of multiple faces, enabling quick identification of individuals stored in the system.
Face Detection:
Purpose: Detects faces in the camera feed, identifying multiple faces at once.
Model Type: YOLOv2 object detection model, optimized for real-time processing on the Maixduino’s hardware.
Outcome: Locates face bounding boxes to trigger further analysis.

Multiple Face Detection using AI Model on Edge
Face Landmark Detection:
Purpose: Identifies specific facial landmarks (e.g., eyes, nose, mouth) within detected faces.
Model Type: Keypoint detection model, enabling finer facial structure identification.
Outcome: Provides a precise facial map, aiding in consistent feature extraction for recognition.

Feature Extraction:
Purpose: Extracts unique facial features from detected landmarks to distinguish individual identities.
Model Type: Embedding model that outputs feature vectors for each detected face.
Outcome: Compares these vectors with stored profiles, recognizing known individuals and categorizing unknown ones as intruders.

When No face is Stored in the Array, it shows that No Face Registered

Unknown Detection

Person 1 is Stored in Array
Intruder Detection and Actuator Control: When an unrecognized person (not in the known faces array) is detected, the system categorizes them as an intruder. It triggers an immediate response, such as sounding a buzzer or activating an LED indicator. The system is also capable of relay control which also allows integration with other actuators, such as door locks, providing instant, real-time physical security.
Communication and Alerts: For reliable notifications, the system can use either Wi-Fi or GSM connectivity to send alerts, ensuring communication in areas with variable internet access. Integrating with third-party messaging apps, like Telegram. This multifaceted communication ensures that users are informed wherever they are, making the system suitable for both urban and remote applications.
Working via Flowchart
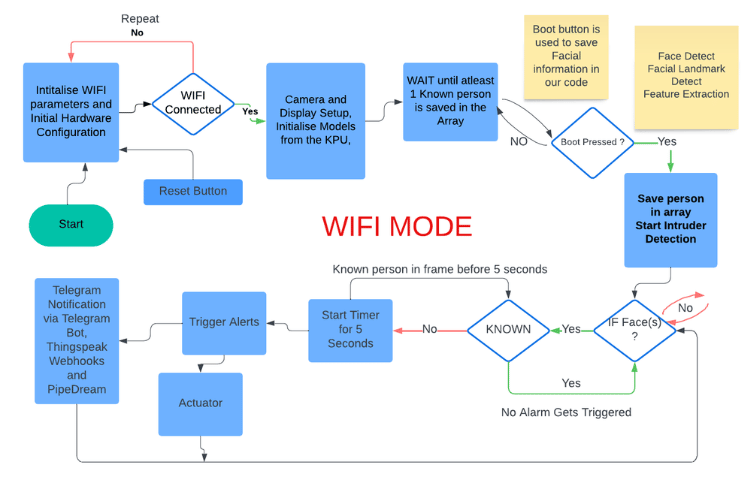
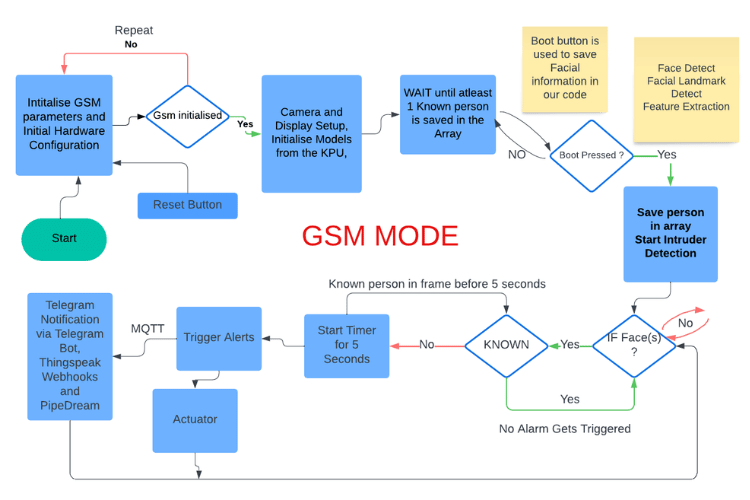
Code Explanation
Everyone don't have Quectel's GSM so i came up with both WIFI and gsm approaches so that project is replicable and user friendly.
WIFI APPROACH: https://github.com/mohittalwar23/camvisiotech-edge-ai-wifi
The code is in micropython and is executed via MaixPy IDE. Here’s a breakdown of each section in boot.py and main.py:
boot.py
Library Imports:
Essential libraries (
gc,sys, etc.) and hardware-specific ones (FPIOA,GPIO,Timer, etc.) are imported to set up system functions and control GPIOs.
LED/Buzzer Setup: ( I didn't had buzzer atm so i did for LED , exactly same for buzzers )
Configures the red LED to act as a visual indicator for intruders by using GPIO pin GPIO0 (mapped to
io_led_red = 14).
Wi-Fi Credentials:
Sets up network credentials (SSID and password) for connecting to Wi-Fi. Also includes a Thingspeak API key and URL for uploading alert data.
Make sure it is 2.4GHz only.
HTTP Request Classes and Functions:
Defines a
Responseclass to handle HTTP responses and arequestfunction to send HTTP requests.Includes a get function for simplified HTTP GET requests, which are used to interact with Thingspeak.
Wi-Fi Setup:
The
enable_esp32function connects to Wi-Fi using the ESP32 module. If the connection is unsuccessful, it retries up to five times.Displays connection status on the LCD and prints Wi-Fi connection details.
Network Enable:
Calls
enable_esp32()to start the Wi-Fi module and set up the network connection.
main.py
Library Imports:
Libraries like
sensor, image, lcd, time, andKPUare imported for camera and AI processing.Imports
GPIOandTimerfor setting up the hardware control of LEDs and timing actions.
HTTP Request Classes and Functions:
Similar to
boot.py, definesResponse, request,andgetfunctions for HTTP requests. These functions handle sending data to Thingspeak.
Face Detection and Recognition Model Setup:
Loads the face detection (
task_fd), landmark detection (task_ld), and feature extraction (task_fe) AI models using KPU.These models are used to detect faces, identify key facial landmarks, and extract unique features for face recognition.
Button Setup for Face Detection Activation:
Sets up a button on the Maixduino (using GPIO) that enables face detection. The
set_key_statefunction activates the system when the button is pressed.
Timer and Camera Initialization:
Initializes a timer for periodic actions and sets up the camera with configurations such as RGB565 color format, QVGA resolution, mirror, and flip.
Thingspeak Integration and Detection Logic:
The
on_timerfunction sends an alert to Thingspeak when an intruder is detected by updatingfield1in the Thingspeak URL.Turns on the LED/Buzzer briefly when an unknown face is detected.
Main Detection Loop:
Continuously checks for faces if detection is active (
start_processing = True).Captures an image, runs face detection (
run_yolo2), and processes any detected objects.Extracts the face feature vector (
feature) for each detected face and sends it to Thingspeak using the calculated value.
This Wi-Fi-based system uses the Maixduino's ESP32 to connect to Wi-Fi, allowing the device to send data (face detection alerts) to Thingspeak, providing remote notifications in real time.
This triggers the Webhook and sends notification to our own telegram bot using Pipedream, free alternative to IFTTT.
Why Thingspeak as Mediator
Thingspeak is an due to its streamlined integration for handling HTTP and MQTT protocols. By utilizing HTTP POST and GET requests over Wi-Fi, Thingspeak enables devices to send data directly to the cloud in real-time. For areas without Wi-Fi coverage, GSM-based devices can leverage MQTT, a lightweight messaging protocol, to send data efficiently over 4G networks to Thingspeak, making it highly versatile in remote settings. Thingspeak’s built-in support for webhooks further enhances its functionality by enabling seamless integration with platforms like IFTTT (If This Then That) , PipeDream (I have used this free alternative). Through webhooks, real-time data from Thingspeak can trigger automated actions on other websites, third-party software like Telegram can be easily incorporated via webhook triggers, allowing users to receive instant alerts or notifications.
GSM APPROACH: https://github.com/mohittalwar23/camvisiotech-edge-ai-gsm
boot.py
This file handles the initial setup for the device and initializes the GSM communication, which will be used to send data when an intruder is detected.
Library Imports:
Essential libraries such as
gc, sys, FPIOA, GPIO, fm, Timer, UART, time,andlcdare imported to control hardware functions on the Maix board (K210).
UART and GSM Setup:
The UART (Universal Asynchronous Receiver/Transmitter) is set up to communicate with the GSM module, which allows the Maix board to send messages over a mobile network.
fm.register(10, fm.fpioa.UART1_TX, force=True) and fm.register(11, fm.fpioa.UART1_RX, force=True)map GPIO pins 10 and 11 for UART transmit (TX) and receive (RX) functionalities.uart_A = UART(UART.UART1, 115200, 8, 1, 0, timeout=1000, read_buf_len=4096)initializes the UART on UART1 at a baud rate of 115200, with an 8-bit data length, 1 stop bit, and no parity bit. The timeout is set to 1000 ms, and the buffer length is 4096 bytes.
AT Command and GSM Functions:
send_at_command(command): Sends an AT command to the GSM module by writing the command to the UART interface. It includes a carriage return and newline (rn) and then clears the buffer after a short delay.read_response(timeout=2000): Reads the response from the GSM module, with a maximum timeout of 2000 ms. It continuously checks if any data is available on the UART and appends it toresponse.
GSM Initialization:
initialize_gsm(): Runs initial AT commands to ensure that the GSM module is ready and connected to the network.
send_at_command('AT')checks if the module is responsive.send_at_command('AT+CREG?')checks the network registration status.send_at_command('AT+QMTCFG="recv/mode",0,0,1')configures the MQTT receive mode.
main.py
The main.py file handles the intruder detection and data publishing through MQTT over GSM.
Library Imports:
Libraries for sensor operations (
sensor, image, lcd, time), face recognition (KPU), and GPIO are imported, as well as other libraries for specific hardware functions.
MQTT Configuration:
Contains MQTT broker settings like the broker address (
BROKER_ADDRESS), port (PORT), client ID, username, and password.PUBLISH_TOPICspecifies the channel and field in which data will be published on ThingSpeak.
UART for GSM Communication:
Sets up UART communication similarly to
boot.pywithsend_at_command()andread_response()to send and receive AT commands.
MQTT Functions:
connect_mqtt(): Opens an MQTT connection over GSM and sends AT commands to connect to the broker using credentials.send_at_command('AT+QMTOPEN=0,"{}",{}'.format(BROKER_ADDRESS, PORT))opens a connection to the MQTT broker.send_at_command('AT+QMTCONN=0,"{}","{}","{}"'.format(MQTT_CLIENT_ID, MQTT_USER, MQTT_PASSWORD))authenticates with the broker.publish_data(field_value): Publishes data to the MQTT broker.Constructs the payload and sends it to the broker using
AT+QMTPUBEX. The payload is sent as a string, which represents the detected feature (intruder detection) value.
Face Detection Initialization:
Loads the models required for face detection and feature extraction with kpu.load():
task_fdis for face detection,task_ldis for landmarks, andtask_feextracts face features.
Timer and Camera Initialization:
Initializes a timer and the LCD display.
Sets up the camera with sensor.reset(), formats the camera for RGB565, and sets frame size and mirroring options.
Main Loop for Intruder Detection:
Runs continuously to detect faces when start_processing is True.
Takes a snapshot with the camera, and if a face is detected, extracts features to calculate field1_value.
Publishes field1_value via MQTT:
connect_mqtt()establishes the MQTT connection.publish_data(field1_value)sends data to cloud.This trigger webhooks and user receives Telegram Notification.
Thingspeak acts as a mediator serving as a MQTT Gateway between Telegram and Maix Board.
Demonstration

Initially when no face is registered in the array


Project Setup
INSTALL MaixPy IDE
This project is written in micropython therefore we will require MaixPy IDE for Run and Build purposes , also it shows camera output to PC directly and is pretty handy.
- Go to https://dl.sipeed.com/shareURL/MAIX/MaixPy/ide/v0.2.5
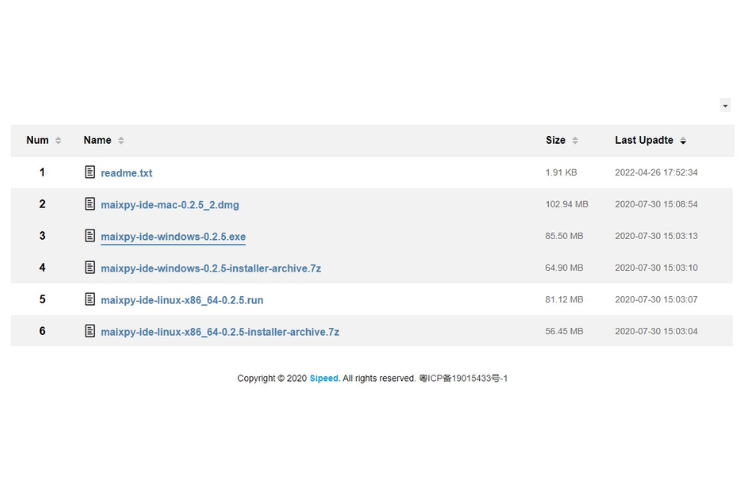
Install for the relevant Operating System, for Windows simply download this .exe file
INSTALL Driver for Maixduino Board
Go to https://dl.sipeed.com/MAIX/tools/driver
Follow these instructions: https://wiki.sipeed.com/soft/maixpy/en/get_started/install_driver/duino.html
After proper installation it will show 2 COM ports in Device manager , one for ESP32 chip and one for the KP10 Chip of Maixduino
Install kflash_gui
This is useful for erasing the flash memory and uploading the ML models to the Kpu
Go to: https://github.com/sipeed/kflash_gui/releases
- Download the Windows Specific Zip (if using windows), Extract and Run.
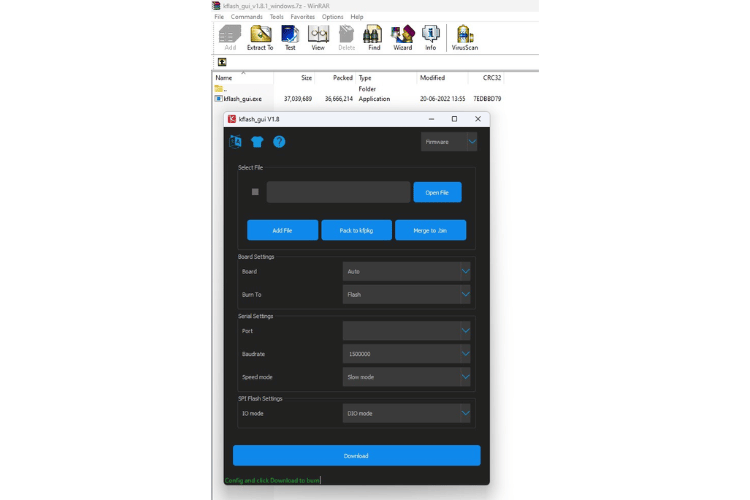
Install uPyloader
Go to: https://github.com/BetaRavener/uPyLoader/releases/tag/v0.1.4
Download the windows specific .exe file.
Use this to access, modify and delete contents from MCU directly.
Erase Flash Memory of Maixduino
Open kflash_gui
Select Erase, then Chip Erase as the mode and board as Maixduino with relevant port.
Press the Erase Button.
Install New Firmware for maxpyv1
Go to: https://dl.sipeed.com/shareURL/MAIX/MaixPy/release/master/maixpy_v0.6.3_2_gd8901fd22
Download this version:
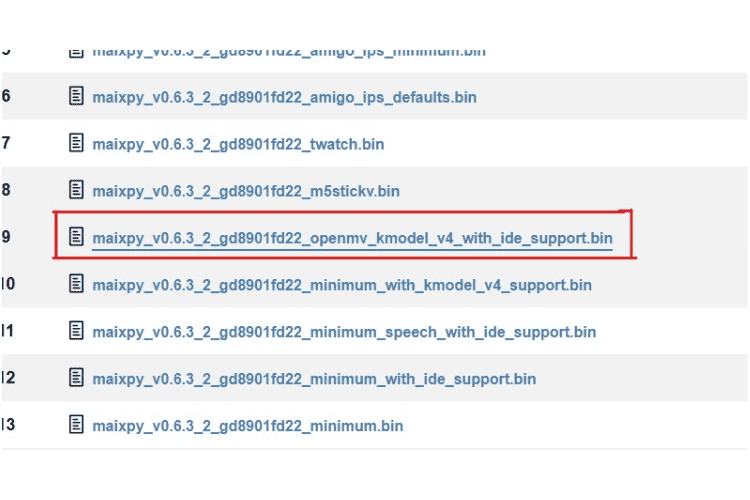
open kflash_gui , select Firmware, browse this file and select other settings.
Press the Download Button, this will install the firmware to the board successfully.
Follow this if you are struck: https://wiki.sipeed.com/soft/maixpy/en/get_started/upgrade_maixpy_firmware.html
Download and Install ML models to KPU of Maixduino Board
Open Terminal Window in your system.
Type: git clone https://github.com/mohittalwar23/camvisiotech-edge-ai-wifi/
Now the complete code and Models folder gets downloaded to your current directory
open kflash_gui, select the first model : face_model_at_0x300000.kfpkg
Download it to the board. ( kfpkg doesnt require any starting address )
Upload the second the model: FaceLandmarkDetection.smodel at 0x500000 address
Similarly upload the third model: FeatureExtraction.smodel at 0x600000 address
WIFI Setup
Update Wifi credentials in Boot.py
Make sure your Access point supports 2.4Ghz , turn on Hotspot beforehand.
Thingspeak Setup
FOR WIFI Mode
Go to thingspeak website, create a mathworks account if not already, Sign IN.
Create a new channel and add a new field there. In our case it is Field1.
- Go to API keys section, copy the Write to channel API Request
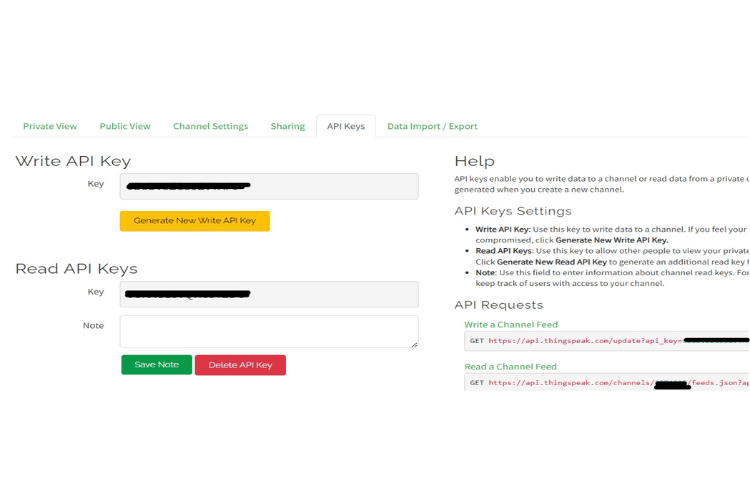
Update the API in Boot.py respectively
For GSM Mode
Go to Devices > MQTT
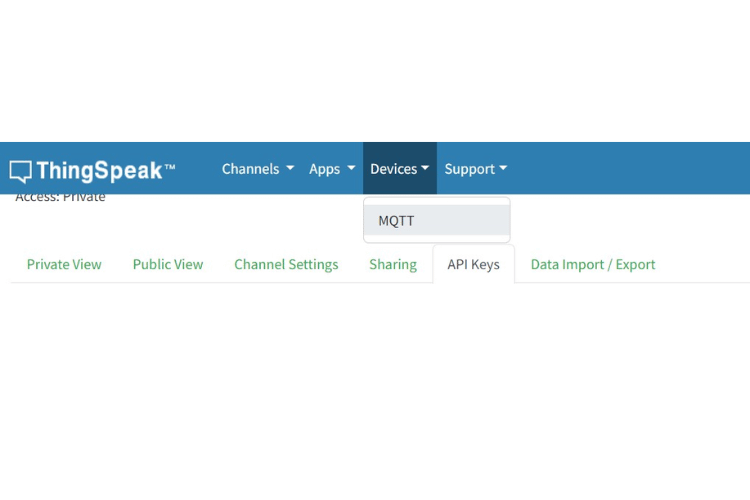
Add a new device, add your channel to authorised channels.
Give publish and subscribe permissions.
Copy the Username, Client ID and Password and paste in the code respectively.
WebHook Setup to Trigger Updates to Pipedream
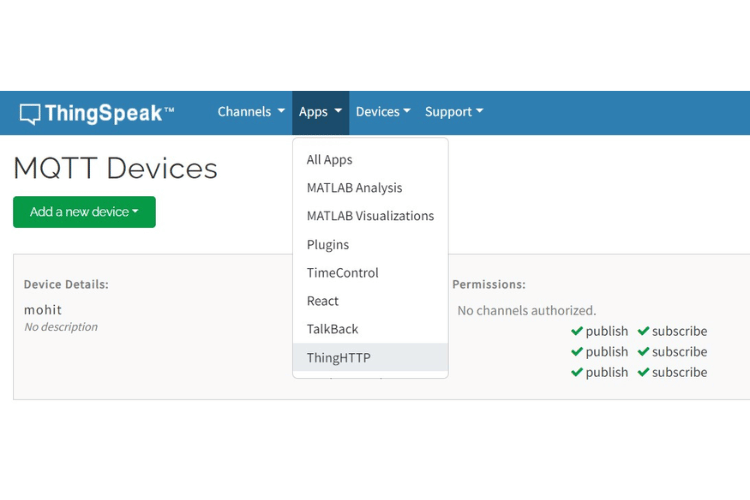
Go to Apps > ThingHTTP
Create a new ThingHTTP
Paste the Pipedream URL here in the URL Section, choose Method as POST
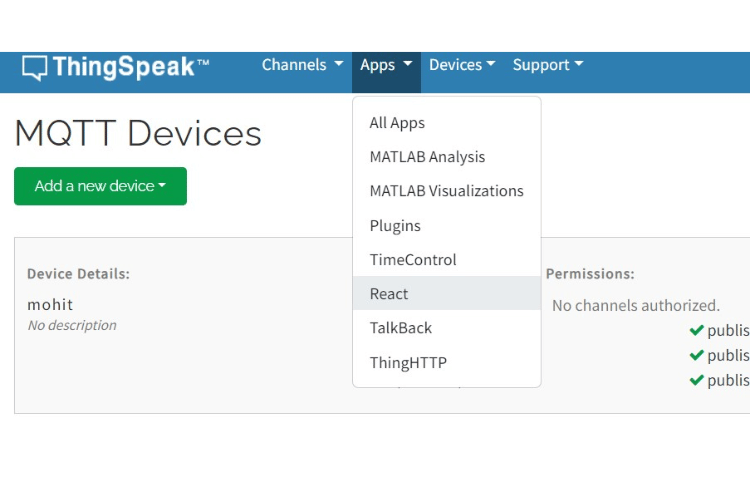
Go to Apps > React
Create a new React, Test Frequency should be On data insertion, channel should be your channel_name and condition should be whatever value we are pushing through code (in our case 90) , select ThingHTTP as the thing_name we just created and Run condition as Each time the condition is met.

Telegram and Pipedream Setup
Create a Telegram Bot using Bot Father, open Telegram Desktop, Search Bot Father.

.png)
Copy this token, send Hi to your Bot and then get the channel id using this command: https://api.telegram.org/bot{our_bot_token}/getUpdates. Save the Channel Id and the Token respectively.
Open Pipedream and create a new account. Create a new workflow there.
Add Webhook Trigger and copy that pipedream URL to the ThingHTTP.
Choose Telegram: send a Text message or Reply option as the trigger, enter your bot's credentials and channel id respectively.
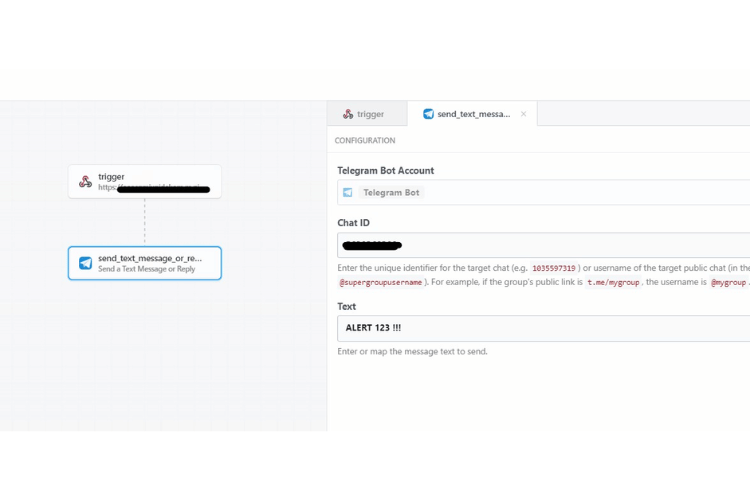
Test your workflow manually once, click on deploy after the Setup.
Similarly, you can choose other Third Party Services here Free of cost.
All setup is done, now we have to simply transfer the files to the board
Verify all APIs and credentials are rightly mentioned in the files.
Connect the board, verify by running the files (without transferring to the board)
Open Boot.py in MaixPy. Choose Save Open Script to Board(Boot.py) in Tools Menu
Open Main.py, Choose Transfer file to Board option in Tools Menu
if you want to Delete the file or make some changes utilize uPYloader application
if stuck somewhere google it :))
Future Scope
Future Android Application with Video Streaming and in App Alerts.
Voice Recognition features using Maixduino's Mic and Audio Capabilities.
Enhanced AI Models: Explore more advanced AI models for better accuracy in face recognition and intruder detection.
Additional Sensor Integration: Incorporate additional sensors (e.g., motion detectors, door/window sensors) to extend the system’s functionality and coverage.
References
https://circuitdigest.com/articles/ai-and-ml-using-maxduino
https://www.instructables.com/Transfer-Learning-With-Sipeed-MaiX-and-Arduino-IDE/
https://maixhub.com/model/zoo/68
https://maixhub.com/model/zoo/60
Conclusion
The AIOT Security System offers a comprehensive, intelligent solution to modern security challenges. By combining AI-driven face recognition, real-time alerts, actuator control, and remote accessibility, this system significantly enhances security, convenience, and user experience.
~ Mohit Talwar
Click on the GitHub Image to view or download code


