 Vedhathiri
Author

Imagine driving into a crowded parking area and not knowing whether a space is available or not. This project solves exactly that problem by building a smart, automatic parking space detection system using the ESP32-CAM and the CircuitDigest Cloud API. With just a button press, the device captures a real-time image of the parking area and sends it over the internet to the cloud-based detection. The system then intelligently analyses the image and identifies how many parking spaces are occupied and how many are free. Within seconds, the result is sent back and displayed, helping users instantly know whether parking is available or full. The entire process happens wirelessly and in real time, making it efficient, low-cost, and easy to deploy. We have also built many similar AI projects and ESP32-CAM Projects previously here at Circuit Digest. You can also check them out if you wish to explore more.
Quick Summary - What This Project Does
- ESP32-CAM captures a parking area image on a button press (GPIO 13).
- The image is sent via HTTPS POST to the CircuitDigest Cloud Parking Detection API.
- The cloud AI model returns JSON with occupied slot count, empty slot count, and per-slot confidence scores.
- Results are printed to the Arduino Serial Monitor in real time.
- No custom model training required; the cloud handles all inference.
Table of Contents
- How Does the ESP32-CAM Parking Space Detection System Work
- Components Required
- Circuit Diagram
- └ ESP32 Pin Assignments
- Hardware Connection
- Step-by-Step Setup
- Code Explanation
- Why Choose CircuitDigest Cloud Over On-Device Inference?
- Real-World Applications
- Troubleshooting
- Advantages and Limitations
- GitHub
How Does the ESP32-CAM Parking Space Detection System Work
The parking detection process begins as soon as a vehicle approaches the entrance gate. The ultrasonic sensor continuously monitors the area and, upon detecting a vehicle nearby, sends a trigger signal to the ESP32-CAM. The ESP32-CAM then captures an image of the parking area. For testing purposes, you can also use a static image instead of a real-time capture.
While capturing the image, ensure that the parking area is well illuminated, as better image quality leads to more accurate detection results. Once the image is captured, it is uploaded to the CircuitDigest Cloud through the API for parking space analysis. The cloud processes the image and intelligently determines whether parking spaces are available or occupied. After the analysis is complete, the result is sent back to the ESP32. If a vacant parking space is detected, the ESP32 commands the servo motor to open the entrance gate. If no parking spaces are available, the gate remains closed. The complete detection result, along with confidence values and parking availability status, is also displayed in the Serial Monitor for monitoring and debugging purposes. Here, we don't want to train a model, the labelling part, and the model creation part, as we used to do on websites like Edge Impulse. By eliminating this workthese works, CircuitDigest Cloud saves time to focus on other changes
Components Required for the Parking Space Detection Project
The table below lists every component used in this ESP32-CAM parking space detection project, along with its purpose in the system.
| S.No | Components | Purpose |
| 1. | ESP32-CAM | Used as a microcontroller and also to take photos. |
| 2. | Ultrasonic Sensor | Used to give the input from the user to the Microcontroller |
| 3. | Breadboard (2) | Used to make the connections simple and neat |
| 4. | ESP32 | Used as another processing microcontroller for the servo motor and the sensor control |
| 5. | Servo Motor | Used to open and close the gate. |
*Important: If you are using the standard ESP32-CAM (without onboard USB), you will need a USB-to-Serial (FTDI) adapter for programming. Connect FTDI TX → ESP32-CAM RX (U0R), RX → TX (U0T), GND → GND, and hold GPIO0 LOW during upload to enter flash mode. If your board has a micro-USB port already, no adapter is required. If you are just getting started with the ESP32-CAM module, we recommend checking out our guide “How to Program the ESP32-CAM?
Circuit Diagram of the ESP32-CAM Parking Space Detection System
The following circuit diagram shows the connection between the ESP32-CAM, ESP32, ultrasonic sensor and micro servo motor. The servo motor is connected to the 27th pin of the ESP32 for the gate control, and the ultrasonic sensor’s TRIG and ECHO pins are connected to the 25th and 26th pins of the ESP32.

ESP32 Pin Assignments
| Component | Component Pin | ESP32 GPIO |
| HC-SR04 Ultrasonic Sensor | TRIG | GPIO 25 |
| HC-SR04 Ultrasonic Sensor | ECHO | GPIO 26 |
| Micro Servo Motor | Signal | GPIO 27 |
| ESP32-CAM (UART) | RX (U0R) | ESP32 TX2 |
| ESP32-CAM (UART) | TX (U0T) | ESP32 RX2 |
| All boards | GND | Common GND rail |
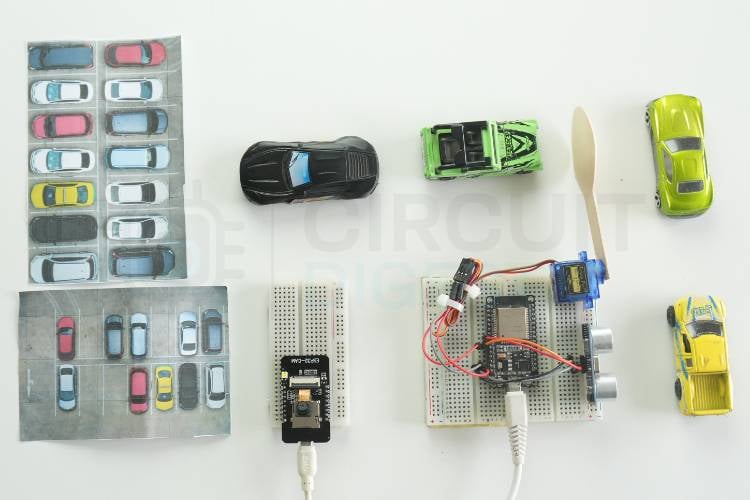
Hardware Connection ESP32-CAM Based Parking Space Detection System
The image below shows the actual hardware assembly used during our testing of this automatic parking space detection system. To power both controllers, we are using the USB cable connected to the USB port of the laptop.
Step-by-Step Setup for the ESP32-CAM Parking Space Detection System
Follow the five steps below to get your parking space detection using ESP32-CAM up and running with the CircuitDigest Cloud object detection API.
Step 1⇒ Create a CircuitDigest Cloud Account
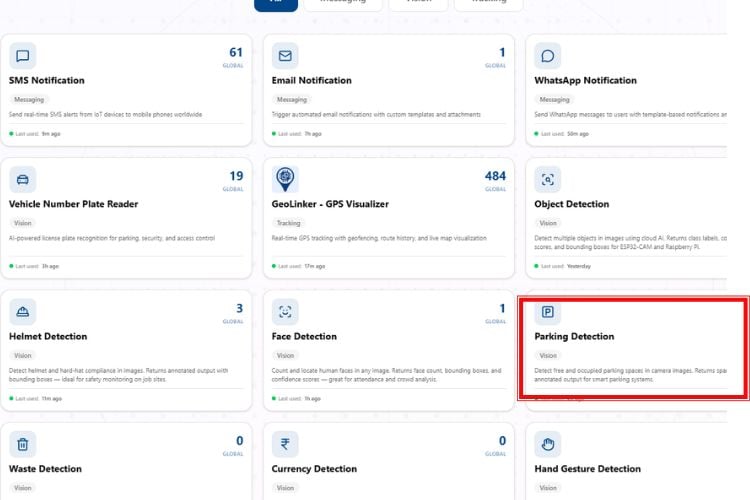
First, you need to make an account on the CircuitDigest Cloud. If you already have one, just go to the CircuitDigest Cloud website, scroll down, and there you will notice the parking space detection feature; click that, and enter.
Step 2⇒ Test the API Using a Sample Image
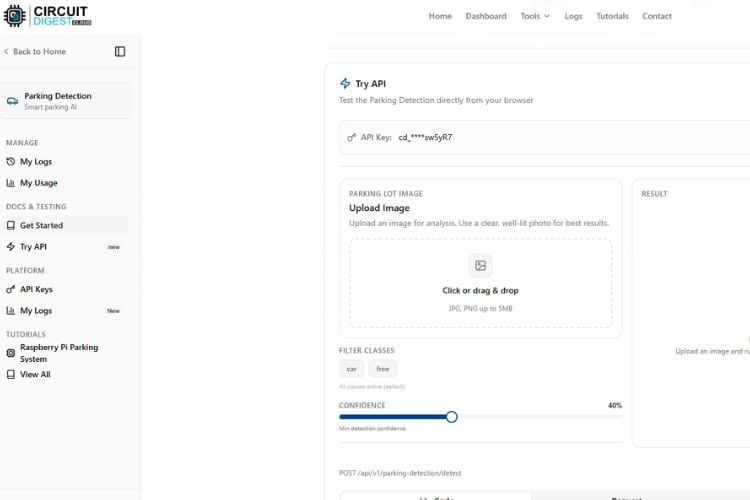
Inside, you’ll notice various options on the left side, such as “Get Started” and “My Usage.” You can also adjust the confidence level based on your requirement, and your API key will be displayed there. Before connecting any hardware, you can test the system using the “Try API” feature. Simply upload an image that contains a parking area with a mix of occupied and empty slots, and click on “Run Test.”
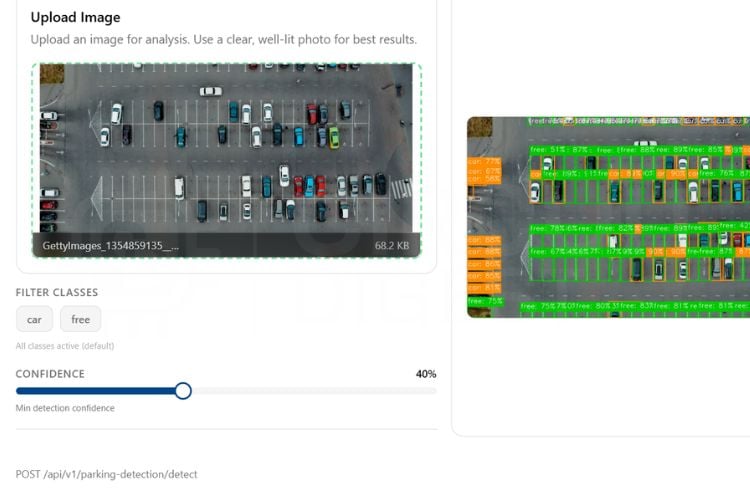
Step 3⇒ Verify Detection Results
Within seconds, the system will process the image and display the number of filled and empty slots. You can try different images to check the accuracy of detection, but keep in mind that each test consumes your API usage limit, which is restricted to 15 requests per day and 100 per month.
Step 4⇒ Wire the Hardware and Upload the Firmware
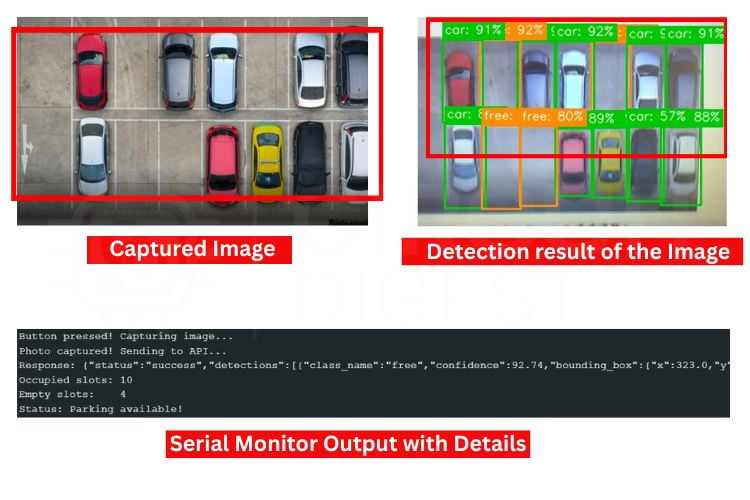
After testing virtually, you can move on to the real-time hardware testing. Connect the ESP32-CAM module according to the circuit diagram and upload the provided code from the ESP32-CAM section. Once the setup is ready, you can either use a sample image or capture a live image of a parking area. By pressing the push button connected to GPIO 13, the ESP32-CAM captures an image and immediately sends it to the CircuitDigest parking space detection API. The server processes the image and returns the result, which is then displayed on the serial monitor. This entire process, from capturing the image to displaying the parking status, happens within a few seconds, making the system fast and suitable for real-world smart parking applications.

The image below shows the captured image from the ESP32-CAM. Along with it, you can see the detection results of the image. Below that, the Serial Monitor displays the detection output, including whether a parking space is available or not.
Code Explanation for the ESP32-CAM Parking Space Detection Project
In the code, we start by including all the necessary libraries, which include the Wi-Fi-related libraries and the esp_camera camera library. After that, we have defined the WiFi SSID and password along with the CircuitDigest Cloud API key. Make sure these are correct. We have also defined the GPIO pin used with the trigger button.
1. Library Includes and Global Configuration
const char* WIFI_SSID  = "Semicon Media";
const char* WIFI_PASS  = "cracksen1605";
const char* API_KEY    = "cd_jre_070126_sw5yR7";
const char* serverName = "www.circuitdigest.cloud";
const char* serverPath = "/api/v1/parking-detection/detect";
This section stores the Wi-Fi credentials and CircuitDigest Cloud API details. These parameters allow the ESP32-CAM to connect to the internet and communicate with the cloud server. The API key is used to authenticate image upload requests.
2. Camera Initialisation and Image Quality Tuning
#define PWDN_GPIO_NUM   32
#define XCLK_GPIO_NUM    0
#define SIOD_GPIO_NUM   26
#define SIOC_GPIO_NUM   27
#define PCLK_GPIO_NUM   22
The ESP32-CAM camera module uses multiple GPIO pins for image acquisition. These pin definitions map the camera hardware to the ESP32 controller. Without proper pin configuration, the camera cannot initialise or capture images correctly.
3. MJPEG Live-Stream Server
cfg.pixel_format = PIXFORMAT_JPEG;
cfg.frame_size   = FRAMESIZE_SVGA;
cfg.jpeg_quality = 8;
cfg.fb_count     = 2;
esp_camera_init(&cfg);
This code configures the camera settings such as image format, resolution, image quality, and frame buffers. The camera is then initialised using these settings. These parameters directly affect image clarity and cloud detection performance.
4. Button-Triggered HTTPS Upload and JSON Parsing
sensor_t* s = esp_camera_sensor_get();
s->set_brightness(s, 1);
s->set_contrast(s, 1);
s->set_exposure_ctrl(s, 1);
s->set_gain_ctrl(s, 1);
After initialization, the camera sensor settings are optimised for better image quality. Brightness, contrast, exposure, and gain controls help capture clearer parking lot images. Better images generally improve parking detection accuracy.
camera_fb_t* fb = esp_camera_fb_get();
if (!fb) {
   Serial.println("[DET] Frame capture failed");
   unlockCam(); setResult("ERROR"); return;
 }
This section captures an image from the ESP32-CAM and stores it in a frame buffer. The captured image will later be sent to the cloud for parking space analysis. If image capture fails, an error message is displayed in the Serial Monitor. Before uploading the image, the ESP32-CAM establishes a secure HTTPS connection with CircuitDigest Cloud. If the connection is successful, the image upload process begins. Otherwise, the system reports a connection error.
Why Choose CircuitDigest Cloud Over On-Device Inference?
The ESP32-CAM, which features an AI-Thinker model that has a total of 520KB of internal SRAM and 4MB of external PSRAM, has memory constraints that limit the ability to run a parked car detection (PCD) convolutional neural network (CNN) in a local environment due to quantising up to 8 bits, complex post-processing, and exceeding the inference-time-memory limits. Therefore, by moving the inference off the ESP32-CAM to the CircuitDigest Cloud, you not only keep the firmware lightweight, but the precision limit for detection is determined by the compute power in the cloud, not by the limitations of the microcontroller.
When developing a custom model to utilise Edge Impulse or Roboflow, developers will incur additional time by needing to go through the following steps: (1) Collecting datasets, (2) Labelling images, (3) Performing multiple model training/runs, and (4) Exporting/converting the final model. As a result, developers can build a working IoT Sensor that detects parked cars in less than one afternoon. Additionally, the feature “Try API” allows for validation of the accuracy of the car detection for your specific parking lot prior to writing any firmware code. Finally, we have built an additional project, “AI-Based Smart Parking System,” using the ESP32-CAM, as an example of a more advanced deployment of the same concept.
Real-World Applications of the ESP32-CAM Parking Detection System
This project is an example; however, the same architecture can be applied to many real-world IoT solutions:
» Apt. Complexes - Each apartment complex has 1 ESP32-CAM monitoring a set of designated parking spots. There is a central server that uses MQTT or a Telegram bot to provide each resident with parking status.
» Small Commercial Parking Lots - Each parking lot comprises multiple units (multiple ESP32-CAMs) on a single Wi-Fi network, covering each parking zone separately. The server aggregates occupancy and provides a single dashboard displaying aggregate occupancy information for all zones.
» College Campuses (in India) - The ESP32-CAM is a low-cost alternative to IR Sensor arrays that can cover up to 8-12 parking slots depending on installation height.
» Smart City Pilot Initiatives - Combine with GeoLinker or an MQTT broker to periodically send live occupancy information from the local ESP32-CAM units to a municipal traffic control system/center.
» Automated Parking Guidance System - Keep real-time counts of available parking spaces using a display panel to help guide drivers to the nearest available parking spot.
ESP32-CAM Based Parking Space Detection Troubleshooting
Issue 1: No output in Serial Monitor
If nothing is displayed in the Serial Monitor, check whether the correct COM port and baud rate (115200) are selected. Also, ensure the USB cable is working properly, and the ESP32 board is correctly detected by the system.
Issue 2: ESP32 restarting continuously
If the ESP32 keeps restarting, it is usually due to an insufficient power supply or unstable voltage. Use a proper 5V regulated power source instead of relying only on USB, and avoid loose connections.
Issue 3: API usage limit exceeded
If the system stops working after multiple tests, it may be due to exceeding the API usage limit. Check your usage in the dashboard and wait for the limit to reset, or upgrade your plan if needed.
Issue 4: Image capture failure
If the camera fails to capture an image, it may be due to loose connections or memory limitations. Make sure the camera module is securely connected and try reducing the image resolution (for example, VGA) to avoid memory-related issues.
Issue 5: API connection error or timeout
If the system fails to send data to the API or shows a timeout error, verify your internet connection and ensure the server endpoint and port are correct. Also, check that the API key is valid and that HTTPS communication is properly configured.
Issue 6: Incorrect detection results
If the output shows wrong counts of occupied or empty slots, the issue may be due to poor image quality or lighting conditions. Use clear images with proper lighting and adjust the confidence level in the API settings for better accuracy.
Advantages and Limitations of the Parking Space Detection System
The advantages and limitations of the Parking slot detection system are as follows.
| S.No | Advantages | Limitations |
| 1. | Real-time object detection within a few seconds | Cannot work without cloud API access |
| 2. | Low-cost system using ESP32-CAM with built-in camera and Wi-Fi | Requires an internet connection for object detection |
| 3. | No need for expensive hardware or powerful processors | Blurry images may give wrong results |
| 4. | Wireless communication without extra modules | Limited by daily or monthly API usage limits |
| 5. | Small size and portable design | Only captures single images, not fully live video detection |
Instead of running complex machine learning models on the ESP32-CAM, which has limited memory and processing power, the image is sent to the cloud, where advanced algorithms handle the detection accurately and quickly. Another key advantage is ease of use. The platform offers a ready-to-use API, a user-friendly interface, and quick testing options like the “Try API” feature, which makes development faster compared to building and training a custom model from scratch. It also reduces development time and complexity, allowing us to focus more on system integration rather than AI model design. We also made an interesting project related to AI, which is an AI Based Smart Parking System using ESP32-CAM, spare some time and go through the project for more details
Frequently Asked Questions -ESP32-CAM Parking Space Detection
⇥ Why is ESP32-CAM used in this project?
ESP32-CAM is used because it has an inbuilt camera module and WiFi capability, making it suitable for capturing and transmitting images over the internet. It is also cost-effective and ideal for IoT-based image processing applications.
⇥ Why is the cloud API used instead of local processing?
The ESP32-CAM has limited memory and processing power, which makes it difficult to run complex AI models locally. Using a cloud API allows heavy image processing and detection to be performed on powerful servers, ensuring better accuracy and performance.
⇥ What happens when the push button is pressed?
When the button is pressed, the ESP32-CAM captures an image of the parking area and sends it to the cloud API. The API processes the image and returns the number of occupied and empty parking slots.
⇥ How accurate is the parking detection system?
The accuracy depends on image quality, lighting conditions, and camera positioning. Clear images with proper lighting and visible parking slots improve detection accuracy significantly.
⇥ Can this system work without the internet?
No, this system requires an active internet connection because image processing is done on the cloud server. Without the internet, the ESP32 cannot send data to the API.
⇥ What are the limitations of this system?
The system depends on internet connectivity and API usage limits. It may also give incorrect results if the image quality is poor or if parking slots are not clearly visible.
ESP32 CAM Parking Space Detection GitHub
This GitHub repository contains the complete source code, circuit diagram, and technical documentation for building an ESP32-CAM-based parking space detection system.


Relevant IoT WhatsApp Alert Projects
Explore real-time IoT projects that send instant WhatsApp alerts using ESP32, Arduino UNO R4 WiFi, and Raspberry Pi Pico W.

Real-Time Motion Detection with XIAO ESP32 WhatsApp Alert System
Build a smart XIAO ESP32 motion detector that sends instant WhatsApp alerts over WiFi whenever movement is detected - no GSM or SIM needed.

How to Send WhatsApp Messages from Arduino Uno R4 Wifi Board
Send WhatsApp alerts from Arduino UNO R4 WiFi using CircuitDigest Cloud API over WiFi - no GSM module or WhatsApp Business API needed.

Raspberry Pi Pico Based Rain Detection System with WhatsApp Alert
Turn your Raspberry Pi Pico W into a smart rain alert system that sends real-time WhatsApp notifications over WiFi without needing a GSM module or SIM card.
Complete Project Code
#include "esp_camera.h"
#include <WiFi.h>
#include <WiFiClientSecure.h>
#include <WebServer.h>
const char* WIFI_SSID  = "yourssidname";
const char* WIFI_PASS  = "YourWifipassword";
const char* API_KEY    = "YourApiKey";
const char* serverName = "www.circuitdigest.cloud";
const char* serverPath = "/api/v1/parking-detection/detect";
const int   serverPort = 443;
#define TRIGGER_BTN   13
#define DEBOUNCE_MS   500
#define PWDN_GPIO_NUM  32
#define RESET_GPIO_NUM -1
#define XCLK_GPIO_NUM   0
#define SIOD_GPIO_NUM  26
#define SIOC_GPIO_NUM  27
#define Y9_GPIO_NUM    35
#define Y8_GPIO_NUM    34
#define Y7_GPIO_NUM    39
#define Y6_GPIO_NUM    36
#define Y5_GPIO_NUM    21
#define Y4_GPIO_NUM    19
#define Y3_GPIO_NUM    18
#define Y2_GPIO_NUM     5
#define VSYNC_GPIO_NUM 25
#define HREF_GPIO_NUM  23
#define PCLK_GPIO_NUM  22
WiFiClientSecure client;
WebServer previewServer(80);
SemaphoreHandle_t camMutex    = NULL;
unsigned long lastTriggerTime = 0;
// ── Camera lock helpers ───────────────────────────────────────────────────
inline bool lockCam(TickType_t wait = portMAX_DELAY) {
 return xSemaphoreTake(camMutex, wait) == pdTRUE;
}
inline void unlockCam() { xSemaphoreGive(camMutex); }
// ── Camera init ───────────────────────────────────────────────────────────
void initCamera() {
 camera_config_t cfg = {};
 cfg.ledc_channel = LEDC_CHANNEL_0; cfg.ledc_timer = LEDC_TIMER_0;
 cfg.pin_d0 = Y2_GPIO_NUM;  cfg.pin_d1 = Y3_GPIO_NUM;
 cfg.pin_d2 = Y4_GPIO_NUM;  cfg.pin_d3 = Y5_GPIO_NUM;
 cfg.pin_d4 = Y6_GPIO_NUM;  cfg.pin_d5 = Y7_GPIO_NUM;
 cfg.pin_d6 = Y8_GPIO_NUM;  cfg.pin_d7 = Y9_GPIO_NUM;
 cfg.pin_xclk     = XCLK_GPIO_NUM;   cfg.pin_pclk     = PCLK_GPIO_NUM;
 cfg.pin_vsync    = VSYNC_GPIO_NUM;  cfg.pin_href     = HREF_GPIO_NUM;
 cfg.pin_sscb_sda = SIOD_GPIO_NUM;   cfg.pin_sscb_scl = SIOC_GPIO_NUM;
 cfg.pin_pwdn     = PWDN_GPIO_NUM;   cfg.pin_reset    = RESET_GPIO_NUM;
 cfg.xclk_freq_hz = 20000000;
 cfg.pixel_format = PIXFORMAT_JPEG;
 cfg.frame_size   = FRAMESIZE_SVGA;  // 800x600 for preview
 cfg.jpeg_quality = 8;
 cfg.fb_count     = 2;
 if (esp_camera_init(&cfg) != ESP_OK) {
   Serial.println("Camera init failed!"); while (1);
 }
 sensor_t* s = esp_camera_sensor_get();
 s->set_brightness(s, 1);
 s->set_contrast(s, 1);
 s->set_saturation(s, 0);
 s->set_whitebal(s, 1);
 s->set_exposure_ctrl(s, 1);
 s->set_gain_ctrl(s, 1);
 s->set_aec2(s, 1);
 s->set_ae_level(s, 1);
 Serial.println("Camera initialized.");
}
// ── WiFi reconnect helper ─────────────────────────────────────────────────
bool ensureWiFi() {
 if (WiFi.status() == WL_CONNECTED) return true;
 Serial.print("WiFi lost, reconnecting");
 WiFi.begin(WIFI_SSID, WIFI_PASS);
 for (int i = 0; i < 20 && WiFi.status() != WL_CONNECTED; i++) {
   delay(500); Serial.print(".");
 }
 if (WiFi.status() == WL_CONNECTED) {
   Serial.println(" OK: " + WiFi.localIP().toString());
   return true;
 }
 Serial.println(" FAILED");
 return false;
}
// ── JSON int parser — reads full number, not just 2 chars ─────────────────
int parseJsonInt(const String& json, const String& key) {
 int idx = json.indexOf("\"" + key + "\":");
 if (idx == -1) return -1;
 int start = idx + key.length() + 3;
 while (start < (int)json.length() && !isDigit(json[start])) start++;
 int end = start;
 while (end < (int)json.length() && isDigit(json[end])) end++;
 if (end == start) return -1;
 return json.substring(start, end).toInt();
}
// ── Web preview handlers ──────────────────────────────────────────────────
void handleRoot() {
 previewServer.send(200, "text/html",
   "<!DOCTYPE html><html><head>"
   "<meta name='viewport' content='width=device-width,initial-scale=1'>"
   "<style>"
   "body{background:#111;margin:0;display:flex;flex-direction:column;"
   "align-items:center;justify-content:center;min-height:100vh;font-family:sans-serif}"
   "h2{color:#fff;margin:12px 0 4px}p{color:#aaa;margin:0 0 12px;font-size:13px}"
   "img{width:100%;max-width:640px;border:1px solid #333;border-radius:6px}"
   "</style>"
   "<script>"
   "var retries=0;"
   "function reloadStream(){"
   "  retries++;"
   "  var delay=Math.min(500*retries,5000);"
   "  var img=document.getElementById('s');"
   "  setTimeout(function(){img.src='/stream?t='+Date.now();},delay);"
   "}"
   "</script>"
   "</head><body>"
   "<h2>Parking Detection Preview</h2>"
   "<p>Press the button to check parking slots</p>"
   "<img id='s' src='/stream' onerror='reloadStream()'>"
   "</body></html>"
 );
}
void handleStream() {
 WiFiClient streamClient = previewServer.client();
 streamClient.println("HTTP/1.1 200 OK");
 streamClient.println("Content-Type: multipart/x-mixed-replace; boundary=frame");
 streamClient.println("Cache-Control: no-cache");
 streamClient.println("Connection: close");
 streamClient.println();
 const TickType_t lockWait = pdMS_TO_TICKS(200);
 const uint32_t   frameGap = 50;
 const uint32_t   yieldGap = 80;
 const uint32_t   watchdog = 8000;
 uint32_t lastFrame = millis();
 while (streamClient.connected()) {
   if (millis() - lastFrame > watchdog) {
     Serial.println("[stream] watchdog timeout");
     break;
   }
   if (!lockCam(lockWait)) {
     vTaskDelay(pdMS_TO_TICKS(yieldGap));
     continue;
   }
   camera_fb_t* discard = esp_camera_fb_get();
   if (discard) esp_camera_fb_return(discard);
   camera_fb_t* fb = esp_camera_fb_get();
   unlockCam();
   if (!fb) { vTaskDelay(pdMS_TO_TICKS(10)); continue; }
   streamClient.print("--frame\r\nContent-Type: image/jpeg\r\nContent-Length: ");
   streamClient.print(fb->len);
   streamClient.print("\r\n\r\n");
   size_t written = streamClient.write(fb->buf, fb->len);
   streamClient.print("\r\n");
   esp_camera_fb_return(fb);
   if (written == 0) { Serial.println("[stream] write failed"); break; }
   lastFrame = millis();
   vTaskDelay(pdMS_TO_TICKS(frameGap));
 }
 streamClient.stop();
 Serial.println("[stream] client disconnected");
}
void webServerTask(void* param) {
 while (true) {
   previewServer.handleClient();
   vTaskDelay(1);
 }
}
// ── Parking check ─────────────────────────────────────────────────────────
void checkParking() {
 if (!ensureWiFi()) return;
 if (!lockCam(pdMS_TO_TICKS(3000))) {
   Serial.println("Could not lock camera — try again");
   return;
 }
 // Switch to VGA for sharper API capture
 sensor_t* s = esp_camera_sensor_get();
 s->set_framesize(s, FRAMESIZE_VGA);
 s->set_quality(s, 10);
 delay(150);
 // Flush warm-up frames so AEC settles
 camera_fb_t* warmup = esp_camera_fb_get();
 if (warmup) esp_camera_fb_return(warmup);
 delay(200);
 camera_fb_t* fb = esp_camera_fb_get();
 if (!fb) {
   Serial.println("Capture failed");
   s->set_framesize(s, FRAMESIZE_SVGA);
   s->set_quality(s, 8);
   unlockCam();
   return;
 }
 Serial.printf("Captured %u bytes\n", fb->len);
 // Restore preview resolution before releasing lock
 s->set_framesize(s, FRAMESIZE_SVGA);
 s->set_quality(s, 8);
 // Copy to heap so camera lock can be released before slow HTTPS upload
 size_t   imgLen = fb->len;
 uint8_t* imgBuf = (uint8_t*)malloc(imgLen);
 if (!imgBuf) {
   Serial.println("malloc failed");
   esp_camera_fb_return(fb);
   unlockCam();
   return;
 }
 memcpy(imgBuf, fb->buf, imgLen);
 esp_camera_fb_return(fb);
 unlockCam();  // ← stream resumes here
 // ── HTTPS upload ──────────────────────────────────────────────────────
 Serial.println("Sending to API...");
 if (!client.connect(serverName, serverPort)) {
   Serial.println("Connection to API server failed");
   free(imgBuf);
   return;
 }
 String boundary   = "----ESP32Boundary";
 String head       = "--" + boundary + "\r\n"
                     "Content-Disposition: form-data; name=\"imageFile\"; filename=\"snap.jpg\"\r\n"
                     "Content-Type: image/jpeg\r\n\r\n";
 String tail       = "\r\n--" + boundary + "--\r\n";
 int    contentLen = head.length() + (int)imgLen + tail.length();
 client.println("POST " + String(serverPath) + " HTTP/1.1");
 client.println("Host: " + String(serverName));
 client.println("X-API-Key: " + String(API_KEY));
 client.println("Content-Type: multipart/form-data; boundary=" + boundary);
 client.println("Content-Length: " + String(contentLen));
 client.println("Connection: close");
 client.println();
 client.print(head);
 client.write(imgBuf, imgLen);
 client.print(tail);
 free(imgBuf);
 // ── Read response ─────────────────────────────────────────────────────
 uint32_t t = millis();
 while (!client.available()) {
   if (millis() - t > 15000) {
     Serial.println("API timeout"); client.stop(); return;
   }
   delay(10);
 }
 String response = "";
 while (client.available()) response += (char)client.read();
 client.stop();
 int jsonStart = response.indexOf("\r\n\r\n");
 String json = (jsonStart != -1) ? response.substring(jsonStart + 4) : response;
 Serial.println("Response: " + json);
 // ── Parse and report ──────────────────────────────────────────────────
 int occupiedCount = parseJsonInt(json, "occupied");
 int emptyCount    = parseJsonInt(json, "empty");
 if (occupiedCount < 0 || emptyCount < 0) {
   Serial.println("Could not parse parking data from response.");
   return;
 }
 Serial.println("Occupied slots: " + String(occupiedCount));
 Serial.println("Empty slots:    " + String(emptyCount));
 Serial.println(emptyCount > 0 ? "Status: Parking available!" : "Status: Parking FULL!");
}
// ── Setup ─────────────────────────────────────────────────────────────────
void setup() {
 Serial.begin(115200);
 pinMode(TRIGGER_BTN, INPUT_PULLUP);
 camMutex = xSemaphoreCreateMutex();
 initCamera();
 client.setInsecure();
 WiFi.begin(WIFI_SSID, WIFI_PASS);
 Serial.print("Connecting to WiFi");
 while (WiFi.status() != WL_CONNECTED) { delay(500); Serial.print("."); }
 Serial.println("\nConnected: " + WiFi.localIP().toString());
 Serial.println("Preview: http://" + WiFi.localIP().toString());
 previewServer.on("/",       handleRoot);
 previewServer.on("/stream", handleStream);
 previewServer.begin();
 xTaskCreatePinnedToCore(webServerTask, "webTask", 8192, NULL, 1, NULL, 0);
}
// ── Loop (Core 1) ─────────────────────────────────────────────────────────
void loop() {
 if (digitalRead(TRIGGER_BTN) == LOW) {
   unsigned long now = millis();
   if (now - lastTriggerTime > DEBOUNCE_MS) {
     lastTriggerTime = now;
     Serial.println("Button pressed — capturing...");
     checkParking();
   }
 }
}
