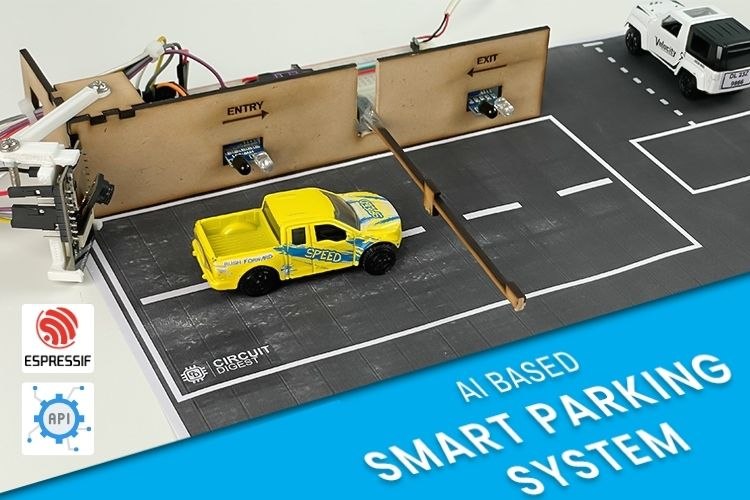
Due to the increasing population, there is a growing number of vehicles, which has led to a higher demand for parking lots in busy cities. Managing the data of vehicles entering and exiting parking lots can be quite a hassle. So today, I’ve come up with an interesting and inexpensive solution to this problem.
We are going to create a smart parking system with an Automatic Number Plate Recognition (ANPR) system using the affordable ESP32-CAM. With its built-in camera, it is possible to capture images and perform number plate recognition. Additionally, we will manage barrier opening and closing, as well as vehicle entry and exit detection, using IR sensors and more. Without any further delay, let's dive into the project. AI Projects offers a collection of real-world AI applications such as voice-enabled ESP32 projects, intelligent parking systems, and smart robotics designs for makers and engineers.
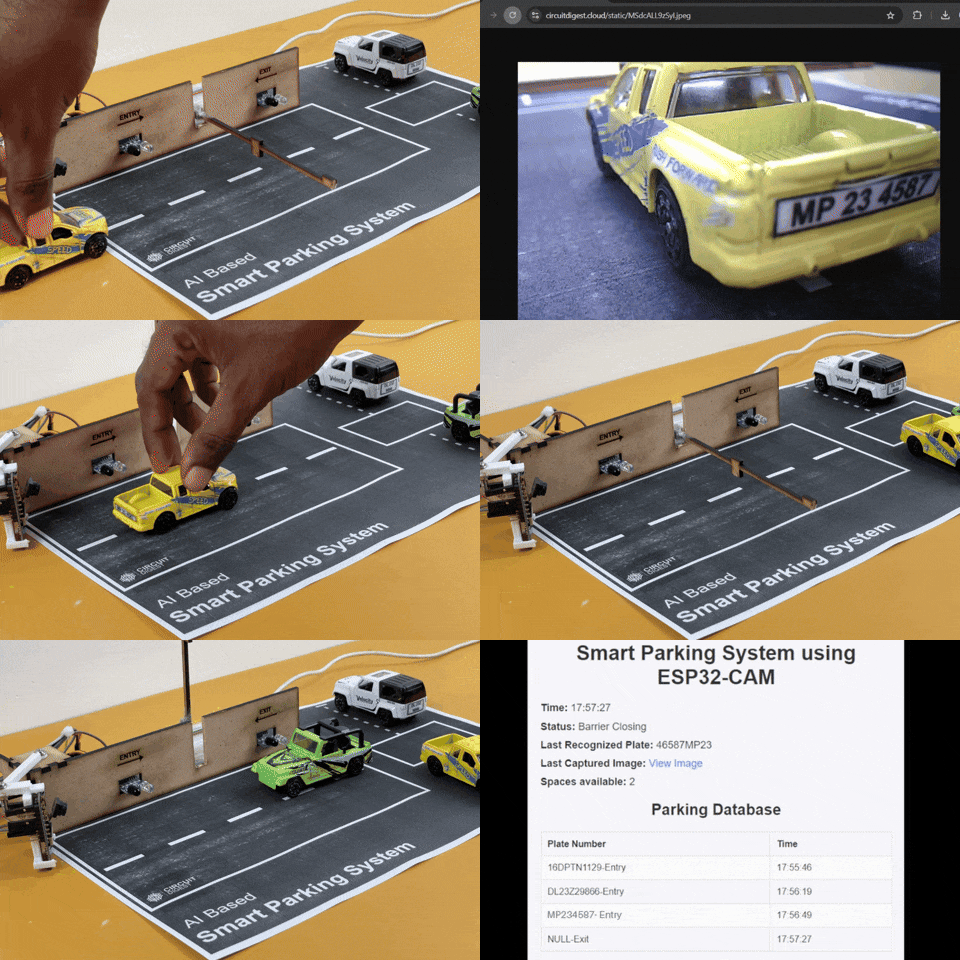
Overview of Smart Parking System
This project features a fully automated number plate detection system with barrier control. There are two IR sensors: one at the entry and one at the exit. When a car approaches the entry sensor, the camera on the ESP32-CAM captures the car's number plate and sends it to our dedicated Number Plate Detection API, receiving a response within seconds. The result is gets logged, and the barrier opens to allow the vehicle inside. Similarly, when a vehicle approaches the exit, the barrier opens, allowing the vehicle to leave, and the data gets logged. This is what we’ve planned for this project. It serves as an introductory example of our latest API, which has many more possibilities that I leave to you to explore.
Components Required to Build Smart Parking System
The most important component here is the ESP32-CAM, which was chosen for being an affordable microcontroller development board with essential features like a camera and Wi-Fi. If any other microcontrollers fit these criteria, you can select them as well. The rest of the components are based on our own concept. As always, you're not limited to the list provided below; feel free to customize it as needed.
Below is the list of components that are required,
ESP32 CAM x1
Servo Motor x1
IR Sensor Module x2
Any USB to UART Converter x1
Breadboard x1
Jumper Wires (Required Quantity)
To mount the ESP32-CAM and add aesthetics to the project, I’ve used 3D printing and 2D laser cutting. However, these are not necessary in your case, as there are many alternatives to fulfill these tasks.
Circuit Diagram for the Smart Parking Management System
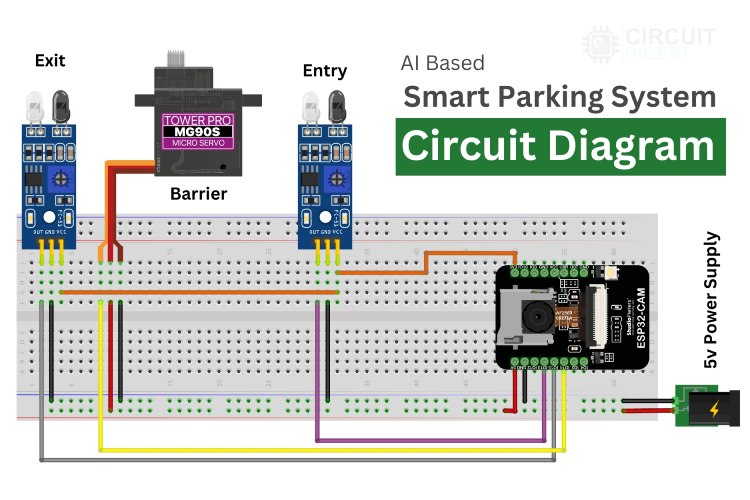
Finally, we come to the actual hardware connection. The circuit diagram is quite simple and self-explanatory. The main connections will be between the ESP32-CAM, servo motor, and IR sensors, with the rest dedicated to the power supply circuit. One important thing to remember is that the servo motor is powered by 5V, and the IR sensors are powered by the 3.3V output from the ESP32-CAM. This ensures that the digital output from the IR sensors won't exceed the 3.3V limit of the ESP32-CAM's GPIOs. I'm going to provide a 5V power supply using an old USB wire I found lying around, but you can use any 5V source available.
Above, you can see the circuit diagram of the smart parking system we are going to build. Let me explain the circuit connections in detail for clarity.
We are utilizing three GPIOs of the ESP32-CAM, one for the servomotor and two for the IR sensors. GPIO 14, configured as PWM output, controls the shaft position of the servo motor. GPIO 15 and GPIO 13, configured as digital inputs, are connected to the two IR sensors, representing the entry and exit points.
Regarding the power supply, we need an input voltage of 5V for the overall circuit. Inside the circuit, we need 3.3V for the IR sensors and the ESP32 module within the ESP32-CAM module, which can be drawn from the built-in voltage regulator of the ESP32-CAM module.
That's it—connection complete!
I'm not going to repeat the programming process for the ESP32-CAM development module, as we already have a dedicated article explaining the concept. For beginners, I recommend checking out the article - How to Program the ESP32-CAM? to see the circuit diagram between the USB-to-UART converter module and ESP32-CAM and to learn about the programming modes of the ESP32-CAM and more.
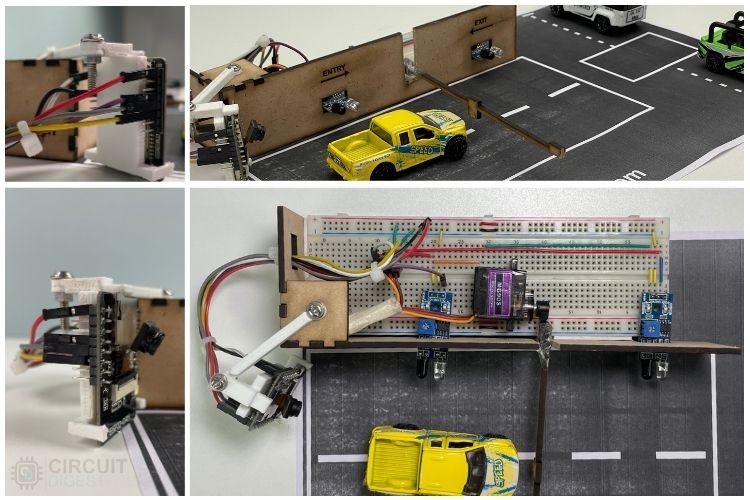
Above, you can see the assembled hardware image of the Smart Parking System. I used 3D printing to hold the ESP32-CAM and performed laser cutting to enhance the project's aesthetics. These are additional steps that aren't required for the project. If you're interested in accessing all the source files, they have been attached to the GitHub repository, which you can find at the bottom of this document.
Disclaimer
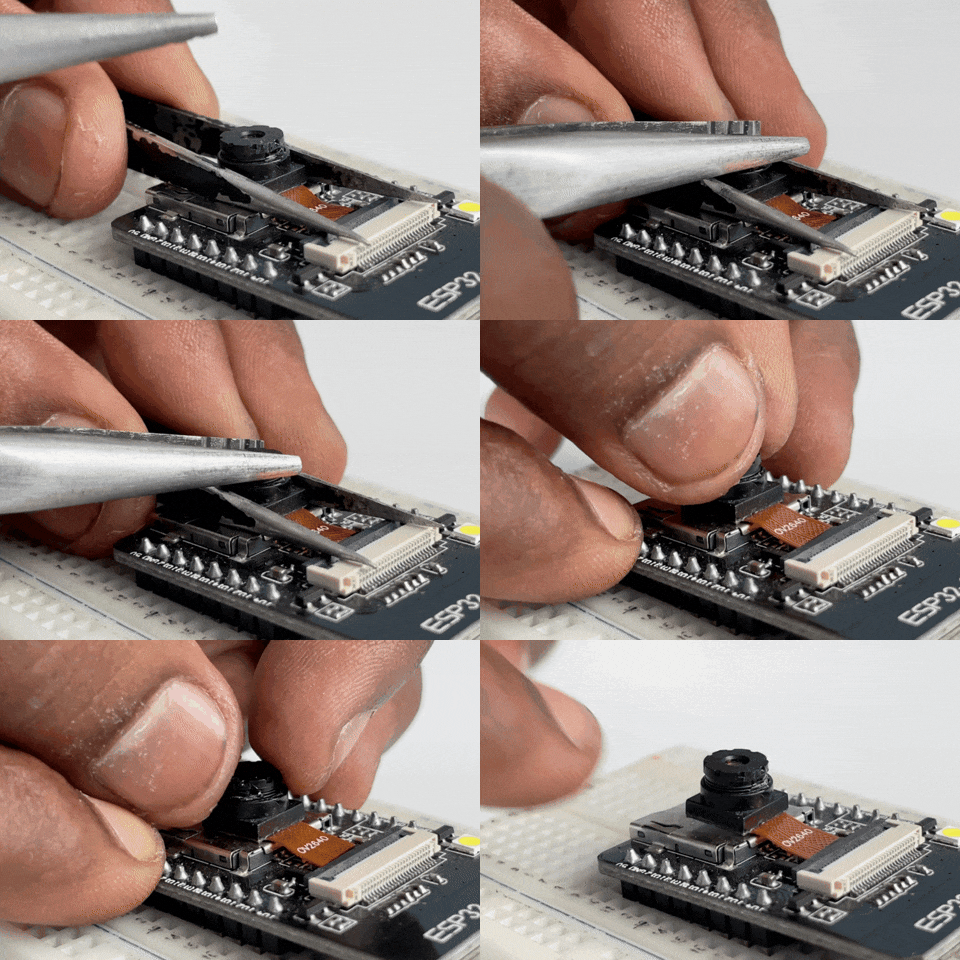
Something you should know about miniature photography using the ESP32-CAM is that it isn't designed for capturing photos of miniature or close-up objects due to the factory-set focal length of the lens. If you wish to take macro or miniature photos, you'll need to manually adjust the lens's focal length. For reference, there's a GIF video below showing how this adjustment can be done using a couple of pliers. If you're not comfortable taking the risk, you can also purchase extra overlay lenses that can achieve the same result.
ESP32-CAM Code for Smart Parking System
Now comes the final part of the project- coding. However, before diving into the code, there are prerequisites such as generating the API Key and installing additional libraries.
Generating API KEY
You need to generate an API Key for accessing the number plate recognition API. Please refer to the section on "Generating API Key" to learn more about this process.
Once you've obtained the API Key, we can proceed with the coding phase, starting with installing the required libraries.
Installing Additional Libraries
We need to install two libraries to proceed with the code,
You can install these libraries directly via the provided GitHub link or by searching for them in the Arduino IDE library manager.
ESP32 Code Explnation
To learn more about the Number Plate Recognition API, its working demonstration, and the detailed code explanation, you are welcome to explore another article dedicated to this topic License Plate Recognition using ESP32-CAM. This is because I will be skipping the most repetitive parts of the code in this explanation.
Including Required Libraries
Initially, the necessary libraries are included in the code. Don't worry about the number of libraries listed in the image—most of them are built-in and will be automatically located when you select the AI Tinker ESP32-CAM Board in the board manager.
// Libraries for WiFi, Secure Client, and Camera functionalities
#include <Arduino.h>
#include <WiFi.h>
#include <WiFiClientSecure.h>
#include <WebServer.h>
#include "soc/soc.h"
#include "soc/rtc_cntl_reg.h"
#include "esp_camera.h"
#include <NTPClient.h>
#include <WiFiUdp.h>
#include <ESP32Servo.h>
// WiFi credentials and server information
const char* ssid = "xxx";             // Replace xxx with your WiFi SSID
const char* password = "xxx";          // Replace xxx with your WiFi Password
String serverName = "www.circuitdigest.cloud";  // Replace with your server domain
String serverPath = "/api/v1/readnumberplate";         // API endpoint path "/readqrcode" or "/readnumberplate"
const int serverPort = 443;                     // HTTPS port
String apiKey = "xxx";                 // Replace xxx with your API key
String imageViewLink = "https://www.circuitdigest.cloud/static/" + apiKey + ".jpeg";
#define flashLight 4  // GPIO pin for the flashlight
int count = 0;        // Counter for image uploads
Next, you will notice some placeholder text like “xxx.” These are areas where you need to replace them with your own details, such as your API key. Other than these changes, if you are replicating this project as is, there are no other modifications required. However, if you plan to adapt the project to your own needs, some adjustments may be necessary.
Pin Declarations and Functions
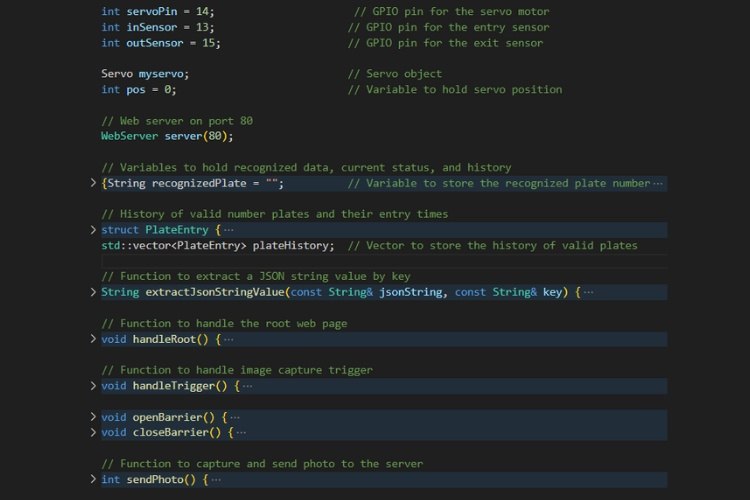
After initializing the required libraries, the next step is pin declaration. This involves assigning GPIO pins to the peripheral devices, such as the two IR sensors and the servo motor. Below, you can see the image showing the GPIO pin numbers allocated:
GPIO 14 for the Servo Motor
GPIO 13 for the Entry IR Sensor
GPIO 15 for the Exit IR Sensor
Now, let's take a closer look at the key functions defined in the code for this smart parking system:
PlateEntry(): The PlateEntry structure represents the vehicle's valid number plate information and its entry time. When a vehicle's number plate is recognized, this structure stores the plate number and entry time for record-keeping and display on the web interface.
extractJsonStringValue(): This function extracts a value from a JSON string based on a given key. It’s used to retrieve specific data, such as the recognized license plate number or an image link, from the server’s JSON response after sending a photo.
handleRoot(): The handleRoot function generates and serves the HTML content for the root web page of the smart parking system. It provides the main interface for the system, which is accessed through a web browser.
handleTrigger(): This function handles the action of triggering an image capture, initiated either by the web interface or another trigger, such as when a vehicle is detected entering the parking area.
openBarrier(): The openBarrier function controls the servo motor to open the parking barrier, allowing entry after a vehicle has been successfully recognized and verified.
closeBarrier(): This function controls the servo motor to close the parking barrier after the vehicle has entered the parking area, securing the parking lot.
sendPhoto(): This critical function captures a photo using the ESP32-CAM and uploads it to the server for license plate recognition. It handles both image capture and server communication, which drive the logic for opening or closing the parking barrier.
These functions work together to manage the core tasks of the smart parking system, including handling the web interface, capturing and uploading photos for recognition, and controlling the parking barrier based on recognition results.
Main Functions
In this project, the most significant functions are the setup() and loop() functions, which are fundamental to the operation of the smart parking system. Let’s explore them in detail.
void loop() {
  // Update the NTP client to get the current time
  timeClient.update();
  currentTime = timeClient.getFormattedTime();
  // Check the web server for any incoming client requests
  server.handleClient();
  // Monitor sensor states for vehicle entry/exit
  if (digitalRead(inSensor) == LOW && vehicalCount < availableSpaces) {
    delay(2000);      // delay for vehicle need to be in a position
    handleTrigger();  // Trigger image capture for entry
  }
  if (digitalRead(outSensor) == LOW && vehicalCount > 0) {
    delay(2000);  // delay for vehicle need to be in a position
    openBarrier();
    PlateEntry newExit;
    newExit.plateNumber = "NULL-Exit";
    newExit.time = currentTime;  // Use the current timestamp
    plateHistory.push_back(newExit);
    delay(barrierDelay);
    vehicalCount--;
    closeBarrier();
    currentStatus = "Idle";
    server.handleClient();  // Update status on webpage
  }
}
Setup() Function
The setup() function runs once at the start and is responsible for initializing hardware components and establishing network connectivity. Below are the key tasks it performs:
Brownout Detector Disable, This prevents the ESP32 from resetting due to voltage fluctuations during power-up.
Serial Communication & Pin Setup, Initializes serial communication for debugging and configures GPIO pins for the servo motor and IR sensors.
Wi-Fi Setup, Establishes a Wi-Fi connection, which is critical for connecting to the number plate recognition API and serving the web interface.
NTPClient Initialization, Sets up the NTP client for fetching the current time. This will be used for timestamping vehicle entries and exits.
Web Server Setup, Initializes the web server to handle client requests, such as displaying vehicle data or triggering image capture.
Camera Configuration, Configures the ESP32-CAM module, ensuring it’s ready to capture images for license plate recognition.
PWM and Servo Initialization, Initializes the PWM (Pulse Width Modulation) signal for controlling the servo motor, which will open and close the barrier.
Loop() Function
The loop() function runs continuously and manages the main functionality of the system. Here’s a breakdown of what it does:
NTP Time Update
The NTP client is updated periodically to fetch the current time. This time is used for timestamping when vehicles enter and exit the parking lot.
Web Server Handling
Continuously checks for incoming web client requests and handles them, such as serving the web interface or responding to commands.
Vehicle Entry Handling
When the inSensor detects a vehicle and there is available space in the parking lot, the system delays briefly to ensure the vehicle is properly positioned.
It then calls the handleTrigger() function to capture an image of the vehicle’s license plate for recognition.
If the recognition is successful, the system logs the vehicle entry and opens the barrier to allow the vehicle inside.
Vehicle Exit Handling
When the outSensor detects a vehicle, and the vehicle count is greater than zero, the system opens the barrier and logs the exit time (marked as "NULL-Exit" for simplicity).
After a delay (giving the vehicle time to pass through), the barrier is closed, and the vehicle count is decremented.
These functions work together to manage the core operations of the smart parking system, including vehicle detection, image capture, number plate recognition, barrier control, and record-keeping. Please note that this code is not yet fully optimized for direct implementation. It requires additional work to enhance error handling and overall robustness. This aspect of the project is left to be refined and perfected.
Now, let’s upload the code and check the result.
Working Demonstration of Smart Parking System
Finally, after successfully uploading the code, you can see the expected result in the GIF video below. The overall system delay is set long because it is a prototype. For deployment, it can be optimized to provide faster results. The only thing causing delay is uploading and waiting for the result, which is unavoidable with this approach to number plate recognition.
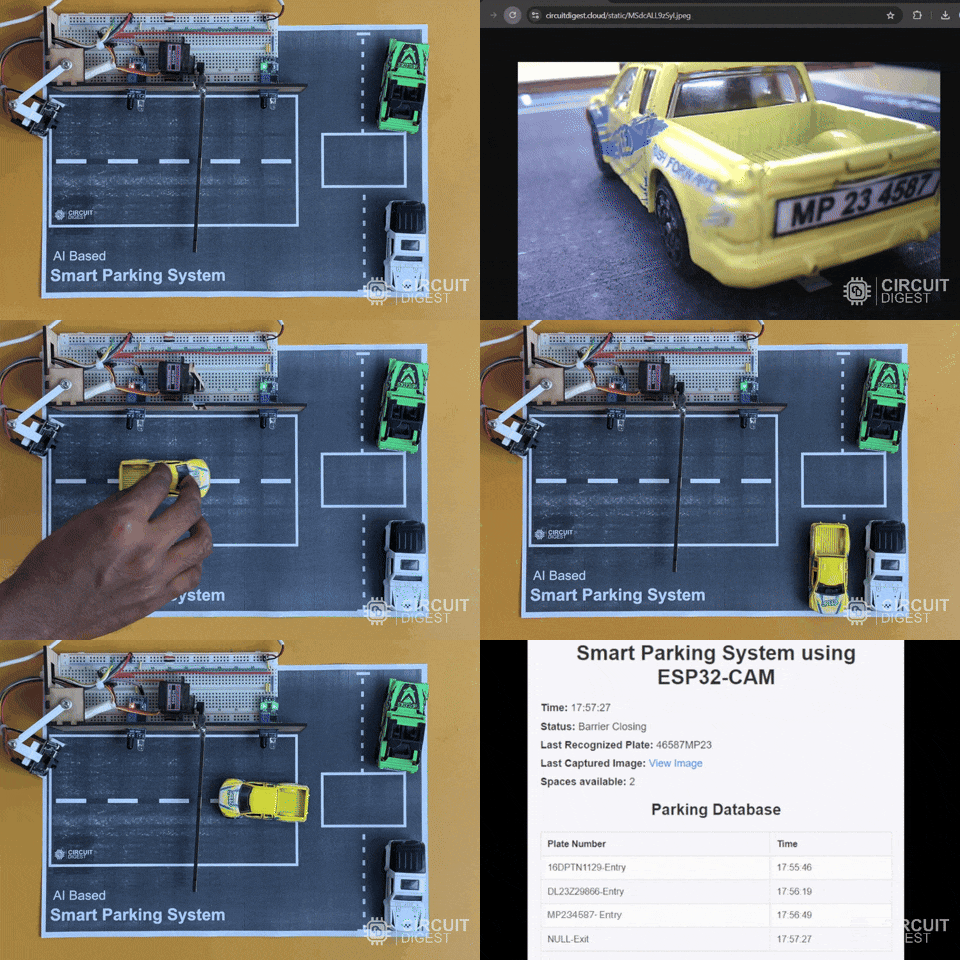
To simplify, we are recognizing the number plate only at the entry, but this can be improved to recognize both entry and exit. In this project, we are storing vehicle data only in RAM, which might not be available after a restart. In that case, you can use any online IoT platform to store the data in the cloud or use the built-in memory card slot to log the data, so it will be available even after a power down.
Successfully, we have created a Smart Parking System with these advanced features. Keep tuning and optimizing this project, and we will meet again with another exciting project soon.
Projects in a Similar Realm
License Plate Recognition using Raspberry Pi and OpenCV: It involves capturing images of vehicle license plates and processing them with OpenCV for accurate recognition. The guide covers the setup of the Raspberry Pi, integration with a camera module, and the development of software to handle image processing and plate detection, offering a practical solution for automated vehicle identification.
Car Number Plate Detection Using MATLAB and Image Processing: Explains how to detect vehicle number plates using MATLAB and image processing techniques. It covers the steps to preprocess images, apply detection algorithms, and extract license plate information. The guide provides a detailed approach to implementing the recognition system, leveraging MATLAB’s powerful image-processing toolbox for accurate vehicle identification.
Optical Character Recognition (OCR) using Tesseract on Raspberry Pi: Demonstrates how to perform Optical Character Recognition (OCR) using Tesseract on a Raspberry Pi. It details the setup of the Raspberry Pi, installation of Tesseract OCR software, and integration with a camera module to capture and recognize text from images. The guide provides step-by-step instructions for configuring and running Tesseract, showcasing how to implement effective OCR for text extraction on a compact, affordable platform.
License Plate Recognition Using ESP32 CAM: In this new project, we'll use a simplified API from Circuit Digest for vehicle number plate recognition. Unlike traditional OCR projects, you only need to capture and send an image to the server; it handles the processing and returns the result.
Complete Project Code
/*
 * Smart Parking System using ESP32-CAM
 *
 * Features:
 * - WiFi connectivity for communication with a remote server.
 * - Secure HTTPS communication with the server using WiFiClientSecure.
 * - Camera functionality to capture images for license plate recognition.
 * - Integration with an NTP server for accurate timekeeping in Indian Standard Time (IST).
 * - Real-time web server interface for monitoring parking system status.
 * - Web page displays real-time information including current time, parking status, and captured images.
 * - Image capture triggered by a POST request from the web interface.
 * - Image upload to a remote server with automatic handling of responses.
 * - Servo motor control to open and close the parking barrier based on vehicle entry/exit.
 * - Detection of vehicle entry and exit using GPIO sensors.
 * - Dynamic update of available parking spaces based on vehicle count.
 * - Logging of valid number plates with timestamps for parking history.
 *
 * Working:
 * 1. Connects to a specified WiFi network.
 * 2. Initializes and configures the camera.
 * 3. Sets up and starts a web server to handle client requests.
 * 4. Establishes an NTP client to get the current time.
 * 5. Continuously updates the web server with real-time status and parking information.
 * 6. Handles image capture and upload when a POST request is received from the web interface.
 * 7. Updates parking space availability and history based on the recognition results.
 * 8. Controls the parking barrier using a servo motor, based on vehicle detection by sensors.
 * 9. Provides a web interface that refreshes periodically to display updated information.
 *
 * Note:
 * - Replace placeholders for WiFi credentials, server details, and API keys with actual values.
 * - Ensure proper handling of HTTPS certificates and security measures for production use.
 */
// Libraries for WiFi, Secure Client, and Camera functionalities
#include <Arduino.h>
#include <WiFi.h>
#include <WiFiClientSecure.h>
#include <WebServer.h>
#include "soc/soc.h"
#include "soc/rtc_cntl_reg.h"
#include "esp_camera.h"
#include <NTPClient.h>
#include <WiFiUdp.h>
#include <ESP32Servo.h>
// WiFi credentials and server information
const char* ssid = "xxx";             // Replace xxx with your WiFi SSID
const char* password = "xxx";          // Replace xxx with your WiFi Password
String serverName = "www.circuitdigest.cloud";  // Replace with your server domain
String serverPath = "/api/v1/readnumberplate";         // API endpoint path "/readqrcode" or "/readnumberplate"
const int serverPort = 443;                     // HTTPS port
String apiKey = "xxx";                 // Replace xxx with your API key
String imageViewLink = "https://www.circuitdigest.cloud/static/" + apiKey + ".jpeg";
#define flashLight 4  // GPIO pin for the flashlight
int count = 0;        // Counter for image uploads
WiFiClientSecure client;  // Secure client for HTTPS communication
// Camera GPIO pins - adjust based on your ESP32-CAM board
#define PWDN_GPIO_NUM 32
#define RESET_GPIO_NUM -1
#define XCLK_GPIO_NUM 0
#define SIOD_GPIO_NUM 26
#define SIOC_GPIO_NUM 27
#define Y9_GPIO_NUM 35
#define Y8_GPIO_NUM 34
#define Y7_GPIO_NUM 39
#define Y6_GPIO_NUM 36
#define Y5_GPIO_NUM 21
#define Y4_GPIO_NUM 19
#define Y3_GPIO_NUM 18
#define Y2_GPIO_NUM 5
#define VSYNC_GPIO_NUM 25
#define HREF_GPIO_NUM 23
#define PCLK_GPIO_NUM 22
// Network Time Protocol (NTP) setup
const char* ntpServer = "pool.ntp.org";  // NTP server
const long utcOffsetInSeconds = 19800;   // IST offset (UTC + 5:30)
int servoPin = 14;                      // GPIO pin for the servo motor
int inSensor = 13;                     // GPIO pin for the entry sensor
int outSensor = 15;                    // GPIO pin for the exit sensor
Servo myservo;                         // Servo object
int pos = 0;                           // Variable to hold servo position
// Initialize the NTPClient
WiFiUDP ntpUDP;
NTPClient timeClient(ntpUDP, ntpServer, utcOffsetInSeconds);
String currentTime = "";
// Web server on port 80
WebServer server(80);
// Variables to hold recognized data, current status, and history
String recognizedPlate = "";          // Variable to store the recognized plate number
String imageLink = "";                // Variable to store the image link
String currentStatus = "Idle";        // Variable to store the current status of the system
int availableSpaces = 4;             // Total parking spaces available
int vehicalCount = 0;                // Number of vehicles currently parked
int barrierDelay = 3000;             // Delay for barrier operations
int siteRefreshTime = 1;             // Web page refresh time in seconds
// History of valid number plates and their entry times
struct PlateEntry {
  String plateNumber;  // Plate number of the vehicle
  String time;        // Entry time of the vehicle
};
std::vector<PlateEntry> plateHistory;  // Vector to store the history of valid plates
// Function to extract a JSON string value by key
String extractJsonStringValue(const String& jsonString, const String& key) {
  int keyIndex = jsonString.indexOf(key);
  if (keyIndex == -1) {
    return "";
  }
  int startIndex = jsonString.indexOf(':', keyIndex) + 2;
  int endIndex = jsonString.indexOf('"', startIndex);
  if (startIndex == -1 || endIndex == -1) {
    return "";
  }
  return jsonString.substring(startIndex, endIndex);
}
// Function to handle the root web page
void handleRoot() {
  String html = "<!DOCTYPE html><html lang='en'><head>";
  html += "<meta charset='UTF-8'>";
  html += "<meta name='viewport' content='width=device-width, initial-scale=1.0'>";
  html += "<title>Smart Parking System</title>";
  html += "<style>";
  html += "body { font-family: Arial, sans-serif; background-color: #f4f4f9; margin: 0; padding: 0; color: #333; }";
  html += ".container { max-width: 1200px; margin: 0 auto; padding: 20px; box-sizing: border-box; }";
  html += "header { text-align: center; padding: 15px; background-color: #0e3d79; color: white; }";
  html += "h1, h2 { text-align: center; margin-bottom: 20px; }";  // Center align all headers
  html += "p { margin: 10px 0; }";
  html += "table { width: 100%; border-collapse: collapse; margin: 20px 0; }";
  html += "th, td { padding: 10px; text-align: left; border: 1px solid #ddd; }";
  html += "tr:nth-child(even) { background-color: #f9f9f9; }";
  html += "form { text-align: center; margin: 20px 0; }";
  html += "input[type='submit'] { background-color: #007bff; color: white; border: none; padding: 10px 20px; font-size: 16px; cursor: pointer; border-radius: 5px; }";
  html += "input[type='submit']:hover { background-color: #0056b3; }";
  html += "a { color: #007bff; text-decoration: none; }";
  html += "a:hover { text-decoration: underline; }";
  html += "img { max-width: 100%; height: auto; margin: 20px 0; display: none; }";  // Initially hide the image
  html += "@media (max-width: 768px) { table { font-size: 14px; } }";
  html += "</style>";
  html += "<meta http-equiv='refresh' content='" + String(siteRefreshTime) + "'>";  // Refresh every x second
  html += "</head><body>";
  html += "<header><h1>Circuit Digest</h1></header>";
  html += "<div class='container'>";
  html += "<h1>Smart Parking System using ESP32-CAM</h1>";
  html += "<p><strong>Time:</strong> " + currentTime + "</p>";
  html += "<p><strong>Status:</strong> " + currentStatus + "</p>";
  html += "<p><strong>Last Recognized Plate:</strong> " + recognizedPlate + "</p>";
  html += "<p><strong>Last Captured Image:</strong> <a href=\"" + imageViewLink + "\" target=\"_blank\">View Image</a></p>";
  // html += "<form action=\"/trigger\" method=\"POST\">";
  // html += "<input type=\"submit\" value=\"Capture Image\">";
  // html += "</form>";
  html += "<p><strong>Spaces available:</strong> " + String(availableSpaces - vehicalCount) + "</p>";
  html += "<h2>Parking Database</h2>";
  if (plateHistory.empty()) {
    html += "<p>No valid number plates recognized yet.</p>";
  } else {
    html += "<table><tr><th>Plate Number</th><th>Time</th></tr>";
    for (const auto& entry : plateHistory) {
      html += "<tr><td>" + entry.plateNumber + "</td><td>" + entry.time + "</td></tr>";
    }
    html += "</table>";
  }
  html += "<script>";
  html += "function toggleImage() {";
  html += "  var img = document.getElementById('capturedImage');";
  html += "  if (img.style.display === 'none') {";
  html += "    img.style.display = 'block';";
  html += "  } else {";
  html += "    img.style.display = 'none';";
  html += "  }";
  html += "}";
  html += "</script>";
  html += "</div></body></html>
Comments
cual es la url para ver el funcionamiento
I have same problem i change the API key in code but still give me URL not found.
plz your support .
server read plate from right to left
I have done everything written in the tutorial, but why can't I still detect and display the HTML?
Find the IP address assigned to the ESP32 and use that to access the webpage.
can you make full tutorial video
Can I buy the full project?



Hi, I have a question: when I go to the page to see the image, it says URL not found.