
Text-to-Speech, or TTS, is a technology that converts written text into spoken audio. It is commonly used in voice assistants, accessibility tools, alert systems, kiosks, and smart devices. On computers and smartphones, TTS works smoothly because these systems have enough processing power and memory to generate speech locally. Microcontrollers are different. They operate with limited speed, limited memory, and no built-in support for advanced audio processing, which makes text-to-speech conversion using esp32 difficult when done directly on the device. Yet we used a Text-to-Speech Offline library to make the ESP32 Text-to-Speech Offline System using low pre-stored texts. This guide walks through the complete process of building an ESP32-C3 text to speech using AI system with the Wit.ai platform, the WitAITTS Arduino library, and a MAX98357A digital amplifier.
The ESP32-C3 is more capable than many basic microcontrollers, but producing natural speech directly on the device is still not practical for real-world use. For this reason, ESP32 C3 Text to Speech online methods are widely adopted. For real-world applications that require dynamic, flexible speech output, ESP32-C3 text to speech online methods are the practical standard. In this approach, the ESP32-C3 sends text to a cloud-based service, where speech is generated and returned as audio. The device then plays the sound through a speaker. This method enables ESP32 C3 Text to Speech using AI while keeping the system efficient and avoiding unnecessary hardware complexity. For more innovative applications, explore our collection of ESP32 Projects.
Table of Contents
- What is ESP32-C3 Text to Speech Online?
- Overview of Text-to-Speech (TTS)
- └ How TTS Works:
- Cloud-Based TTS Approach
- └ Benefits of Cloud-Based TTS vs. Offline TTS on ESP32-C3
- What Is Wit.ai?
- Hardware Requirements
- Circuit Diagram
- └Pin Connection Table
- Creating and Configuring a Wit.ai Account
- Installing the WitAITTS Library
- Uploading Sketch to ESP32-C3 Microcontroller
- Audio Streaming and Playback
- Common Errors and Troubleshooting
- GitHub Repository
What is ESP32-C3 Text to Speech Online?
ESP32-C3 Text-to-Speech is a cloud-based solution. The ESP32-C3 microcontroller connects to the internet and sends text data via Wi-Fi to the Wit.ai AI speech API. The Wit.ai will convert the text to MP3 audio output, then stream this back to the ESP32-C3 device, which plays the audio back through a MAX98357A I2S amplifier and speaker. All HTTP communication, audio buffering and I2S playback are handled by the WitAITTS Arduino library, making this the easiest way to add ESP32-C3 Text-to-Speech capability to any IoT device using AI without local speech models.
Overview of Text-to-Speech (TTS)
Text-to-speech may appear simple, but it involves several important steps. First, the text is prepared for speech by converting numbers into words, expanding abbreviations, and turning symbols into readable characters. Next, the system analyzes the text and breaks it into speech sounds. It also decides how the voice should sound, including pauses, emphasis, and tone, so the spoken output feels natural. Finally, the processed speech is converted into digital audio and played through a speaker. ESP32-based platforms are almost universally implemented as ESP32 text to speech online.
On computers, these steps are handled quickly and efficiently. Microcontrollers such as the ESP32-C3 have more limitations. They do not have enough memory to store large speech models, and their processors are not designed to generate high-quality speech in real time. Storage space is also limited. Because of this, ESP32 Text to Speech online methods and ESP32 C3 Text to Speech using AI are commonly adopted, where the main speech processing is handled by remote servers, and the ESP32-C3 only manages text transmission and audio playback.
How TTS Works: Step by Step Guide
1. Text normalisation: This involves breaking down any numbers into words, resolving any abbreviations, and converting symbols into what they would sound like when spoken out loud. For example, '£' in written form will become read out as "Pounds".
2. Linguistic analysis: The linguistic analysis of the text occurs when the text is broken down into the phonemes, which are the basic building blocks of sound, giving the process the basis for establishing the correct boundaries between the syllables, and determining syllable stress.
3. Prosody modelling: This stage is where the TTS engine determines the tone, inflection, pitch, rhythm, etc. of the voice so that the output has a conversational feeling and sounds pleasing to the ear.
4. Waveform synthesis: The waveforms are then created using a neural vocoder from the data of the phonemes and prosody determined previously to create the waveform audio output.
5. Audio delivery: Finally, after the waveform audio has been created, it is encoded (usually into MP3 or WAV), then returned to the requesting application to be played back through the speakers of that device.
Cloud-Based TTS Approach for ESP32-C3
The overall process is simple and fast when a cloud-based Text-to-Speech system is used. The hardware device sends text to a remote server, where all speech generation tasks are handled. Once the audio is created, it is streamed back to the device in real time, and the device only needs to play the sound through a speaker. This allows even small devices to produce clear and natural speech without performing heavy processing locally.
This method provides several practical advantages. High-quality voice output is achieved without increasing hardware requirements. Support for multiple languages and voices can be added without modifying the device firmware. Since speech models remain on the server, the system stays lightweight and easier to manage. The ESP32 text-to-speech library and tools designed for ESP32 C3 Text to Speech online follow this approach, making it suitable for scalable and maintainable ESP32-C3-based projects.
Benefits of Cloud-Based TTS vs. Offline TTS on ESP32-C3
The table below shows the features used in Cloud-Based TTS and Offline TTS.
| Feature | Cloud-Based TTS (Online) | Offline TTS |
| Audio quality | High and neural AI voices | Low, limited phoneme synthesis |
| Flash memory required | Minimal (library + sketch) | High (pre-recorded clips or model) |
| Language & voice variety | Wide and updated server-side | Restricted to stored data |
| Dynamic text support | Full, any runtime text string | None, fixed phrases only |
| Internet dependency | Required | Not required |
| Firmware complexity | Low, handled by TTS servers | High, custom audio management |
What Is Wit.ai? The AI Engine Behind This Project
Wit.ai is a cloud-based AI platform created by Meta Platforms, Inc. It provides speech and language processing through simple HTTP-based APIs. The platform supports features such as Text-to-Speech, Speech-to-Text, and basic language understanding. In text-to-speech in ESP32 implementations, this service is commonly used to convert text into spoken audio.
For ESP32-C3 Text-to-Speech, the process is straightforward. Text is sent to the Wit.ai servers using a secure HTTPS request with authentication. The service returns the generated speech in WAV or MPEG audio format. The audio can be streamed while it is being received, allowing playback to begin before the full file is downloaded, which results in smoother audio output.
Wit.ai offers a free usage tier that is suitable for learning, testing, and early-stage development. Request limits are applied, so applications that send frequent requests should be designed with these limits in mind. All speech processing and language analysis are handled on Wit.ai's servers. The ESP32-C3 only sends text data and plays back the received audio. This separation allows an ESP32 TTS library to deliver speech features on low-power hardware without increasing system complexity.
Hardware Requirements to Make the Hardware Speak
The image below shows the list of components which is required for converting Text-to-Speech on ESP32-C3. The list below covers everything needed to build a working ESP32-C3 text to speech online Arduino system.
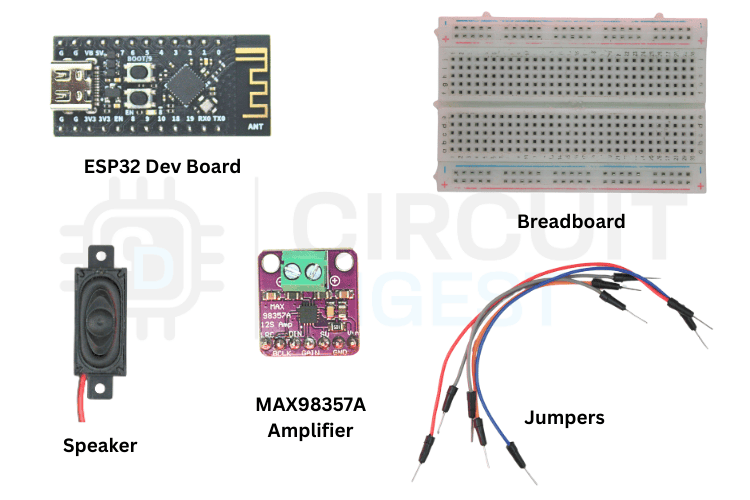
The table below shows the list of components to make the ESP32-C3 speak
| Component | Quantity | Notes |
| ESP32-C3 Dev Module | 1 | ESP32-C3 with Wi-Fi support |
| MAX98357A Amplifier | 1 | Digital audio amplifier module |
| Speaker | 1 | 4Ω or 8Ω impedance speaker to play audio |
| Breadboard | 1 | For prototyping connections |
| Jumper Wires | 1 | Male-to-female or male-to-male as needed |
| USB Cable | 1 | To power and programming |
Circuit Diagram of ESP32-C3 with MAX98357A Amplifier
Follow the wiring diagram provided to connect your ESP32-C3 to the I2S amplifier and speaker. Make sure to check your connections before turning it on to prevent any short circuits. We have also completed projects that use I2S audio communication with detailed setup instructions.

ESP32-C3 to MAX98357A Pin Connection Table
The pinout used in the library to make Text-to-Speech is given below
| ESP32-C3 Pin | MAX98357A Pin | Connection Type |
| GPIO07 | BCLK | Bit Clock |
| GPIO06 | LRC | Left/Right Clock |
| GPIO05 | DIN | Data Input |
| 5V | VIN | Power Supply |
| GND | GND | Ground |
Creating and Configuring a Wit.ai Account
Before writing any code, you need a Wit.ai account and a Server Access Token. The token authenticates every TTS request your ESP32-C3 makes. Follow these five steps to get set up.
Step 1⇒ Create Your Account
Go to the Wit.ai website and click to sign in through Meta. You'll have a few options for authentication, but email is the simplest and keeps things separate from your other accounts. Fill in your date of birth, create a password, and verify your email address with the six-digit code they send you. Once that's done, you're in.
.png)
Step 2⇒ Create a New App
From the dashboard, you need to create a new app before you can perform any useful actions. This is where naming matters; pick something meaningful because this name will follow you through logs, training data, and integrations. Also, choose your language carefully, since it affects how well the system understands intents and extracts information.
Step 3⇒ Get Your Server Access Token
Navigate to the Management section and click on Settings. Look for the HTTP API section where you'll find your Server Access Token (it's listed as a Bearer token). This token is critical; it's how your application talks to Wit.ai.
.png)
Step 4⇒ Secure Your Token
Copy the Server Access Token and store it somewhere safe. Avoid hardcoding it directly into your code or committing it to version control. Instead, use environment variables or a secure configuration system. Once you're running in production, avoid regenerating this token unless necessary.
Step 5⇒ You're Ready
That's it. Your Wit.ai account is set up and ready to integrate with your embedded devices, backend services, or any other system you're building. You shouldn't need to touch these settings again unless something changes in your project.
Installing the WitAITTS Library for ESP32-C3 Text to Speech Online
The WitAITTS library is distributed through the Arduino Library Manager. The WitAITTS library is the core component that enables ESP32-C3 text to speech online development.
Installation via Arduino Library Manager
Open Arduino IDE, go to the Library Manager icon on the left sidebar, type "WitAITTS" into the search bar, and click Install when it pops up.
The Output window shows whether the library is successfully installed or not.
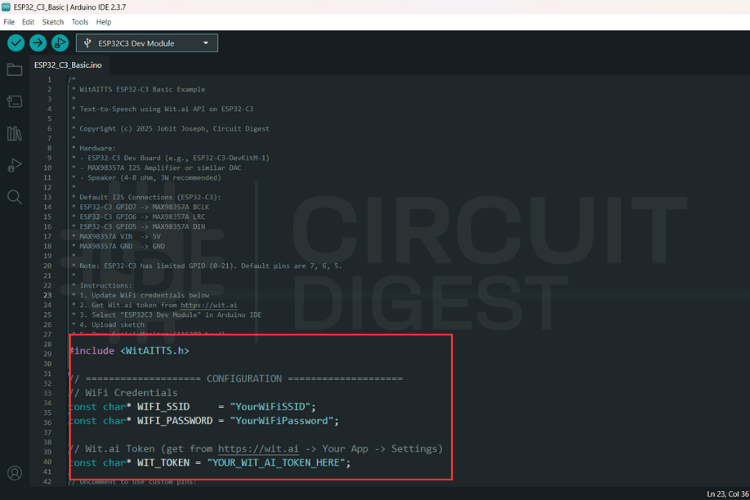
Instead of writing everything from scratch, let's use the example sketch. Go to File > Examples > WitAITTS and select ESP32_C3_Basic. This will open the ESP32-based example sketch.
Replace the YourWiFiSSID and YourWiFiPassword with the actual network details. Paste that Server Access Token you copied earlier into the YOUR_WIT_AI_TOKEN_HERE spot.
ESP32-C3 Text to Speech Source Code Explanation
This program converts typed text into spoken audio by using an online text-to-speech service and playing the sound through an audio output on the board. The system depends on WiFi and a valid cloud token. When text is sent, the board requests speech from the server, receives digital audio, and plays it through the I2S interface. The design stays simple and blocking, which suits demos and maker projects.
WitAITTS tts;This line creates the main text-to-speech engine. The object manages the entire workflow, including WiFi handling, secure communication with the Wit.ai server, audio decoding, and sound output to the speaker. All speech-related features depend on this object.
tts.begin(WIFI_SSID, WIFI_PASSWORD, WIT_TOKEN);This line connects the board to the WiFi network and authenticates with the Wit.ai service using the access token. The program verifies network access and service availability at this stage. If this step fails, the system cannot request or play any speech.
tts.setVoice("wit$Remi");This line selects the voice used for speech output. The chosen voice defines the tone, gender, and character of the sound. Changing this value directly changes how the device sounds to the user.
tts.setSpeed(100);
tts.setPitch(100);
These lines control how fast and how high the voice speaks. Normal values keep the speech clear and natural. Adjusting these settings helps tune clarity, comfort, and listening experience.
tts.speak(text);This line sends the text to the cloud service for conversion into audio. The board waits while the server generates speech and streams the audio back. The system plays the audio immediately and pauses all other work until playback finishes.
Uploading Sketch to ESP32-C3 Microcontroller
Before uploading, click the Verify icon in the top-left corner to ensure your code and credentials are typed correctly.
Keep an eye on the Notifications tab at the bottom right; once it says "Done compiling," you know the library and code are ready for the hardware.
Connect your board to your computer and hit the Upload arrow icon to send the sketch to your ESP32.
Check the Output window at the bottom of the screen. You will see the writing progress says 100% along with the "Hard resetting via RTS pin..." message.
Click the magnifying glass icon in the top right to open the Serial Monitor.
The serial monitor shows a log of the WitAITTS Configuration, including your WiFi and IP status.
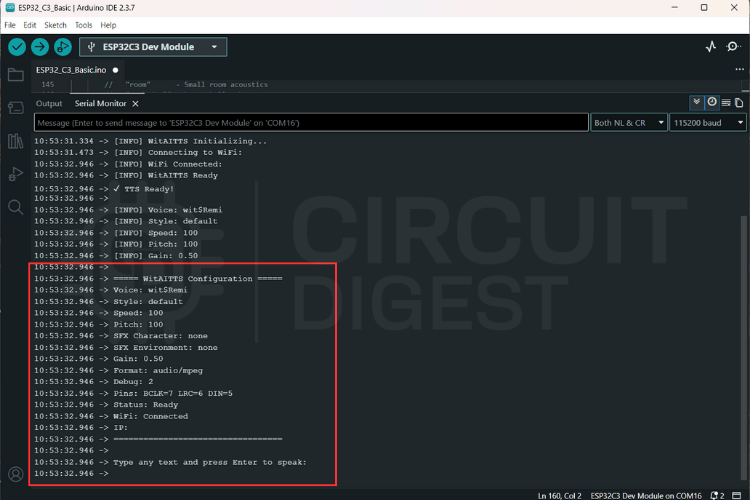
Testing TTS Output
Type a sentence into the input bar at the top of the Serial Monitor and hit Enter to send it to the Wit.ai API.
The console will log "Requesting TTS" followed by "Buffer ready, starting playback," confirming that your ESP32 is successfully receiving audio data.
Audio Streaming and Playback on the ESP32-C3
Audio is received as an MP3 stream and processed incrementally.
Advantages:
- Reduced memory usage
- Faster perceived response
- No need for full file buffering
Playback quality depends heavily on:
- Network latency
- Power stability
- Speaker quality
Common Errors and Troubleshooting
It was determined that hardware integrity must be validated prior to the commencement of software-level debugging.
| Category | Observed Issue | Potential Root Cause |
| Audio Output | No Sound Output | • Incorrect wiring configurations • Absence of amplifier power supply • Erroneous I2S pin assignments |
| Communication | HTTP Errors | • 400: Provision of invalid or empty text strings • 401: Utilization of an invalid access token • Network Timeout: Presence of Wi-Fi instability |
| Signal Quality | Distorted Audio | • Insufficient power supply voltage • Mismatch in speaker impedance • Improper clock configuration settings |
Real-World Applications of ESP32-C3 Text to Speech Using AI
Text-to-Speech on ESP32-C3 finds practical use across numerous real-world scenarios where voice feedback enhances user interaction or accessibility:
- Systems announce door status, security alerts, temperature readings, or appliance notifications without requiring users to check displays
- Provide vocal alerts when sensor thresholds are exceeded, equipment malfunctions occur, or maintenance schedules approach, ensuring operators receive critical information even when visual attention is directed elsewhere
- Help visually impaired users by reading out information from sensors, timers, or environmental monitors
- Create engaging experiences where projects can speak instructions, quiz questions, or provide feedback
- Verbally announce incoming messages, calendar reminders, weather updates, or package delivery confirmations, transforming silent smart devices into interactive assistants that communicate naturally with users
Frequently Asked Questions
⇥ 1. Can the ESP32-C3 perform Text-to-Speech without internet connectivity?
While offline TTS is technically possible using pre-recorded audio segments or severely limited synthesis libraries, the quality and flexibility are drastically reduced compared to cloud-based solutions. The WitAITTS library requires an active internet connection to access Wit.ai servers, which handle the complex speech generation process. For truly offline applications, consider storing pre-generated audio files for fixed phrases, though this approach lacks the dynamic text conversion capability that makes TTS valuable.
⇥ 2. How much does Wit.ai cost for TTS usage?
Wit.ai provides a free tier suitable for development, prototyping, and moderate-use applications. However, request limits apply, so high-frequency or commercial deployments should review Meta's current usage policies and rate limits to ensure compliance. The free tier typically accommodates hobbyist projects and educational use without issue.
⇥ 3. What audio quality can I expect from the ESP32-C3 TTS system?
Audio quality depends on several factors, including network stability, speaker specifications, amplifier performance, and power supply consistency. The Wit.ai service delivers clear, natural-sounding speech in various voices and languages. However, the final output heard through your speaker is influenced by the MAX98357A amplifier configuration, speaker impedance matching, and electrical noise in your circuit. Proper wiring and adequate power supply are essential for optimal results.
⇥ 4. Can I use different voices or languages with this setup?
Yes, Wit.ai supports multiple voices and languages. The WitAITTS library includes functions like setVoice(), setStyle(), setSpeed(), and setPitch() that allow customization of speech characteristics. Available voices and languages depend on Wit.ai's current offerings, which you can explore through their platform documentation or by experimenting with different voice identifiers in your code.
⇥ 5. What is the Arduino library for TTS using an ESP32-C3?
The WitAITTS library (available via the Arduino Library Manager or on GitHub) allows you to perform text to speech on an ESP32-C3 over the Internet. It performs HTTPS authentication with Wit.ai, streams an MP3 file returned from Wit.ai, and sends that MP3 data to the MAX98357A amplifier via I2S with relatively little coding required by you.
⇥ 6. What would cause the audio produced by my ESP32-C3 TTS to be distorted/audible?
Audio distortion usually results from either an insufficient power supply voltage, an impedance mismatch of the speaker, or an incorrect I2S clock. No sound is normally due to poor wiring, missing amplifier power, or problems with the GPIO pins used in your sketch. You should always confirm the five hardware connections before you debug any of the software layers.
⇥ 7. What type of equipment do I require for ESP32-C3 text to speech?
You will require an ESP32-C3 Development Module with Wi-Fi, MAX98357A I2S Digital Amplifier Module, 4Ω or 8Ω Speaker, Breadboard, Jumper Wires, and a USB Cable. You will not need SD Cards, 2nd Processors or External Storage Devices when using the Cloud-Based WitAITTS method.
Conclusion
The WitAITTS library adds dependable Text-to-Speech features to your ESP32-C3 by using Wit.ai's online speech synthesis service. The WitAITTS library, paired with the Wit.ai cloud AI platform, provides a reliable and scalable path to adding ESP32-C3 text to speech online capability to any Wi-Fi-connected project. This method aligns with standard practices for embedded systems, where running AI locally isn't really feasible. Once everything is properly set up, you get steady audio results, less complicated firmware, and speech features that can expand as your project grows. Taking time to get the setup right from the beginning will save you a lot of time when trying to fix issues later. Special thanks to Meta Platforms, Inc. for providing the Wit.ai platform that powers this implementation.
Library GitHub Repository
The library file, along with the required example sketches and connections are uploaded to the ESP32 Text to Speech GitHub repository. This is the canonical esp32 c3 text to speech online GitHub resource for the WitAITTS library:


DIY Projects Built with Arduino and ESP32
Explore the projects below to see how Arduino and ESP32 are used to build practical, real-world electronic systems. Each link provides a complete breakdown of the design, components, and working principles involved.

Learn how to build an ESP32-based audio player with an LM386 amplifier and speaker. This DIY guide covers components, circuit connections, WAV audio preparation, Arduino programming, and testing your ESP32 music player project.

ESP32 Based Internet Radio using MAX98357A I2S Amplifier Board
Build an ESP32-based internet radio using the MAX98357A I2S amplifier board. This step-by-step DIY project covers components, wiring, Arduino code, and how to stream online audio with ESP32 for your custom Wi-Fi radio player.

Build an Arduino-based smart alarm clock with LCD display, real-time clock module, and user-friendly features. This DIY guide includes a parts list, circuit diagram, Arduino code, and step-by-step instructions to create your own programmable alarm clock.
Complete Project Code
#include <WitAITTS.h>
const char* WIFI_SSID     = "YourWiFiSSID";
const char* WIFI_PASSWORD = "YourWiFiPassword";
const char* WIT_TOKEN = "YOUR_WIT_AI_TOKEN_HERE";
WitAITTS tts;
void setup() {
   Serial.begin(115200);
   delay(1000);
   Serial.println("\n\n========================================");
   Serial.println("   WitAITTS ESP32-C3 Basic Example");
   Serial.println("   Copyright (c) 2025 Jobit Joseph");
   Serial.println("           Circuit Digest");
   Serial.println("========================================\n");
   tts.setDebugLevel(DEBUG_INFO);
   if (tts.begin(WIFI_SSID, WIFI_PASSWORD, WIT_TOKEN)) {
       Serial.println("✓ TTS Ready!\n");
       tts.setVoice("wit$Remi");
       tts.setStyle("default");
       tts.setSpeed(100);
       tts.setPitch(100);
       tts.setGain(0.5);
       tts.printConfig();
       Serial.println("Type any text and press Enter to speak:\n");
   } else {
       Serial.println("✗ TTS initialization failed!");
       Serial.println("Check WiFi credentials and Wit.ai token");
   }
}
void loop() {
   tts.loop();
   if (Serial.available()) {
       String text = Serial.readStringUntil('\n');
       text.trim();
       if (text.length() > 0) {
           Serial.println("Speaking: " + text);
           tts.speak(text);
       }
   }
}
