

Every one of us likes a little greenery in our houses, don’t we? Plants require really low maintenance and can be left for days without supervision, but our long trips extending over a week or 2 can be detrimental to the health of plants due to the lack of moisture in the soil. In such situations, the plant may wither or die due to the absence of proper watering. In order to solve this problem, in this project, we are making an Automatic Irrigation System with an Arduino Uno, which will irrigate your plants automatically and keep them healthy even when you are out of the town for weeks or months. In this project, a Moisture sensor will be used to maintain the optimum level of moisture for your plants. This system can be implemented, both for your garden or for your Indoor plants, thus taking care of your leafy pets when you are away. If you are a beginner, you can also read our Arduino Soil moisture sensor tutorial to understand the basics before proceeding with this tutorial.
We also built a low-cost IoT-based Soil Moisture Monitoring Device; you can check out the demonstration video given below.
This smart irrigation system using Arduino Uno combines a soil moisture sensor with automated pump control to create an efficient automatic plant watering system using Arduino code. The complete automatic irrigation system using Arduino Uno diagram will be provided below, along with step-by-step assembly instructions.
Automatic Irrigation System Using Arduino Uno
Build Time: 3-5 hours | Cost: $25-35 | Difficulty: Beginner-Intermediate
What You'll Learn: How to interface a soil moisture sensor with Arduino and control a water pump using a relay module for automated irrigation.
Applications: Automating plant care for indoor plants, gardens, or greenhouses, especially during extended absences.
Table of Contents
- What is an Automatic Irrigation System?
- Key Features
- Working of the Smart Irrigation System using Arduino Uno
- Components Required for the Automatic Irrigation System
- Automatic Irrigation System Using an Arduino Uno Diagram
- Assembling the Automatic Irrigation System
- Automatic Plant Watering System Using Arduino Code
- Calibrating an Automatic Irrigation System Using a Soil Moisture Sensor
- Testing the Automatic Irrigation System
- Frequently Asked Questions
- Technical Summary and GitHub Repository
- Explore More Water Projects
What is an Automatic Irrigation System?
An automatic irrigation system using Arduino Uno is a smart watering system that measures soil moisture levels and automatically waters the plants when they need it. It utilises a soil moisture sensor, an Arduino microcontroller, a relay module, and a water pump to create an autonomous plant care system that could operate completely independently, without human involvement
Key Features
∗ Automatic soil moisture detection
∗ Programmable watering schedules
∗ Water pump control via relay
∗ Low-maintenance operation
∗ Suitable for indoor and outdoor plants
Working of the Smart Irrigation System using Arduino Uno
The logic of this system is very simple. In this system, the moisture sensor senses the moisture level of the soil, and when the sensor senses a low moisture level, it automatically switches on the water pump with the help of a microcontroller and irrigates the plant. After supplying sufficient water, the soil retains the moisture, hence automatically stopping the pump.
Soil Moisture Sensor

The working of the Automatic irrigation system using soil moisture sensor is very easy to understand. It has 2 probes with exposed contacts that act like a variable resistor whose resistance varies according to the water content in the soil. This resistance is inversely proportional to the soil moisture, which means that higher water in the soil means better conductivity and hence a lower resistance. The lower water in the soil means poor conductivity and will result in higher resistance. The sensor produces an analog voltage output according to the resistance.
The sensor comes with an electronic module that connects the probe to the Arduino. The module has an LM393 High Precision Comparator, which converts the analog signal to a Digital Output that is fed to the microcontroller. We have covered an in-depth Arduino soil moisture sensor tutorial, which covers the working of the soil moisture sensor module and how to use it with the Arduino. You can check the tutorial if you want to learn more about the soil moisture sensor.
Pump

We need a small pump to irrigate the plant, but in the case of a garden, we need to drive a larger pump that can provide a higher volume of water, depending on the size of your garden, which can’t be directly powered by an Arduino. So, in case you need to operate a larger pump, a driver is necessary to provide enough current for the pump, as shown that I am using a 5V relay. You can also use an AC-powered pump and use a suitable relay. The working will remain the same as shown in this Automatic irrigation system using an Arduino Uno project; you just have to replace the DC power input connected to the relay with an AC power input, and have to power your Arduino with a separate DC power source.
Components Required for the Automatic Irrigation System
The project requires very few components, and the connection is also very simple. The components are listed below:
- Arduino * 1
- moisture sensor * 1
- 5v relay module * 1
- 6v Mini water pump with small pipe * 1
- Connecting wires
- 5v battery * 1

Automatic Irrigation System Using an Arduino Uno Diagram
The complete circuit diagram for the Arduino Automatic Irrigation System is shown below:

In this section, I will explain all the details with the help of the Automatic irrigation system using an Arduino Uno diagram. The Arduino UNO is the brain of this whole project. It controls the motor pump according to the moisture in the soil, which is given by the moisture sensor.
To power the circuit, I am using an external Battery. You can use any 9V or 12-volt battery. The battery is connected to the Vin and ground pins of the Arduino, and we can also connect the motor to this battery via a relay. The moisture sensor output is connected to the analog pin of the Arduino. Do remember to use the Arduino’s 5V pin to power the sensor and relay module.
Assembling the Automatic Irrigation System
Let's start with connecting the relay to the Arduino board. Connect the VCC of the relay module to the 5V pin of the Arduino, and connect the ground of the relay to the ground of the Arduino. Now connect the relay signal pin to any digital pin of Arduino except pin 13. Here, I have connected it to pin 3 as shown in the image below.

The next step is to connect the soil moisture sensor with the Arduino. Connect the VCC and GND of the sensor to the 5V and ground pin of the Arduino. The analogue output of the sensor connects to any analogue pin of the Arduino; here, I’ve connected it to pin A0 (according to our program).

Finally, connect the pump to the relay module. A relay module has 3 connection points, which are common, normally closed, and normally open. We have to connect the pump positive to the common and connect the normally open pin to the positive of the battery. You have to select the battery according to your pump. The next step is to connect the ground of the pump to the ground of the Arduino, and finally, connect the small hose to the water pump.
Now connect the battery to the circuit, and if the pump starts working, then your circuit is okay. Now let's upload code to the Arduino.
Automatic Plant Watering System Using Arduino Code
For this project, we are not using any library; we are just using the basic functions for programming. The code is very simple and easy to use. The explanation of the code is as follows.
We start by defining all the required integers here. I used two integers for storing the soil moisture and the converted moisture percentage.
int soilMoistureValue = 0;
int percentage=0;
Now, we define the pin mode. Here, I have used pin 3 as an output, and in the next line, I have initialised the Serial Monitor for debugging.
void setup() {
  pinMode(3,OUTPUT);
  Serial.begin(9600);
}
I started the loop section by reading the soil moisture. I used the analogRead function of Arduino to read the soil moisture, and I stored that in soilMoistureValue. This value varies from 0 to 1023
void loop() {
soilMoistureValue = analogRead(A0);
In the line below, I have converted the sensor values from 0-100 per cent so that we can see the map function on Arduino. That means that if the soil is dry, then the output moisture percentage is 0% and if the soil is extremely wet, then the moisture percentage is 100%.
percentage = map(soilMoistureValue, 490, 1023, 0, 100);
Serial.println(percentage);
Calibrating an Automatic Irrigation System Using a Soil Moisture Sensor
In the map function, we need to assign the dry value and wet value. To do that, we need to monitor those values. You can read those values using the following code:
void setup() {
  Serial.begin(9600);
}
void loop() {
 int sensorValue = analogRead(A0);
  Serial.println(sensorValue);
  delay(1);
Upload the above code to your Arduino and open the serial monitor. Then place your soil moisture sensor in dry soil, or just hold the sensor in the air and read the value. Now put that value in place of 490(second term of map function).
The next step is to place the sensor in wet soil or submerge it in water and read the value, and assign that value in place of 1023 (third term of the map function). These values will calibrate your sensors correctly to get better results.

After converting the values, we can control the pump according to the soil moisture percentage. With the help of ‘If condition’, I write the first condition, if the moisture percentage goes below 10, then the Arduino will turn pin 3 to LOW and the pump will turn on ( our relay module uses the active low signal to trigger), and the Arduino will print pump on message in the serial monitor.
If (percentage < 10)
{
  Serial.println(" pump on");
  digitalWrite(3,LOW);
}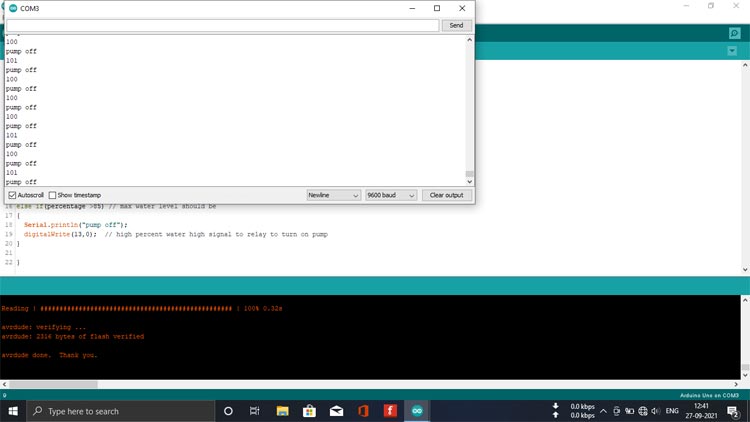
When the moisture percentage goes above 80 per cent ( indicating soil is filled with water) the Arduino will turn off the pump and print the ‘pump off’ on the serial monitor.
if(percentage >80)
{
  Serial.println("pump off");
  digitalWrite(3,HIGH);
}
}
Testing the Automatic Irrigation System
After uploading the code to the Arduino, I placed the whole circuit, except the pump and sensor probe, in a plastic box as shown in the figure below.

Now, place the moisture sensor into the soil. Place the Automatic irrigation system using a soil moisture sensor as close to the roots of the plants as possible for higher accuracy.

The final step is to place your motor in a container filled with water, and your automatic irrigation is ready to take care of your lovely plants when you are not around.

You might have to change the moisture percentage to start and stop the pump, as different plants have different water requirements. Hope you enjoyed the project and are ready to build your automatic irrigation system using Arduino. If you have any questions, you can leave them in the comment section below.
Frequently Asked Questions
⇥ How does Arduino automate irrigation in smart farming?
The Arduino automatic irrigation system runs by continuously measuring soil moisture levels with the soil moisture sensor. Once the moisture falls below a predetermined threshold (usually about 10%), the Arduino turns on a relay to operate a water pump. When the soil moisture has attained adequate moisture (at about 80%), the system shuts off the water.
⇥ What sensors are required for an Arduino irrigation system?
The minimum sensor required is a soil moisture sensor, which will output an analog signal to the Arduino. Additional sensors with analog output include temperature sensors, humidity sensors, and water level sensors.
⇥ How much does it cost to build an Arduino irrigation system?
A basic Arduino automatic irrigation system costs range from $25-35 USD, breaking down to the following components: Arduino Uno ($15), soil moisture sensor ($5), relay module ($3), water pump ($8), and connecting components ($4-8).
⇥ Can I use an Arduino irrigation system on multiple plants?
Yes, you can modify the system to have multiple plants with the same number of zones by including multiple soil moisture sensors (a maximum of six due to the analog pins on the Arduino Uno) and three operated relay-controlled pumps for each plant zone.
⇥ How to set up a soil moisture sensor for Arduino.
To set up: 1) Put the sensor in totally dry soil and measure the reading, 2) Put the sensor in saturated soil and measure the reading, 3) Use those values in the map() function to convert the raw readings into useful percentages.
⇥ What is the power usage of the Arduino irrigation system?
Power usage is very variable, but the typical power usage of the Arduino Uno is ~50mA (0.25W), typically ~35mA for the soil moisture sensor, typically ~70mA for the relay module, and typically 100 to 500mA for the water pump (depending on the size). The typical power usage of the entire system when operational is 1-3 watts.
Technical Summary and GitHub Repository
A technical summary gives a brief summary of a project's architecture, functions, and technologies. A GitHub repository contains the source code for the project, along with documentation and version history for the project, allowing collaborative development and management of the code. Combined, these two documents give a complete overview of the project.


Explore More Water Projects
From basic plant care to smart water monitoring, these related builds cover practical ways to manage water efficiently using simple electronics.

Build a Simple Automatic Plant Watering System using Arduino
In this complete guide, we'll show you how to make an automatic plant watering system with soil moisture sensing and mobile app control capabilities.

Simple Water Level Indicator Alarm with Buzzer
This comprehensive water level indicator project tutorial will guide you to build a simple DIY water level indicator circuit that detects water levels and raises an alarm when your tank reaches preset levels - perfect for preventing overflow and water wastage.

Measuring water Flow Rate and Volume using Arduino and a Flow Sensor
In this project, we are going to build a water flow sensor using Arduino. We will interface the water flow sensor with Arduino and LCD, and program it to display the volume of water, which has passed through the valve.
Complete Project Code
int soilMoistureValue = 0;
int percentage=0;
void setup() {
  pinMode(3,OUTPUT);
  Serial.begin(9600);
}
void loop() {
soilMoistureValue = analogRead(A0);
Serial.println(percentage);
percentage = map(soilMoistureValue, 490, 1023, 100, 0);
if(percentage < 10)
{
  Serial.println(" pump on");
  digitalWrite(3,LOW);
}
if(percentage >80)
{
  Serial.println("pump off");
  digitalWrite(3,HIGH);
}
}
