

Nowadays, many people are turning towards green solutions to lead healthier lives. Efforts are being made to grow plants, which contribute to maintaining the stability of nature. The key challenge in growing plants is maintenance, particularly ensuring they receive adequate watering. Despite our best intentions, we may forget to water our plants at times. To address this, we have developed a straightforward automatic plant watering system without Arduino. The idea is to use minimal components and reduce complexity, allowing everyone to easily build it. It's an ideal option for anyone who is trying to automatically water their potted plants during a vacation. An automatic plant watering system addresses this issue by watching soil moisture levels and watering exactly when your plants need it. This article explains how to make a simple automatic plant watering system without Arduino. The components are easily available to you, and you will need no programming experience.
This simple automatic watering system for potted plants relies on simple transistor circuits instead of complicated microcontroller-based solutions, making it an easy project to access for beginners while still achieving an incredibly efficient indoor plant watering automation system.
Let’s see how we can do that!
Table of Contents
How Does This Automatic Plant Watering System Work?
The automatic plant watering system using soil moisture sensor is meant for three stages.
- Detection phase: The soil moisture sensor is there to keep a constant check on the water content in the soil, and whenever the soil turns dry, it will put in a HIGH signal.
- Timer phase: The RC timer circuit will generate an adjustable delay within which the watering has to take place.
- Pump control phase: The BC547 signal switching transistors will switch the mini water pump ON and OFF, relating to the signals from the sensor and from the timer.
The use of such transistor configurations keeps the plants' soil from drying out while avoiding excessive watering. This grows to be one of the perfect solutions as an automatic watering system for potted plants indoors or for balconies outdoors.
Why Choose This Automatic Plant Watering System Project?
- Based on the commonly used BC547.
- Easy to build.
- No need for coding.
- Low-cost design.
- Easy availability of components.
- Has a built-in adjustable delay function.
Components Required to Build Self Plant Watering System:
Required Components are listed below to build the simple Automatic plant watering system.
- Soil Moisture Sensor - x1
- BC547 - x3
- Electrolytic Capacitor - 680uf - x1
Resistor
○ 10k-x1
○ 1k-x1
○ 500E-x1
- 100k Ohm Potentiometer - x1
- Bread Board - x1
- Mini Water Pump (3-6v) - x1
- Mini Water Tube suitable for pump- Required Length.
- 5V Power Source - Any
Automatic Plant Watering System Circuit Diagram Explained
Below is the circuit diagram of the Automatic plant watering system. As you can see, this circuit diagram was so simple and beginner-friendly. If you are not comfortable using components like transistors and resistors, you can try checking out our alternate project, which uses Arduino for an Automatic plant watering system.
Here, the soil moisture sensor is the main component to detect the presence of water in the soil. You can visit our well-written article to learn how the soil moisture sensor works. You may think that with the addition of a single transistor to switch the motor, our circuit can be completed, but there are still two transistors used. It looks simple at the beginning, but if you think carefully, there is a problem that if the motor is turned on for a very short duration, it might trigger the motor more often, and there will be a need for proper watering of the plant. The automatic plant watering system circuit diagram presented below features a beginner's setup for constructing an automatic plant watering system that anyone can use. This automatic plant watering system for indoor use utilises discrete transistors instead of a microcontroller, avoiding programming issues as the automatic watering system operates reliably.

So, to solve this issue, we are utilising the simplest timer circuit known as the RC Timer, which can be seen below. Depending on the value of the resistor and capacitor, we can make the time delay up to a few seconds. As an advantage, we added a potentiometer to make this time delay adjustable. The heart of this automatic plant watering system project is the resistor-capacitor timer that determines watering duration.

Next, you can understand that the Transistor Q1 is used to discharge the capacitor whenever the HIGH signal is received from the Soil Moisture sensor. The output from the RC Timer is connected to Q2, which here works as an inverter. Therefore, I am using Q3 to drive the motor.
You may confuse Q2 itself, which can drive the motor instead of being an inverter. Yeah, of course, it can be used to drive a motor if your sensor provides a Low for Dryness. But Most of the sensors out there will provide High for Dryness and Low for Wetness. You can refer to the table provided below for a brief understanding.
| Sensor Input | Sensor Output | Inverter Requirement | Expected Water Pump State |
| Wetness | HIGH | YES | OFF |
| Wetness | LOW | NO | OFF |
| Dryness | LOW | YES | ON |
| Dryness | HIGH | NO | ON |
Components Assembly of the Automatic Plant Watering System:
For this self watering system for indoor plants, breadboard construction is recommended for easy troubleshooting and modifications. To make this simple, our preference is to make use of a breadboard. If you want to make it more stable, you can also solder it to a Dotted PCB and keep it in any small enclosure. You can see the assembled image of the components, made in the breadboard below. We increased the length of the Wire given in the water Pump, and talking about the pump, I appreciate you checking the perfectness of the waterproofing of the motor. If not, make a proper seal by yourself using some sort of gum or even hot glue, which works well.

And the main thing we need to discuss here is the power supply. This circuit was made to accept a 5V DC input. There are numerous ways to power this circuit, like using DC Power Adapters, Mobile chargers, Power banks, etc. I am using a Micro USB Breakout Module to power up the circuit using a USB Cable Connected to the power bank, which can be seen below.

Ensure that the Proper Connections are made between the components, and then we can start the installation.
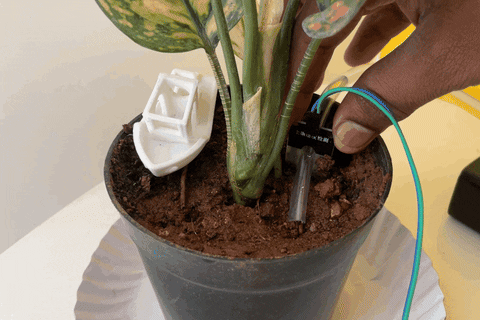
Before integrating the pump into your automatic plant watering system, verify its waterproofing integrity. I have selected a small indoor plant pot and installed the humidity sensor along with the tube from the water pump, and the water pump itself was placed in the bottle with the big mouth so that the motor could be installed straightaway. The remaining circuit was placed near the pot and powered by the power bank. This Setup can be seen below.

This automatic plant watering system is powered by 5V DC, which offers a few power options:
» USB Power Bank: Best for portable use and vacation use (recommended for an automatic watering system for potted plants).
» Mobile Phone Charger: A 5V USB wall adapter for permanent installations.
» DC Power Adapter: 5V regulated for constant use.
» Battery System: A Li-ion cell and boost converter for a completely wireless option.
Automatic Plant Watering System using TinkerCad:
Let's simulate the Automatic Plant Watering System using TinkerCad before moving on to a real-time working demonstration. Before building the physical automatic plant watering system project, you can simulate and test the circuit design using TinkerCAD's online platform:
In the simulation, you'll notice that the working logic appears inverted. This is due to the sensor available in TinkerCad providing an inverted output. However, apart from this inversion, the overall logic and components remain the same.
Working Demo of the Automatic Plant Watering System Project:
As already discussed, this project works by detecting dryness in the soil using a soil moisture sensor and switching ON the mini water pump. Once the water starts flowing from the water storage to the Flowerpot, it will be turned OFF after a certain amount of delay set via the potentiometer once it detects wetness inside the pot. The video below shows how this automatic watering system for potted plants works.
That’s all, we completed our Project. This comprehensive demonstration shows how the automatic plant watering system using a soil moisture sensor operates in real-world conditions
Here are some hacks you can do in this automatic plant waterer project.
You can change the Q3-BC547_General Purpose NPN Transistor to some other NPN transistor to increase the current capacity to drive the higher power motors.
C1 can be changed as per your needs. Using the trial-and-error method, you can find the most suitable one.
You can use a battery system consisting of a Single Li-ion cell, a DC-DC Boost Converter, Battery Charging, and a Protection Circuit to make this project portable.
Apart from this concept of an Automatic Plant Watering system, this circuit has many scopes.
Troubleshooting Common Issues
| Problem | Possible Cause | Solution |
| Pump runs continuously | Sensor output inverted or Q2 transistor faulty | Check sensor output polarity; test Q2 transistor; verify wiring |
| Pump never activates | Power supply issue or transistor not conducting | Verify 5V power at all points; check transistor orientation; test with multimeter |
| Very short watering duration | Capacitor value too small or potentiometer at minimum | Increase capacitor value; adjust potentiometer clockwise |
| Sensor not detecting moisture | Sensor corrosion or poor soil contact | Clean sensor probes; ensure proper insertion depth; check sensor power |
| Weak water flow | Pump voltage insufficient or tubing kinked | Verify 5V at pump terminals; straighten tubing; check for blockages |
Conclusion:
This automatic watering system for potted plants allows both novice and seasoned makers to care for their plants, keeping them healthy and ever watered with ease. This automatic plant watering system without Arduino is a great introduction to electronics and automated gardening. This self watering system for indoor plants provides peace of mind and consistent plant care.
Have you built this automatic plant watering system project? What modifications did you make? Share your results and tips in the comments below or on our forum for discussion to help fellow plant enthusiasts create their own automated watering solutions!
Frequently Asked Questions About an Automatic Plant Watering System
⇥ Q1: How is this different from Arduino-based automatic plant watering systems?
This transistor-based system has no programming, is cheaper ($8-15 compared to $25-35 for Arduino models), and uses very little power. But Arduino systems have more features, such as timed watering, moisture readout displays, and remote access. Pick this project for ease and economy.
⇥ Q2: Is it possible to water multiple plants using one automatic watering system?
Yes, in two ways: you can create separate circuits for each of your plants (these may have different water requirements), or you can use a single pump and a manifold tube with a different valve for each plant. If you'd like to have total independent control over each pot, simply copy the entire circuit for each pot, using only one common 5 V power supply for each circuit.
⇥ Q3: What types of plants are best to use in automatic watering systems?
All potted house plants like an automatic watering system, especially if they like to be watered regularly. You want to find plants that like to be watered, like ferns, peace lilies, pothos, and spider plants. Make sure to alter the length of the water timer depending on how much moisture your plant actually needs. Vary the timer length depending on plants, for example: longer for plants requiring more moisture, and shorter watering for succulents that require less water. If you have an extra drought-resistant plant like a cactus that likes to have its soil dry out, do not use an automatic watering system with those plants, and instead just water them as you are supposed to.
⇥ Q4: Could you explain the process of changing the watering interval for my personal plants?
Please rotate the 100kΩ potentiometer in a clockwise direction; the duration will be longer, and counterclockwise, the duration will be shorter. Start at the middle position, and then check the soil moisture after 2-4 hours following watering. If the soil seems too wet, you'll need to reduce the amount, and if the soil is dry, the test period can be increased. The 680µF capacitor will give roughly 30-90 seconds according to the potentiometer adjustment.
⇥ Q5: Will this system prevent me from overwatering my plants?
Yes, the ground moisture sensor wants to avoid overwatering since it only turns the pump on when the ground is dry; however, the RC timer tells you when to water, but not if the plant is actually flooded. It still requires a proper adjustment to the timer to make sure the soil is optimally watered, and not too much water causes flooding.
⇥ Q6: What is the power consumption I can anticipate with this automatic watering system?
Low power usage: around 50-100mA in standby (monitoring with sensors) and 200-400mA when the pump is on. The system can be powered for 2-3 weeks on typical water cycles with a 10,000mAh power bank. For long-term usage, use a wall plug or solar-powered battery pack.
⇥ Q7: Can I make this without electronics knowledge?
Sure thing! This project is easy to start with, involving only wire connections and breadboard component placement using the circuit diagram. Initial builds do not require soldering. Simple multimeter work assists in troubleshooting, but it is not necessary. Dedicate 1-2 hours to the first-time assembly and testing of your automatic plant watering system.
Discover Exciting Projects in a Similar Realm
If you are interested in building more such projects, check out our collection of Arduino Projects. We have more than 500 projects with Code and Circuit diagrams that you can use to build your projects today.

Simple Soil Moisture Detector Circuit
Build your own soil moisture sensor with an easy-to-follow circuit. In this project, we are going to build a simple Transistor Soil Moisture Detector Circuit. In this circuit, we have used an NPN transistor to detect soil moisture.

Arduino-based Automatic Plant Irrigation System with Message Alert
Learn to create an automatic plant watering system using Arduino and get text message alerts using the Sim800L module. You'll also set up a 16x2 LCD display for feedback.

Low Power IoT-Based Compact Soil Moisture Monitoring Device
Make your own battery-powered smart soil moisture sensor using IoT technology, focusing on the ESP8266 module as the main controller.

Arduino Smart Irrigation System Using ESP32 and Blynk App
Explore a smart irrigation setup with Arduino and ESP32. This project goes beyond soil moisture sensing, incorporating water level, humidity, and temperature sensors. Discover how to use IoT features with Blynk.
