
Obstacle Avoiding Robot is an intelligent device that can automatically sense the obstacle in front of it and avoid them by turning itself in another direction. This design allows the robot to navigate in an unknown environment by avoiding collisions, which is a primary requirement for any autonomous mobile robot. The application of the Obstacle Avoiding robot is not limited and it is used in most of the military organizations now which helps carry out many risky jobs that cannot be done by any soldiers.
If you have just started to work with Arduino do check out our Arduino Projects and Tutorials. We have a collection of almost 500+ Arduino projects with Code, Circuit Diagram, and detailed explanations completely free for everyone to build and learn on their own.
If you want a more advanced version of this project check out Obstacle Avoiding Arduino Car. We previously built Obstacle Avoiding Robot using Raspberry Pi and using PIC Microcontroller. This time we will build an Obstacle avoiding robot using an ultrasonic sensor and Arduino. Here an Ultrasonic sensor is used to sense the obstacles in the path by calculating the distance between the robot and obstacle. If robot finds any obstacle it changes the direction and continue moving.
How to build obstacle avoiding robot using Ultrasonic Sensor
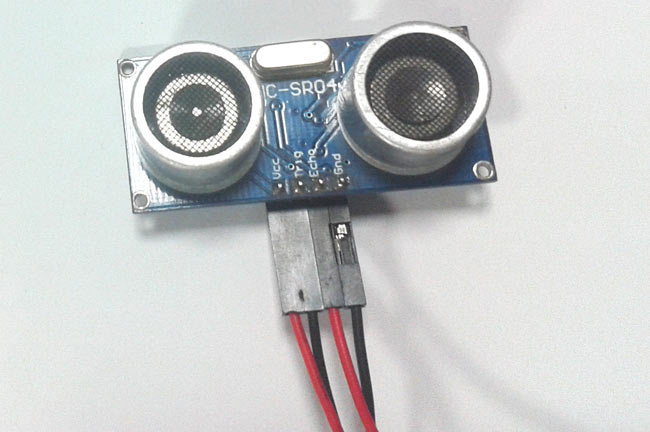
Before going to build the robot, it is important to understand how the ultrasonic sensor works because this sensor will have important role in detecting obstacle. The basic principle behind the working of ultrasonic sensor is to note down the time taken by sensor to transmit ultrasonic beams and receiving the ultrasonic beams after hitting the surface. Then further the distance is calculated using the formula. In this project, the widely available HC-SR04 Ultrasonic Sensor is used. To use this sensor, similar approach will be followed explained above.
So, the Trig pin of HC-SR04 is made high for at least 10 us. A sonic beam is transmitted with 8 pulses of 40KHz each.
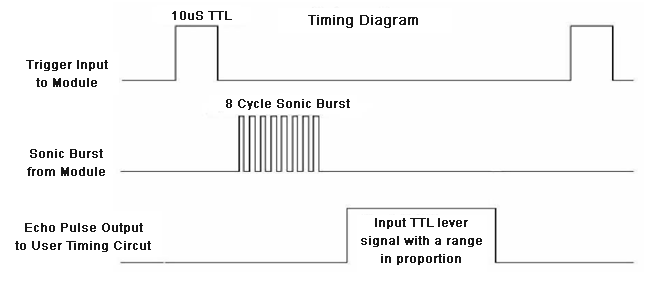
The signal then hits the surface and return back and captured by the receiver Echo pin of HC-SR04. The Echo pin had already made high at the time sending high.

The time taken by beam to return back is saved in variable and converted to distance using appropriate calculations like below
Distance= (Time x Speed of Sound in Air (343 m/s))/2
We used ultrasonic sensor in many projects, to learn more about Ultrasonic sensor, check other projects related to Ultrasonic sensor.
The components for this obstacle avoiding robot can be found easily. In order to make chassis, any toy chassis can be used or can be custom made.
Components Required
- Arduino NANO or Uno (any version)
- HC-SR04 Ultrasonic Sensor
- LM298N Motor Driver Module
- 5V DC Motors
- Battery
- Wheels
- Chassis
- Jumper Wires
Circuit Diagram
The complete circuit diagram for this project is given below, as you can see it uses an Arduino nano. But we can also build an obstacle avoiding robot using Arduino UNO with the same circuit (follow the same pinout) and code.

Once the circuit is ready we have to build our obstacle avoiding car by assembling the circuit on top of a robotic chassis as shown below.

Obstacle Avoiding Robot using Arduino - Code
The complete program with a demonstration video is given at the end of this project. The program will include setting up HC-SR04 module and outputting the signals to Motor Pins to move motor direction accordingly. No libraries will be used in this project.
First define trig and echo pin of HC-SR04 in the program. In this project the trig pin is connected to GPIO9 and echo pin is connected to GPIO10 of Arduino NANO.
int trigPin = 9;      // trig pin of HC-SR04
int echoPin = 10;     // Echo pin of HC-SR04
Define pins for input of LM298N Motor Driver Module. The LM298N has 4 data input pins used to control the direction of motor connected to it.
int revleft4 = 4;       //REVerse motion of Left motor
int fwdleft5 = 5;       //ForWarD motion of Left motor
int revright6 = 6;      //REVerse motion of Right motor
int fwdright7 = 7;      //ForWarD motion of Right motor

In setup() function, define the data direction of utilised GPIO pins. The four Motor pins and Trig pin is set as OUTPUT and Echo Pin is set as Input.
pinMode(revleft4, OUTPUT);      // set Motor pins as output
pinMode(fwdleft5, OUTPUT);
pinMode(revright6, OUTPUT);
pinMode(fwdright7, OUTPUT);
pinMode(trigPin, OUTPUT);         // set trig pin as output
pinMode(echoPin, INPUT);          //set echo pin as input to capture reflected waves
In loop() function, get the distance from HC-SR04 and based on the distance move the motor direction. The distance will show the object distance coming in front of the robot. The Distance is taken by bursting a beam of ultrasonic up to 10 us and receiving it after 10us. To learn more about measuring distance using Ultrasonic sensor and Arduino, follow the link.
digitalWrite(trigPin, LOW);
delayMicroseconds(2);
digitalWrite(trigPin, HIGH);     // send waves for 10 us
delayMicroseconds(10);
duration = pulseIn(echoPin, HIGH); // receive reflected waves
distance = duration / 58.2;   // convert to distance
delay(10);
If the distance is greater than the defined distance means there is not obstacle in its path and it will moving in forward direction.
            if (distance > 19)
            {
            digitalWrite(fwdright7, HIGH);                    // move forward
            digitalWrite(revright6, LOW);
            digitalWrite(fwdleft5, HIGH);
            digitalWrite(revleft4, LOW);
            }
If the distance is less than the defined distance to avoid obstacle means there is some obstacle ahead. So in this situation robot will stop for a while and movebackwards after that again stop for a while and then take turn to another direction.
              if (distance < 18)
             {
             digitalWrite(fwdright7, LOW);  //Stop
             digitalWrite(revright6, LOW);
             digitalWrite(fwdleft5, LOW);
             digitalWrite(revleft4, LOW);
             delay(500);
             digitalWrite(fwdright7, LOW);      //movebackword
             digitalWrite(revright6, HIGH);
             digitalWrite(fwdleft5, LOW);
             digitalWrite(revleft4, HIGH);
             delay(500);
             digitalWrite(fwdright7, LOW);  //Stop
             digitalWrite(revright6, LOW);
             digitalWrite(fwdleft5, LOW);
             digitalWrite(revleft4, LOW);
             delay(100);
             digitalWrite(fwdright7, HIGH);
             digitalWrite(revright6, LOW);
             digitalWrite(revleft4, LOW);
             digitalWrite(fwdleft5, LOW);
             delay(500);
            }
So this is how a robot can avoid obstacles in its path without getting stuck anywhere. Find the complete code and video below.
Complete Project Code
/* Obstacle Avoiding Robot Using Ultrasonic Sensor and Arduino NANO
 */
int trigPin = 9;      // trig pin of HC-SR04
int echoPin = 10;     // Echo pin of HC-SR04
int revleft4 = 4;       //REVerse motion of Left motor
int fwdleft5 = 5;       //ForWarD motion of Left motor
int revright6 = 6;      //REVerse motion of Right motor
int fwdright7 = 7;      //ForWarD motion of Right motor
long duration, distance;
void setup() {

  delay(random(500,2000));   // delay for random time
  Serial.begin(9600);
  pinMode(revleft4, OUTPUT);      // set Motor pins as output
  pinMode(fwdleft5, OUTPUT);
  pinMode(revright6, OUTPUT);
  pinMode(fwdright7, OUTPUT);

  pinMode(trigPin, OUTPUT);         // set trig pin as output
  pinMode(echoPin, INPUT);          //set echo pin as input to capture reflected waves
}
void loop() {
  digitalWrite(trigPin, LOW);
  delayMicroseconds(2);
  digitalWrite(trigPin, HIGH);     // send waves for 10 us
  delayMicroseconds(10);
  duration = pulseIn(echoPin, HIGH); // receive reflected waves
  distance = duration / 58.2;   // convert to distance
  delay(10);
    // If you dont get proper movements of your robot then alter the pin numbers
  if (distance > 19)
  {
    digitalWrite(fwdright7, HIGH);                    // move forward
    digitalWrite(revright6, LOW);
    digitalWrite(fwdleft5, HIGH);
    digitalWrite(revleft4, LOW);
  }
  if (distance < 18)
  {
    digitalWrite(fwdright7, LOW);  //Stop
    digitalWrite(revright6, LOW);
    digitalWrite(fwdleft5, LOW);
    digitalWrite(revleft4, LOW);
    delay(500);
    digitalWrite(fwdright7, LOW);      //movebackword
    digitalWrite(revright6, HIGH);
    digitalWrite(fwdleft5, LOW);
    digitalWrite(revleft4, HIGH);
    delay(500);
    digitalWrite(fwdright7, LOW);  //Stop
    digitalWrite(revright6, LOW);
    digitalWrite(fwdleft5, LOW);
    digitalWrite(revleft4, LOW);
    delay(100);
    digitalWrite(fwdright7, HIGH);
    digitalWrite(revright6, LOW);
    digitalWrite(revleft4, LOW);
    digitalWrite(fwdleft5, LOW);
    delay(500);
  }
}
Comments
code is invalid this guy misleading people so plz dont waste your time on this.

thanks for this nice information. great tutorial of i really apreciate