Bluetooth is one of the most popular and easy to use wireless technology. Over the few years there have been many upgrades of Bluetooth standard to keep pace with the current ongoing technology with future technology and to satisfy needs of users. Starting from the Bluetooth version 1.0 to Bluetooth version 5.0, there are many things changed including higher data rates, the ability to be used for IoT with low current consumption, improved security, etc. To learn Bluetooth communication there are many modules available which can be interfaced with microcontrollers. Such a Bluetooth module is HM10 which is based on Bluetooth 4.0.
What is HM10 BLE 4.0 Module?
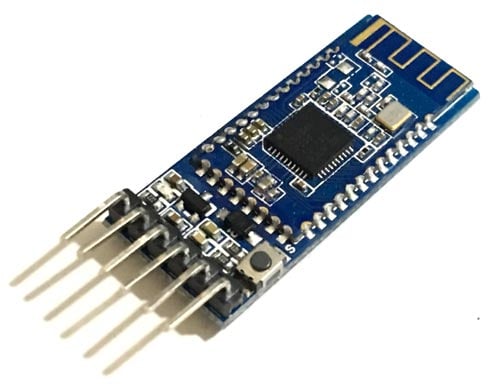
The HM10 is a serial BLE module (Bluetooth-Low-Energy) which is intended to use for the low power consumption applications and can last long even with a coin-sized battery. The HM10 is a Bluetooth 4.0 module based on the Texas Instruments CC2540 or CC2541 BLE System SoC (System on Chip). The firmware and design of the module is made and managed by Jinan Huamao Technology. The module comes with serial/UART layer which makes the device to be able to interface with different microcontrollers. The HM10 is ideal for creating simple connections and using it with or as an iBeacon.

The HM10 has become a very popular Bluetooth 4.0 BLE module. The HM10 is a Bluetooth 4.0 based module only, so it will not connect with Bluetooth 2/2.1 module such as HC-05, HC-06 and other Bluetooth modules. The HM10 is controlled via AT commands sent over the serial UART connection. HM-10 is a Bluetooth Low Energy (BLE) module, to know more about BLE follow the link. Also learn how an nRF24L01 module can be used as BLE module with Arduino.
Difference between HM10 and other Bluetooth Module
The major difference HM10 possess is the Bluetooth Version. The HM10 is Bluetooth 4.0 module, so it comes with all Bluetooth Version 4.0 features such as speed, throughput and range. The HM10 offers a data rate of up to 24 Mbps with low-energy/low-power consumption. Along with this the HM10 offers a distance range of 100 meters in open space. Compare to other Bluetooth modules such as HC-05 which is a Bluetooth 2.0 based module, the HM10 certainly performs better than the HC-05. The HC-05 only offers 3 Mbps compared to HM10 which is quite less.
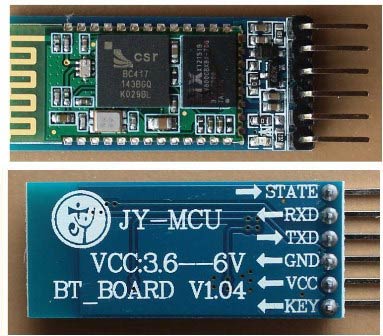
Bluetooth module HC-05 and HC-06 are still very popular among makers and hobbyists as they are cheap and easy to interface. We also made many projects using HC-05/06 and interfaced them with many other microcontrollers:
- Bluetooth Module Interfacing with ESP8266: Controlling an LED
- Interfacing Bluetooth HC-05 with STM32F103C8 Blue Pill: Controlling LED
- Interfacing HC-05 Bluetooth module with AVR Microcontroller
- Interfacing Bluetooth Module HC-06 with PIC Microcontroller
- Voice Controlled LEDs using Arduino and Bluetooth
- Voice Controlled Lights using Raspberry Pi

All the Bluetooth related projects can be found at this link.
Today we will interface HM-10 BLE Module with Arduino Uno to control an LED wirelessly using Bluetooth protocol. The On/Off commands will be sent by Smartphone.
Components Required
Hardware:
- Arduino UNO
- HM10 Bluetooth Module
- Resistors(1 kΩ, 470 Ω)
- Jumper Wires
Software:
- Arduino IDE
- Arduino Bluetooth Controller(HM-10 Module) Android App
- Android Smart phone
Circuit Diagram
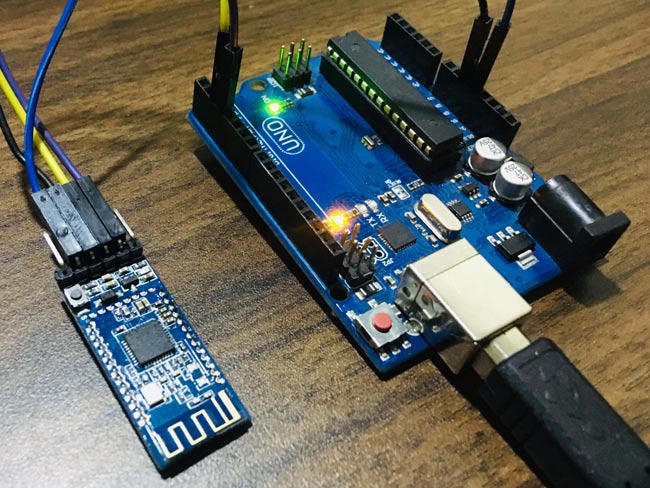
Circuit diagram for connecting Arduino and HM-10 Bluetooth module is very simple as shown below.

Before starting with the project make sure that your HM-10 module is a genuine HM-10 module. There are widely Chinese cloned HM-10 modules available. To identify the difference between Genuine and Cloned HM-10 module, just look the presence of Crystal Oscillator of 32KHz on the HM-10 Board. If the Crystal Oscillator is present then it is a genuine HM-10 Module and you don’t need to change the Firmware. But if you cannot see the Crystal Oscillator in place of it then it is a Cloned HM10 module and you need to change the Firmware of the Cloned HM-10 Module. Without changing the HM-10 firmware, you can neither access the HM-10 module with AT commands nor you can pair it with smartphones. Here we are also using the clone module so we flashed its firmware before connecting it with Ardruino. In order to change the Firmware of Cloned HM-10 module, simply follow our tutorial on How to change or flash the Firmware of Clone HM-10 module.
Arduino Bluetooth Controller (HM-10 Module) Android Application
The Arduino Bluetooth Controller (HM-10 Module) is an android application which is available free on Google Play Store. This app is having easy and simple interface for HM-10 BLE Module. While testing, it was able to find HM-10 quickly and it connected instantly with HM-10. The app has some cool feature like you can create a button and customize it with custom name and functions. Here we will how to create two buttons in this Bluetooth controller app to turn on and off the LED connected with Arduino.
How to setup Arduino Bluetooth Controller (HM-10 Module) Android App:
- Download the app from Google Play Store.

- The Home page of the app will look like below where you can find features like, connect Device, Search Icon, Delete Icon, Device Status, Send Text, Add Template etc. Start with searching the Device either by clicking on Search Icon or by clicking to three dots on the upper right corner and choose connect Device.

- All available devices will be shown in the screen. Choose the correct HM-10 Module.

- Now the HM-10 will be successfully connected and you will be able to see the status of HM-10 in the Top of Screen.

- Now either you can directly send a text or String by writing on the text section and hit arrow to send or you can create a custom template.

- To create a custom template to save time. Click on the “+” icon on upper right corner and fill the details. The “Name” is button name, the “Text” field is for texts or string which will be sent to HM-10 and “Description” is just the button description that how the button will function.

- Firstly, create a button for turn LED ON and give it a Green Color. The Button will send “N” letter to HM-10 which will turn on the LED connected to Arduino. Similarly create a button for LED OFF and give it a Red Color. . The Button will send “F” letter to HM-10 which will turn off the LED connected to Arduino.

- Now you can see the two buttons created just below the Text Field. Now if you want to control LED then just click on the Buttons.

This finishes the setting up android app to control the HM-10 module. Now we will start with the programming Arduino Uno to get the characters from Android App.
Programming Arduino UNO to Control LED using HM-10 Bluetooth Module
As always complete program with demonstration video can be found at the end of this tutorial. Programming Arduino UNO for this project neither requires much effort nor any library. You can use hardware serial and software serial library. If you are using software serial then just include software serial library else proceed with hardware serial. In this project we are using SoftwareSerial. So start with including Software Serial Library. The pins Rx and Tx are connected at 2 and 3 Pins of Arduino.
#include <SoftwareSerial.h>
SoftwareSerial HM10(2, 3); // RX = 2, TX = 3
The two variables are used to store the data received from HM10 and android app.
char appData;
String inData = "";
Just start the Hardware and Software Serial at 9600 baud rate and print some debugging statements. The LED pin is set as output and initially it is off.
 Serial.begin(9600);
  Serial.println("HM10 serial started at 9600");
  HM10.begin(9600); // set HM10 serial at 9600 baud rate
  pinMode(13, OUTPUT); // onboard LED
  digitalWrite(13, LOW); // switch OFF LED
Start listening the HM10 port and read the string until the HM10 is available and sends the data. Save the data in string.
  HM10.listen();  // listen the HM10 port
  while (HM10.available() > 0) {   // if HM10 sends something then read
    appData = HM10.read();
    inData = String(appData);  // save the data in string format
    Serial.write(appData);
  }
For debugging the HM10 with AT commands just write the below code line which will send the string to HM10.
  if (Serial.available()) {           // Read user input if available.
    delay(10);
    HM10.write(Serial.read());
  }
If the received string is “F” then print a message on serial monitor and turn OFF the led else if the received string is “N” then print a message on serial monitor and Blink led with a delay of 500ms.
if ( inData == "F") {
    Serial.println("LED OFF");
    digitalWrite(13, LOW); // switch OFF LED
    delay(500);
  }
  if ( inData == "N") {
    Serial.println("LED ON");
    digitalWrite(13, HIGH); // switch OFF LED
    delay(500);
    digitalWrite(13, LOW); // switch OFF LED
    delay(500);
  }

This finishes the complete tutorial on how to control LED using Arduino and BLE HM10 Blutooth 4.0 module. Again remember that, if you have a genuine HM10 module then you don’t need to flash its firmware, it can be used straight away. But If you are using a cloned HM-10 module then flash the firmware on clone HM10 BLE module. If you have any doubt or suggestion then please comment below or write to our forum.
Complete Project Code
#include <SoftwareSerial.h>

SoftwareSerial HM10(2, 3); // RX = 2, TX = 3

char appData;

String inData = "";

void setup()

{

  Serial.begin(9600);

  Serial.println("HM10 serial started at 9600");

  HM10.begin(9600); // set HM10 serial at 9600 baud rate

  pinMode(13, OUTPUT); // onboard LED

  digitalWrite(13, LOW); // switch OFF LED
}
void loop()

{

  HM10.listen();  // listen the HM10 port

  while (HM10.available() > 0) {   // if HM10 sends something then read

    appData = HM10.read();

    inData = String(appData);  // save the data in string format

    Serial.write(appData);

  }


  if (Serial.available()) {           // Read user input if available.

    delay(10);

    HM10.write(Serial.read());

  }

  if ( inData == "F") {

    Serial.println("LED OFF");

    digitalWrite(13, LOW); // switch OFF LED

    delay(500);

  }

  if ( inData == "N") {

    Serial.println("LED ON");

    digitalWrite(13, HIGH); // switch OFF LED

    delay(500);

    digitalWrite(13, LOW); // switch OFF LED

    delay(500);

  }

}
Comments
Very useful article - thank…
Very useful article - thank you!
I have been struggling with an HM10 that I bought off eBay which matybe I need to reflash - will now do AT commands but will not pair.
One thing that I wouid add to the article is to state that the HM10 expects to get commands as a single continuous transmission. I was trying to do testing with Putty and just getting "Error" over and over again whenever I typed anything into the serial terminal emulator.
Turns out that HM10 reads input until there is no more and then just looks at whatever it has, it doesn't wait for human typing speeds! So, If i type "A" to begin my "AT" command, HM10 sees the "A" but doesn't understand it and says "Error". I could not find a way to make Putty buffer up a complete line and send it all in one go when complete - at least not when it was in serial port mode.
After wasting a lot of time I found a blog which outlined this problem and suggested the use of an alternative to Putty - which is CoolTerm - that does have a "line at a time" mode that you can use with a serial terminal. Using that, I could do all the AT commands no problem.
Now, using your instructions on firmware reflashing I am off to see if doing that will cure my "no pairing" problem.
Many thanks
Alan T


Lovely article. Thanks for explaining so well Abhiemanyu.
Cheers,
Jay