The Beacon and iBeacon technology terms are often used interchangeably. iBeacon was introduced by Apple and is Apple’s implementation of Bluetooth low-energy (BLE) wireless technology for providing a different way of location-based information and services to the Apple’s iPhones and other iOS Devices. The technology standard allows Mobile Apps (running on both iOS and Android devices) to gather the information from Beacons in the physical world and show the information on Phones.
What is Bluetooth Low Energy (BLE)?
BLE is similar to the Bluetooth Protocol with a difference of Power Consumption. The BLE is a wireless personal area network technology which is used to transmit data over a short distance and its designed for low energy consumption. The BLE was designed to run for a long period of time even using a CR2032 coin battery. The BLE maintains the communication range similar to its previous Classic Bluetooth.

How does iBeacon technology use BLE?
With iBeacon technology, Apple has standardized the format for BLE advertising. The standard format consists of four main pieces which are UUID, Major, Minor, Tx Power. To understand each Terms more clearly, take an example of Apple Electronics where the number of Stores has to be setup in different countries. The description of each is as follows:
UUID: The UUID is a 16-byte string which is used to identify the number of Beacon from a large group of Beacons. This identifies the Beacons for a particular application. For example, If Apple is maintaining a chain of Offline Electronic Store then all the Beacon will share same UUID telling that the beacon Belongs to Apple.
Major: This is a 2-byte string used to identify smaller group of Beacon from a large group of the Beacon. So, if the Beacon belongs to Apple and Apple has setup 10 beacons in a city for 10 stores then Apple will come to know that which beacon belong to which store in the same city.
Minor: This is a 2-byte string which is used to identify the individual Beacon from a group of Beacons. Suppose Apple has setup 50 Beacons in a store, so by using the Minor, Apple will able to find the that where the customer is in the store.
Tx Power: The Tx Power is used to determine the proximity or distance from the beacon. The proximity must be chosen before calibrating, and should be hardcoded in advance. The chosen proximity gives an estimated distance to be taken as a baseline by devices.
For Example: The already Setup and broadcasting Beacon will look like following:
UUID: 36BFDA543784CAD5
Major: 45
Minor: 7
We will set all these parameters in this tutorial using a BLE Module set in iBeacon Mode.
To learn more about BLE technology check our previous article on BLE with ESP32.
How iBeacon is Important?
With growing popularity of Target Margeting, the iBeacon can play a significant role. By forming iBeacon network, any brand, retailer or store will be able to locate the activity and other important customer behaviour data which can further be used to send highly meaningful, contextual and hyper-local advertisement on customer’s smartphone. Taking example of Apple as above, suppose a customer with a smartphone is passing nearby an Apple Electronic Store.
When the app installed on Customer’s smartphone hears an iBeacon installed on store, the app is able to send the data through iBeacon with all offers, advertisement and store details. If the customer finds the offer attractive and wants to buy, he can then enter and buy from the store. Other than this the iBeacon can have some other applications such as payments, shopper/customer analytics and applications at airports, theme parks, concert venues and many other areas. The potential of iBeacon technology is limitless and yet to be discovered.
In this tutorial, we will demonstrate iBeacon using Bluetooth 4.0 based HM10 BLE module. But before starting, it is important to have a look on How to change or flash the Firmware of Clone HM-10 module if you are using a Cloned HM10 Module as most the HM10 module available in the market are cloned ones. We also used HM10 Bluetooth module with Arduino to control an LED.
This HM10 BLE iBeacon tutorial will demonstrate how to setup HM10 module as iBeacon and discovering its details such as RSSI (Proximity, Distance) on android app.
Components Required
Hardware:
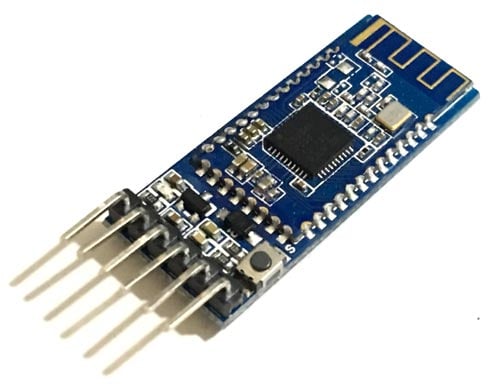
- HM10 BLE Module
- USB to TTL converter
- Jumpers
Software:
- Arduino IDE
- Android App (BLE Scanner)
BLE HM10 used in this tutorial is using HM10 firmware v540 available at the official jnhuamao website.
![]()
Setting the HM10 BLE Module in iBeacon Mode
Initially set the BLE HM10 Module in the iBeacon Mode. To set the HM10 in iBeacon Mode, just follow the below steps.
- Connect the HM10 Module and USB/TTL converter with following connections.
|
HM10 Module Pins |
USB/TTL Converter |
|
Rx |
Tx |
|
Tx |
Rx |
|
Vcc |
5V |
|
Gnd |
Gnd |

- Open Arduino IDE and select the COM Port of the USB/TTL Converter
- Now open the Serial Monitor of the Arduino IDE and select the Baud Rate of ‘9600’ and also select the ‘No Line Ending’ on Serial Monitor.
- Type the following AT Commands in sequence mode one after the other, after getting OK response from HM10.
AT+RENEW
AT+RESET
AT
AT+MARJ0x1000
AT+MINO0x0007
AT+ADVI5
AT+NAMEiBeacon
AT+ADTY3
AT+IBEA1
AT+DELO2
AT+PWRM0
AT+RESET
Note: The Red marked values in the AT Command is user configurable. It can be changed by the user according to their examples.
The Description of the all AT Command used above is as follow:
- AT+RENEW (Restores the factory defaults)
- AT+RESET (Reboots the HM10)
- AT (AT Test)
- AT+MARJ0x1000 (Sets iBeacon Major Number to 0x1000 HEX converted to 4096 in DEC)
- AT+MINO0x0007 (Sets iBeacon Minor Number to 0x1000 HEX converted to 4096 in DEC)
- AT+ADVI5 (Sets advertising interval to 5 i.e. 546.25 milliseconds)
- AT+NAMEiBeacon (Set HM-10 module name to iBeacon. Change it according to use)
- AT+ADTY3 (Sets HM10 non-connectable to save the power and no client can connect to module helps in saving more power)
- AT+IBEA1 (Enables iBeacon Mode on HM10)
- AT+DELO2 (Sets the iBeacon in Broadcast mode only to save power. The HM10 can broadcasts its presence and scans for other devices as it is a Bluetooth Transceiver)
- AT+PWRM0 (Enables HM10 to auto sleep and reduce power consumption from 8 to 0.18 mA. The iBeacon will be always transmitting though)
After executing all AT Commands Serial Monitor looks like below:
![]()
The AT Commands reply is printed serially without any new line. You can easily make the difference between reply of two AT Commands since after every AT command, the HM10 replies OK. So, if the command is AT+RENEW then HM10 will reply OK+RENEW and similarly for other AT commands.
Now the HM10 is set in the iBeacon Mode. It can now Broadcast UUID, Major, Minor and other details. To see the broadcasted details, there are number of iBeacon Android App available, download any iBeacon Android App from Play Store or Apple store and you will be able to find HM10 module set in iBeacon Mode. In this tutorial we are using a “BLE Scanner” Android App.
To disable the iBeacon Mode, simply use the Command AT+IBEA0. And then make Advertising Scan Response Connectable by sending AT+ADTY0. And then just reset the HM10 by sending AT+RESET.
Using the BLE Scanner Android App for iBeacon
- Download the BLE Scanner app from Play Store and Open it.
![]()
- The screen looks like below.

- The ‘Near By’ tab will be used to see all the available iBeacons. To start searching for the iBeacon either pull down the screen or go to the Search Icon on the top right corner of the Screen. This will start searching for the iBeacons.
- After searching the iBeacon, you will be able to see the RSSI, UUID, Major and Minor of iBeacon. The RSSI will change if you take the mobile or iBeacon away from each other. Here in this screen, the RSSI is (-50). This can be seen in the demonstration Video given at the end of this article.
![]()
- After taking away the smartphone from iBeacon HM10, the RSSI value changes from -50 to -81. These values will keep on changing if you move one of the devices.
![]()
The RSSI signal acceptable values are as follow:
|
Signal Strength |
TL;DR |
|
Required for |
|---|---|---|---|
|
-30 dBm |
Amazing |
Max achievable signal strength. The client can only be a few feet from the AP to achieve this. Not typical or desirable in the real world. |
N/A |
|
-67 dBm |
Very Good |
Minimum signal strength for applications that require very reliable, timely delivery of data packets. |
VoIP/VoWiFi, streaming video |
|
-70 dBm |
Okay |
Minimum signal strength for reliable packet delivery. |
Email, web |
|
-80 dBm |
Not Good |
Minimum signal strength for basic connectivity. Packet delivery may be unreliable. |
N/A |
|
-90 dBm |
Unusable |
Approaching or drowning in the noise floor. Any functionality is highly unlikely. |
N/A |
- To find the iBeacon in the proximity view, just go to the proximity icon on top right corner just beside the Search Icon. The Screen will show all available iBeacon with RSSI Signal.
![]()
This finishes the tutorial on setting up HM10 BLE Module as iBeacon. If you have any doubt or suggestion then please write to our forum or comment below.

Hi,, Thanks for the nice article.. I have the below questions..
Will this setup work with Windows 7?..
Can HM-10 Ble Mobule acts as central?.
Can the Windows get the ble advertisement data as a serial data ?..