")
Bluetooth Low Energy (BLE) is a version of Bluetooth and it is present as a smaller, highly optimized version of the classic Bluetooth. It is also known as Smart Bluetooth. The BLE was designed keeping in mind the lowest possible power consumption specifically for low cost, low bandwidth, low power and low complexity. ESP32 has inbuilt BLE capabilities but for other microcontrollers like Arduino, nRF24L01 can be used. This RF module can be also used as BLE module to send the data to other Bluetooth device like smartphones, computer etc.
Here in this tutorial we will demonstrate how to send any data over BLE using nRF24L01. We will send temperature readings from DHT11 to smartphone using Arduino and nRF module over BLE. If you do not want to use the BLE function you can still use the nRF24L01 to send data wirelessly with arduino.
How Bluetooth Low Energy (BLE) is different?
The BLE was adopted due to its power consumption features as it was able to run for an extended period of time using just a coin cell. Compared to other wireless standards, the rapid growth of BLE has gone further faster because of its phenomenal applications in smartphones, tablets, and mobile computing.
BLE Capability of NRF24L01 Module
BLE uses the same 2.4 GHz ISM band with baud rate from 250Kbps to 2Mbps which is allowed in many countries and can be applied to industrial and medical applications. The Band starts at 2400 MHz to 2483.5 MHz and it is the divided into 40 channels. Three of these channels are known as ‘Advertising’ and are used by devices to send advertising packets with information about them so other BLE devices can connect. These channels were initially selected at the lower upper of the band and middle of the band to avoid interference which can possibly interfere with a number of channels. To learn more about BLE, follow this tutorial.
This tutorial will explain how to use NRF24L01 module as BLE transceiver. The tutorial on NRF24L01 as RF module has already been explained in interfacing nRF24L01 with Arduino tutorial. Today the BLE functionality of this module will be explained by sending sensor data to a smart phone. Here this nRF24L01 module will be interfaced with Arduino Microcontroller and the DHT11 sensor temperature data will be sent to official Nordic BLE android application.
Components Required
Hardware:
- Arduino UNO
- nRF24L01 BLE Module
- DHT11 Temperature and Humidity Sensor
- Jumpers
Software:
- Arduino IDE
- Nordic BLE Android Application (nRF Temp 2.0 for BLE or nRF Connect for Mobile)
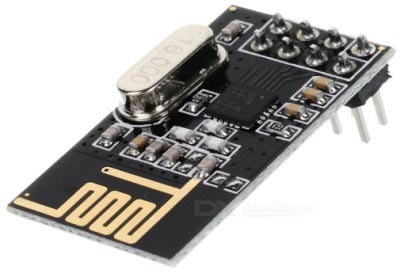
Starting with nRF24L01 Module
The nRF24L01 modules are transceiver modules, meaning each module can both send and receive data but since they are half-duplex they can either send or receive data at a time. The module has the generic nRF24L01 IC from Nordic semi-conductors which is responsible for transmission and reception of data. The IC communicates using the SPI protocol and hence can be easily interfaced with any microcontrollers. It gets a lot easier with Arduino since the libraries are readily available. We already used nRF24L01 module with Arduino to create a chat room and to control servo motors wirelessly.
The pinouts of a standard nRF24L01 module is shown below:

The module has on operating voltage from 1.9V to 3.6V (typically 3.3V) and consumes very less current of only 12mA during normal operation which makes it battery efficient and hence can even run on coin cells. Even though the operating voltage is 3.3V most of the pins are 5V tolerant and hence can be directly interfaced with 5V microcontrollers like Arduino. Another advantage of using these modules is that, each module has 6 Pipelines. Meaning, each module can communicate with 6 other modules to transmit or receive data. This makes the module suitable for creating star or mesh networks in IoT applications. Also they have a wide address range of 125 unique ID’s, hence in a closed area we can use 125 of these modules without interfering with each other.
Arduino NRF24L01 Module Circuit Diagram


Interfacing nRF24L01 with Arduino for BLE communication
Firstly include the required libraries. The library includes RF24 to access nRF24L01 commands, DHT11 library for accessing DHT11 commands and BTLE library to use BLE functions.
#include <SPI.h>
#include <RF24.h>
#include <BTLE.h>
#include <DHT.h>
Define and initialize the pins and functions for DHT11 and BLE module. The DHT type is initialized as DHT11 since we are using DHT11. The DHT is connected to GPIO Pin 4 and nRF module’s CE and CSN pins are connected to Pin 9 and 10 respectively.
#define DHTPIN
#define DHTTYPE DHT11
DHT22
DHT dht(DHTPIN, DHTTYPE);
RF24 radio(9, 10);
BTLE btle(&radio);
Start the serial port at 9600, you can choose any port. Then begin the DHT sensor and also begin BTLE with the Bluetooth Local Name with max 8 characters long.
Serial.begin(9600);
dht.begin();
btle.begin("CD Temp");
Read the temperature over the loop and save it to a float variable temp. Add a debug line for showing an error message if DHT loses its power or anything unexpected happens.
  float temp = dht.readTemperature();   //read temperature data
  if (isnan(h) || isnan(t)) {
    Serial.println(F("Failed to read from DHT sensor!"));
    return;
  }
Save the value to Buffer and parse it to the BLE module. Also send the Temperature value to BLE Module. The BLE module will advertise the Temperature data. The android app can search the BLE module and receive the sensor data.
  nrf_service_data buf;
  buf.service_uuid = NRF_TEMPERATURE_SERVICE_UUID;
  buf.value = BTLE::to_nRF_Float(temp);

  if (!btle.advertise(0x16, &buf, sizeof(buf))) {
    Serial.println("BTLE advertisement failed..!");
  }
When done, just hop to the next channel.
btle.hopChannel();
Since the DHT sensor documentation recommends to keep a delay of a minimum 2 seconds after one reading, so add a delay of 2 seconds.
delay(2000);
After uploading the and pairing the smartphone with nRF module, you will start getting the values on nRF Temp 2.0 for BLE android application like shown below. Complete procedure of pairing and getting the data on android app is also explained in the video:

This finishes the complete tutorial on advertising the sensor data to Nordic Android App using BLE nRF24L01. If you find any difficulty then comment below or write to our forum. To explore more about nRF24L02 , you can also try to Create a Private Chat Room using Arduino, nRF24L01 and Processing.
Complete Project Code
/* Sending Sensor Data to Nordic BLE android app  by CircuitDigest
  works with nRF24L01. and the works for Nordic's
   It reads temperature from a DHT11 and sends it via BTLE.
   Works with Nordic Semiconductor apps such as
   "nRF Connect for Mobile" and "nRF Temp 2.0 for BLE"
   Pin Mapping:
  GND -> GND on the Arduino
  VCC -> 3.3v on the Arduino
  CE -> PIN 9 on the Arduino
  CSN -> PIN 10 on the Arduino
  SCK -> PIN 13 on the Arduino Uno
  MOSI -> PIN 11 on the Arduino Uno
  MISO -> PIN 12 on the Arduino Uno
  IRQ -> not used
*/
#include <SPI.h>
#include <RF24.h>
#include <BTLE.h>
#include <DHT.h>                                                            // dht11 temperature and humidity sensor library
#define DHTPIN 4                                                           // what digital pin we're connected to
#define DHTTYPE DHT11                                                       // select dht type as DHT 11 or DHT22
DHT dht(DHTPIN, DHTTYPE);
RF24 radio(9, 10); // CE, CSN
BTLE btle(&radio);
void setup() {
  Serial.begin(9600);
  delay(1000);
  Serial.print("BLE and DHT Starting... ");
  Serial.println("Send Temperature Data over BTLE");
  dht.begin();   // initialise DHT11 sensor
  btle.begin("CD Temp");    // 8 chars max
  Serial.println("Successfully Started");
}
void loop() {
  float temp = dht.readTemperature();   //read temperature data
  if (isnan(h) || isnan(t)) {                                                // Check if any reads failed and exit early (to try again).
    Serial.println(F("Failed to read from DHT sensor!"));
    return;
  }
  Serial.print(" Temperature: ");  Serial.print(t);  Serial.println("°C ");
  nrf_service_data buf;
  buf.service_uuid = NRF_TEMPERATURE_SERVICE_UUID;
  buf.value = BTLE::to_nRF_Float(temp);
  if (!btle.advertise(0x16, &buf, sizeof(buf))) {
    Serial.println("BTLE advertisement failed..!");
  }
  btle.hopChannel();
  delay(2000);
}
Comments
hi
im new
cant get sketch to upload...get this error msg
exit status 1
'h' was not declared in this scope
if (isnan(h) || isnan(t)) {
im stuck any help appreciated
tom
what is ur library for DHT ? pls share ur librarie
The code is missing some part.
I have digged into it and added the missing part. Now the code is working for me. Here is the complete sketch:
/*
https://circuitdigest.com/microcontroller-projects/sending-sensor-data-…
Reference for added code to define t, h and f:
https://gist.github.com/amfgames/7e6b2673bf45d5c84d016b37ec5e10da
*/
/* Sending Sensor Data to Nordic BLE android app by CircuitDigest(www.circuitdigest.com)
works with nRF24L01. and the works for Nordic's
It reads temperature from a DHT11 and sends it via BTLE.
Works with Nordic Semiconductor apps such as
"nRF Connect for Mobile" and "nRF Temp 2.0 for BLE"
Pin Mapping:
GND -> GND on the Arduino
VCC -> 3.3v on the Arduino
CE -> PIN 9 on the Arduino
CSN -> PIN 10 on the Arduino
SCK -> PIN 13 on the Arduino Uno
MOSI -> PIN 11 on the Arduino Uno
MISO -> PIN 12 on the Arduino Uno
IRQ -> not used
*/
#include <SPI.h>
#include <RF24.h>
#include <BTLE.h>
#include <DHT.h> // dht11 temperature and humidity sensor library
#define DHTPIN 4 // what digital pin we're connected to
#define DHTTYPE DHT11 // select dht type as DHT 11 or DHT22
DHT dht(DHTPIN, DHTTYPE);
RF24 radio(9, 10); // CE, CSN
BTLE btle(&radio);
void setup() {
Serial.begin(9600);
delay(1000);
Serial.print("BLE and DHT Starting... ");
Serial.println("Send Temperature Data over BTLE");
dht.begin(); // initialise DHT11 sensor
btle.begin("DHT"); // 8 chars max
Serial.println("Successfully Started");
}
void loop() {
// This is the missing code part
// Reading temperature or humidity takes about 250 milliseconds!
// Sensor readings may also be up to 2 seconds 'old' (its a very slow sensor)
float h = dht.readHumidity();
// Read temperature as Celsius (the default)
float t = dht.readTemperature();
// Read temperature as Fahrenheit (isFahrenheit = true)
float f = dht.readTemperature(true);
// End of the missing code part
float temp = dht.readTemperature(); //read temperature data
if (isnan(h) || isnan(t)) { // Check if any reads failed and exit early (to try again).
Serial.println(F("Failed to read from DHT sensor!"));
return;
}
Serial.print(" Temperature: ");
Serial.print(t);
Serial.println(" °C ");
nrf_service_data buf;
buf.service_uuid = NRF_TEMPERATURE_SERVICE_UUID;
buf.value = BTLE::to_nRF_Float(temp);
if (!btle.advertise(0x16, &buf, sizeof(buf))) {
Serial.println("BTLE advertisement failed..!");
}
btle.hopChannel();
delay(2000);
Same problem here. "'h' was not declared in this scope"
concerning: "if (isnan(h) || isnan(t)) { "
Okay we can do without this check but commenting this with // gives: "'t' was not declared in this scope" for "Serial.print(" Temperature: "); Serial.print(t); Serial.println("°C ");" So commenting this line with // makes compilation succeed but not sure if the project will work. The Serial.print is not that neccesary and we can find an other solution. Will give this a try.....
Solved. Added:
float h = dht.readHumidity();
float t = dht.readTemperature();
float f = dht.readTemperature(true);
to void loop() (First lines) so the variables h,t and f are linked to functions from the library.
Hi,
Thank You Dear Meindert !
Now can uploaded this .ino file.

hi, i want to use the lm35 instead the dht11. How shoud i configure it. I am still a rookie, thanks for any help.