
Automatic Bottle Filling Machines are most commonly used in beverages and soft drink industries. These machines use a conveyor belt which is an economical and fast way to fill bottles. Mostly PLCs are used for Automatic bottle filling machines, but you can make a very basic and versatile bottle filler using an Arduino. You can program the Arduino to automatically detect the bottle using IR or ultrasonic sensor and allow the bottler to fill by stopping the conveyer belt for some time. Then again move the belt and stop when the next bottle is detected.
Here we are going to design a prototype for Automatic Bottle Filling Machine using Arduino Uno, conveyor belt, solenoid valve, IR sensor, and Stepper motor. Belt conveyor is driven by a stepper motor at a constant preset speed. The stepper motor will keep driving the belt until an IR sensor detects the presence of a bottle on the belt. We used the IR sensor as an external trigger. So whenever the IR sensor goes high it sends a trigger to Arduino to stop the motor and turn on the solenoid valve. A preset required delay is already entered in the code for bottle filling. The Arduino will keep the solenoid valve on and stepper motor off until that specified time. After that time, the solenoid valve turns off the filling, and the conveyor starts moving so that the next bottle can be filled.
We previously used Arduino with Solenoid valve, IR Sensor and Stepper motor, so to learn more about basic interfacing of Arduino with these components, you can visit the links.
Components Required
- Arduino Uno
- Stepper Motor (Nema17)
- Relay
- Solenoid Valve
- IR Sensor
- A4988 Motor Driver
- Battery
Circuit Diagram
The circuit diagram for the Automatic Bottle Filling System using Arduino is given below.

I have used Fritzing to draw the circuit diagram. In this circuit, Solenoid Valve is connected to Arduino through the Relay module and the A4988 driver module is used to control the stepper motor. You can follow the How to Control Nema17 with Arduino and A4988 tutorial for more information on Nema17 and A4988 driver module.
The input pin of the Relay module is connected to pin 7 of Arduino. Direction and Step pins of the A4988 module are connected to 2 and 4 pins of Arduino. In this project, an IR sensor is used as an external interrupt to Arduino. In Arduino Uno, digital pin 2 & 3 are the interrupt pins, so connect the Out pin of IR sensor to the 3rd pin of Arduino. Solenoid Valve is powered by a 24V power source, and Stepper motor is powered by a 12V power source.
Arduino Program for Automatic Bottle Filling
The complete program for this Automatic Bottle Filling System using Arduino is given at the end. Here I am explaining some important lines.
Start the program by including the stepper motor library. You can download the stepper motor library from here.
After that, define the no of steps per revolution for the stepper motor. For NEMA 17 steps per revolution is 200.
#include <Stepper.h>
#define STEPS 200
Specify the pins to which Step and Direction pins of the motor driver module is connected. As the motor is connected through the driver module, define the motor interface type as Type1.
Stepper stepper(STEPS, 2, 4);
#define motorInterfaceType 1
Set the stepper motor speed.
stepper.setSpeed(500);
Define the Relay, step and direction pins as output
pinMode(relay,OUTPUT);
pinMode(4,OUTPUT);
pinMode(2,OUTPUT);
The syntax for external interrupt in Arduino is given below:
attachInterrupt(digitalPinToInterrupt(pin), ISR, mode);
Where:
digitalPinToInterrupt(pin): It is used to define the pin at which external interrupt is connected. In Arduino Uno Pin 2 & 3 are external interrupt pins.
ISR: It is a function that is called when an external interrupt is called.
Mode: Type of transition to trigger on, e.g., falling, rising, etc.
Learn more about Arduino Interrupts by following the link.
In attachInterrupt() function it is specified that pin 3 is the external interrupt pin, and IR_detected function is called whenever IR sensor changes its state from is LOW to HIGH (RISING).
attachInterrupt(digitalPinToInterrupt(3),IR_detected,HIGH);
void IR_detected() is an ISR function that executes when the IR sensor goes high. So whenever the IR sensor goes high, this function runs the stepper motor for a few steps, and then stops the stepper motor and turns on the solenoid valve.
void IR_detected()           {
  stepper.step(150);
  digitalWrite(relay,HIGH);
  stepper.step(0);
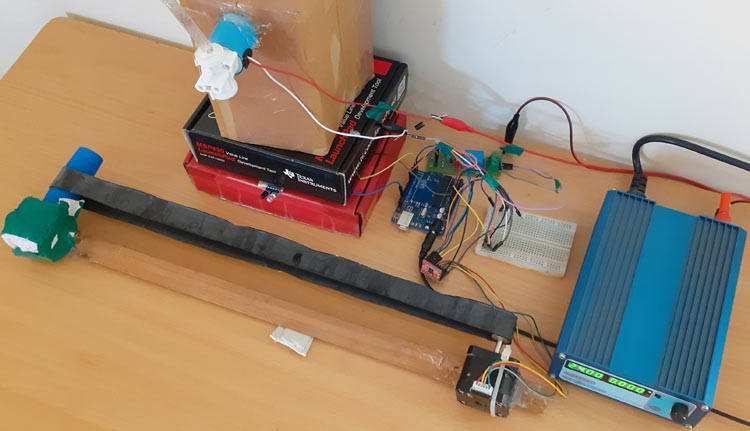
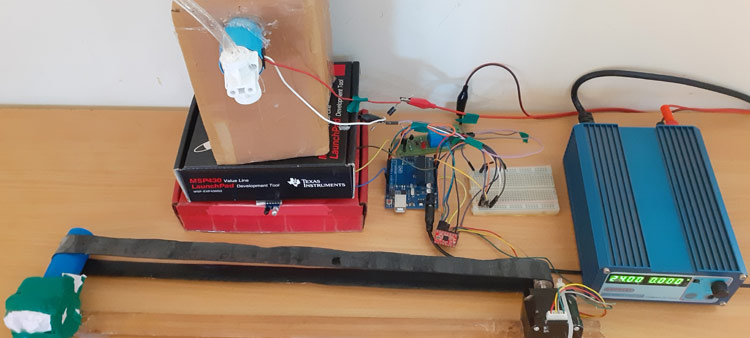
Now finally upload the code to Arduino by connecting it to the laptop. The below image shows our prototype for the Automatic Bottle Filling System using Arduino.
Complete code and demonstration Video are given below.
Complete Project Code
#include <Stepper.h>
#define STEPS 200
#define motorInterfaceType 1
Stepper stepper(STEPS, 2, 4);
int relay=7;
int step_num =700;
void setup() {
  Serial.begin(9600);
  pinMode(relay,OUTPUT);
  stepper.setSpeed(500);
  pinMode(4,OUTPUT);
  pinMode(2,OUTPUT);
 attachInterrupt(digitalPinToInterrupt(3),IR_detected,RISING);
}
boolean solenoid_on = false;
void loop() {
  if (solenoid_on)
  {
    delay(6000); //wait for 6 sec
    solenoid_on = false;
  }
  digitalWrite(relay,LOW);    // now relay is off condition (and motor is on  condition)
  stepper.step(step_num);
  }
void IR_detected()           //ISR function excutes when IR sensor goes high.
{
  Serial.println ("Interrupt Detected");
  stepper.step(150); //To run the stepper motor few steps before it stops
  digitalWrite(relay,HIGH); //to turn on solenoid
  stepper.step(0); //to stop the stepper motor
  solenoid_on = true;
  }
Comments
hello, I like the project. I have some trouble with the code, it does not upload to arduino, could you help with that? thanks
What is the error message?
I actually fixed it, but after the sensor detected something and the belt stops, the relay turns on but nothing happens, the solenoid doesn't open. I think the error is in the encoding, I think HIGH is off and Low is on instead of HIGH on and LOW off. I tried it this way, and it works, but then the relay kept turning on and off. so I'm stuck there, I can't find what is wrong, really need help

good project .Thank you very much