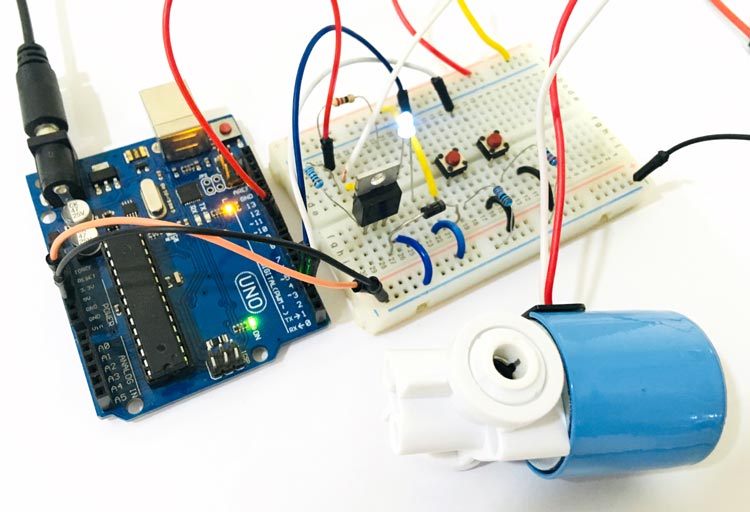
Solenoids are very commonly used actuators in many process automation systems. There are many types of solenoid, for instance, there are solenoid valves which can be used to open or close water or gas pipelines and there are solenoid plungers which are used to produce linear motion. One very common application of solenoid that most of us would have come across is the ding-dong doorbell. The Door bell has a plunger-type solenoid coil inside it, which when energized by AC power source will move a small rod up and down. This rod will hit the metal plates placed on either side of the solenoid to produce the soothing ding dong sound. It is also used as starters in vehicles or as a valve in RO and sprinkler systems.
How Does a Solenoid Valve Work?
A solenoid is a device that converts electrical energy into mechanical energy. It has a coil wound over a conductive material, this set-up acts as an electromagnet. The advantage of an electromagnet over natural magnet is that it can be turned on or off when required by energizing the coil. Thus when the coil is energized then according to faradays law the current-carrying conductor has a magnetic field around it, since the conductor is a coil the magnetic field is strong enough to magnetize the material and create a linear motion.

The operation principle is similar to relay, it has a coil inside it, which when energized, pulls the conductive material (piston) inside it, thus allowing the flow of liquid. And when de-energized it pushes the piston back in the previous position using the spring and again blocks the flow of liquid.
During this process, the coil draws a large amount of current and also produces hysteresis problem, hence it is not possible to drive a Solenoid coil directly through a logic circuit. Here we are using a 12V solenoid valve which is commonly used in controlling the flow of liquids. The solenoid draws a continuous current of 700mA when energized and a peak of nearly 1.2A so we have to consider these things while designing the solenoid driver circuit for this particular Solenoid valve.
Components Required
- Arduino UNO
- Solenoid Valve
- IRF540 MOSFET
- Pushbutton – 2 nos.
- Resistor (10k, 100k)
- Diode – 1N4007
- Breadboard
- Connecting Wires
Circuit Diagram
Circuit diagram for Arduino controlled Solenoid valve is given below:
Programming Code Explanation
The complete code for Arduino solenoid valve is given at the end. Here we are explaining the complete program to understand the working of the project
Firstly we have defined digital pin 9 as output for the solenoid and digital pin 2 and 3 as input pins for buttons.
void setup() {
     pinMode(9, OUTPUT);
     pinMode(2, INPUT);
     pinMode(3, INPUT);
}
Now in void loop, turn on or off the solenoid based on status of digital pin 2 and 3, where two push buttons are connected to turn on and off the solenoid.
void loop() {
if(digitalRead(2)==HIGH)
{
     digitalWrite(9,HIGH);
     delay(1000);
}
else if(digitalRead(3)==HIGH)
{
     digitalWrite(9,LOW);
     delay(1000);
}
}
Controlling a Solenoid Valve from an Arduino
After uploading complete code into the Arduino, you will be able to turn on and off the solenoid with the help of two push buttons. An LED is also attached with solenoid for indication purpose. Complete working video is given at the end of this tutorial.

When button 1 is pressed, Arduino send a HIGH logic to gate terminal of the MOSFET IRF540, connected on the 9th pin of the Arduino. As IRF540 is an N-Channel MOSFET, so when its gate terminal gets HIGH, it allow the flow of current from drain to source and turn the solenoid on.
Similarly, when we press the button 2, Arduino sends a LOW logic to the gate terminal of the MOSFET IRF540 which makes the solenoid turn off.
To learn more about role of MOSFETs in driving the solenoid, you can check solenoid driver circuit.
Complete Project Code
void setup() {

pinMode(9, OUTPUT);

pinMode(2, INPUT);

pinMode(3, INPUT);

}

void loop() {

if(digitalRead(2)==HIGH)

{

  digitalWrite(9,HIGH);

  delay(1000);

}

else if(digitalRead(3)==HIGH)

{

  digitalWrite(9,LOW);

delay(1000);

}

}
Comments
Can this be use to connect arduino to mobile app?and will send notifications?pls .because we will be doing our thesis.


very good ,and easy learn .thank you very much.