

This tutorial describes how to make an automatic water dispenser from Arduino and an ultrasonic sensor. This tutorial describes how to make an automatic water dispenser using an electronic diagram, a code snippet, a list of things, and a demonstration of how to make your water dispenser work.
Table of Contents
Why Build an Automatic Water Dispenser?
About 71% of Earth is covered with water, but sadly, only 2.5% of it is drinking water. With the rise in population, pollution and climate change, it is expected that by as early as 2025, we will experience perennial water shortages. On one hand, there are already minor disputes among nations and states for sharing river water; on the other hand, we as humans waste a lot of drinking water due to our negligence. The solution lies in smart technology: replacing manual taps with automatic water dispensers with sensors that open and close automatically, saving water while promoting hygiene.
It might not appear big at first, but if your tap dripped a drop of water once every second, it would take only about five hours for you to waste one gallon of water, which is enough water for an average human to survive for two days. So what can be done to stop this? As always, the answer to this lies with improvement in technology. If we replace all the manual taps with a smart one that opens and closes on its own automatically, not only can we save water, but also have a healthier lifestyle since we don’t have to operate the tap with our dirty hands. So in this project, we will build an Automatic Water Dispenser using Arduino and a Solenoid valve that can automatically give you water when a glass is placed near it. Sounds cool, right? So let’s build one...
Components Required for Arduino Water Dispenser
- Solenoid Valve
- Arduino Uno (any version)
- HCSR04 – Ultrasonic Sensor
- IRF540 MOSFET
- 1k and 10k Resistor
- Breadboard
- Connecting Wires
How an Automatic Water Dispenser Using Ultrasonic Sensor Works
The Concept behind the Automatic Water Dispenser is very simple. We will use an HCSR04 Ultrasonic Sensor to check if any object, such as the glass, is placed before the dispenser. A solenoid valve will be used to control the flow of water. When energised, the water will flow out, and when de-energised, the water will be stopped. So we will write an Arduino program which always checks if any object is placed near the tap, if yes, then the solenoid will be turned on and wait till the object is removed, once the object is removed, the solenoid will turn off automatically, thus closing the supply of water. Learn more about using an Ultrasonic sensor with Arduino here.
The automatic water dispenser project adheres to a straightforward but effective principle:
1) Detection Phase: The HC-SR04 ultrasonic sensor is constantly monitoring for objects within a 10cm range
2) Activation Phase: Detection of a glass causes Arduino to send a HIGH signal to the gate of the MOSFET
3) Flow Phase: MOSFET turns ON and solely powers the 12V solenoid valve to allow water flow
4) Deactivation Phase: Detection of no glass will cause the MOSFET to turn OFF, stopping water flow.
Automatic Water Dispenser Using Arduino Circuit Diagram
The complete circuit diagram for Arduino based water Dispenser is shown below. The complete automatic water dispenser using Arduino circuit diagram shows the connection between all components:

The solenoid valve used in this project is a 12V valve with a maximum current rating of 1.2A and a continuous current rating of 700mA. That is, when the Valve is turned on, it will consume about 700mA to keep the valve turned on. As we know, an Arduino is a Development board which operates with 5V, and hence we need a switching driver circuit for the Solenoid to turn it on and off.
The switching device used in this project is the IRF540N N-Channel MOSFET. It has the 3 pins Gate, Source and Drain from pin 1, respectively. As shown in the circuit diagram, the positive terminal of the solenoid is powered by the Vin pin of the Arduino. Because we will use a 12V adapter to power the Arduino, and thus the Vin pin will output 12V, which can be used to control the Solenoid. The negative terminal of the solenoid is connected to the ground through the MOSFET’s Source and Drain pins. So the solenoid will be powered only if the MOSFET is turned on.
The gate pin of the MOSFET is used to turn it on or off. It will remain off if the gate pin is grounded and will turn on if a gate voltage is applied. To keep the MOSFET turned off when no voltage is applied to the gate pin, the gate pin is pulled to ground through a 10k resistor. The Arduino pin 12 is used to turn on or off the MOSFET, so the D12 pin is connected to the gate pin through a 1K resistor. This 1K resistor is used for current limiting purposes.
The Ultrasonic Sensor is powered by the +5V and ground pins of the Arduino. The Echo and Trigger pin is connected to pins 8 and 9, respectively. We can then program the Arduino to use the Ultrasonic sensor to measure the distance and turn on the MOSFET when an object is detected. The whole circuit is simple and hence can be easily built on top of a breadboard. Mine looked something like this, below, after making the connections.
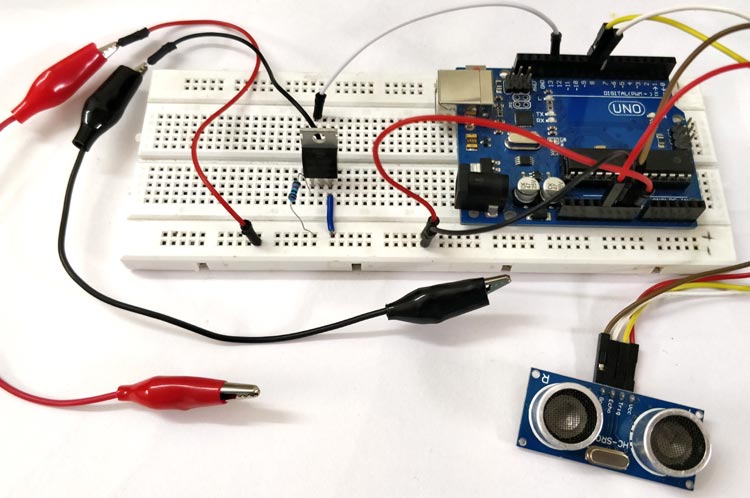
Circuit Connection Details
| Arduino Pin | Connected To | Component Pin | Notes |
| Digital Pin 8 | HC-SR04 | Echo | Distance measurement input |
| Digital Pin 9 | HC-SR04 | Trigger | Ultrasonic signal output |
| Digital Pin 12 | MOSFET | Gate (via 1kΩ resistor) | Solenoid control signal |
| Digital Pin 13 | Built-in LED | Onboard LED | Status indicator |
| 5V | HC-SR04 | VCC | Sensor power supply |
| VIN | Solenoid Valve | Positive terminal | 12V power from adapter |
| GND | All components | Ground pins | Common ground |
Automatic Water Dispenser Using Arduino Code
For this project, we have to write a program which uses the HCSR-04 Ultrasonic sensor to measure the distance of the object in front of it. When the distance is less than 10cm, we have to turn on the MOSFET; otherwise, we have to turn off the MOSFET. We will also use the onboard LED connected to pin 13 and toggle it along with the MOSFET so that we can ensure if the MOSFET is in the on or off state. The complete program to do the same is given at the end of this page. Just below, I have explained the program by breaking it into small, meaningful snippets. The automatic water dispenser using Arduino code continuously monitors the ultrasonic sensor and controls the solenoid valve based on object detection.
The program starts with macro definitions. We have the trigger and echo pin for the Ultrasonic sensor, the MOSFET gate pin and the LED as the I/O for our Arduino. So we have defined which pin these will be connected to. In our hardware, we have connected the Echo and Trigger pins to the 8th and 9th digital pins, respectively. Then the MOSFET pin is connected to pin 12, and the onboard LED by default is connected to pin 13. We define the same using the following lines
#define trigger 9
#define echo 8
#define LED 13
#define MOSFET 12
Inside the setup function, we declare which pins are input and which are output. In our hardware, only the Echo pin of the Ultrasonic(US) sensor is the input pin, and the rest are output pins. So we use the pinMode function of Arduino to specify the same as shown below
pinMode(trigger,OUTPUT);
 pinMode(echo,INPUT);
 pinMode(LED,OUTPUT);
 pinMode(MOSFET,OUTPUT);
Inside the main loop function, we call the function measure_distance(). This function uses the US sensor to measure the distance of the object in front of it and updates the value to the variable ‘distance’. To measure distance using a US sensor, the trigger pin must first be held low for two microseconds and then held high for ten microseconds, and again held low for two microseconds. This will send a sonic blast of Ultrasonic signals into the air, which will get reflected by the object in front of it, and the echo pin will pick up the signals reflected by it. Then we use the time taken value to calculate the distance of the object ahead of the sensor. If you want to know more about how to interface the HC-SR04 Ultrasonic sensor with Arduino, read through the link. The program to calculate the distance is given below
digitalWrite(trigger,LOW);
 delayMicroseconds(2);
 digitalWrite(trigger,HIGH);
 delayMicroseconds(10);
 digitalWrite(trigger,LOW);
 delayMicroseconds(2);
 time=pulseIn(echo,HIGH);
 distance=time*340/20000;
Once the distance is calculated, we have to compare the value of distance using a simple if statement, and if the value is less than 10cm, we make the MOSFET and LED go high; in the following else statement, we make the MOSFET and LED go low. The program to do the same is shown below.
if(distance<10)
 {
   digitalWrite(LED,HIGH);digitalWrite(MOSFET,HIGH);
 }
 else
 {
   digitalWrite(LED,LOW);digitalWrite(MOSFET,LOW);
 }
Working of the Automatic Water Dispenser
Make the connections as shown in the circuit and upload the program given below into your Arduino board. Make a simple arrangement to connect the solenoid valve to the water inlet and power up the circuit using the 12V adapter to the DC jack of the Arduino board. Make sure the on-board LED is turned off; this ensures that the Solenoid is also off. The setup that I have made to demonstrate the project is shown below
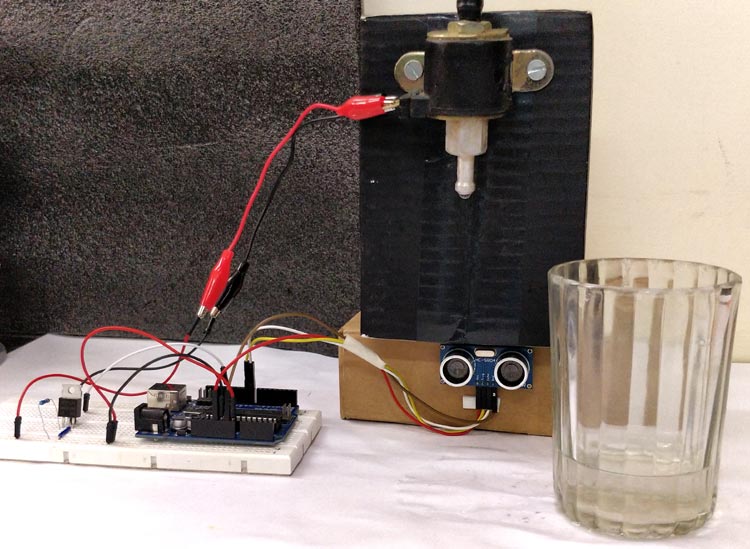
As you can see, I have placed the Ultrasonic sensor directly below the solenoid valve such that when the glass/tumbler is placed below the solenoid, it gets directly opposite to the ultrasonic sensor. This object will be sensed by the ultrasonic sensor, and the MOSFET, along with the LED, will turn ON, thus making the solenoid open and the water flows down.
Similarly, when the glass is removed, the ultrasonic sensor tells the Arduino there is no glass in front of it, and thus the Arduino closes the valve. The complete working of the project can be found in the video below. If you have any doubts about getting this to work, post it in the comment section or use the forum for technical help.
Technical Summary and GitHub Repository
The Technical Summary explains the project’s core idea, design flow, and functional aspects in a simplified manner. The GitHub Repository offers complete code, circuit diagrams, and resources for replication and learning.


Troubleshooting Common Issues
| Problem | Possible Cause | Solution |
| Solenoid not working | Insufficient power supply | Check 12V adapter connection, verify VIN voltage |
| Sensor not detecting | Wrong pin connections | Verify trigger pin 9, echo pin 8 connections |
| Continuous water flow | MOSFET stuck ON | Check pull-down resistor, MOSFET connections |
| No response to objects | Code upload issues | Re-upload code, check serial monitor output |
| Erratic behavior | Loose connections | Check all breadboard connections, use solid wires |
Warning: Different Solenoid valves have different operating voltage and current ratings. Make sure your solenoid operates on 12V and consumes not more than 1.5A maximum.
Project Enhancements and Modifications
∗ Timer Cut-off: Add maximum dispensing time to prevent overflow.
∗ Volume Control: Implement different dispensing volumes according to glass size.
∗ LCD Display: Displays status messages with the volume of water dispensed.
∗ WiFi Connectivity: To allow remote monitoring and control with your smartphone.
∗ Water level Monitoring: Alerts to low water in the reservoir.
∗ Temperature Sensor: Water temperature displayed.
This automatic water dispenser using Arduino project demonstrates the practical application of microcontroller programming, sensor interfacing, and electronic switching.
Frequently Asked Questions About Arduino Water Dispenser
⇥ 1. Why employ a MOSFET in an automatic water dispenser circuit?
MOSFET is an electronic switch for a 12V solenoid valve. Arduino supplies 5V, which is not enough to operate a solenoid. IRF540N MOSFET allows Arduino to drive a high-current 12V solenoid with a low-voltage control signal.
⇥ 2. How to set the range of detection in the Arduino water dispenser?
Adjust the threshold variable in the code. The default is 10cm. Update "int threshold = 10;" with your desired value (recommended 2-15cm). Range short reduces false triggering, range long enhances the detection area.
⇥ 3. What is the required power supply for an automatic water dispenser?
Use a 12V DC power adapter having a minimum capacity of 1.5A to be plugged into the Arduino DC jack. This gives 12V to the solenoid valve through the VIN pin and 5V for Arduino and sensor usage automatically.
⇥ 4. How can I prevent water from overflowing the automatic dispenser?
You can use a timer off in the code using the millis() function to use maximum dispense time (5 seconds, for example). You could also add a second sensor in a higher position to detect when the glass is full.
⇥ 5. Can I utilise different specifications/part numbers of solenoid valves?
Yes, but make sure that it is rated for the voltage that it is supplied. If you use 24V solenoids, you must use a 24V adapter and check to see if the MOSFET is rated for 24V. If you use 5V, then you can wire it directly to the 5V pin and not plug in the VIN pin - it will take less power.
⇥ 6. What if my sensor is not detecting the object?
Check the wiring: trigger should be connected to pin 9 on the Arduino; echo should be connected to pin 8 on the Arduino; VCC to the 5V, and GND to ground. Check the direction of the sensor and make sure nothing is in front of the sensor face. You can test this using the Serial Monitor output.
⇥ 7. Is an automatic water dispenser safe for drinking water?
Use a potable water-rated food-grade solenoid valve. Isolate electrical components from water exposure. Cleaning and regular maintenance of the water lines and valves keep them contamination-free and ready for operation.
Projects Built Around HC-SR04 Sensor
Our project archive includes a range of HC-SR04 Sensor applications; discover them in the links below.

How does an HC-SR04 Ultrasonic Range Sensor Work and How to Interface with ESP32
So, in this project, we are going to know every little detail about the HC-SR04 Ultrasonic Distance Sensor module, along with interfacing it with the ESP32. The HC-SR04 ultrasonic sensor has a detection range of 13 feet with an angle of 15 degrees, which is great for detecting obstacles.

Measure Distance using Raspberry Pi and HCSR04 Ultrasonic Sensor
In this project, we are going to interface the HC-SR04 Ultrasonic sensor module to the Raspberry Pi to measure distance. We have previously used an Ultrasonic sensor with a Raspberry Pi to build an obstacle-avoiding robot.

Distance Measurement using Ultrasonic Sensor and Arduino
This is an efficient way to measure small distances precisely. In this project, we have used the HC-SR04 Ultrasonic Sensor with Arduino to determine the distance of an obstacle from the sensor. The basic principle of ultrasonic distance measurement is based on ECHO.
Complete Project Code
#define trigger 9
#define echo 8
#define LED 13
#define MOSFET 12


float time=0,distance=0;

void setup()
{
Serial.begin(9600);
 pinMode(trigger,OUTPUT);
 pinMode(echo,INPUT);
 pinMode(LED,OUTPUT);
 pinMode(MOSFET,OUTPUT);
 delay(2000);
}

void loop()
{
 measure_distance();

 if(distance<10)
 {
   digitalWrite(LED,HIGH);digitalWrite(MOSFET,HIGH);
 }
 else
 {
   digitalWrite(LED,LOW);digitalWrite(MOSFET,LOW);
 }

 delay(500);
}
void measure_distance()
{
 digitalWrite(trigger,LOW);
 delayMicroseconds(2);
 digitalWrite(trigger,HIGH);
 delayMicroseconds(10);
 digitalWrite(trigger,LOW);
 delayMicroseconds(2);
 time=pulseIn(echo,HIGH);

 distance=time*340/20000;
}
Comments
a bit, but if this is over a sink or drain, not much is lost. I like this for hand washing. combine it with temperature mixing so you get a preset temperature.
This is very nice project. I see your project code but i didn't found code for automatic turn off. How its happened (automatic turn off)???
if the glass is removed the turn off is triggered:
if(distance<10)
{
digitalWrite(LED,HIGH);digitalWrite(MOSFET,HIGH);
}
else
{
digitalWrite(LED,LOW);digitalWrite(MOSFET,LOW);
}
signal and stop timing gap ?
what action is perform when the object occur in front where it is rewritten in the code??????
Nice idea
is it possible for the arms to be used instead of a glass?
lets say i am from the toilet and dont wish to dirt my hands again, so i just put my hands to wash and after i just leave.
how much expense of this project
where we can buy this component
Total expense should be less than 25$. You can get the components in your local hardware store
i badly want to know the kind of solenoid valve you used, its name, brand, and place of purchase, i am confused to what solenoid valve I'm gonna use. please help. is this valve applicable when the water has pressure? i really need the answer ASAP pleeeeeeaaaaasssse
You can use any common 12V solenoid. Yes these bigger solenoid should with stand the normal household pressure
When Vin is connected to Soledoid valve and then Mosfet Drain pin is connected to the other side. When the sensor detect objet it give only 0.03 volts.Please can you tell me the reason.All resistor were correct
In your pictures you have used only one resistor but in the circuit diagram there are two resistors being used. I am confused if I have to use two resistors or one?
Hi! I am trying to make this project. Is there any way to get rid off the delay and if there is can u give me the code
Can you name a sensor which can detect the glass, so that the water stop automatically
They said water pump is more convinient on just using solenoid ?
Thanks for this guide! I followed all the steps so far, but when I tried to program the Arduino, the code gave me an error of "exit status 1, expected constructor, destructor, or type conversion before '(' token". How can I fix this?
Actually, it looks like there are more errors than that. Any chance someone could send me a working .txt file of the code?
Please send me Circuit diagram for this Project, in hand drawing. Thank you
why is that distance is divided by 20000? ...usually we divide by 2
what are the software requirements of this project
Please help me am working on the same project and it is not working even the ultrasonic sensors are not detecting please help
My class is currently working this project, but for some reason, our arduinos are getting burnt out when we connect power, does anyone no why this could be happening? and if so, how to fix it
Hallo james, I'm doing this for my final year project.. would you mind sharing with me the full code you guys are using.. thanks
want to make this project.i bought solenoid valve with 12V & 0.5 AMP .will it work ? if yes please mention suitable dc adaptor for powering solenoid ?
can i use 12 volt 1.5 amp adaptor ?
what pump should i use insted of solenoid for ling lasting?
Pls. guide how to burn these codes to Atmega8A-PU controller & also use this Chip actually in PCB. Will we need to use Crystal & tact switch with Atmega8A in PCB?

It's a wonderful, clever project. But I was thinking that when we remove the glass, it'll take some time for this signal to close the solenoid valve. Thereby, throwing out some water when glass is removed. Wouldn't it?