
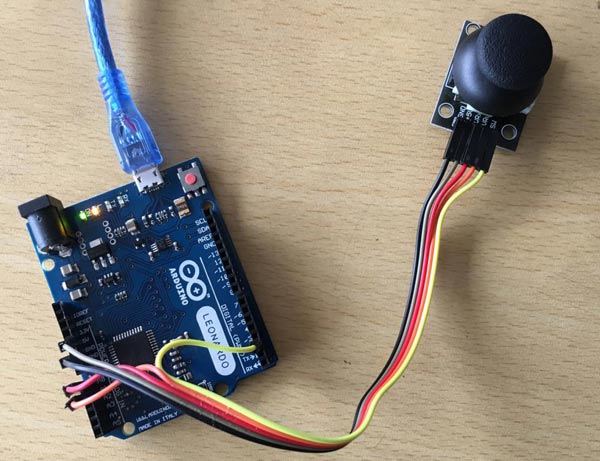
We previously interfaced Joystick with Arduino UNO to understand how it works and controlled four LEDs on its left, right, up and down movement. In this project we will use the same Joystick as Gamepad or game controller to play any computer games which requires left, right, up and down movements. To play games which requies more control options, two or more joysticks can be used. Here we will use Arduino Leonardo to interface Joystick as Game controller. Arduino Leonardo has advantage over Uno that we can install USB drivers on it and it can be detected as mouse, keyboard or joystick by computer when connected.
Components Required
- Arduino Leonardo
- Dual Axis XY Joystick Module
- Arduino IDE
- Connecting wires
Arduino Leonardo
For this project we are using the Arduino Leonardo, it is a microcontroller board based on the ATmega32u4. It has 20 digital input/output pins (out of which 7 can be used as PWM outputs and 12 as Analog inputs), a 16 MHz crystal oscillator, a micro USB connection, a power jack, an ICSP header and a reset button. It contains everything needed to support the microcontroller; simply connect it to a computer with a USB cable or power it with a AC-to-DC adapter or battery to get started.
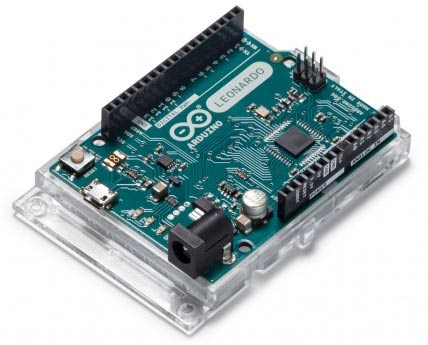
The Leonardo is different from all preceding boards in that the ATmega32u4 has built-in USB communication, eliminating the need for a secondary processor. This allows the Leonardo to appear to a connected computer as a mouse and keyboard, in addition to a virtual (CDC) serial / COM port.
Technical Specifications
| Microcontroller | ATmega32u4 |
| Operating Voltage | 5V |
| Input Voltage (Recommended) | 7-12V |
| Input Voltage (limits) | 6-20V |
| Digital I/O Pins | 20 |
| PWM Channels | 7 |
| Analog Input Channels | 12 |
| DC Current per I/O Pin | 40 mA |
| DC Current for 3.3V Pin | 50 mA |
| Flash Memory | 32 KB (ATmega32u4) of which 4 KB used by bootloader |
| SRAM | 2.5 KB (ATmega32u4) |
| EEPROM | 1 KB (ATmega32u4) |
| Clock Speed | 16 MHz |
| Length | 68.6 mm |
| Width | 53.3 mm |
| Weight | 20 g |
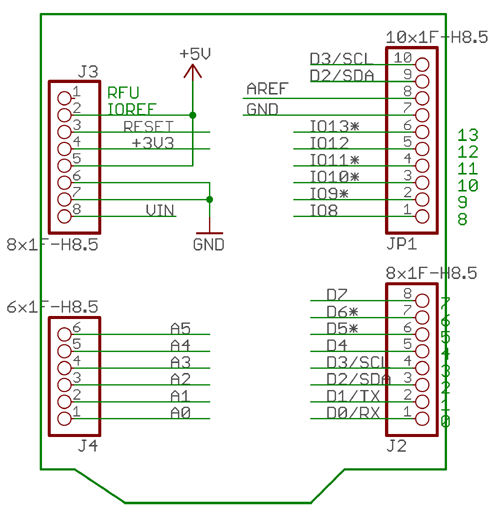
PIN Out Reference
Dual Axis XY Joystick Module
Joysticks are available in different shapes and sizes. A typical Joystick module is shown in the figure below. This Joystick module typically provides Analog Outputs and the output voltages provided by this module keep changing according to the direction in which we move it. And we can get the direction of movement by interpreting these voltage changes using some microcontroller. Previously we interfaced joy stick with different microcontrollers:
- Interfacing Joystick with Arduino
- Interfacing Joystick with Raspberry Pi
- Interfacing Joystick with PIC Microcontroller
- Joystick Interfacing with AVR Microcontroller
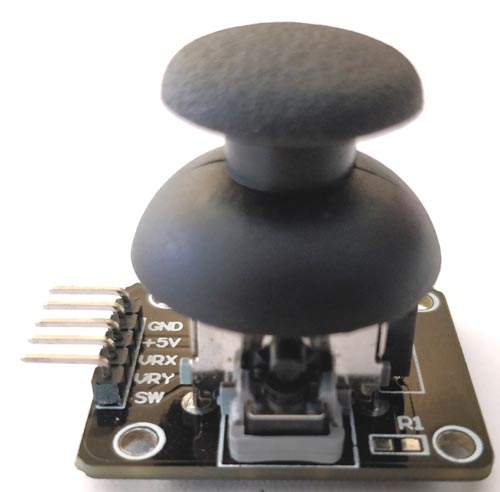
This joystick module has two axes as you can see. They are X-axis and Y-axis. Each axis of JOY STICK is mounted to a potentiometer or pot. The mid points of these pots are driven out as Rx and Ry. So Rx and Ry are variable points to these pots. When the Joystick is in standby, Rx and Ry act as voltage divider.
When joystick is moved along the horizontal axis, the voltage at Rx pin changes. Similarly, when it is moved along the vertical axis, the voltage at Ry pin changes. So we have four directions of Joystick on two ADC outputs. When the stick is moved, the voltage on each pin goes high or low depending on direction.
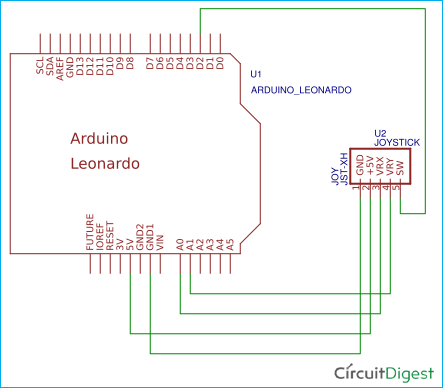
Circuit Diagram
This Arduino Joystick Game Controller requires connections between the Arduino and the Joystick as follows:

Code and Working Explanation
Complete code with a demo video is given at the end; here we are explaining few important part of it.
Firstly, we need to initialize the keyboard library
#include<Keyboard.h>
Next in below code, we have initialised X and Y axis of the Joystick module for Analog pin A0 and A1 respectively.
const int X_pin and const int Y_pin respectively
The analog value of the VRX pin is read and if the value is 1023 then the command for “up” is given and if the value is 0 then the command for “down” is given.
Similarly, the analog value of the VRY pin is read and if the value is 1023 then the command for “right” is given and if the value is 0 then the command for “left” is given.
Joystick also has a push button on top so this button (SW) is also read and if the button is pressed the value will be 0 then the command for “enter” is given.
Finally burn the code into Arduino and connect the Arduino with computer.
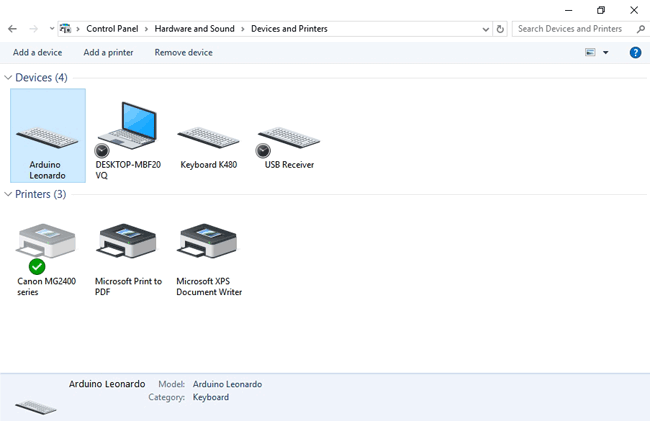
Next check the ‘Devices and Printers’ in your control panel, you will be able to see “Arduino Leonardo” under devices section as shown in below image. Now you are ready to play with the joystick.
We can control the any game controls using this Joystick. The Joystick has two potentiometers inside it, one is for X-axis movement and another is for Y-axis movement. Each potentiometer gets 5v from the Arduino. So as we move the joystick, the voltage value will change and the analog value at Analog pins A0 and A1 will also change. So the joystick will act as a gamepad.
So this is how a normal Joystick can be converted into a Game Controller using Arduino Leonardo and can be used to play games having all the controls to move left, right, up and down. As told earliar more than one Joystick can be interfaced to get more controls other than these basic four functions.
Complete Project Code
#include<Keyboard.h>
const int SW_pin = 2; // digital pin connected to switch output
const int X_pin = A0; // analog pin connected to X output
const int Y_pin = A1; // analog pin connected to Y output
int x, y;
void setup()
{
  pinMode(SW_pin, INPUT); // SW pin set as input
  digitalWrite(SW_pin, HIGH); // A high value is written to SW pin
  Serial.begin(115200);
  Keyboard.begin();
}
void loop()
{
  x = analogRead(X_pin); // output of X_pin is read
  if (x == 1023) // check whether the value of x = 1023
  {
    Serial.println("Up:");
    Keyboard.press(218); // key moves up
  }
  else
  {
    Keyboard.release(218);  // release the key
  }
  x = analogRead(X_pin);  // output of X_pin is read
  if (x == 0) // check whether the value of x = 0
  {
    Serial.println("Down:");
    Keyboard.press(217); // key moves down
  }
  else
  {
    Keyboard.release(217);  // release the key
  }
  y = analogRead(Y_pin);  // output of Y_pin is read
    if (y == 1023) // check whether the value of  y = 1023
    {
      Serial.println("Right:");
      Keyboard.press(216); // key moves right
    }
    else
    {
     Keyboard.release(216);  // release the key
    }
  y = analogRead(Y_pin); // output of Y_pin is read
    if (y == 0) // check whether the value of y = 0
    {
      Serial.println("Left:");
      Keyboard.press(215); // key moves left
  }
  else
  {
    Keyboard.release(215);  // release the key
  }
  int z = digitalRead(SW_pin); // read the value of SW pin
    if (z == 0) //check whether the value of z = 0
    {
      Serial.println("Enter:");
      Keyboard.println(); //enter key is pressed
   }
  delay(500);
}
Comments
Should be a library problem
The Arduino has a debug console for a reason, as you can see the console itself says
'Keyboard' not found. Does your sketch include the line '#include <Keyboard.h>'?
So what is your answer for that?
It showing same for me and i
It showing same for me and i have included '#include <Keyboard.h>'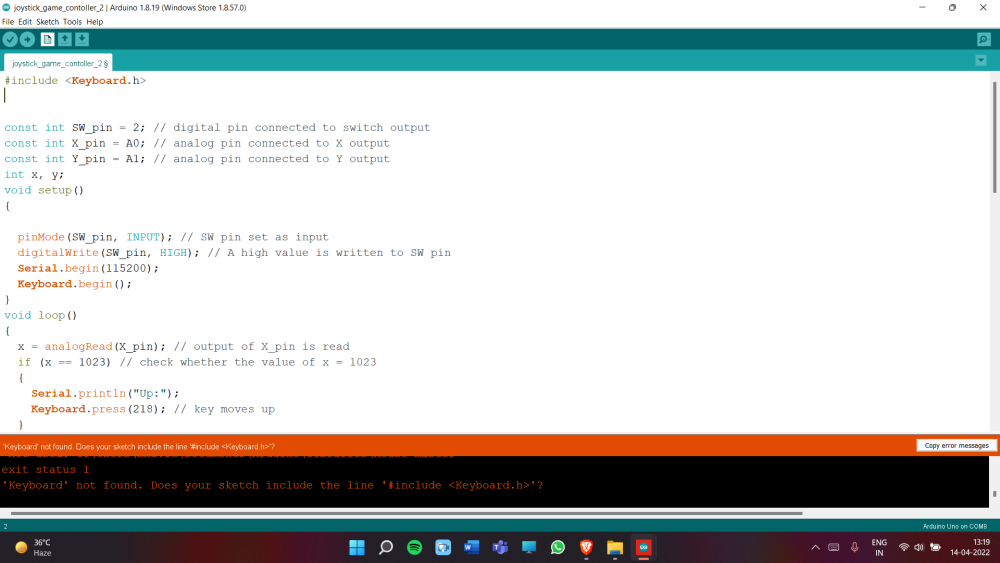
Also, I have the exact same…
Also, I have the exact same problem
How do you use an analog…
How do you use an analog input? I'm making a mixture control slider for MSFS2020 and I want it to be controlled via a slide potentiometer

Arduino: 1.8.13 (Windows Store 1.8.42.0) (Windows 10), Board: "Arduino Uno"
In file included from C:\Users\abhinanth\Desktop\sketch_oct22a\sketch_oct22a.ino:1:0:
C:\Program Files\WindowsApps\ArduinoLLC.ArduinoIDE_1.8.42.0_x86__mdqgnx93n4wtt\libraries\Keyboard\src/Keyboard.h:29:2: warning: #warning "Using legacy HID core (non pluggable)" [-Wcpp]
#warning "Using legacy HID core (non pluggable)"
^~~~~~~
C:\Users\abhinanth\Desktop\sketch_oct22a\sketch_oct22a.ino: In function 'void setup()':
sketch_oct22a:12:3: error: 'Keyboard' not found. Does your sketch include the line '#include <Keyboard.h>'?
Keyboard.begin();
^~~~~~~~
C:\Users\abhinanth\Desktop\sketch_oct22a\sketch_oct22a.ino: In function 'void loop()':
sketch_oct22a:20:5: error: 'Keyboard' not found. Does your sketch include the line '#include <Keyboard.h>'?
Keyboard.press(218); // key moves up
^~~~~~~~
sketch_oct22a:24:5: error: 'Keyboard' not found. Does your sketch include the line '#include <Keyboard.h>'?
Keyboard.release(218); // release the key
^~~~~~~~
sketch_oct22a:31:5: error: 'Keyboard' not found. Does your sketch include the line '#include <Keyboard.h>'?
Keyboard.press(217); // key moves down
^~~~~~~~
sketch_oct22a:35:5: error: 'Keyboard' not found. Does your sketch include the line '#include <Keyboard.h>'?
Keyboard.release(217); // release the key
^~~~~~~~
sketch_oct22a:42:7: error: 'Keyboard' not found. Does your sketch include the line '#include <Keyboard.h>'?
Keyboard.press(216); // key moves right
^~~~~~~~
sketch_oct22a:46:6: error: 'Keyboard' not found. Does your sketch include the line '#include <Keyboard.h>'?
Keyboard.release(216); // release the key
^~~~~~~~
sketch_oct22a:53:7: error: 'Keyboard' not found. Does your sketch include the line '#include <Keyboard.h>'?
Keyboard.press(215); // key moves left
^~~~~~~~
sketch_oct22a:58:5: error: 'Keyboard' not found. Does your sketch include the line '#include <Keyboard.h>'?
Keyboard.release(215); // release the key
^~~~~~~~
exit status 1
'Keyboard' not found. Does your sketch include the line '#include <Keyboard.h>'?
This report would have more information with
"Show verbose output during compilation"
option enabled in File -> Preferences.