

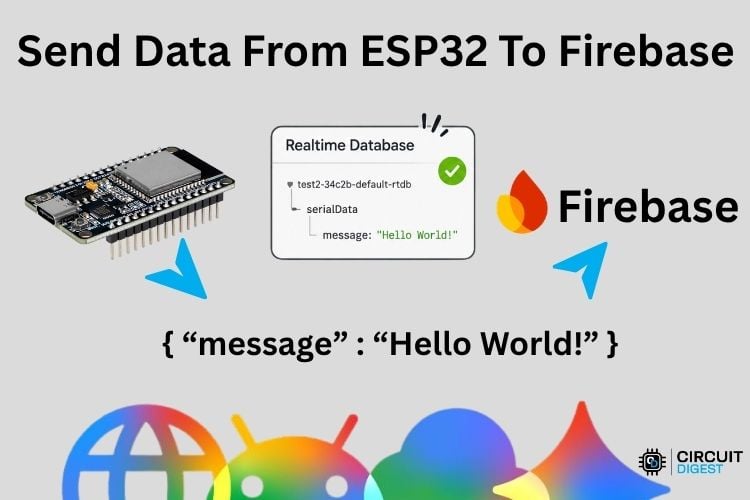
In this tutorial, we’re going to learn how to send data from an ESP32 to Firebase Realtime Database. We are using ESP32 Firebase Google as our cloud platform. A lot of cloud-based IoT projects on YouTube / GitHub / similar platforms using ESP32, ESP8266, UNO R4, or similar microcontrollers use Firebase as the cloud platform. And this guide covers the complete ESP32 Firebase tutorial workflow from project creation to live data streaming. Here is our list of ESP32 based projects for your reference. Talking about Firebase, an ESP32 Firebase database project can be created in minutes. You just need two credentials: the database URL and the Web API key. No need to configure any servers, virtual machines, API gateways or Databases. As easy as that. Also, the ESP32 Firebase library we're using here, the Firebase ESP Client library we’re going to use here, is heavily maintained, updated constantly, and has thousands of stars on GitHub. First, let’s learn how to set up Google Firebase ESP32 properly.
Quick Reference: What You Need for ESP32 Firebase Setup
| Requirement | Where to Find It | Used For |
| Database URL | Realtime Database > Data tab | Connecting ESP32 to the correct RTDB instance |
| Web API Key | Settings > General > Web App | Authenticating the ESP32 with Firebase |
| Anonymous Authentication | Authentication > Sign-in method | Letting ESP32 connect without login credentials |
| Security Rules (read/write: true) | Realtime Database > Rules tab | Allowing the ESP32 to write data to RTDB |
| Firebase_ESP_Client Library | Arduino IDE Library Manager (by Mobizt) | Handling all Firebase communication in code |
Table of Contents
ESP32 Firebase Setup: Creating Your Realtime Database
Let's take a look at the procedures to set up your Firebase properly.
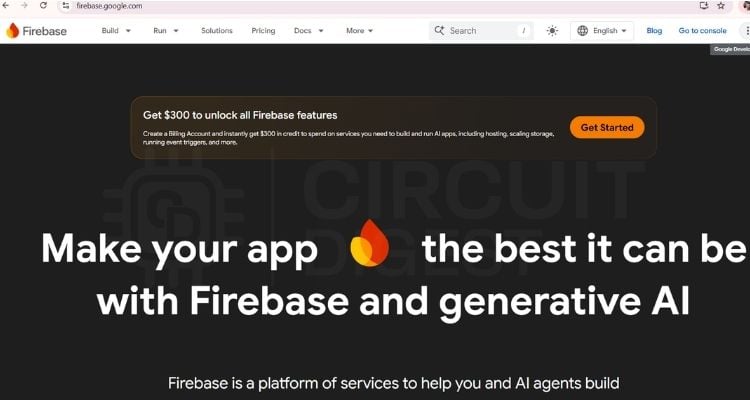
When logged in, this will be the first screen we are greeted with. Firebase gets frequent updates, so this is their new welcome window. Let’s explore the next steps.
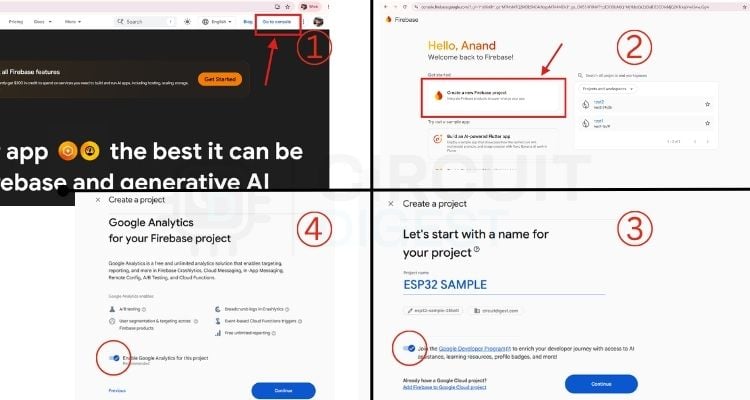
As highlighted in the image, first, we need to go to the Firebase console by clicking the highlighted option. Then let’s create a new Firebase project, give it a name and click Create. It's optional if you need to turn on the “Join Google Developer Program” and “Enable Google Analytics". I prefer to turn them off, as that’s not going to affect what we are going to do in this ESP32 Firebase real-time database tutorial.
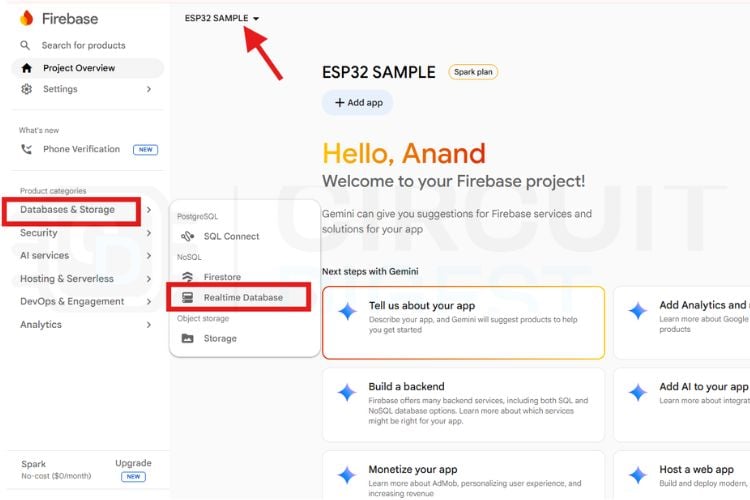
Once that project is created, you'll have a window like this. Here, by clicking the top drop-down menu, you can check into other projects. Right now, we are inside the newly created project. Now, let’s create a Real-Time Database (RTDB) for our project. For this, from the left menu bar, go to Database & Storage > Realtime Database. Let’s see the next steps below.
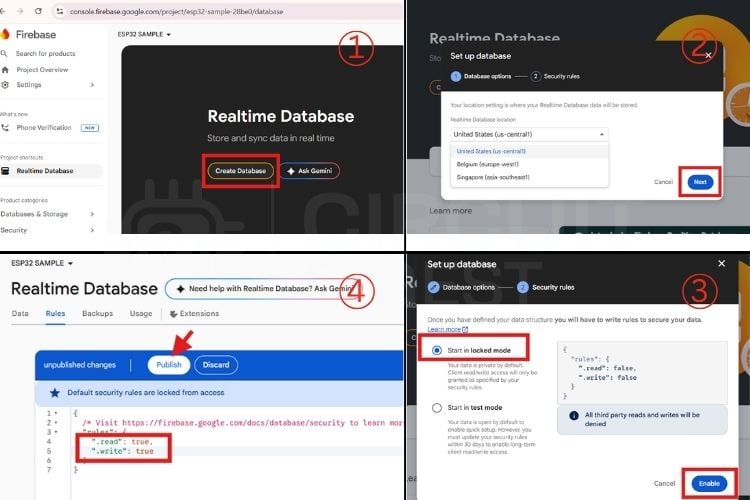
As highlighted, you need to click on Create Database, then pick a location of your choice, then in security rules, choose “Start in locked mode”. If you take a look at the code snippet, you can see that the read and write are disabled in this mode, which we’ll edit in the next step. Now, let’s click Enable and complete the Database creation. Once that’s done, go to Rules, which appear on top of the window, edit the read and write from false to true and hit Publish. Now our ESP32 will have read and write permission to our RTDB.
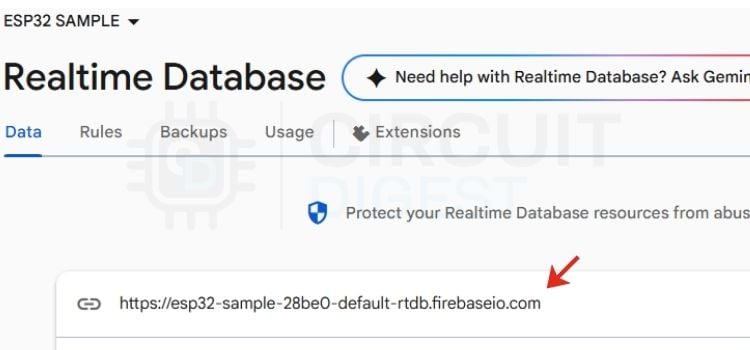
From the Data tab, copy the Database URL that appears at the top. This URL will be used in our ESP32 code to send data to it. This URL can be pasted directly into our code where it asks for the Database URL.
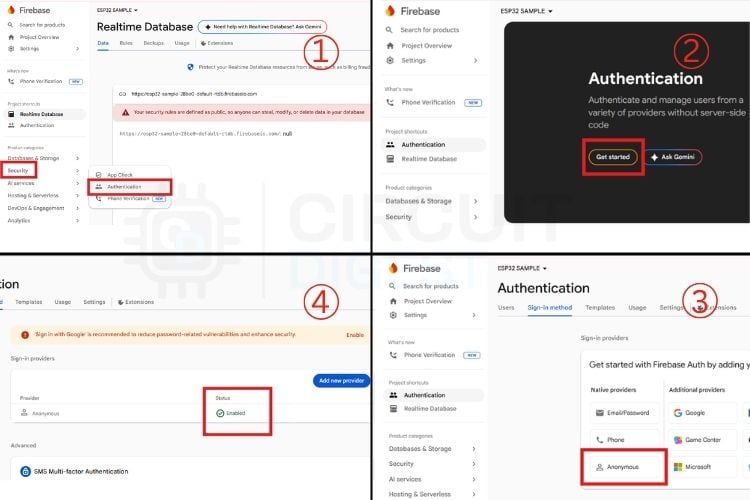
Now, let's configure Authentication so that ESP32 can flawlessly communicate with our RTDB without getting blocked. For this, from the sidebar menu, go to Security > Authentication > Get started. From the list of Sign-in methods, pick Anonymous. Anonymous allows ESP32 to communicate without any user ID or password, which is the most convenient for us now. You can change it according to your requirements. When saved, you should see the status as Enabled for Anonymous.
From previous steps, we already got the Database URL, that need s to be pasted in our ESP32 code. Now we need one more credential from Firebase, which is the API KEY. Let’s see how to get the API KEY for our project.
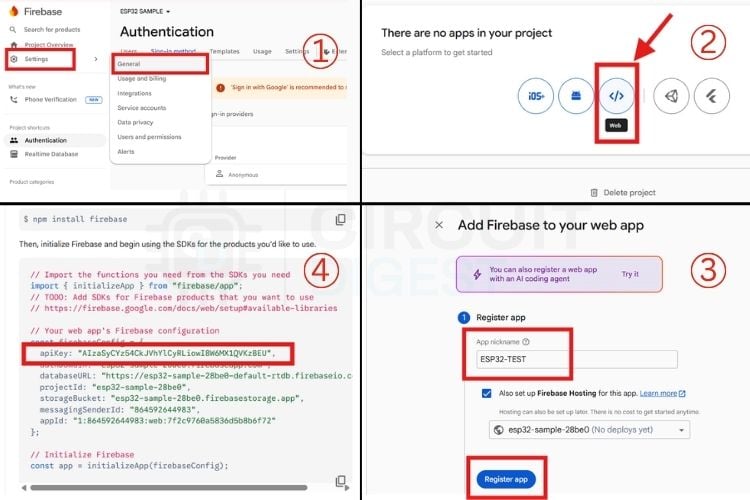
For the API Key, first, let's go to Settings > General, scroll down and create a web app > give it a name > Register App. No need to go to the next steps; just close the window now. It will redirect us back to the previous page. Scroll down and copy the API Key from the code snippet. This API Key will be pasted into our ESP32 Code. Now that we have the Database URL and API Key, let’s take a look at the Hardware setup.
ESP32 Hardware Setup for Firebase Connection
Here's the hardware setup used for this ESP32 Firebase tutorial.
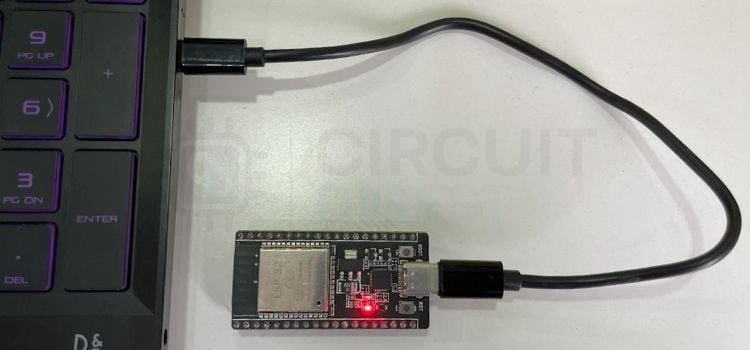
We have an ESP32 Dev Module connected to a Laptop using a data cable. Any ESP32 board will work fine; the only thing is to choose the right board and port number in the Arduino IDE. This setup didn’t have any complex circuits or components, so it’s just plug the ESP32 and upload the code. When it comes to complex circuits, we might need to design a custom PCB as well. Water Level and Water Quantity Monitoring System using ESP32 - this is our Firebase-connected project, where we have designed a custom PCB too. Now that we have the Firebase and hardware properly set up, let's take a look at the ESP32 code.
ESP32 Firebase Code Explanation (Firebase ESP Client Library)
Here's a detailed breakdown of the ESP32 Firebase code used in this tutorial.
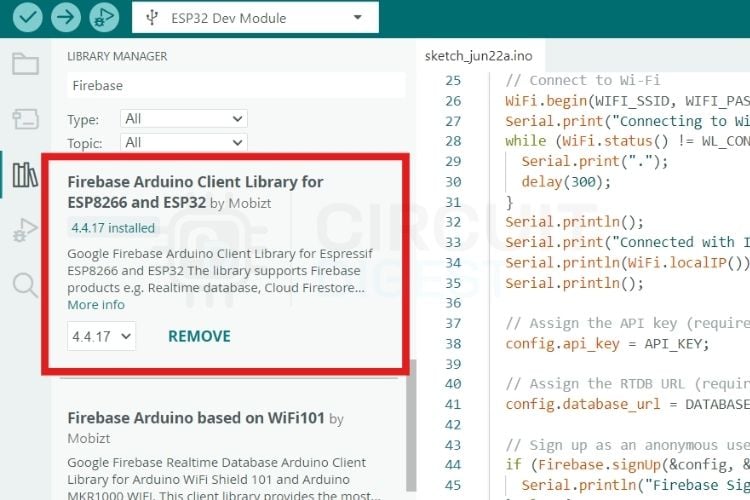
First of all, you need to install the Firebase_ESP_Client.h library for this to work. As highlighted in the image, you need to install the right library from Mobizt. Let's take a look at the sections of the code below.
ESP32 Firebase Library and Header Files
#include <WiFi.h>
#include <Firebase_ESP_Client.h>
#include "addons/TokenHelper.h"
#include "addons/RTDBHelper.h"
These are the libraries and headers required for this project. The "addons/TokenHelper.h" and "addons/RTDBHelper.h" are helper files included with the library - Firebase_ESP_Client.h. Make sure the library is installed before you upload the code.
Firebase API Key and Database URL Configuration
#define WIFI_SSID "your_ssid"
#define WIFI_PASSWORD "your_password"
#define API_KEY "your_api_key"
#define DATABASE_URL "your_database_url"
FirebaseData fbdo;
FirebaseAuth auth;
FirebaseConfig config;
These are the credentials and Firebase objects section. Replace the SSID, Password, API key, and Database URL with yours.
ESP32 Firebase setup() Function Explained
void setup() {
Serial.begin(115200);
// Connect to Wi-Fi
WiFi.begin(WIFI_SSID, WIFI_PASSWORD);
Serial.print("Connecting to Wi-Fi");
while (WiFi.status() != WL_CONNECTED) {
  Serial.print(".");
  delay(300);
}
Serial.println();
Serial.print("Connected with IP: ");
Serial.println(WiFi.localIP());
Serial.println();
// Assign the API key (required)
config.api_key = API_KEY;
// Assign the RTDB URL (required)
config.database_url = DATABASE_URL;
// Sign up as an anonymous user (easiest for testing)
if (Firebase.signUp(&config, &auth, "", "")) {
  Serial.println("Firebase SignUp Successok");
} else {
  Serial.printf("%s\n", config.signer.signupError.message.c_str());
}
// Assign the callback function for the long running token generation task
config.token_status_callback = tokenStatusCallback;
// Initialize the Firebase library
Firebase.begin(&config, &auth);
Firebase.reconnectWiFi(true);
Serial.println("--- Setup Complete ---");
Serial.println("Type something in the Serial Monitor and press Enter:");
}
This is the setup() that connects to WiFi, loads the Firebase credentials into the configuration object, initiates the Anonymous Authentication and starts the system using Firebase.begin(). All these steps are done in sequence once we power on the device.
ESP32 Firebase loop() Function Explained
void loop() {
 // Check if Firebase is ready and if there is data in the Serial Monitor
 if (Firebase.ready() && Serial.available() > 0) {

   // Read the incoming string until a newline character
   String inputData = Serial.readStringUntil('\n');
   inputData.trim(); // Remove any accidental spaces or newline characters
   if (inputData.length() > 0) {
     Serial.print("Sending to Firebase: ");
     Serial.println(inputData);
     // Send the string to the database path "/serialData/message"
     if (Firebase.RTDB.setString(&fbdo, "/serialData/message", inputData)) {
       Serial.println("Data sent successfully!");
       Serial.println("Path: " + fbdo.dataPath());
       Serial.println("Type: " + fbdo.dataType());
     } else {
       Serial.print("Failed to send data. Reason: ");
       Serial.println(fbdo.errorReason());
     }
     Serial.println("-------------------------------------");
   }
 }
}
This is the loop() that checks whether the ESP32 is successfully connected to Wi-Fi and whether its security token hasn't expired. It sends an HTTP request that pushes the text we type in the Serial Monitor to the database path "/serialData/message", which is displayed in the RTDB Data tab. Once data is transferred successfully and Firebase returns true, it displays "Data sent successfully!" in the Serial Monitor. Otherwise, it displays “Failed to send data” and the reason for that as well.
Testing the ESP32 Firebase Realtime Database Connection
Here's how to test the completed ESP32 Firebase real-time database connection.
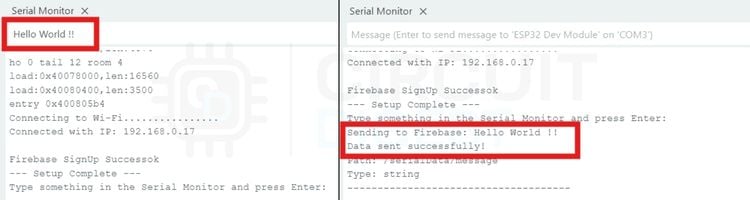
Once the code is successfully uploaded, we can test if it really works. Let’s keep the Data tab in the RTDB open so that we can visualise the data in real time. All we are going to do is, in the Serial Monitor, enter the Data that we need to send as follows and hit Enter.
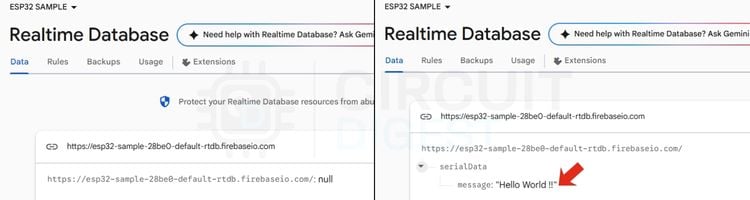
As you can see in the side-by-side image, right after I hit Enter, we can see that the data is reflected in our RTDB as well. Cool right. There you have it! You’ve successfully connected your ESP32 to the Firebase Realtime Database and sent data to it, entirely for free.
Conclusion: ESP32 to Firebase Realtime Database Made Easy
With this ESP32 Firebase tutorial, we learned how easily an ESP32 microcontroller can be integrated with the Firebase Realtime Database and send data to it as well. By bypassing complex configurations, we established a live, bidirectional connection capable of streaming data seamlessly from ESP32 to the cloud. We set up the proper authentication so that we can bypass any errors or blocks that may come in the path. From start to end, all the steps were beginner-friendly so that anyone can hook up their ESP32 to Firebase.
The possibilities are endless. You can swap out the Serial Monitor input for a temperature sensor, a motion detector, or an RFID scanner to build a fully automated IoT solution and visualise the data in a custom web page as well. Here is a tutorial from us that shows how to control an LED using the Google Firebase Console and ESP8266. If you need to swap the Serial Monitor input with some real sensor data, here is our IoT-based Garden X Soil Monitoring Device using ESP32, DHT11, MQ135 and Firebase tutorial. If you come across any errors, feel free to share them in the comments section.
ESP32 Firebase Troubleshooting: Common Errors and Fixes
| Issue | Likely Cause | Fix |
| Code fails to upload / Upload error | ESP32 not entering flashing mode, or loose data cable | Press the BOOT button when "Connecting..." appears in the Serial Monitor; check the data cable connection |
| Token error: code 400, INVALID_EMAIL / bad request | Anonymous Authentication is disabled in the Firebase console | Go to Authentication > Sign-in method > Anonymous, toggle it Enabled, and save |
| Failed to send data. Reason: Permission denied | Realtime Database security rules blocking writes | In RTDB > Rules tab, set both .read and .write to true for testing |
Firebase ESP32 GitHub
This repository provides ESP32 projects integrated with Firebase for real-time IoT communication. It includes example code for connecting ESP32 devices to Firebase services such as Realtime Database and Authentication. Designed for developers and learners, it serves as a practical reference for building cloud-connected ESP32 applications.


ESP32 Firebase Tutorial: Frequently Asked Questions
1. What is the difference between Locked Mode and Test Mode?
The difference is that Test Mode provides full unrestricted access for read and write to anyone for 30 days. After 30 days, one should set up proper security rules. With locked mode, access will have to be manually provided at the start.
2. If I set my database rules to true, why do I still need to enable Anonymous Authentication?
Yes, you will have to. The reason is that ESP32 must complete the login handshake first. If Anonymous Authentication is turned off in the console, Google blocks the handshake, and data will not be transferred.
3. Can I connect multiple ESP32s to the same Firebase database?
Yes, you can have multiple ESP32s reading or writing to different paths in the database.
Explore More IoT Projects
Discover practical IoT applications featuring ESP8266/NodeMCU, cloud integration, and smart automation. These projects include temperature data logging, smart home automation, and automated farming solutions, offering hands-on examples to help you build reliable, connected IoT systems.
Log Temperature Sensor Data to Google Sheet using NodeMCU ESP8266
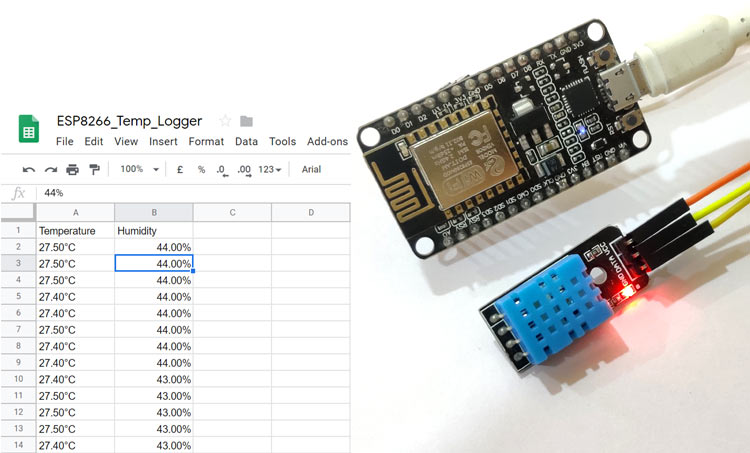
Today we will do a similar project and use the Google Sheet as an IoT cloud to log the data generated by a Temperature Sensor. Here we will use the ESP8266 NodeMCU to send the temperature and humidity data from the DHT11 sensor to the Google Sheet over the internet.
Smart Phone controlled Home Appliances with Energy Meter using NodeMCU
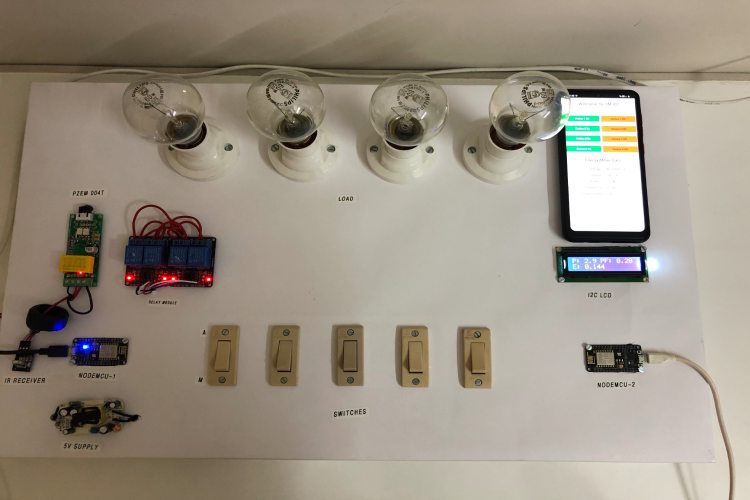
Our project is about a SMART HOME. With the advancement of technology, who doesn’t love being able to control appliances remotely? It will also allow you to have greater control of your energy use, and it provides a platform for communication between the user and the device.

My project, Advanced Automated Farm, as its name suggests, I automated the farm by using the Maixduino Development board. This project solves the major problems faced by the farmers when they are not available at the farm to maintain and have other stuff to do, so I came up with this idea.

Add a comment
No account needed. Your comment appears once a moderator has reviewed it.