

Over the years, I’ve collected a few Raspberry Pi boards, my trusty Pi 4 and even an older Pi 3 that was gathering dust in a drawer. Instead of letting them sit unused, I decided to give them a new life by turning them into something surprisingly practical: a Raspberry Pi WiFi router with built-in ad-blocking capabilities.
With the help of RaspAP’s pre-built image, I managed to transform these little boards into wireless routers that not only share the internet but also strip out ads at the network level. That means every device I connect, laptops, phones, even smart TVs, enjoys cleaner, faster browsing. And because a Raspberry Pi can run off a simple power bank, it doubles as a portable travel router, perfect for hotel stays or road trips.
Now, if you prefer the hardcore way with OpenWrt, we’ve already covered how to run it on Raspberry Pi in another guide Turn your Raspberry Pi into a WiFi Router using OpenWrt. And if you’re someone who wants to dive deeper into the world of Raspberry Pi, you’ll find plenty more hands-on Raspberry Pi projects here on CircuitDigest. This guide is just one of many experiments we’ve done, and you can always find new ways to unlock more potential from your Pi.
Table of Contents
Why I Chose RaspAP Over OpenWrt for My Raspberry Pi Wireless Router
OpenWrt is a beast; it’s robust, battle-tested, and used in enterprise-grade routers. But when it comes to Raspberry Pi as router applications, it often feels like putting racing tyres on a bicycle. You can make it work, but you’ll spend hours tweaking.

RaspAP, on the other hand, feels like it was designed for the Pi. It has a clean, modern web interface, preconfigured settings, and beginner-friendly defaults. In short, OpenWrt is for networking experts, RaspAP is for Raspberry Pi enthusiasts who want results fast. The RaspAP setup process is straightforward, and you can have a functional Raspberry Pi WiFi hotspot with Ethernet connectivity running in under 30 minutes. For additional insights on network configuration, refer to this comprehensive tutorial on configuring a Raspberry Pi to share Wi-Fi through its Ethernet port.
Required Components for Raspberry Pi WiFi Router Project
Before we begin the RaspAP setup, let's gather everything you'll need to successfully turn Raspberry Pi into WiFi router:
Understanding Raspberry Pi WiFi Connection Interfaces
One thing that often confuses beginners when learning how to connect Raspberry Pi to WiFi router setup is the different network interfaces on the Raspberry Pi. Here’s how RaspAP organises for your Raspberry Pi WiFi router project:
In my setup, I kept things simple: eth0 as the internet input, wlan0 as the output hotspot. But knowing you can add a second dongle or even tether your phone makes the Pi router far more versatile than I expected. This flexibility allows you to use your Pi as a RaspAP WiFi repeater or even a standalone portable router powered by mobile data.
Ad Blocking Capabilities
Google recently made life harder for traditional ad blockers like uBlock Origin by crippling their features in Chrome, which means YouTube ads sneak through again. But RaspAP blocks ads at the DNS level, meaning the requests for ad servers are killed before they ever reach your browser. This DNS-based approach works across all devices connected to your Raspberry Pi WiFi router, smartphones, tablets, smart TVs, and gaming consoles, without requiring individual ad blocker installations.
⇒ Step 1: Flashing the RaspAP Pre-Built Image
I started by downloading the RaspAP pre-built image from their official GitHub page. It’s based on Raspberry Pi OS Lite but already configured with RaspAP installed.
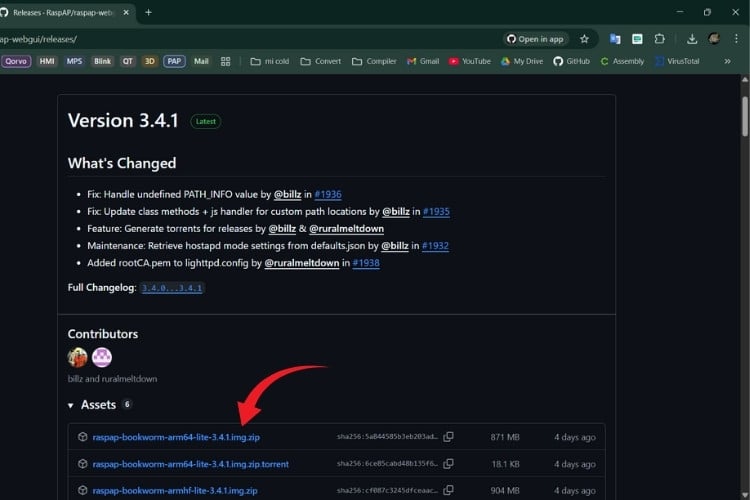
Using Raspberry Pi Imager, I selected “Use custom image,” pointed it to the file, and flashed it to a 16GB microSD card. The process took a few minutes, and then I slotted the card into my Pi 4 and powered it up.

Within a couple of minutes, a new network appeared in my PC’s Wi-Fi scan list called RaspAP. This automatic network creation is one of the major advantages of using the pre-built image; no command line configuration is needed to get started with your Raspberry Pi wireless router.
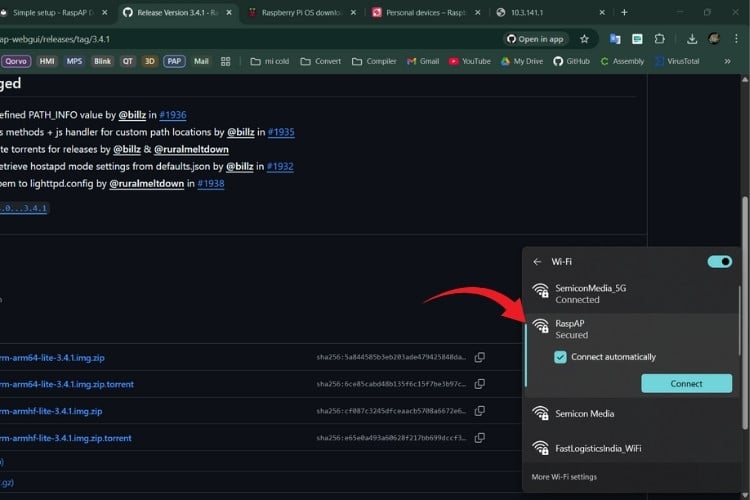
I connected to it using the default password ChangeMe, and just like that, I was connected to my brand-new Pi-powered Wi-Fi hotspot. No complex networking commands or terminal configurations required, this is what makes RaspAP ideal for those learning how to connect Raspberry Pi to WiFi router configuration.
⇒ Step 2: Accessing the RaspAP Dashboard
Once connected to the RaspAP network, I opened my browser and typed:
| http://10.3.141.1 |
This brought up the RaspAP web interface. The default login was:
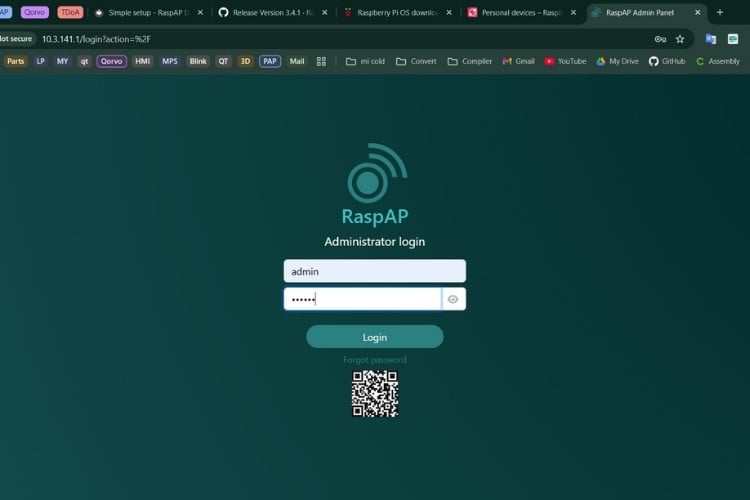
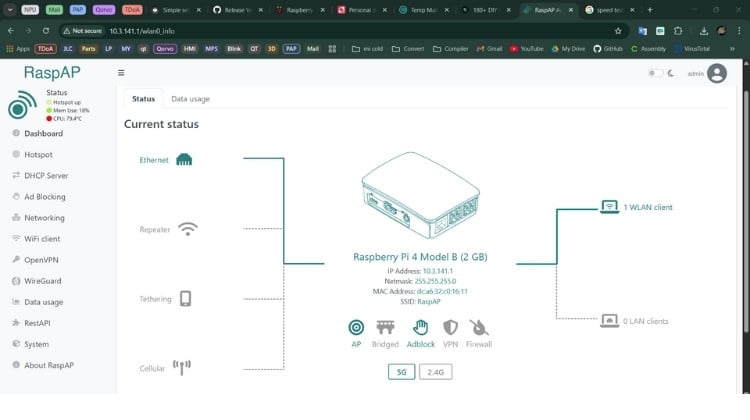
After logging in to complete the RaspAP setup, I was greeted by a sleek dashboard showing connected clients, bandwidth graphs, and hotspot controls. It honestly felt like I was using the interface of a commercial router, not a $35 single-board computer turned into a Raspberry Pi WiFi router.
⇒ Step 3: Customising Your Raspberry Pi WiFi Hotspot Settings
By default, the hotspot is named RaspAP with the password ChangeMe. That’s fine for testing, but not something you’d want to leave running; anyone who knows the defaults could connect to it.
From the Hotspot settings page in the RaspAP dashboard, I made a few important changes for my Raspberry Pi wireless router:

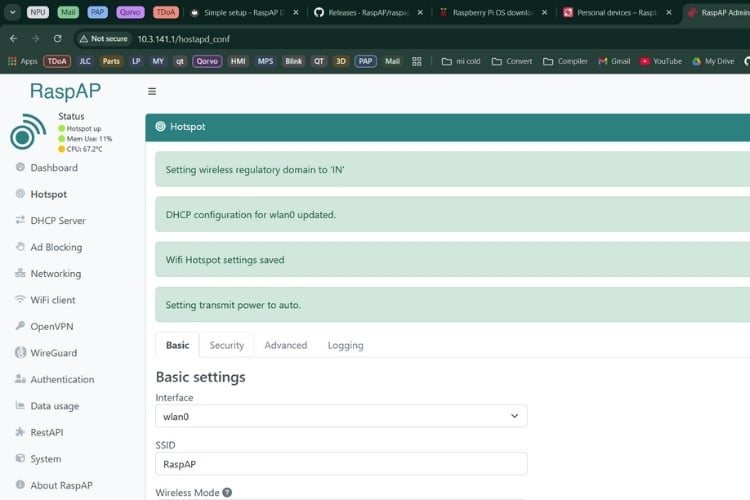
After saving the changes, RaspAP prompted me to reboot the hotspot. When the Pi came back online, my customised Wi-Fi network appeared in the scan list with the new name and settings. I reconnected with the new password, and everything worked smoothly. This completes the basic RaspAP setup for your Raspberry Pi WiFi router.

⇒ Step 4: Setting Up DNS-Based Ad Blocking
One of the best features of RaspAP for your Raspberry Pi WiFi router project is its built-in DNS-based ad blocker. Unlike browser extensions, which only block ads on a single device, this works at the network level, meaning every device that connects to your Raspberry Pi wireless router gets ad-free browsing.
Enabling Network-Wide Ad Blocking
To activate ad blocking on your Raspberry Pi WiFi router, follow these steps:
- Log in to the RaspAP dashboard at http://10.3.141.1.
- From the left-hand menu, go to Ad Blocking.
- Toggle the switch to Enable Blocklists.
- Select a DNS blocklist Provider (the default works well, but you can add more if you want stronger filtering).
- Save the settings and reboot the Pi.

After the reboot (which takes approximately 30-45 seconds), your Raspberry Pi WiFi router will act as both a router and a network-wide ad filter, blocking advertisements, tracking scripts, and malicious domains before they reach any connected device.
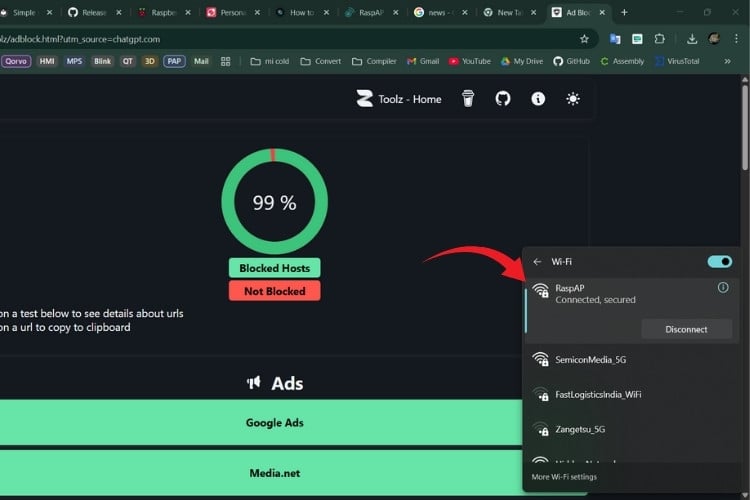
Testing the Ad Blocker
To confirm that the ad blocking is working properly on your Raspberry Pi wireless router, I performed several tests:

Real-World Performance Testing: Raspberry Pi WiFi Router Speed Analysis
After completing the RaspAP setup, I wanted to benchmark how fast my Raspberry Pi WiFi router really performed compared to commercial routers. Here’s what I measured:
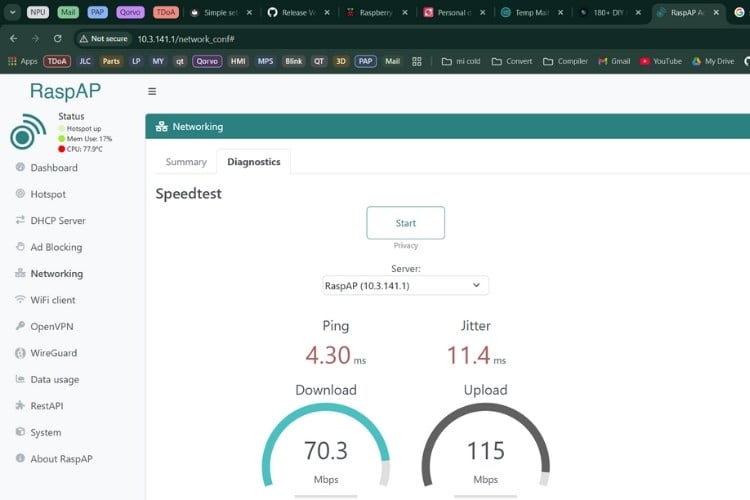
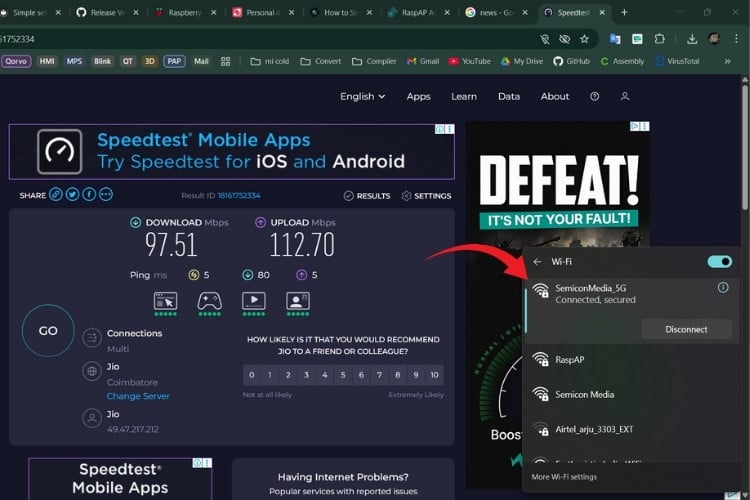
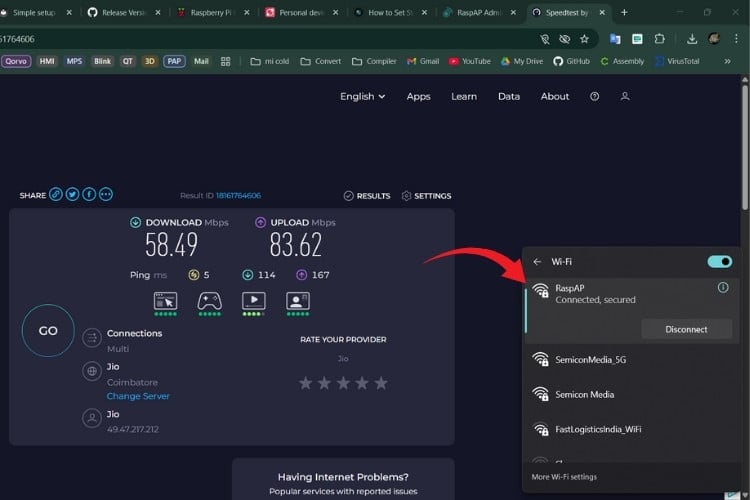
Not blazing fast compared to high-end WiFi 6 routers, but impressive considering this Raspberry Pi wireless router was running on a board the size of a credit card, with built-in ad blocking, and costing a fraction of commercial alternatives.
Advanced Features: Beyond Basic Routing
The more I explored the RaspAP dashboard, the more I realised my Raspberry Pi WiFi router wasn’t just a simple hotspot manager; it had a full set of features you’d normally expect from a commercial router. Here are some of the highlights I tested:
→ VPN Support for Secure Connections: RaspAP integrates with both OpenVPN and WireGuard, letting you route all network traffic through a VPN server. This is useful if you want to secure devices that don’t natively support VPNs, like smart TVs or IoT gadgets. For travel, this feature is especially handy; you can connect your Pi to hotel Wi-Fi and automatically tunnel all your traffic through your home VPN, like smart TVs, gaming consoles, or IoT gadgets, by connecting them to your Raspberry Pi WiFi router.

For travel scenarios, this feature is especially handy: you can connect your Raspberry Pi WiFi hotspot with Ethernet to hotel Wi-Fi and automatically tunnel all your traffic through your home VPN, creating a secure network wherever you go. This transforms your Pi into a true portable RaspAP WiFi repeater with VPN capabilities
→ Bandwidth Monitoring and Traffic Analysis: The dashboard includes real-time traffic graphs and per-device usage statistics. I could instantly see which devices were using the most bandwidth on my Raspberry Pi wireless router, which is useful if your network feels slow and you suspect one device is hogging the connection.
→ Firewall & Port Forwarding Configuration: RaspAP gives you a web interface for firewall rules, making it possible to block certain devices, restrict traffic types, or expose a local service to the outside world. For example, you could configure port forwarding on your Raspberry Pi WiFi router to make your Pi's web server or home automation system accessible remotely while maintaining security.
→ Bridged vs Routed Network Modes: By default, the Pi works in routed mode, acting as a proper NAT router. But switching to bridged mode allows your Raspberry Pi WiFi router to extend an existing network without creating a new subnet. This flexibility means you can choose between a fully independent Pi-based router or a transparent RaspAP WiFi repeater, depending on your specific networking needs.
What impressed me most was how scalable this Raspberry Pi WiFi router project feels. For a small home lab, a travel router, or even a secondary network at home, RaspAP offers enough features to experiment with advanced networking while still being beginner-friendly.
How to Connect Raspberry Pi to WiFi Router via Command Line
While RaspAP provides an excellent web interface, you may occasionally need to connect Raspberry Pi to WiFi command line for troubleshooting or advanced configuration. These commands are particularly useful when setting up your Raspberry Pi wireless router in headless mode (without monitor/keyboard) or when troubleshooting connectivity issues remotely via SSH.
Frequently Asked Questions About Raspberry Pi WiFi Router Setup & Troubleshooting
⇥ 1. Can I use Raspberry Pi 3 or Raspberry Pi 5 with RaspAP?
Yes. RaspAP works across Pi 3, 4, and 5. The Pi 3 is slower and best for light use, while the Pi 5 delivers speeds close to budget consumer routers.
⇥ 2. What are the default login details for RaspAP?
⇥ 3. Why don’t I see the Wi-Fi hotspot (raspi-webgui) after the first boot?
Make sure your Pi’s built-in Wi-Fi is not blocked. On some models, you may need to run:
| sudo rfkill unblock wifi |
Then reboot. If you’re using a Pi 3, check that the microSD image flashed properly.
⇥ 4. My Pi connects, but I don’t get internet on devices. What’s wrong?
Check the uplink interface (the source of the internet):
⇥ 5. How many devices can RaspAP handle at once?
It depends on your Pi model and internet source:
⇥ 6. Does RaspAP really block YouTube ads?
Yes, but not in the same way as browser extensions. Since ad-blocking happens at the DNS level, it prevents connections to known ad servers. This works on TVs, phones, and tablets too. It won’t block every single YouTube ad (since some are served from the same domains as content), but it cuts out most ads better than today’s crippled browser-based blockers.
⇥ 7. Can I replace my main home router with RaspAP?
Technically, yes, but keep expectations realistic. A Pi 4 or Pi 5 can handle small households, but for gigabit internet and 20+ devices, you’ll want a dedicated router. RaspAP is best as a travel router, learning project, or secondary network.
⇥ 8. I forgot the web dashboard password. How do I reset it?
SSH into your Pi and run:
| sudo htpasswd /etc/raspap/raspap.auth admin |
Then set a new password for the admin user.
⇥ 9. My Wi-Fi speed is slow compared to my main router. Why?
Remember, the Raspberry Pi’s Wi-Fi hardware is mid-range. For better speeds:
Use a Pi 5 with an external USB Wi-Fi dongle.
Stick to 5 GHz instead of 2.4 GHz if your devices support it.
Keep your Pi in an open space to avoid interference.
⇥ 10. Why not just use OpenWrt instead of RaspAP?
You can, but OpenWrt on Pi requires more manual tweaking and isn’t as beginner-friendly. RaspAP is built specifically for Raspberry Pi, with plug-and-play defaults, a modern dashboard, and extras like built-in ad-blocking.
Conclusion: Breathing New Life Into Your Raspberry Pi
By the end of this project, my Raspberry Pi wifi router project had gone from sitting idle on my desk to running as a mini router with DNS-based ad blocking, and even VPN support. All of this came together with very little effort thanks to the RaspAP pre-built image, which saved me from complicated manual configurations.
OpenWrt indeed remains the heavyweight option for dedicated routers, especially for advanced networking scenarios. But when it comes to Raspberry Pi as router applications, RaspAP delivers the perfect middle ground, powerful enough to give you features like WireGuard, bandwidth monitoring, and ad-blocking, yet simple enough to set up in under an hour.
For me, this Raspberry Pi wireless router project wasn’t just about speed or features; it was about breathing new life into old Pi boards and turning them into something useful again. Whether as a home lab experiment, a portable travel router, or a secondary Wi-Fi network, the RaspAP WiFi repeater makes the Raspberry Pi shine in a whole new role.
If you’re a hobbyist, a student learning networking, or simply someone curious about pushing your Pi further, this Raspberry Pi wifi router project is rewarding, practical, and a great way to explore the potential of open-source tools on affordable hardware
Projects using Raspberry Pi
Previously, we have used Raspberry Pi to build many interesting projects. If you want to know more about those topics, links are given below.

How to Install Windows 11 on Raspberry Pi Devices
Learn how to install Windows 11 on Raspberry Pi 4 and Pi 5. Step-by-step tutorial with WoR setup, UEFI configuration, and performance tips for 2025.

How to Boot Raspberry Pi from USB without SD Card
Learn how to boot a Raspberry Pi from USB without using an SD card. This step-by-step guide covers Raspberry Pi 3, 4, and 5 models, helping you improve system reliability and performance.

How to Set a Static IP on Raspberry Pi?
Learn how to set a static IP on Raspberry Pi using NetworkManager (nmcli) and GUI methods. Complete step-by-step guide for Raspberry Pi OS Bookworm with screenshots and troubleshooting tips.
Great explanation about earthing systems. SG Power is one of the best companies for premium-quality grounding solutions and is known as a reliable Earthing Rods Manufacturer & Supplier in India.
Very informative post regarding heavy duty earth pit covers. Choosing the right Heavy Duty Earth Pit Cover Manufacturer & Supplier in India helps improve electrical safety and grounding performance.

Newbie here, if I add a USB Wifi adapter, are there any additional instructions/settings that I need to do? Please advise and thank you.