

Wi-fi these days is an incredibly common technology and chances are, you’re reading this article accessing a Wi-fi somewhere near you. But every technology comes with its own set of vulnerabilities and risks, these can easily be exploited to harvest your data. In times like these when data is the new gold, what are some sure shots of making sure that your data remains with only you and not with some company wanting to taint your screen with personalized advertisements. Well, one solution to this snag could be, building your own custom router. Of course, building one from scratch might be a distant concept (for now), but thanks to the open-source and open-hardware community, we have a simple solution sitting on our workbenches, “The Raspberry Pi”. Let’s have a look at how this is possible.
OpenWrt
“OpenWrt”, which literally means “Open Wireless Router”, is an open-source Linux operating system that has been developed to target embedded developers. OpenWrt allows developers to completely customize the firmware on compatible network devices. Along with this, thanks to the open-source and customizability offered by OpenWrt, you can add functionalities like:
Native Ad-Blocking will completely block ads and make your surfing experience much more fluid.
Ability to use VPN Add-Ons to prevent your Internet Service Provider from accessing you’re your search data, DNS Requests, etc.
Firmware Updates, A lot of manufacturers often stop giving firmware updates which makes your router vulnerable to new security threats, since OpenWrt has a huge thriving community of developers, it will always have updates and you can be sure that your custom router is protected from new threats.
Since OpenWrt is a Linux-based firmware, it is immune to a lot of common attacks.
These are just a few of the plethora of features offered by OpenWrt. In this tutorial, we will be loading the OpenWrt Firmware on Raspberry Pi and configure it to use it as a router acting like a bridge between the Router provided by our ISP and our Computer.
Requirements to Make Router at Home
Raspberry Pi Module (3 series or the 4 series).
Appropriate Power Supply to the Raspberry Pi.
Ethernet LAN Cable.
Your ISPs Wifi Router.
SD Card and an SD Card Reader.
How This will work
Our primary gateway to the internet services is the Router provided by the ISP, but instead of directly connecting our devices to the router, we connect our R-Pi to this router using a LAN Cable. This Raspberry Pi loaded with the OpenWrt OS acts as an access point for all the devices that we want to connect. This tutorial will discuss in detail how to install and configure OpenWrt on your Raspberry Pi and effectively use it as your personal router.
The Process
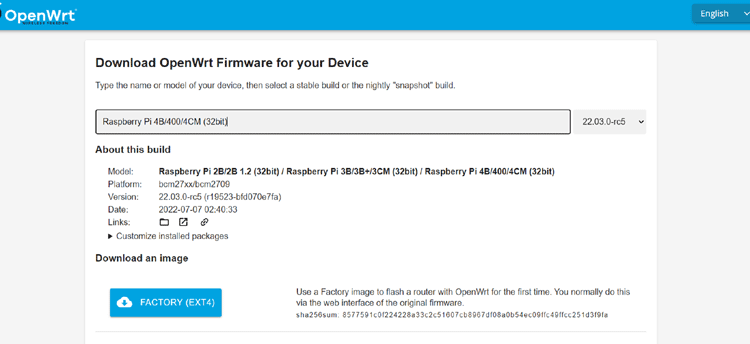
1. Let’s begin by downloading the image files of the latest stable release of OpenWrt from its official website.
Select the raspberry model that you are going to use for the project and download the EXT4 Image File (We Recommended using the Model 3 or 4 Series).
2. Once you have successfully downloaded the latest build, we will etch it onto the SD card, but for that, we will need two more utilities, namely the SD Card Formatter for cleaning your SD Card, and the Balena Etcher to write the image file onto your SD Card. Both these software can be easily downloaded from their respective sites.
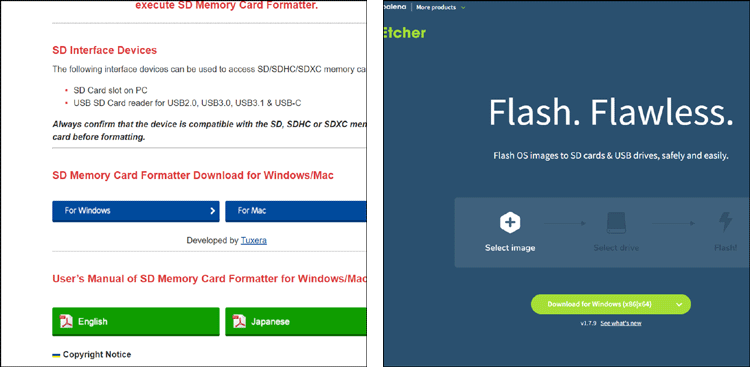
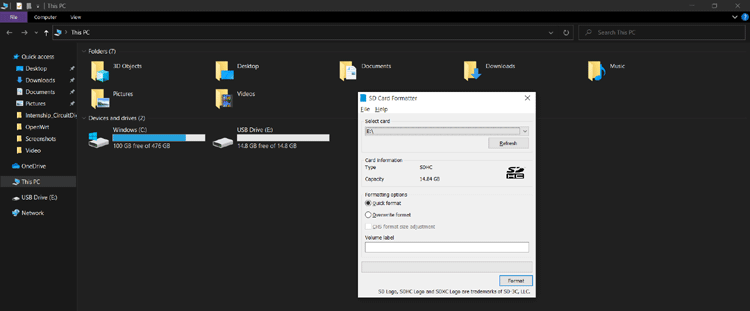
3. Once We have the software installed, plug your SD Card into the Card Reader and then into your computer system. Open the SD Card Formatter > Select the SD Drive > click on format.
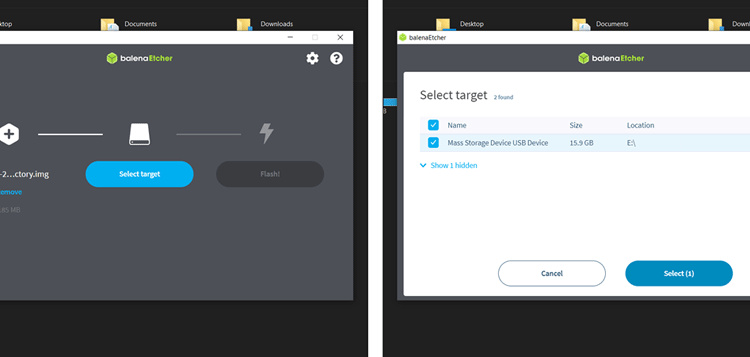
4. Open the Balena Etcher Tool and select the “Flash from file option”.

5. Select the image file that you downloaded from the OpenWrt website in Step 1.
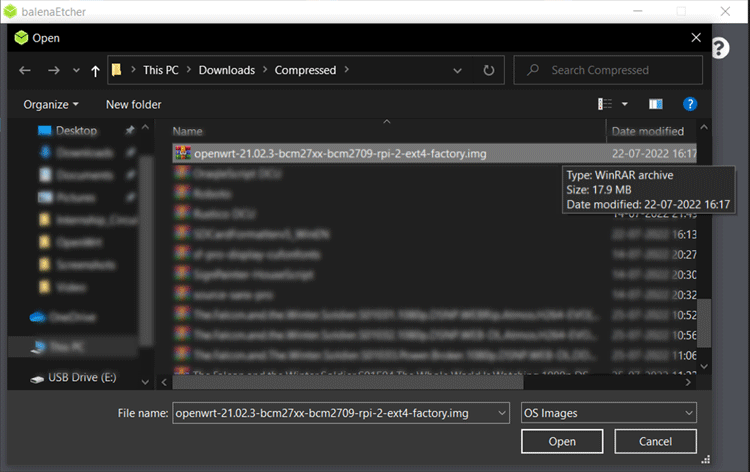
6. Click on the Select Target button and select your drive.
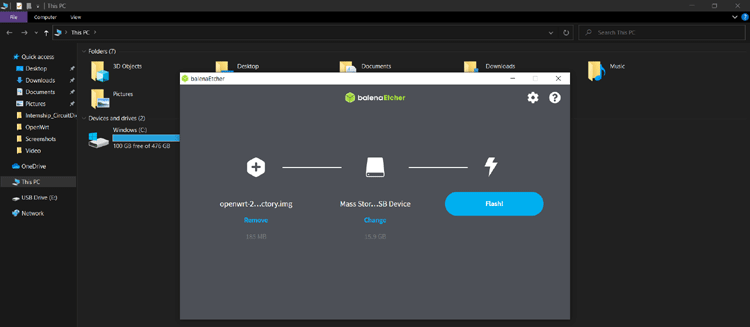
7. Click on the Flash Button and that’s it. OpenWrt will be etched on your SD card and can now be plugged into your Raspberry Pi.
8. Before booting up our Raspberry Pi, we have to determine the default gateway IP of our ISP Router. For this, connect your PC to the router’s Wi-fi and open CMD to run the following command.
Ipconfig
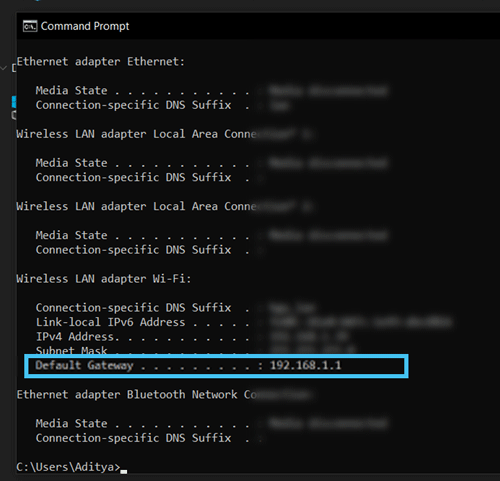
Under the wireless LAN adapter option, you will see the Default Gateway IP of your router. Note this down as it will be used later.
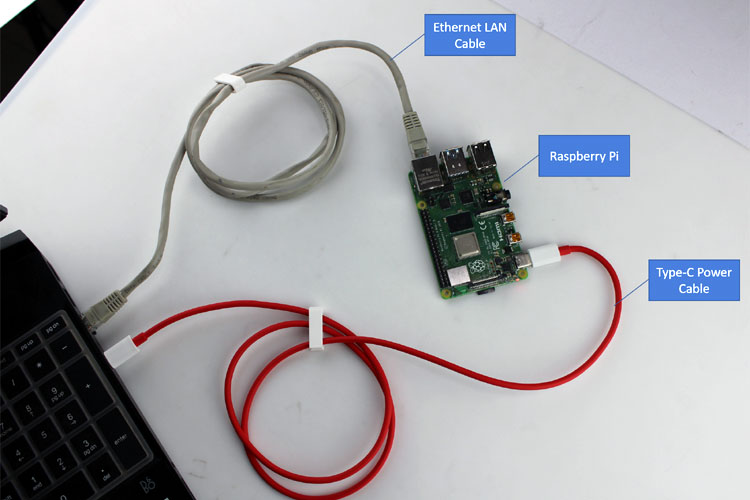
9. You now need to disconnect from your Wi-fi. Plug in your SD Card to your R-Pi and connect it to a power supply. Using an Ethernet LAN Cable, connect the R-Pi to your system.
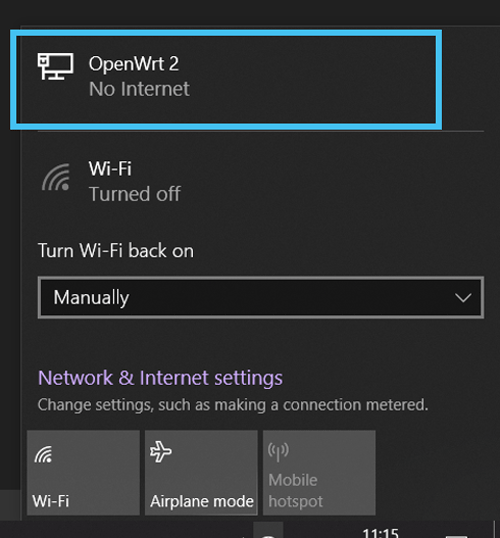
10. Once your PC is connected with the R-Pi via the LAN Cable, you will see an Ethernet Network.
11. Open Command Prompt and run the command
arp -a
This will list all the available devices in your network. Note down the IP Address of the device which has an address in the form
192.186.x.x
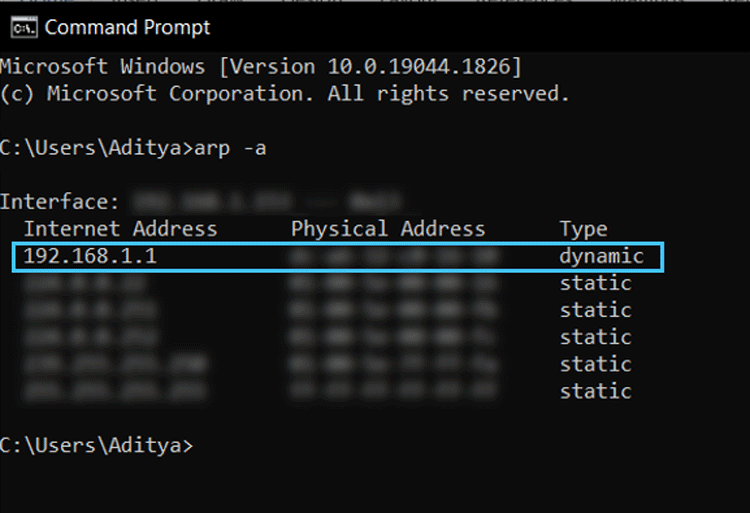
This will be our R-Pi device and we will use this IP to log into our R-Pi using SSH (Secure Shell Protocol).
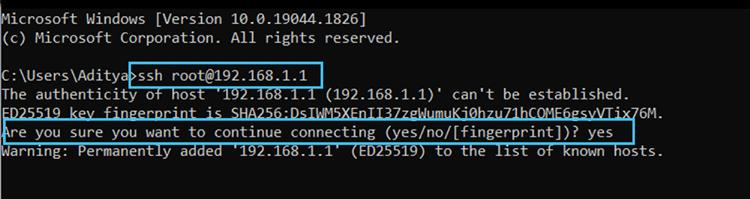
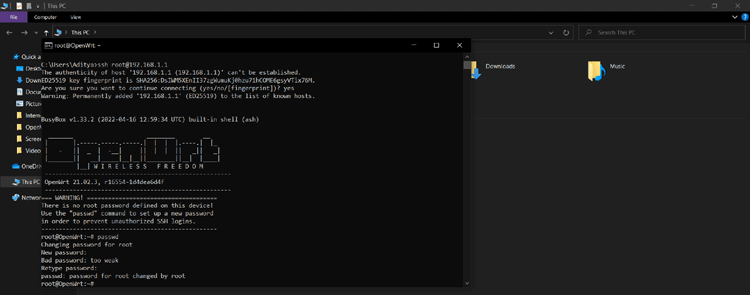
12. If you have Windows 10 and above, you can directly SSH into the R-Pi using the command
SSH [email protected]
Where root is the default username and 192.x.x is the IP. (if the prompt asks you for a password, leave it blank)
Note: CMD will prompt you if you want to continue with the connection, type yes and hit enter.
You can also use the software PuTTy to log in via SSH. Be starting an SSH client as shown in the image.
When asked for a Username enter “root” and leave the password field blank.
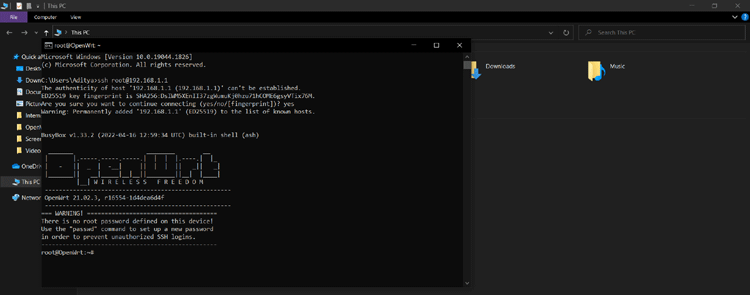
13. When you successfully log in via SSH, you will see a prompt like this which means OpenWrt has been successfully installed and booted.
14. Run the command
passwd
This will set a password for your device; this will be used only when you want to SSH into the device again or log in to the web dashboard.
15. Now we just have to edit two configuration files. Since the commonly used Linux-based text editor ‘nano’ is not available in OpenWrt, we will be using the text editor vim.
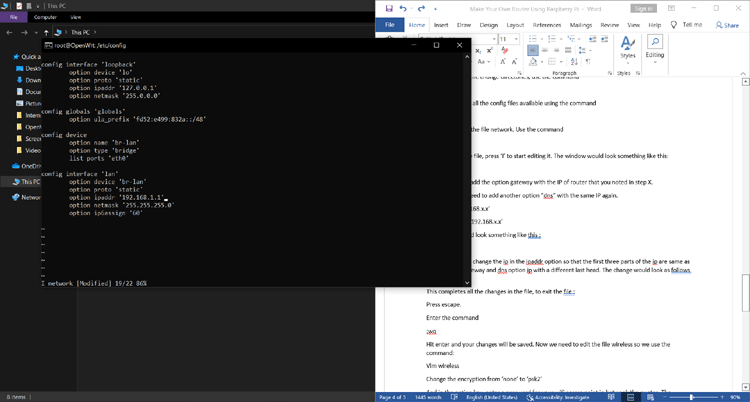
16. First, we need to change directories, use the command:
cd /etc/config
17. You can then see all the config files available using the command:
ls
18. We will first edit the file network. Use the command-
vim network
19. This will open the file, press ‘i’ on your keyboard to start editing it. The window would look something like this:
20. First, we need to add the option gateway with the IP of the router that you noted in Step 8.
Along with this, need to add another option dns with the same IP again.
option dns ‘192.168.x.x’
option gateway ‘192.168.x.x’
The change would look something like this:
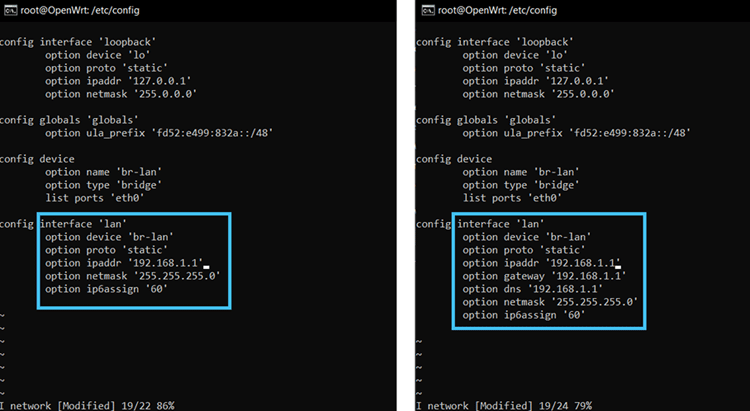
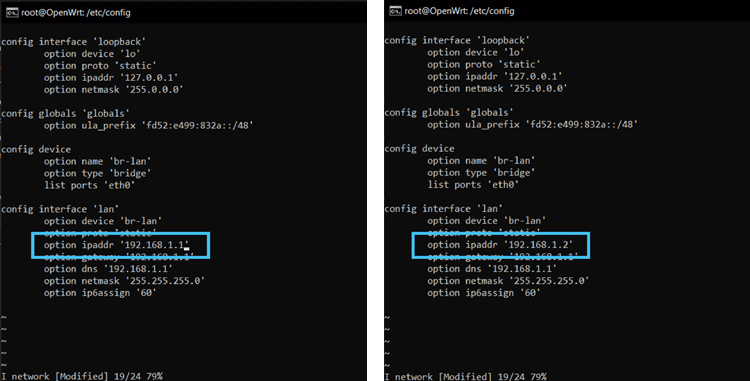
21. Now you need to change the IP in the ipaddr option so that the first three parts of the IP are the same as that of the gateway and dns option IP with a different last head. The change would look as follows:
22. This completes all the changes in the file, to exit the file:
Press ESC
Enter the command:
:wq
Hit Enter and your changes will be saved.
23. Now we need to edit the file wireless so we use the command:
vim wireless
Change the disabled option from ‘1’ to ‘0’
Change the encryption from ‘none’ to ‘psk2’
Create a new option key, and enter a password for your Wi-fi access point in between the quotes. The changes would look as follows.
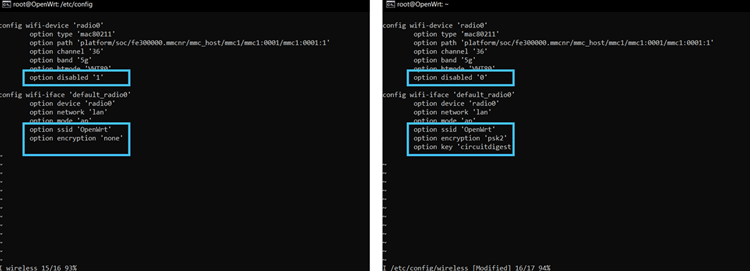
24. Follow the save and exit procedure i.e. hit ESC, and enter the command:
:wq
25. Once you hit Enter, all the required configurations are done, we just need to restart the network using the command:
reboot network /etc/init.d/network restart
26. This will close your SSH connection and restart the R-Pi. You can also unplug the Ethernet LAN cable from your PC.
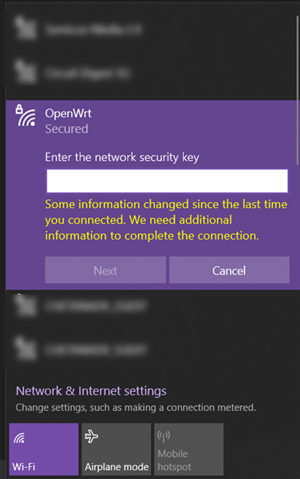
27. After the R-Pi boots, you will now be able to see the OpenWrt access point on all of your Wi-fi enabled devices nearby. You can simply connect to this by entering the key you had entered.
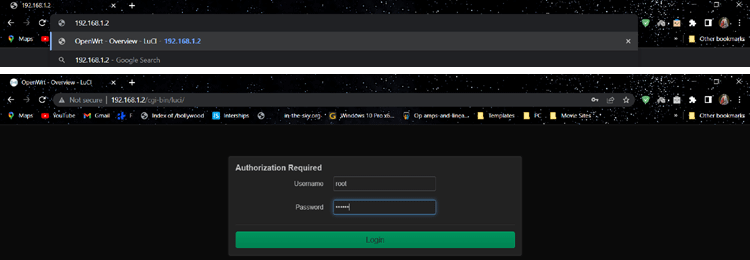
28. You can open the dashboard of OpenWrt on any browser by simply entering its IP address in the address bar of your browser. And log in after entering the username as root and the password that we set in Step 14.
29. Since the dashboard looks all set, we can now plug in one end of the ethernet cable to the ISP Router and the Other End to the R-Pi.
Reboot the R-PI by re-plugging the power supply.
You can once again see the OpenWrt access point on all Wi-fi enabled devices, this time since the R-Pi is connected to your router, you will be able to successfully access the internet with this access point.
If you’re interested in exploring an alternative approach to turning your Raspberry Pi into a Wi-Fi router—especially one that focuses on a simpler setup using RaspAP—you can also check out this detailed guide on building a Raspberry Pi Wi-Fi router with RaspAP, which walks through a different software stack and configuration method. T
his is how you can build your own router using a Raspberry Pi at home. If you have any suggestions to improve it, feel free to comment below. Also, if you face any issues while trying your hands on it, you can use our Forum to connect with our engineers.

I did the whole thing and every thing worked.
But i have a problem, the other side of the ethernet is my college campus. Which is providing internet through a security kind of thing. I am supposed to log in in to an ip address first and then access internet.
I am also able to access the login page provided by the campus lan, but even though I login I cannot access the internet. What am i supposed to do?