
You must have familiar with Voice typing, which is very commonly used in Computers and mobiles phone, where you can type any word by speaking it. Voice typing is very useful for handicapped person or for anybody who wants to type fast. So today we are implementing the same on 16x2 LCD Display, where the voice text will be displayed on LCD. Here we have used 16x2 LCD, but this setup can be installed at many places with a bigger display to broadcast any message, like at airports, malls, offices etc.
In this project we will provide the input voice using Google Voice Keyboard via a Android App (BlueTerm) and print the text on 16x2 LCD using Raspberry Pi. Here we will type the text on 16x2 LCD using wireless Bluetooth Medium and will use USB Bluetooth dongle with Raspberry Pi. So basically we need interface the 16x2 LCD with Raspberry Pi and setup the Bluetooth in Raspberry Pi to receive the data sent by Mobile phone. We already interfaced LCD with Raspberry Pi and wrote a tutorial on Bluetooth with Raspberry Pi, you can check them.
Connecting 16x2 LCD with Raspberry Pi:
Before we proceed with Bluetooth setup, first we will interface 16x2 LCD with Raspberry Pi. Here in this Project we have used an external Adafruit Library for interfacing the 16x2 LCD with Raspberry Pi, using which you don’t need to write many lines of code to drive the LCD and you can directly print on LCD by just using one line of code. However this Library is created by Adafruit but it can used for any LCD module which has HD44780 controller. If you want to connect the LCD without using any external library then you can check our previous tutorials to interface the LCD in 8-bit Mode and to interface the LCD in 4-bit mode.
To use the Adafruit Library, we first need to install it by using below commands. First command will clone the CharLCD repository (by Adafruit) on your Raspberry Pi, second command will take you inside that downloaded directory and finally we need to execute setup.py script, presented inside the Adafruit_Python_CharLCD directory, to install the library.
git clone https://github.com/adafruit/Adafruit_Python_CharLCD.git
cd ./Adafruit_Python_CharLCD
sudo python setup.py install
Now the library for 16x2 LCD has been installed and you can use its functions by just importing this library in your python program using the below line:
import Adafruit_CharLCD as LCD
There are some example scripts inside the ‘examples’ folder which is present in the library folder (Adafruit_Python_CharLCD). You can test the setup by running char_lcd.py example script. But before that, you need to connect the LCD pins with the Raspberry Pi as given below in the circuit diagram in next section.
You can also connect LCD with some other GPIO pins of Raspberry Pi, all you need to mention the correct interfacing pins in your python program like below. Learn more about Raspberry Pi GPIO Pins here.
# Raspberry Pi pin setup
lcd_rs = 18
lcd_en = 23
lcd_d4 = 24
lcd_d5 = 16
lcd_d6 = 20
lcd_d7 = 21
lcd_backlight = 2
Now you can directly use the functions provided by Adafruit Library to control the LCD. Some of the functions are given below; you can find more in example script:
- lcd.message(message) = To print the text on LCD.
- lcd.clear() = To clear the LCD.
- lcd.set_cursor(col, row) = Move the cursor to any position at column and row.
- lcd.blink(True) = To blink the cursor (True or False)
- lcd.move_left() = To move the cursor to Left by one position.
- lcd.move_right() = To move the cursor to Right by one position.
Now we will connect our Raspberry Pi with Android Smart phone using Bluetooth.
Installing Required Packages for Bluetooth Communication:
Here we are using Raspberry 2 Pi Model B which don’t have inbuilt Bluetooth, so we are using a simple USB Bluetooth dongle for setting up Bluetooth communication in Raspberry Pi. You should have a Raspbian Jessie installed memory card ready with Raspberry Pi. Check this article to install the Raspbian OS and getting started with Raspberry Pi. So now we first need to update the Raspbian using below commands:
sudo apt-get update
sudo apt-get upgrade
Then we need to install few Bluetooth related packages:
sudo apt-get install bluetooth blueman bluez
Then reboot the Raspberry Pi:
sudo reboot
BlueZ is a open source project and official Linux Bluetooth protocol stack. It supports all the core Bluetooth protocols and now become part of official Linux Kernel.
Blueman provides the Desktop interface to manage and control the Bluetooth devices.
Finally we need python Library for Bluetooth communication so that we can send and receive data through RFCOMM using Python language:
sudo apt-get install python-bluetooth
Also install the GPIO support libraries for Raspberry Pi:
sudo apt-get install python-rpi.gpio
Now we are done with installing required packages for Bluetooth communication in Raspberry Pi.
Pairing Devices with Raspberry Pi over Bluetooth:
Pairing Bluetooth Devices, like mobile phone, with Raspberry Pi is very easy. Here we have paired our Android Smart phone with Raspberry Pi. We have previously installed BlueZ in Pi, which provides a command line utility called “bluetoothctl” to manage our Bluetooth devices. But before that, connect your USB Bluetooth dongle with Raspberry Pi and check that whether it is detected or not, by using below command:
lsusb
Now open the bluetoothctl utility by below command:
sudo bluetoothctl
You can check all the commands of bluetoothctl utility by typing ‘help’. For now we need to enter below commands in given order:
[bluetooth]# power on
[bluetooth]# agent on
[bluetooth]# discoverable on
[bluetooth]# pairable on
[bluetooth]# scan on
After the last command “scan on”, you will see your Bluetooth device (Mobile phone) in the list. Make sure that your mobile has Bluetooth turned on and visible by nearby devices. Then copy the MAC address of you device and pair it by using given command:
pair <address of your phone>
Then you will be prompted for Passcode or Pin in your Terminal console then type passcode there and press enter. Then type the same passcode in your mobile phone when prompted and you are now successfully paired with Raspberry Pi. We have also explained this whole process in our previous tutorial on Controlling GPIO with Bluetooth.

Circuit Diagram:

Voice Typing on LCD using Android App BlueTerm:
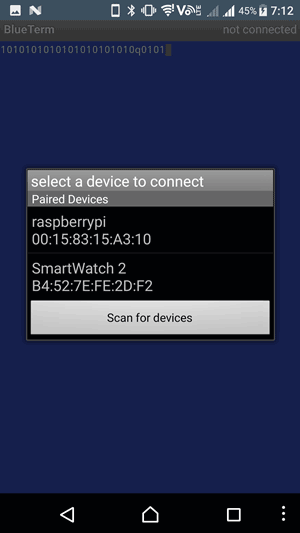
Now after paring the Mobile Phone, we need to install a Android App for communicating with Raspberry Pi using a Bluetooth Serial Adapter. RFCOMM/SPP protocol emulates serial communication over Bluetooth, so we installed here BlueTerm App which supports this protocol.
You can also use any other Bluetooth Terminal App which supports communication via RFCOMM socket.
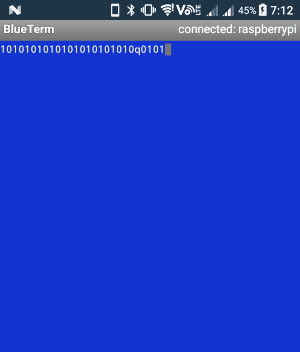
Now after downloading and installing the BlueTerm App, run the below given Python Program from the terminal and connect the paired raspberrypi device from the BlueTerm App at the same time. After successful connection you will see connected:raspberrypi at the top right corner of the App as shown below. Now select the Google Voice Typing Keyboard and start speaking, it will be appeared the LCD.
Python Program for this project is given below and can be easily understood. The main typical part is related to Bluetooth Programming which we have explained previously; check programming section of this article.
We can further extend this project by using the Voice to control Raspberry GPIO pins or can use bigger LCD/TFT display for displaying bigger messages. Also check our previous Raspberry Pi Projects and Tutorials.
Complete Project Code
import bluetooth
import RPi.GPIO as GPIO   #calling for header file which helps in using GPIOs of PI
import Adafruit_CharLCD as LCD
# Raspberry Pi pin setup
lcd_rs = 18
lcd_en = 23
lcd_d4 = 24
lcd_d5 = 16
lcd_d6 = 20
lcd_d7 = 21
lcd_backlight = 2
# Define LCD column and row size for 16x2 LCD.
lcd_columns = 16
lcd_rows = 2
lcd = LCD.Adafruit_CharLCD(lcd_rs, lcd_en, lcd_d4, lcd_d5, lcd_d6, lcd_d7, lcd_columns, lcd_rows, lcd_backlight)

server_socket=bluetooth.BluetoothSocket( bluetooth.RFCOMM )

port = 1
server_socket.bind(("",port))
server_socket.listen(1)

client_socket,address = server_socket.accept()
print "Accepted connection from ",address
while 1:

 data = client_socket.recv(1024)
 print "Received: %s" % data
 if (data != ""):
  lcd.clear()
  print (len(data))
  if (len(data) > 16):  #breaking long strings into 2 parts
   i = len(data)-16
   a,b = data[:16], data[16:]  #first string will be of 16 char
   lcd.message(a)
   lcd.message('\n')
   lcd.message(b)
   print i
   print a
   print b
  else:
   lcd.message(data)

 if (data == "clear"):
  lcd.clear()

 if (data == "q"):
  print ("Quit")
  break

client_socket.close()
server_socket.close()
Comments
we are doing project on voice typing on 16*2 lcd using raspberry pi3 and andriod app ,we are executing code but we are not able connect to lcd 16*2 display to show please help us

can i get block diagram for this