 Vedhathiri
Author

Everybody likes weekends. On weekends, you often drive with your family to crowded places like malls, theme parks, or circuses for outings and relaxation. But then comes one of the most frustrating parts of the trip: searching for parking. Sometimes, finding a parking space feels even harder than waking up early in the morning.
Even if there is a security guard or supervising person helping to manage the parking area, it is still difficult for them to quickly identify which spaces are empty and which are already occupied. To overcome this, an automatic parking space detection system solves this problem; why not create a system that captures the entire parking area and automatically detects how many parking spaces are filled and how many are vacant? That is exactly what this project does. We have built a smart parking space detection system without any complex setup. For this, we only need a Raspberry Pi board, a USB camera, and an account in CircuitDigest Cloud. Let's dive in and see how to build this Raspberry Pi parking space detection project. You can also check out similar AI projects and Raspberry Pi projects done previously here at Circuit Digest.
Table of Contents
What Is an Automatic Parking Space Detection System?
A parking space detection system detects a parking space using a setup that uses cameras to analyse video footage of a parking lot to identify whether each space is either occupied or empty in real-time with no human intervention involved. The project’s computer vision API uses already built-in and trained models to detect parking spaces rather than building a machine learning model manually; there is no heavy labour of image processing, classification or counting due to all of these tasks occurring on a cloud server.
How Parking Space Detection Using Image Processing Works
The system starts with the USB camera continuously capturing parking spaces and cars. OpenCV is used to access the camera, display the live video feed, and capture images either manually by pressing the SPACE key in keyboard mode or automatically after a fixed time interval in auto mode. After capturing, the image is converted into JPEG format using OpenCV for easy transmission. The Requests library then sends the image securely to the CircuitDigest Cloud Parking Space Detection API using an HTTPS POST request along with the API key. The cloud server processes the image using AI-based Parking Space detection and checks whether the space is available or filled. The result is then sent back to the system and displayed in the terminal.
Components Required for the Raspberry Pi Parking Space Detection System
The components below are the ones that are used to build the Raspberry Pi-based Parking Space Detection tutorial.
| S.No | Components | Purpose |
| 1. | Raspberry pi | It is the main controller in this setup for processing. |
| 2. | USB Camera | Used to capture the image for processing |
| 3. | MicroSD Card | Used to boot the OS on the board |
Circuit Diagram for Parking Space Detection Using Raspberry Pi
The circuit diagram below shows that the Raspberry Pi is connected to the external power supply for sufficient power, and the USB camera is connected to the Raspberry Pi board's USB port. The Raspberry Pi is remotely connected to the laptop.

Step-by-Step Procedure to Set Up the Parking Space Detection System Using Raspberry Pi
Unlike ESP32 or Arduino, the code cannot be flashed directly to the Raspberry Pi using the Arduino IDE. Before running the project, the Raspberry Pi must be properly set up by installing the operating system on a microSD card. This process is done using Raspberry Pi Imager on a laptop or PC. First, the microSD card is inserted into the system, and, using Raspberry Pi Imager, the required Raspberry Pi OS and initial configurations, such as Wi-Fi, username, password, and SSH settings, are selected and installed. After the OS installation is completed, the SD card is removed and inserted into the Raspberry Pi’s memory card slot, and the board is powered ON. Although the first-time setup may seem like a lot of work, it is actually simple once completed. A detailed step-by-step guide for the complete Raspberry Pi setup can be found in the Raspberry Pi Complete Setup tutorial. The ways to get the Raspberry Pi connected are as follows,
- Direct Hardware Connection
The first method is by connecting external components such as a monitor, keyboard, and mouse directly to the Raspberry Pi. This allows the Raspberry Pi to work like a normal desktop computer and is mainly useful during the initial setup and for direct operation. - Using SSH (Secure Shell)
The second method is through SSH, where the Raspberry Pi can be accessed remotely from another computer using the same network connection. This method provides command-line control without needing a separate monitor, keyboard, or mouse connected to the Raspberry Pi. - Using VNC Viewer
The third method is to use VNC Viewer, which allows remote access to the Raspberry Pi's full graphical desktop from another computer. This makes it possible to control the Raspberry Pi exactly like working directly on its own screen, but from a remote location. To work on the setup using VNC Viewer, refer to this VNC Viewer for Raspberry Pi tutorial for a detailed step-by-step procedure.
Before stepping into the Thonny IDE present in the Raspberry Pi desktop, first you need the code; for that, follow the steps below,
Step 1⇒ Create a CircuitDigest Cloud Account
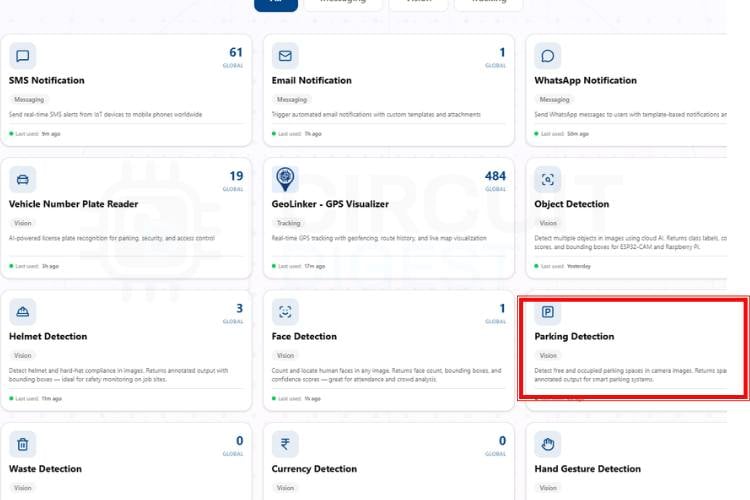
First, you need to make an account on the CircuitDigest Cloud. If you already have one, just go to the CircuitDigest Cloud website, scroll down, and there you will notice the Parking Space detection feature; click that, and enter.
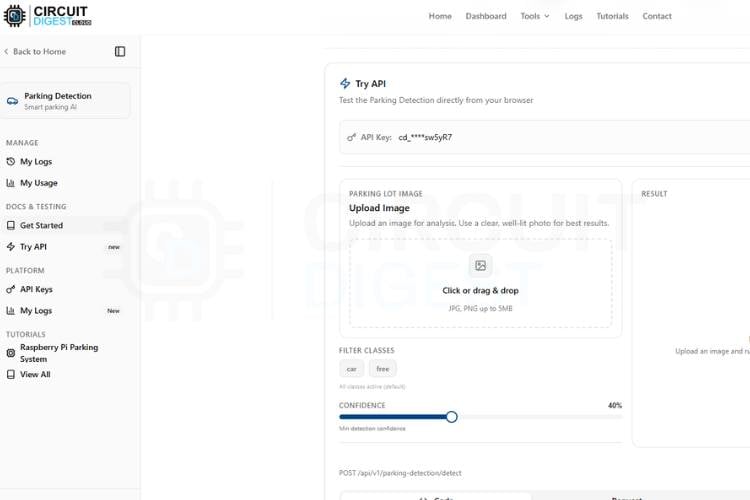
Step 2⇒ Adjust the Confidence Threshold
There, you will notice the try api section, various options like image, classes, confidence, result, and a board selection section with its relevant codes. First, you can minimize and maximize the confidence level according to your needs because the confidence value sets the minimum probability threshold for Parking Space detection. A higher value results in more accurate detections but may miss some, while a lower value detects more objects but with less certainty.
Step 3⇒ Test Detection With a Sample Image
Now, to try without any microcontroller boards, you need to take a picture that has some parking spaces available and some filled. Upload it to the image section and click Run Test. In a few seconds, you will get the result with Parking Space detection and its count also.

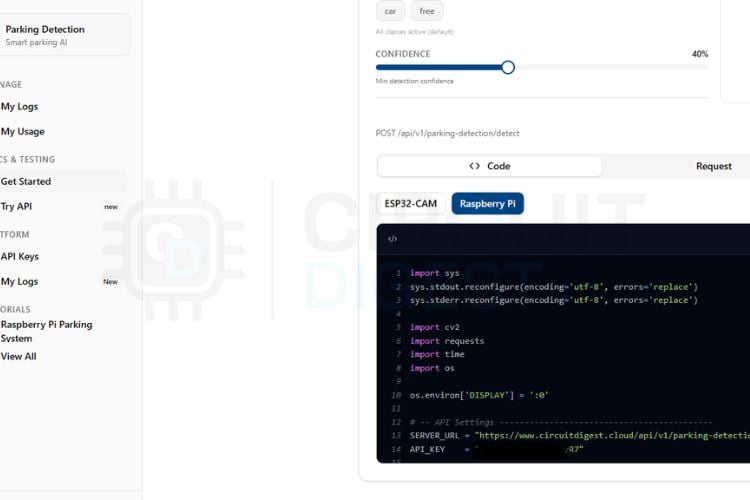
Step 4⇒ Get the Raspberry Pi Code and Run It
Below the page, you can see the microcontroller selection. Now, we will try this system with the Raspberry Pi. Click the Raspberry Pi, and the page will give you the code. Just copy the code; now go to the Raspberry Pi desktop, click Thonny IDE for programming. In that, paste the copied code after making all connections correct. Nothing, just connect the USB camera to the Raspberry Pi and run the code; that's it. Take any dummy picture from the internet that has a parking space filled with cars, and some are empty, or you can test this in real time by taking a picture of the real-time parking space area, using the keyboard keys, or you can set it automatically by changing the MODE = "keyboard" in the code, like,
- Keyboard Mode
In this mode, the user captures the image manually by pressing the SPACE key on the keyboard. It is mainly used when working directly with a monitor or through VNC Viewer. - Auto Mode
In this mode, the system automatically captures images after a fixed time interval without any user interaction. It is useful for continuous monitoring applications. - SSH Mode
In this mode, the program runs through terminal access using SSH and captures images automatically without using the OpenCV display window. The results are shown directly in the terminal.
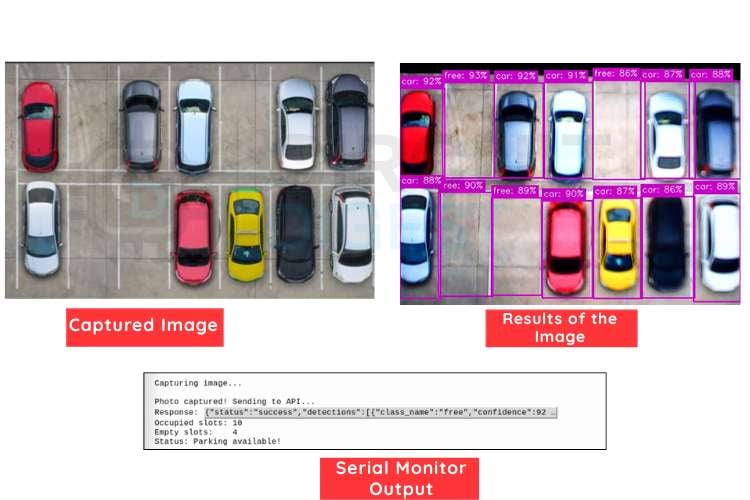
The image below shows the captured image from the Raspberry Pi. Along with it, you can see the detection results of the image, where the occupied and vacant spaces are identified. Below that, the serial monitor displays the detection output, which includes the count and the confidence value for each identified thing.
Code Explanation for Raspberry Pi Parking Space Detection Using Image Processing
The code is written in Python for real-time Parking Space detection using a USB camera and CircuitDigest Cloud API. OpenCV is used to capture live images and display the camera feed on the screen. The program supports keyboard mode for manual capture and auto mode for automatic image capture. The captured image is converted into JPEG format for easy transmission. Using the Requests library, the image is sent securely to the cloud API through HTTPS. The server processes the image and returns the Parking Space detection result to the terminal.
import cv2
import requests
import time
import os
import sys
SERVER_URL = "https://www.circuitdigest.cloud/api/v1/parking-detection/detect"
API_KEY    = "YourApikey"
This section imports the required Python libraries for camera access, API communication, timing control, and system handling. OpenCV is used for capturing images from the USB camera, while the Requests library sends the captured image to the CircuitDigest Cloud API. The server URL and API key are also defined here for parking detection processing.
MODE = "keyboard"
AUTO_INTERVAL = 5
cap = cv2.VideoCapture(0)
cap.set(cv2.CAP_PROP_FRAME_WIDTH, 640)
cap.set(cv2.CAP_PROP_FRAME_HEIGHT, 480)
This part selects the operating mode of the system, either keyboard mode for manual image capture or auto mode for automatic detection after fixed intervals. The USB camera is initialised using OpenCV, and the resolution is set to capture clear images. The auto interval controls how often images are captured automatically.
if not cap.isOpened():
   print("Camera not found! Check USB camera connection.")
   sys.exit()
This section checks whether the USB camera is properly connected and recognised by the Raspberry Pi. If the camera is not detected, the program displays an error message and stops immediately. This avoids running the project without valid camera input.
_, img_encoded = cv2.imencode('.jpg', frame, [cv2.IMWRITE_JPEG_QUALITY, 90])
img_bytes = img_encoded.tobytes()
response = requests.post(SERVER_URL, headers=headers,
                       files=files, timeout=15)
This part captures the image from the live camera feed and converts it into JPEG format for easy transmission. The image is then sent securely to the CircuitDigest Cloud Parking Detection API using an HTTPS POST request. The cloud server processes the image and detects occupied and empty parking spaces.
occupied = result.get("occupied", 0)
empty = result.get("empty", 0)
print(f"Occupied slots: {occupied}")
print(f"Empty slots: {empty}")
This section reads the response received from the cloud server after image processing. It extracts the number of occupied and empty parking slots and displays the result in the terminal. Based on the result, the system also shows whether parking is available or if the parking area is full.
Troubleshooting the Parking Space Detection System
Issue 1: Camera not detected
If the USB camera is not detected, the program may display “Camera not found” and stop running. This usually happens because of a loose USB connection or incorrect camera selection. Reconnect the camera properly and make sure it is firmly attached. You can also try changing cv2.VideoCapture(0) to cv2.VideoCapture(1) if another camera device is connected.
Issue 2: API request timeout
Sometimes the captured image may not reach the server, and the program shows a timeout error. This usually happens because of a slow internet connection or unstable network access. Check whether the Raspberry Pi is properly connected to Wi-Fi or Ethernet. Increasing the timeout value in the request function can also help solve this issue.
Issue 3: Invalid API key error
If the API key is incorrect, the cloud server will reject the request and parking detection will fail. This can happen if the key is copied incorrectly or contains extra spaces. Recheck the API key from the CircuitDigest Cloud account and paste it correctly in the code. Make sure there are no missing or extra characters.
Issue 4: Incorrect parking detection result
Sometimes the system may show wrong occupied or empty slot counts because of poor lighting or unclear camera angles. Shadows, parked vehicle positions, and low image quality can affect detection accuracy. Place the camera in a proper top-view position with good lighting conditions. Increasing camera resolution can also improve accuracy.
Issue 5: Program crashes during execution
The program may stop suddenly because of missing Python libraries or frame capture errors. This usually happens when OpenCV or Requests is not installed properly on the Raspberry Pi. Make sure all required libraries are installed before running the project. Restarting the Raspberry Pi and checking the camera feed can also help fix the problem.
Advantages and Limitations of Parking Space Detection Using Raspberry Pi
The following table gives a clear idea about the limitations and the advantages of Waste detection using a Raspberry Pi
| S.No | Advantages | Limitations |
| 1. | Automatically detects occupied and empty parking spaces in real time | Requires a stable internet connection for cloud processing |
| 2. | Reduces manual work for security guards and parking supervisors | Detection accuracy depends on camera quality and angle |
| 3. | Easy to implement using a Raspberry Pi and a USB camera | Poor lighting or shadows can affect detection results |
| 4. | Supports both manual and automatic image capture modes | Cloud API usage may have daily or monthly limits |
| 5. | Improves parking management and reduces traffic congestion | Slight delay may occur due to API response time |
The key advantage of this setup is that we don't need to take any datasets manually or download them from the internet, don't need to label the objects, or create any model. With the help of the CircuitDigest Cloud, we are just flashing the code and using it like a ready-made model, a real-time Raspberry Pi parking space detection system in under an hour. This saves time, and with this time, we can focus more on other hardware modifications for future enhancements. This method will eliminate the use of ML training websites like Edge Impulse and TensorFlow Lite.
Raspberry Pi Parking Space Detection Project GitHub
Download and explore a Raspberry Pi-based smart parking project designed for real-time space detection. The included source code enables automated parking monitoring using computer vision technology. With CircuitDigest Cloud, you simply use the ready-made parking space detection computer vision model, saving time that can instead go toward other hardware improvements.


Frequently Asked Questions
⇥ Is model training required for this project?
No, model training is not required because the parking detection is handled by the CircuitDigest Cloud API. This makes the project simple and easy to implement without collecting datasets or training AI models.
⇥ Can this system work for multi-floor parking areas?
Yes, the system can be used for multi-floor parking areas by installing separate cameras for each floor. Each camera can monitor its own section and provide parking availability information independently.
⇥ Does this system work without an internet connection?
No, this system requires an internet connection because the captured image is sent to the CircuitDigest Cloud API for parking detection processing. Without the internet, the detection will not work.
⇥ Can I use any USB camera for this project?
Yes, most standard USB webcams can be used with the Raspberry Pi for this project. However, using a better-quality camera improves image clarity and parking detection accuracy.
⇥ What is the use of keyboard mode and auto mode?
Keyboard mode allows the user to manually capture an image by pressing the SPACE key. Auto mode captures images automatically after a fixed time interval, making it useful for continuous parking monitoring applications.
⇥ How can I improve parking detection accuracy?
You can improve accuracy by placing the camera in a proper top-view position with good lighting conditions. Avoid shadows and unclear parking slot visibility, as these can affect detection results.
⇥ Can this system detect multiple parking slots at the same time?
Yes, the system can detect multiple occupied and empty parking spaces from a single image and display the total count in the terminal. This makes it useful for large parking areas.
WhatsApp-Based IoT and Automation Projects
Discover innovative projects that integrate WhatsApp with IoT devices for real-time monitoring, alerts, and remote control. These projects demonstrate how WhatsApp can be used as a simple and effective interface for home automation, notifications, and smart device management.

ESP32-CAM WhatsApp: Send Images Instantly via IoT
In this project, we build a system where the ESP32-CAM is able to capture an image and send it directly to WhatsApp. With the help of the CircuitDigest Cloud, we can do that easily.

WhatsApp Automation using Python on Raspberry Pi – A Personalised WhatsApp bot for Home Automation
In this tutorial, we will be building a Raspberry Pi WhatsApp Bot using the Python pyautogui package. We will be launching WhatsApp Web on our Pi and reading messages from our chat and responding to those messages with appropriate answers.

How to Install WhatsApp on a Raspberry Pi to Send and Receive Messages
Here we will explain the complete process of installing and configuring WhatsApp on a Raspberry Pi. To activate WhatsApp on the Pi, you will need a new phone number, as it won’t work with currently running WhatsApp no.
Complete Project Code
import sys
sys.stdout.reconfigure(encoding='utf-8', errors='replace')
sys.stderr.reconfigure(encoding='utf-8', errors='replace')
import cv2
import requests
import time
import os
os.environ['DISPLAY'] = ':0'
# -- API Settings -------------------------------------------
SERVER_URL = "https://www.circuitdigest.cloud/api/v1/parking-detection/detect"
API_KEY    = "YourApikey"
# -- Mode Selection -----------------------------------------
# "auto"     ? captures every X seconds (VNC / SSH)
# "keyboard" ? press SPACE to capture (Direct Monitor)
MODE          = "keyboard"
AUTO_INTERVAL = 5  # seconds between captures
# -- Camera Setup -------------------------------------------
cap = cv2.VideoCapture(0)
cap.set(cv2.CAP_PROP_FRAME_WIDTH, 640)
cap.set(cv2.CAP_PROP_FRAME_HEIGHT, 480)
if not cap.isOpened():
   print("Camera not found! Check USB camera connection.")
   sys.exit()
print("Camera initialized.")
print(f"Running in [{MODE}] mode")
if MODE == "keyboard":
   print("Press SPACE to capture | Press ESC to quit")
elif MODE == "auto":
   print(f"Auto capturing every {AUTO_INTERVAL} seconds | Press ESC to quit")
# -- Send Image to API --------------------------------------
def check_parking(frame):
   # Warm-up frames
   for _ in range(3):
       cap.read()
   ret, frame = cap.read()
   if not ret:
       print("Capture failed")
       return
   _, img_encoded = cv2.imencode('.jpg', frame, [cv2.IMWRITE_JPEG_QUALITY, 90])
   img_bytes = img_encoded.tobytes()
   headers = { "X-API-Key": API_KEY }
   files   = { "imageFile": ("snap.jpg", img_bytes, "image/jpeg") }
   try:
       print("\nPhoto captured! Sending to API...")
       response = requests.post(SERVER_URL, headers=headers,
                                files=files, timeout=15)
       if response.status_code == 200:
           result = response.json()
           safe_response = response.text.encode('utf-8', errors='replace').decode('utf-8')
           print("Response:", safe_response)
           # Parse counts
           occupied = result.get("occupied", 0)
           empty    = result.get("empty", 0)
           # Try from summary if not at root level
           if "summary" in result:
               occupied = result["summary"].get("occupied", occupied)
               empty    = result["summary"].get("empty", empty)
           print(f"Occupied slots: {occupied}")
           print(f"Empty slots:    {empty}")
           if empty > 0:
               print("Status: Parking available!")
           else:
               print("Status: Parking FULL!")
       else:
           print(f"HTTP error: {response.status_code}")
   except requests.exceptions.Timeout:
       print("Request timed out!")
   except Exception as e:
       print(f"Error: {str(e).encode('utf-8', errors='replace').decode('utf-8')}")
# -- Main Loop ----------------------------------------------
last_capture_time = 0
while True:
   ret, frame = cap.read()
   if not ret:
       print("Failed to grab frame")
       break
   cv2.imshow("Parking Detection - SPACE: capture | ESC: quit", frame)
   key = cv2.waitKey(1) & 0xFF
   if MODE == "keyboard":
       if key == 32:  # SPACE
           print("\nCapturing image...")
           check_parking(frame)
   elif MODE == "auto":
       current_time = time.time()
       if current_time - last_capture_time >= AUTO_INTERVAL:
           last_capture_time = current_time
           print("\nAuto capturing...")
           check_parking(frame)
   if key == 27:  # ESC
       print("Quitting...")
       break
cap.release()
cv2.destroyAllWindows()
