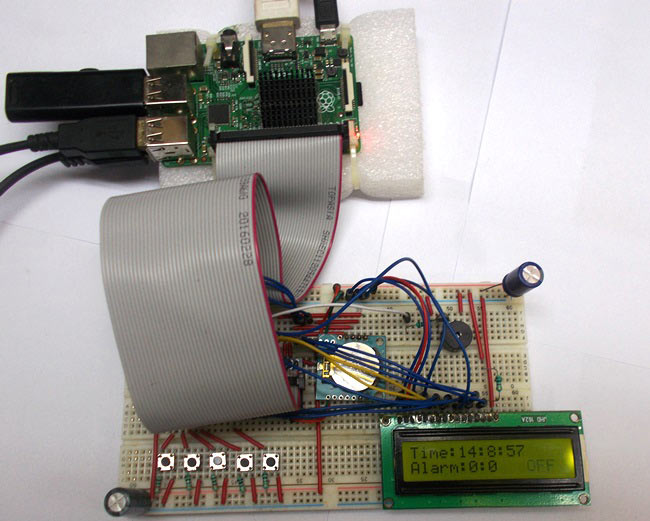
In this session we are going to Interface Real Time Clock Module DS1307 with Raspberry PI to make an Alarm Clock. Although Raspberry Pi has an internal clock, but without internet connection this internal clock resets after every reboot. So to get accurate TIME without internet connection, we need to interface a RTC Module DS1307 to Raspberry Pi. RTC module has button battery for backup so the TIME will not reset. We have also built Alarm Clock using Arduino and using ATmega32 AVR Microcontroller, check them too.
In this Raspberry Pi Digital Clock, a 16*2 Character LCD is to display Real Time, Alarm time and status of the alarm (ON/OFF). Once the program starts running in Pi, we can disconnect the monitor and can set the alarm with the help of this LCD and five buttons.
Each of 17 GPIO pins can deliver or draw a maximum of 15mA current. So do not play with GPIO pins and check the connections twice before powering the Raspberry Pi. Learn more about GPIO Pins and interfacing button with Raspberry Pi here. Also check our Raspberry Pi Tutorial Series along with some good IoT Projects.
Components Required:
Here we are using Raspberry Pi 2 Model B with Raspbian Jessie OS. All the basic Hardware and Software requirements are previously discussed, you can look it up in the Raspberry Pi Introduction and Raspberry PI LED Blinking for getting started, other than that we need:
- Raspberry Pi with pre-installed OS
- RTC Module DS1307 with Battery
- Power supply
- 1KΩ resistor (6 pieces)
- 5 buttons
- 1000uF capacitor (2 pieces)
- 16*2 character LCD
- 2N2222 transistor
- Buzzer
Setup Raspberry Pi for Alarm clock:
Before going any further, we need to configure Raspberry Pi a little bit and install the library file for RTC Module, follow below steps:
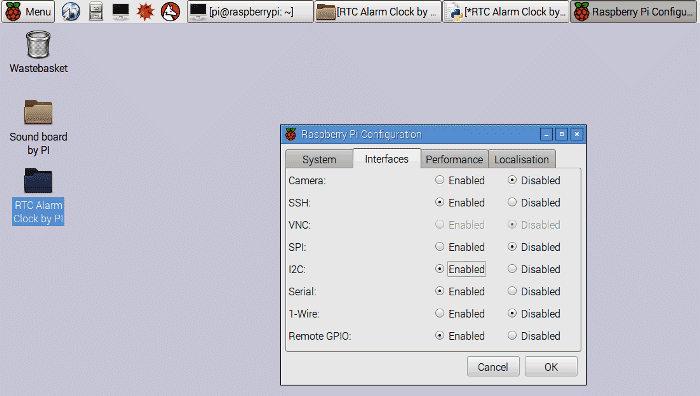
Step 1: First go to Raspberry Pi configuration menu and enable I2C option as shown below:
Step 2: Create a new folder on Raspberry Pi desktop screen and name it as “Alarm Clock”
Step 3: Download the Header File for RTC module from below link:
https://codeload.github.com/switchdoclabs/RTC_SDL_DS1307/zip/master
Step 4: Unzip the downloaded zip file into the folder (Alarm Clock) created on DESKTOP, as told in previous step.
Step 5: Open the terminal window in Raspberry Pi and enter below command, then press enter:
sudo apt-get install i2c-tools
This command installs I2C tools required for interfacing RTC module. Then reboot the Raspberry pi by issuing ‘sudo reboot’ command.
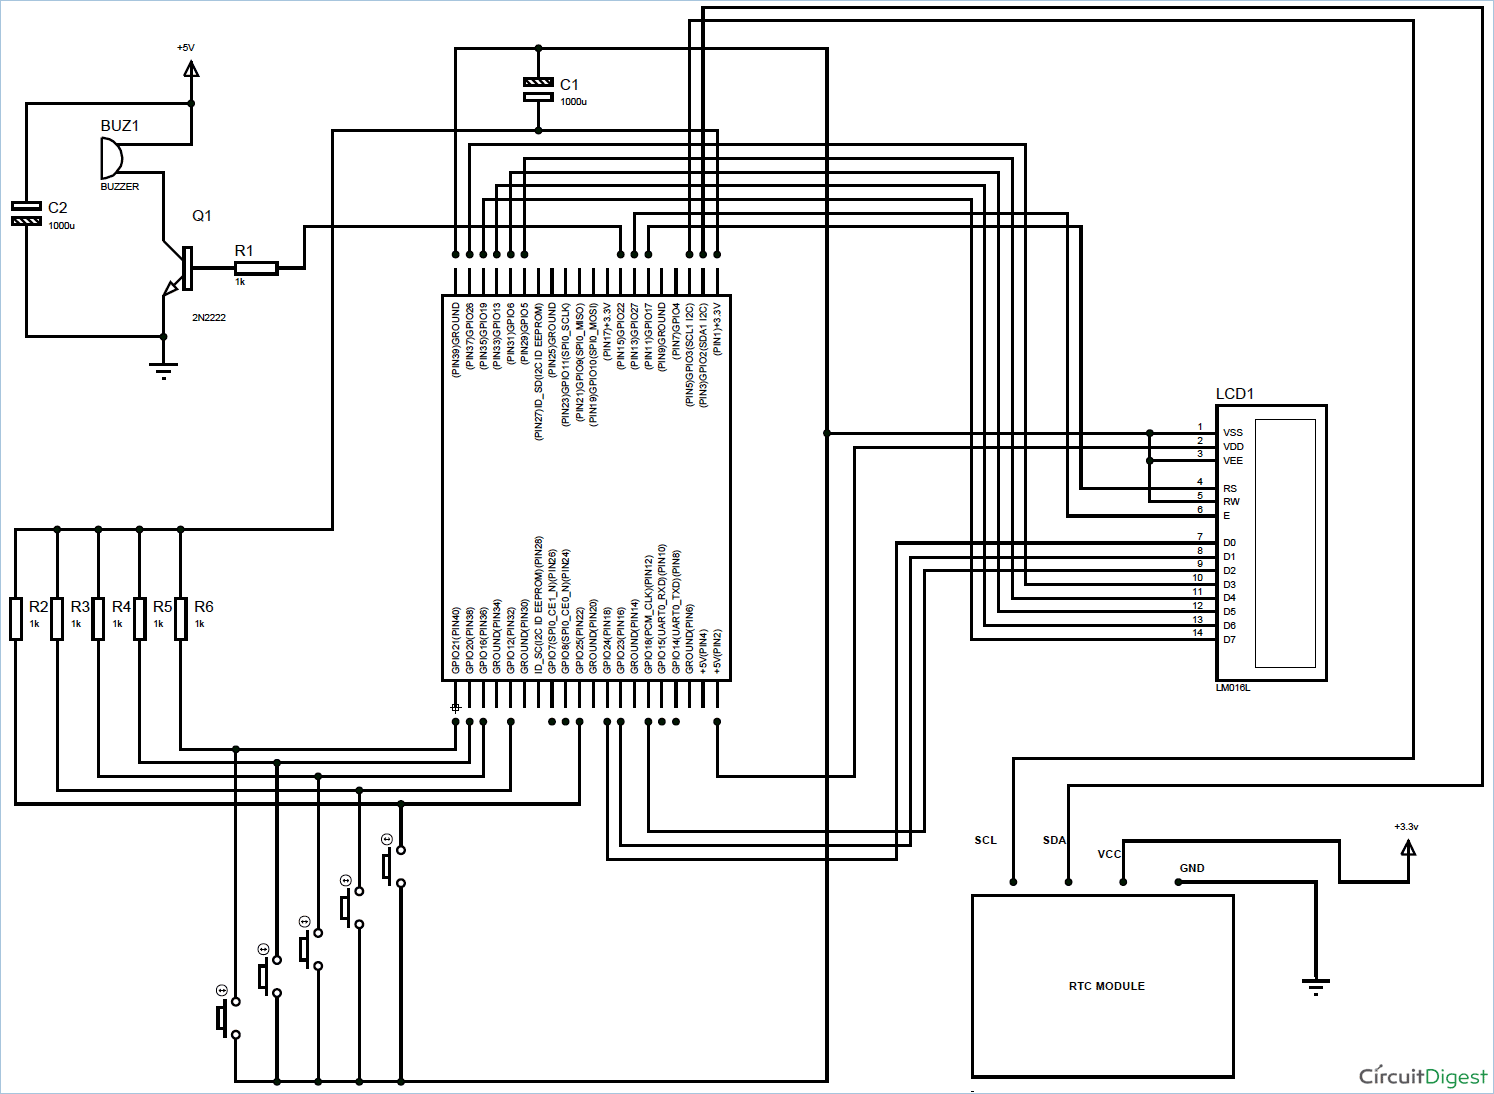
Step 6: Now we need to check the I2C address of RTC module. Before checking the address, first connect the RTC module as shown in the Circuit Diagram below.
Then enter below in terminal window.
sudo i2cdetect -y 0
OR
sudo i2cdetect -y 1
Step 7: If either of above commands works, you will see something like this:
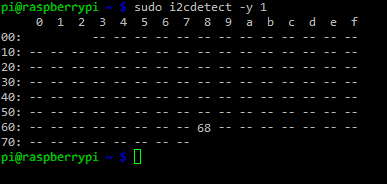
Step 8: You will see I2C address 0x68 if RTC module is connected properly, record the value.
With this all the necessary adjustments are done with Raspberry Pi configuration.
Circuit Diagram and Connections:
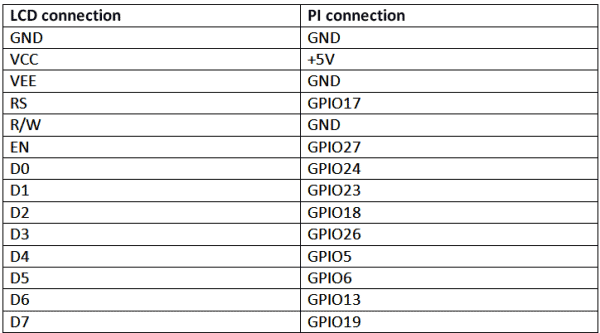
Connections between Raspberry Pi and LCD are shown in below table:
Connections between Raspberry Pi and five buttons are also shown in below table with the respective function of each button:

Program and Working Explanation:
RTC Module has a button cell for power backup as discussed, so the time will be up to date until the backup runs out and we will have accurate time in RTC.
Now we will write a Python Program to get the accurate time from RTC Module DS1307. This time will be showed on the 16x2 LCD. After that we will have alarm clock feature written in program. The alarm time will also be displayed on the second line of LCD, followed by ON and OFF status. Alarm time can be adjusted by 5 buttons connected to Raspberry Pi as mentioned in the table given above and it is very easy to set the Alarm. You can also check our Demo Video to operate this Raspberry Pi Alarm Clock. There are 2 buttons for increment & decrement Alarm Hour time, 2 buttons for increment & decrement Alarm Minute time and 1 button for ON & OFF the alarm.
Python program keeps comparing the Alarm Time with RTC Time continuously and once the Alarm time matches with the RTC time, PI triggers the Buzzer, which is connected to GPIO pin 22 of Raspberry Pi through the NPN transistor 2N2222. So once the alarm time reached, buzzer makes the sound.
Complete Program is given below, and well explained through the comments. If you have any doubt you can ask in comment section below.
Complete Project Code
import RPi.GPIO as IO  #calling for header file which helps in using GPIO’s of PI
import time            #we are calling for time to provide delays in program
import datetime        #we are calling for DATE
import SDL_DS1307      #calling for special functions which helps us interface RTC module
h=0                    #integers for storing values
m=0
alarm=0
string_of_characters = 0
ds1307 = SDL_DS1307.SDL_DS1307(1, 0x68)  #entering I2c address, which we recorded previously
ds1307.write_now()
IO.setwarnings(False)  #do not show any warnings
IO.setmode (IO.BCM)    #programming the GPIO by BCM pin numbers. (like PIN29 as'GPIO5')
#initialize GPIO17,27,24,23,18,26,5,6,13,19 as an output
IO.setup(17,IO.OUT)
IO.setup(27,IO.OUT)
IO.setup(24,IO.OUT)
IO.setup(23,IO.OUT)
IO.setup(18,IO.OUT)
IO.setup(26,IO.OUT)
IO.setup(5,IO.OUT)
IO.setup(6,IO.OUT)
IO.setup(13,IO.OUT)
IO.setup(19,IO.OUT)
IO.setup(21,IO.IN)  #initialize GPIO21 as an input.
IO.setup(20,IO.IN)  #initialize GPIO20 as an input.
IO.setup(16,IO.IN)
IO.setup(12,IO.IN)
IO.setup(25,IO.IN)
IO.setup(22,IO.OUT) #initialize GPIO22 as an output.
def send_a_command (command):  #steps for sending a command to 16*2LCD
    pin=command
    PORT(pin);
    IO.output(17,0)
    IO.output(27,1)
    time.sleep(0.001)
    IO.output(27,0)
    pin=0
    PORT(pin);
def send_a_character (character):#steps for sending a character to 16*2 LCD
    pin=character
    PORT(pin);
    IO.output(17,1)
    IO.output(27,1)
    time.sleep(0.001)
    IO.output(27,0)
    pin=0
    PORT(pin);
def PORT(pin):            #assigning level for PI GPIO for sending data to LCD through D0-D7
    if(pin&0x01 == 0x01):
        IO.output(24,1)
    else:
        IO.output(24,0)
    if(pin&0x02 == 0x02):
        IO.output(23,1)
    else:
        IO.output(23,0)
    if(pin&0x04 == 0x04):
        IO.output(18,1)
    else:
        IO.output(18,0)
    if(pin&0x08 == 0x08):
        IO.output(26,1)
    else:
        IO.output(26,0)
    if(pin&0x10 == 0x10):
        IO.output(5,1)
    else:
        IO.output(5,0)
    if(pin&0x20 == 0x20):
        IO.output(6,1)
    else:
        IO.output(6,0)
    if(pin&0x40 == 0x40):
        IO.output(13,1)
    else:
        IO.output(13,0)
    if(pin&0x80 == 0x80):
        IO.output(19,1)
    else:
        IO.output(19,0)
def send_a_string(string_of_characters):  #steps for sending string of characters to LCD
  string_of_characters = string_of_characters.ljust(16," ")
  for i in range(16):
    send_a_character(ord(string_of_characters[i]))
#send characters one by one until all the strings characters are sent through data port
while 1:
    send_a_command(0x38); #use two lines of LCD
    send_a_command(0x0E); #screen and cursor ON
    send_a_command(0x01); #clear screen
    time.sleep(0.1)       #sleep for 100msec
    while 1:
        if (IO.input(21) == 0):
            if (h<23):    #if button1 is pressed and hour count is less than 23 increment 'h' by one
                h=h+1
        if (IO.input(20) == 0):
            if (h>0):     #if button2 is pressed and hour count is more than 0 decrease 'h' by one
                h=h-1
        if (IO.input(16) == 0):
            if (m<59):    #if button3 is pressed and minute count is less than 59 increment 'm' by one
                m=m+1
        if (IO.input(12) == 0):
            if (m>0):     #if button4is pressed and minute count is more than 0 decrease 'm' by one
                m=m-1
        if (IO.input(25) == 0):  #if button5 is pressed toggle Alarm ON and OFF
            if (alarm==0):
                alarm=1
            else:
                alarm=0
            time.sleep(0.1)
        if (alarm==1):
            send_a_command(0x80 + 0x40 + 12);
            send_a_string("ON");  #if alarm is set, then display "ON" at the 12th position of second line of LCD
            if ((h==ds1307._read_hours())):
                if ((m==ds1307._read_minutes())):
                    IO.output(22,1)  #if alarm is set, and hour-minute settings match the RTC time, trigger the buzzer
        if (alarm==0):
            send_a_command(0x80 + 0x40 + 12);
            send_a_string("OFF"); #if alarm is OFF, then display "OFF" at the 12th position of second line of LCD
            IO.output(22,0)       #turn off the buzzer
        send_a_command(0x80 + 0);   #move courser to 0 position
        send_a_string ("Time:%s:%s:%s" % (ds1307._read_hours(),ds1307._read_minutes(),ds1307._read_seconds()));
        #display RTC hours, minutes, seconds
        send_a_command(0x80 + 0x40 + 0);  #move courser to second line
        send_a_string ("Alarm:%s:%s" % (h,m));  #show alarm time
        time.sleep(0.1)  #wait for 100msec



So I've finished wiring the circuit board but when I run sudo i2cdetect -y 1, two addresses are popping up. The two i2c addresses are 50 and 68. I've noticed that when I remove the connection between the RTC and the 3V source address 50 does not appear, however when the RTC is connected to the 3V source the address does appear. If I remove the connection between the SDA or SDL adddress 68 disappears when I run i2cdetect. Any idea what could be causing this? Thanks