
Most people assume object tracking for autonomous flight is very complex, but it doesn’t have to be that way. All you need is a different way of looking at the problem. We built this project to see if we could make a simple LiteWing drone behave intelligently using just a laptop and a basic camera.
By placing the camera above the room ceiling, the floor becomes a large coordinate map. The code is very simple; it detects a red marker on the drone and a green target, then makes the drone move toward the target, like matching two points. If the target moves, the drone follows it. No complex algorithms or costly hardware, but with smart Python logic and a Wi-Fi connection.
If you're interested in building more drone-based projects like this, be sure to check out our dedicated Drone Projects section on Circuit Digest.
Key Takeaways
- Tracks a target using only a ceiling webcam and colour detection, no GPS or expensive sensors needed.
- Runs on a simple three-zone distance model: Follow, Maintain, and Retreat.
- Built entirely in Python using OpenCV and NumPy, with the LiteWing library handling Wi-Fi flight commands.
- The LiteWing Position Module keeps height and position stable so the tracking script only has to worry about direction.
Table of Contents
Prerequisites & Components for the Object Tracking Drone Project
Before building the system, a few basic hardware and software components are required. The goal of this setup is to keep everything simple and accessible while still achieving reliable tracking.
Hardware Side
The hardware setup for this system is simple. It mainly consists of a LiteWing drone equipped with the LiteWing Position Module, a laptop or PC that runs the object tracking program, and a ceiling-mounted USB webcam. The Position Module enables features such as height hold and position hold, allowing the drone to maintain a stable flight while the tracking algorithm focuses on following the target. Meanwhile, the ceiling-mounted webcam continuously monitors the entire area from above, providing a consistent top-down view for accurate object tracking.
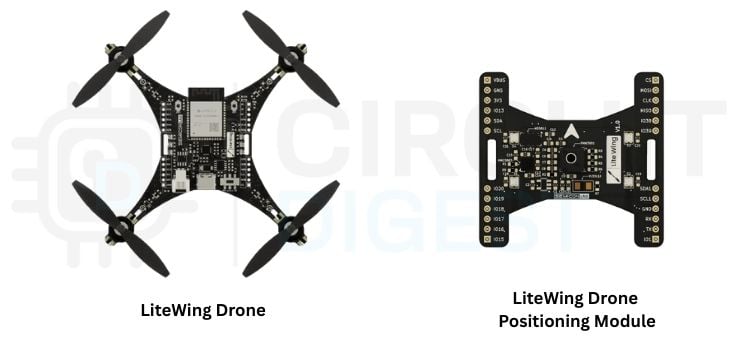
The laptop connects to the drone using its built-in Wi-Fi access point (AP), allowing real-time communication and control. The LiteWing positioning module also plays a key role by helping the drone stay stable and maintain its height, resulting in smoother and more reliable movement while following the target.
Software Side
| Component | Description |
| Python 3.11 | Main programming language used to develop the object tracking application. |
| OpenCV | Performs colour detection, image processing, and object position tracking. |
| NumPy | Handles mathematical calculations such as distance and coordinate computations. |
| LiteWing Library | Establishes communication with the LiteWing drone and sends real-time flight commands over Wi-Fi. |
This minimal setup makes the project easy to replicate without needing specialised hardware or complex dependencies.
*NOTE
- Before running the project, make sure that the LiteWing drone is updated with the latest firmware, as outdated firmware may cause connection issues or unexpected behaviour during flight.
- It is also important to use the latest version of the LiteWing Python library, since newer updates often include bug fixes, performance improvements, and better compatibility with the drone.
Keeping both the firmware and library up to date ensures smooth operation and reliable performance of the system.
How the ESP32 Object Tracking Drone System Works
The system follows a simple but efficient workflow that runs continuously in real time. First, the ceiling-mounted camera captures live video frames from a top-down view. Each frame is then converted into the HSV colour space using OpenCV, which makes it easier to detect specific colours under different lighting conditions.
Next, the system applies colour thresholds to identify the green target and the red marker on the drone. From the detected regions, the system extracts the largest contour and calculates its centre position, which represents the coordinates of the drone and the target.
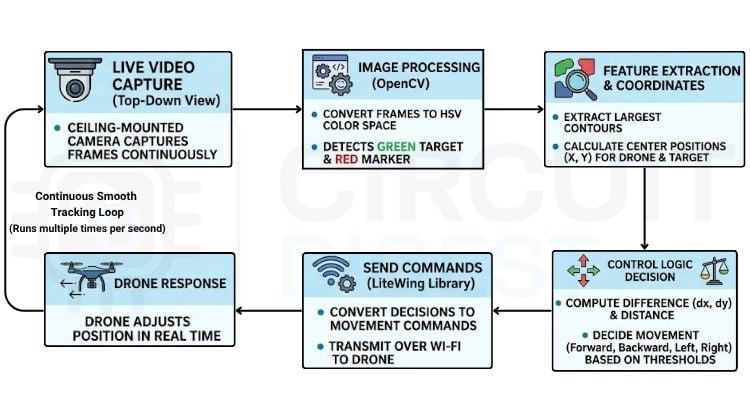
Once both positions are known, the system computes the coordinate difference (dx, dy) and calculates the distance between them. Based on predefined thresholds, the control logic decides whether the drone should move toward the target, maintain its position, or move away if it is too close.
These decisions are converted into simple movement commands like xforward, backward, left, right and sent to the drone over Wi-Fi using the LiteWing library. The drone then responds in real time, adjusting its position accordingly.
This entire loop captures, processes, calculates, and controls, running multiple times per second to enable smooth, responsive tracking without the need for complex algorithms.
Core Logic: Three-Zone Object Tracking Model
The tracking system is based on a simple three-zone control model that uses the distance between the drone and the target to decide how the drone should move. Instead of using complex navigation algorithms, the system relies on basic distance thresholds, making it both efficient and easy to implement.
Follow Zone:
When the target is far from the drone (beyond a predefined distance), the system enters the following mode. Here, the drone moves toward the target by comparing its positions (dx, dy). It decides the dominant direction (horizontal or vertical) and sends the appropriate movement command to reduce the distance.
Maintain Zone:
When the drone reaches an optimal distance from the target, it enters the maintenance zone. In this state, no movement commands are sent, allowing the drone to hover steadily. This prevents unnecessary oscillations and ensures smoother tracking behaviour.
Retreat Zone:
If the drone gets too close to the target (below a minimum safe distance), it enters the retreat zone. In this case, the drone moves in the opposite direction to increase the distance, avoiding collisions and maintaining safe operation.
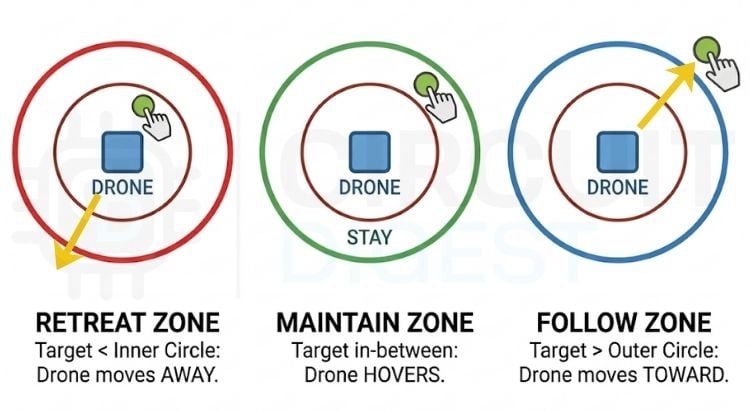
This zone-based logic works continuously in real time. By switching between these three states to follow, maintain, and retreat, the drone can track the target smoothly without requiring complex path planning or heavy computations.
Working Demo
To begin the demonstration, first power on the LiteWing drone along with the LiteWing Position Module. Make sure the drone is running the latest firmware, then connect your laptop to the LiteWing Wi-Fi access point (AP). Next, open the project in your preferred Python environment and run the Python script. Once the program starts, a live camera window will appear, and the system will begin detecting both the drone and the target using the configured colour settings. After confirming that both objects are being detected correctly, press T in the terminal. The drone will take off, reach the configured target height, and automatically begin tracking the target using the three-zone control logic.
Now, simply move the target around within the camera's field of view. As the target moves, the drone continuously adjusts its position and follows it while maintaining the desired distance. If you want to end the demonstration, press L to land the drone safely, or press the Spacebar at any time to perform an emergency stop.
Code Explanation: Building the ESP32 Object Tracking Drone Program
The first part of the program is responsible for detecting both the drone and the target object using colour detection. Every frame captured by the ceiling-mounted camera is converted into the HSV colour space, which provides more reliable colour segmentation under varying lighting conditions.
import threading, msvcrt, time
import cv2
import numpy as np
from litewing import LiteWing
from litewing.manual_control import run_manual_control
# ── Configuration ─────────────────────────────────────────────
DEBUG_MODE       = 0                 # Enable debug mode (displays debug info/badge on the HUD)
CAMERA_INDEX     = 1                 # Index of the camera device to use (e.g., 0 for built-in, 1 for external ceiling camera)
DRONE_IP         = "192.168.43.42"   # IP address of the LiteWing drone for network connection
SENSITIVITY      = 0.2               # Movement sensitivity modifier for the drone controller
TARGET_HEIGHT    = 0.4               # Target altitude in meters for the drone to maintain when airborne
RESIZE_WIDTH     = None
RESIZE_HEIGHT    = None
# HSV ranges -- light green target (tuned for bright green ball)
GREEN_LO = (35, 60, 50)
GREEN_HI = (90, 255, 255)
# HSV ranges -- blue drone marker (Light/Sky Blue)
BLUE_LO = (90, 80, 100)
BLUE_HI = (135, 255, 255)
# Tracking -- 3-zone distance model
RETREAT_DIST    = 85   # px -- retreat if closer than this
FOLLOW_DIST     = 125   # px -- follow only if farther than this
DEADZONE        = 20    # px -- ignore smaller offsets
MIN_AREA        = 500   # px² -- noise filter
BOUNDARY        = 40    # px -- safety margin from frame edge
# Direction keys (adjust to match camera orientation)
DIRS = {"up": "w", "down": "s", "left": "a", "right": "d"}
# States that allow autonomous movement
AIRBORNE = {"HOVERING", "TRACKING", "TOO CLOSE", "MAINTAINING",
           "ALIGNED", "TARGET LOST", "TAKING_OFF"}
# ── Helpers ───────────────────────────────────────────────────
def clear_keys(drone):
   """Reset all movement keys to False."""
   for k in "wasd":
       drone._manual_keys[k] = False
def detect(hsv, color):
   """Return (cx, cy, radius) of the largest blob, or None."""
   if color == "target":
       mask = cv2.inRange(hsv, BLUE_LO, BLUE_HI)
   else:
       mask = cv2.inRange(hsv, GREEN_LO, GREEN_HI)
   kern = cv2.getStructuringElement(cv2.MORPH_ELLIPSE, (5, 5))
   mask = cv2.dilate(cv2.erode(mask, kern, iterations=1), kern, iterations=2)
   contours, _ = cv2.findContours(mask, cv2.RETR_EXTERNAL, cv2.CHAIN_APPROX_SIMPLE)
   if not contours:
       return None
   best = max(contours, key=cv2.contourArea)
   if cv2.contourArea(best) < MIN_AREA:
       return None
   (cx, cy), r = cv2.minEnclosingCircle(best)
   return int(cx), int(cy), int(r)
The detect() function applies predefined HSV thresholds to isolate the colored markers placed on the drone and the target. To remove unwanted noise, the detected mask is processed using erosion and dilation operations. The function then finds the largest contour, calculates its centre position, and returns the coordinates of the detected object.
These coordinates serve as the input for the tracking algorithm, allowing the system to continuously monitor the positions of both the drone and the target in real time.
   def track(target, drone_pos, drone):
   """3-zone autonomous tracking. Returns (status, direction)."""
   clear_keys(drone)
   if target is None or drone_pos is None:
       return "TARGET LOST", "HOLD"
   dx = target[0] - drone_pos[0]
   dy = target[1] - drone_pos[1]
   dist = (dx**2 + dy**2) ** 0.5
   vert_dom = abs(dy) >= abs(dx)
   # ── ZONE 1: RETREAT (too close) ───────────────────────
   if dist < RETREAT_DIST:
       if vert_dom:
           key = DIRS["down"] if dy < 0 else DIRS["up"]
           label = "RETREAT " + ("BACK" if dy < 0 else "FWD")
       else:
           key = DIRS["right"] if dx < 0 else DIRS["left"]
           label = "RETREAT " + ("RIGHT" if dx < 0 else "LEFT")
       drone._manual_keys[key] = True
       return "TOO CLOSE", label
   # ── ZONE 2: MAINTAIN (buffer -- hold position) ────────
   if dist < FOLLOW_DIST:
       return "MAINTAINING", "HOLD"
   # ── ZONE 3: FOLLOW (far away -- move toward target) ───
   if vert_dom and abs(dy) > DEADZONE:
       key = DIRS["up"] if dy < 0 else DIRS["down"]
       label = "FWD" if dy < 0 else "BACK"
   elif abs(dx) > DEADZONE:
       key = DIRS["left"] if dx < 0 else DIRS["right"]
       label = "LEFT" if dx < 0 else "RIGHT"
   else:
       return "ALIGNED", "ALIGNED"
   drone._manual_keys[key] = True
   return "TRACKING", label
Once the positions of the drone and the target are known, the track() function calculates the horizontal and vertical offsets (dx and dy) along with the distance between them. Based on this distance, the system switches between three predefined control zones.
Follow Zone: If the target is beyond the follow threshold, the drone moves toward it by determining the dominant direction and sending the corresponding movement command.
Maintain Zone: When the drone reaches the desired distance from the target, it simply hovers without sending any movement commands, resulting in smooth and stable tracking.
Retreat Zone: If the drone gets too close to the target, it moves in the opposite direction until a safe distance is restored.
This simple zone-based control strategy eliminates the need for complex path-planning algorithms while still providing reliable object-following behaviour.
Troubleshooting Common Drone Object Tracking Issues
While the system is simple, you may face a few common issues during setup and testing. Here are some typical problems and how to fix them:
| Issue | Likely Cause | Fix |
| Object not detected properly | Poor lighting or low colour contrast | Improve lighting and adjust the HSV range values in the code for the drone marker colour |
| Noisy or unstable detection | Image noise or inconsistent lighting | Increase the minimum contour area and fine-tune erosion/dilation settings |
| The wrong object is getting detected | Similar-coloured objects in the background | Remove similar colours from the environment or narrow the HSV range |
| Drone drifting outside the boundary | Target near the frame edge or overly aggressive correction | Set proper boundary limits in the code, reduce sensitivity, or add stricter boundary checks |
ESP32 Object Tracking Drone GitHub
Access the complete GitHub repository that contains the source code, project files, and setup instructions to build your own AI-powered object-tracking drone system.


Frequently Asked Questions About Object Tracking Drone Project
⇥ Why is color detection used instead of an object detection model?
The project uses color detection because it is lightweight, fast, and easy to implement. Since the drone and the target are marked with different colors, OpenCV can reliably detect and track them in real time without requiring machine learning models.
⇥ Can I use different colors for the drone and the target?
Yes. You can use any pair of distinct colors as long as you update the corresponding HSV ranges in the code. Make sure the chosen colors are different from the background for reliable detection.
⇥ Does this project require an internet connection?
No. The laptop communicates directly with the LiteWing drone over its built-in Wi-Fi access point. An internet connection is not required during operation.
⇥ Can this project track multiple objects?
The current implementation is designed to track a single target. However, the code can be extended to detect and track multiple objects by modifying the detection and control logic.
⇥ Can I replace colour detection with AI-based object detection?
Yes. Instead of colour detection, you can integrate object detection models such as YOLO or TensorFlow-based detectors. However, this requires more computational power and may reduce the overall processing speed compared to simple color detection.
Related LiteWing Drone Projects
Discover more hands-on LiteWing drone projects and tutorials to expand your skills in autonomous flight, computer vision, ESP32 programming, and drone control. From voice-controlled and gesture-controlled drones to Betaflight setup and configuration, these step-by-step guides will help you build smarter, AI-powered drone applications.
Build an ESP32 Voice-Controlled Drone with LiteWing using Python
We built a voice-controlled drone using ESP32 for the LiteWing drone using Python and speech recognition tools. The system listens to voice input through a microphone, converts the spoken words into text, and then translates those commands into actions for the drone
DIY Gesture Control Drone using Python with LiteWing and ESP32
In this article, we are going to show you how you can build a gesture-controlled drone. To do this, we will obviously need a drone, which in our case is a LiteWing Drone, and to control this drone, we will use an ESP32 dev module along with an mpu6050, both of which are strapped to our hand.
How to Connect the LiteWing ESP32 Drone to Betaflight
LiteWing can also be configured using Betaflight, a powerful and widely adopted flight control software used in FPV and racing drones. In this ESP32 Betaflight tutorial, we will go through the process of configuring the LiteWing drone Betaflight and turning it into a fully tunable drone.
Complete Project Code
# LiteWing Object Tracker — Lite Edition
# Autonomous BLUE-ball follower using a ceiling camera.
# Drone is identified by GREEN paper on top.
#
# Keys: T=Takeoff | L=Land | SPACE=E-Stop | Q=Quit
import threading, msvcrt, time
import cv2
import numpy as np
from litewing import LiteWing
from litewing.manual_control import run_manual_control
# ── Configuration ─────────────────────────────────────────────
DEBUG_MODE       = 0                 # Enable debug mode (displays debug info/badge on the HUD)
CAMERA_INDEX     = 1                 # Index of the camera device to use (e.g., 0 for built-in, 1 for external ceiling camera)
DRONE_IP         = "192.168.43.42"   # IP address of the LiteWing drone for network connection
SENSITIVITY      = 0.2               # Movement sensitivity modifier for the drone controller
TARGET_HEIGHT    = 0.4               # Target altitude in meters for the drone to maintain when airborne
# Camera Feed Resizing Options
# Set to integers (e.g., 640 and 480) to scale the processed camera frame.
# Set both to None to use the camera's original default resolution.
RESIZE_WIDTH     = None
RESIZE_HEIGHT    = None
# HSV ranges — light green target (tuned for bright green ball)
GREEN_LO = (35, 60, 50)
GREEN_HI = (90, 255, 255)
# HSV ranges — blue drone marker (Light/Sky Blue)
BLUE_LO = (90, 80, 100)
BLUE_HI = (135, 255, 255)

# Tracking — 3-zone distance model
RETREAT_DIST    = 85   # px — retreat if closer than this
FOLLOW_DIST     = 125   # px — follow only if farther than this
DEADZONE        = 20    # px — ignore smaller offsets
MIN_AREA        = 500   # px² — noise filter
BOUNDARY        = 40    # px — safety margin from frame edge
# Direction keys (adjust to match camera orientation)
DIRS = {"up": "w", "down": "s", "left": "a", "right": "d"}
# States that allow autonomous movement
AIRBORNE = {"HOVERING", "TRACKING", "TOO CLOSE", "MAINTAINING",
           "ALIGNED", "TARGET LOST", "TAKING_OFF"}
# ── Helpers ───────────────────────────────────────────────────
def clear_keys(drone):
   """Reset all movement keys to False."""
   for k in "wasd":
       drone._manual_keys[k] = False

def detect(hsv, color):
   """Return (cx, cy, radius) of the largest blob, or None."""
   if color == "target":
       mask = cv2.inRange(hsv, BLUE_LO, BLUE_HI)
   else:
       mask = cv2.inRange(hsv, GREEN_LO, GREEN_HI)
   kern = cv2.getStructuringElement(cv2.MORPH_ELLIPSE, (5, 5))
   mask = cv2.dilate(cv2.erode(mask, kern, iterations=1), kern, iterations=2)
   contours, _ = cv2.findContours(mask, cv2.RETR_EXTERNAL, cv2.CHAIN_APPROX_SIMPLE)
   if not contours:
       return None
   best = max(contours, key=cv2.contourArea)
   if cv2.contourArea(best) < MIN_AREA:
       return None
   (cx, cy), r = cv2.minEnclosingCircle(best)
   return int(cx), int(cy), int(r)

def out_of_bounds(pos, shape):
   """True if pos is outside the boundary margin."""
   if pos is None:
       return False
   h, w = shape[:2]
   x, y = pos[0], pos[1]
   return x < BOUNDARY or x > w - BOUNDARY or y < BOUNDARY or y > h - BOUNDARY

# ── Tracking Logic ────────────────────────────────────────────
def track(target, drone_pos, drone):
   """3-zone autonomous tracking. Returns (status, direction)."""
   clear_keys(drone)
   if target is None or drone_pos is None:
       return "TARGET LOST", "HOLD"
   dx = target[0] - drone_pos[0]
   dy = target[1] - drone_pos[1]
   dist = (dx**2 + dy**2) ** 0.5
   vert_dom = abs(dy) >= abs(dx)
   # ── ZONE 1: RETREAT (too close) ───────────────────────
   if dist < RETREAT_DIST:
       if vert_dom:
           key = DIRS["down"] if dy < 0 else DIRS["up"]
           label = "RETREAT " + ("BACK" if dy < 0 else "FWD")
       else:
           key = DIRS["right"] if dx < 0 else DIRS["left"]
           label = "RETREAT " + ("RIGHT" if dx < 0 else "LEFT")
       drone._manual_keys[key] = True
       return "TOO CLOSE", label
   # ── ZONE 2: MAINTAIN (buffer — hold position) ────────
   if dist < FOLLOW_DIST:
       return "MAINTAINING", "HOLD"
   # ── ZONE 3: FOLLOW (far away — move toward target) ───
   if vert_dom and abs(dy) > DEADZONE:
       key = DIRS["up"] if dy < 0 else DIRS["down"]
       label = "FWD" if dy < 0 else "BACK"
   elif abs(dx) > DEADZONE:
       key = DIRS["left"] if dx < 0 else DIRS["right"]
       label = "LEFT" if dx < 0 else "RIGHT"
   else:
       return "ALIGNED", "ALIGNED"
   drone._manual_keys[key] = True
   return "TRACKING", label

# ── HUD ───────────────────────────────────────────────────────
STATUS_COLORS = {
   "TRACKING":    (0, 200, 0),
   "ALIGNED":     (0, 255, 200),
   "MAINTAINING": (200, 180, 0),
   "TOO CLOSE":   (0, 100, 255),
   "TARGET LOST": (0, 140, 255),
}
def draw_hud(frame, target, drone_pos, status, drone, oob, direction):
   """Minimal heads-up display."""
   h, w = frame.shape[:2]
   # Boundary box
   color = (0, 0, 255) if oob else (80, 80, 80)
   cv2.rectangle(frame, (BOUNDARY, BOUNDARY), (w - BOUNDARY, h - BOUNDARY), color, 2)
   # Target marker
   if target:
       tx, ty, tr = target
       cv2.circle(frame, (tx, ty), tr, (255, 0, 0), 3)
       cv2.circle(frame, (tx, ty), 4, (255, 0, 0), -1)
       cv2.putText(frame, "TARGET", (tx - 28, ty - tr - 8),
                   cv2.FONT_HERSHEY_SIMPLEX, 0.45, (255, 0, 0), 1, cv2.LINE_AA)
   # Drone marker
   if drone_pos:
       dx, dy, dr = drone_pos
       cv2.circle(frame, (dx, dy), dr, (0, 255, 0), 3)
       cv2.circle(frame, (dx, dy), 4, (0, 255, 0), -1)
       cv2.putText(frame, "DRONE", (dx - 24, dy - dr - 8),
                   cv2.FONT_HERSHEY_SIMPLEX, 0.45, (0, 255, 0), 1, cv2.LINE_AA)
   else:
       cv2.putText(frame, "DRONE: NOT FOUND", (15, h - 40),
                   cv2.FONT_HERSHEY_SIMPLEX, 0.5, (0, 255, 0), 1, cv2.LINE_AA)
   # Arrow from drone → target + zone rings
   if target and drone_pos:
       cv2.arrowedLine(frame, (drone_pos[0], drone_pos[1]),
                       (target[0], target[1]), (0, 255, 255), 2, tipLength=0.15)
       cv2.circle(frame, (drone_pos[0], drone_pos[1]), RETREAT_DIST, (0, 80, 200), 1)
       cv2.circle(frame, (drone_pos[0], drone_pos[1]), FOLLOW_DIST, (0, 160, 0), 1)
   # Status + direction (top-left)
   s_col = STATUS_COLORS.get(status, (200, 200, 200))
   cv2.putText(frame, status, (15, 30),
               cv2.FONT_HERSHEY_SIMPLEX, 0.65, s_col, 2, cv2.LINE_AA)
   if direction:
       cv2.putText(frame, direction, (15, 58),
                   cv2.FONT_HERSHEY_SIMPLEX, 0.5, (0, 255, 255), 1, cv2.LINE_AA)
   # Telemetry (bottom-left)
   info = f"Bat {drone.battery:.1f}V | Alt {drone.height:.2f}m"
   cv2.putText(frame, info, (15, h - 15),
               cv2.FONT_HERSHEY_SIMPLEX, 0.42, (200, 200, 200), 1, cv2.LINE_AA)
   # Debug badge
   if drone.debug_mode:
       cv2.putText(frame, "[DEBUG]", (w - 100, 28),
                   cv2.FONT_HERSHEY_SIMPLEX, 0.55, (0, 165, 255), 2, cv2.LINE_AA)

# ── Main ──────────────────────────────────────────────────────
def main():
   drone = LiteWing(DRONE_IP)
   drone.debug_mode    = bool(DEBUG_MODE)
   drone.sensitivity   = SENSITIVITY
   drone.target_height = TARGET_HEIGHT
   drone.default_landing_duration = 0.1
   try:
       drone.connect()
       drone.land()
       time.sleep(1)
   except Exception as e:
       print(f"[CONN] {e}")
   cap = cv2.VideoCapture(CAMERA_INDEX, cv2.CAP_DSHOW)
   if not cap.isOpened():
       cap = cv2.VideoCapture(CAMERA_INDEX)
   if not cap.isOpened():
       print(f"[ERR] Cannot open camera {CAMERA_INDEX}")
       return
   print("LiteWing Tracker Lite  |  T=Takeoff  L=Land  SPACE=Stop  Q=Quit")
   status = "LANDED"
   flight_thread = None
   def _flight_loop():
       nonlocal status
       drone._manual_active = True
       try:
           run_manual_control(drone)
       except Exception:
           pass
       finally:
           drone._manual_active = False
           status = "LANDED"
   # Initialize resizable display window
   cv2.namedWindow("LiteWing Tracker", cv2.WINDOW_NORMAL)
   while True:
       ret, frame = cap.read()
       if not ret:
           break
       if RESIZE_WIDTH is not None and RESIZE_HEIGHT is not None:
           frame = cv2.resize(frame, (RESIZE_WIDTH, RESIZE_HEIGHT))
       hsv    = cv2.cvtColor(frame, cv2.COLOR_BGR2HSV)
       target = detect(hsv, "target")
       dpos   = detect(hsv, "drone")
       # ── Key handling ──
       if msvcrt.kbhit():
           key = msvcrt.getch()
           if key in (b'q', b'Q'):
               break
           elif key == b' ':
               drone._manual_active = False
               clear_keys(drone)
               try:
                   drone.emergency_stop()
               except Exception:
                   pass
               break
           elif key in (b't', b'T') and status == "LANDED":
               if flight_thread is None or not flight_thread.is_alive():
                   status = "TAKING_OFF"
                   flight_thread = threading.Thread(target=_flight_loop, daemon=True)
                   flight_thread.start()
           elif key in (b'l', b'L') and status not in ("LANDED", "LANDING"):
               status = "LANDING"
               clear_keys(drone)
               drone._manual_active = False
       # Transition: taking off → hovering
       if status == "TAKING_OFF" and drone.height >= TARGET_HEIGHT * 0.85:
           status = "HOVERING"
       oob = out_of_bounds(target, frame.shape) or out_of_bounds(dpos, frame.shape)
       # ── Autonomous tracking ──
       direction = ""
       if status in AIRBORNE:
           status, direction = track(target, dpos, drone)
       else:
           clear_keys(drone)
           if status == "LANDED":
               direction = "Press T"
       label = f"[DBG] {status}" if drone.debug_mode else status
       draw_hud(frame, target, dpos, label, drone, oob, direction)
       cv2.imshow("LiteWing Tracker", frame)
       if cv2.waitKey(1) & 0xFF in (ord('q'), ord(' ')):
           break
   # Cleanup
   drone._manual_active = False
   clear_keys(drone)
   cap.release()
   cv2.destroyAllWindows()

if __name__ == "__main__":
   main()

Add a comment
No account needed. Your comment appears once a moderator has reviewed it.