
LiteWing is an open-source ESP32-S3 based drone that offers a flexible platform for experimentation and learning. By default, LiteWing operates using the modified Crazyflie firmware. LiteWing can also be configured using Betaflight, a powerful and widely adopted flight control software used in FPV and racing drones.
In this ESP32 Betaflight tutorial, we will go through the process of configuring the LiteWing drone Betaflight and turning it into a fully tunable drone. LiteWing drone Betaflight integration unlocks a rich set of features such as PID tuning, motor configuration, receiver setup, flight modes, and real-time diagnostics, making it an excellent choice for users who want deeper control over their drone’s behavior.
This ESP32 Betaflight configurator guide is for beginners as well as experienced developers who want to explore how open-source hardware like LiteWing can be integrated with standard flight software. By the end of this ESP32 Betaflight tutorial, you will have a properly configured LiteWing drone and a clear understanding of how ESP32 Betaflight firmware can be used to unlock its full potential. If you want to learn more about the LiteWing drone, its hardware, and other features, make sure to check out the official documentation and resources.
What You'll Learn in This ESP32 Drone Betaflight Tutorial:
- Flashing the ESP32 Betaflight firmware to your LiteWing drone.
- Setting up and optimising your ESP32 Betaflight Configurator.
- Pin configuration for the correct communication between compatible hardware.
- Integrating your ExpressLRS receiver with Betaflight.
- PID tuning of the brushed motor drone.
- Configuring your flight modes and enabling your Blackbox Data Log.
Table of Contents
- Pre-Requirements for LiteWing Betaflight Configuration
- Step 1⇒ Uploading ESP32 Betaflight Firmware to LiteWing Drone
- Step 2⇒ Installing Betaflight Configurator for ESP32 Configuration
- Step 3⇒ Configuring Hardware Pins via Betaflight CLI
- Step 4⇒ Correcting IMU Orientation in LiteWing Betaflight Drone
- Step 5⇒ Battery Voltage Monitoring Configuration
- Step 6⇒ Configuring Motor Protocol for Brushed DC Motors
- Step 7⇒ Connecting and Configuring ExpressLRS Receiver
- Step 8⇒ Configuring Flight Modes for LiteWing Betaflight Drone
- Step 9⇒ PID Tuning for LiteWing Brushed Motor Drone
- Step 10⇒ Blackbox Flight Data Recording and Analysis
- Troubleshooting
- Advanced ESP32 Betaflight Configuration Tips
Pre-Requirements for LiteWing Betaflight Configuration
To follow this tutorial, you will need a LiteWing drone, an ExpressLRS (ELRS) receiver, and a compatible ELRS transmitter to control the drone. The receiver and transmitter should already be bound before connecting to the drone. A computer with Betaflight Configurator installed is also required for configuration and tuning. This ESP32 Betaflight configurator setup requires proper hardware connections.
Hardware Requirements:
» LiteWing ESP32-S3 drone with all components assembled
» ExpressLRS (ELRS) receiver for low-latency radio communication
» Compatible ELRS transmitter (pre-bound to receiver)
» USB data cable for computer connection
» LiPo battery suitable for LiteWing drone
Software Requirements:
» Betaflight Configurator v10.10.0 is installed on your computer
» Web browser (Chrome or Edge) for ESP flashing tool
» ESP32 Betaflight firmware binary file for ESP32-S3
Step 1⇒Uploading ESP32 Betaflight Firmware to LiteWing Drone
Before configuring the LiteWing ESP32 drone Betaflight firmware must be programmed manually using the ESP flashing tool. LiteWing uses an ESP32-S3 based ESP-FC, so the correct binary file must be flashed before proceeding.
Downloading the ESP32 Betaflight Firmware
First, open the ESP-FC open-source GitHub repository using the link below. This firmware is developed and maintained by rtlopez, and his work is highly appreciated for contributing to the open-source community.
GitHub Repository: https://github.com/rtlopez/esp-fc
Once the repository page opens, navigate to the Releases section. The releases page contains precompiled firmware binaries for different ESP based flight controllers. From there, download the firmware .zip file specifically built for the ESP32-S3 microcontroller since LiteWing is based on the ESP32-S3 platform.

To flash the firmware onto the LiteWing drone, open the Espressif ESP Tool (Web-based flasher) in a supported browser. Connect the LiteWing drone to your computer using a USB data cable, ensuring the drone is powered on and detected by your system. On the ESP Tool web page, click Select Port, choose the COM port corresponding to the LiteWing drone from the pop-up list and confirm the selection. Then click Connect to establish communication between the tool and the drone. Once connected successfully, the tool will be ready for firmware upload.
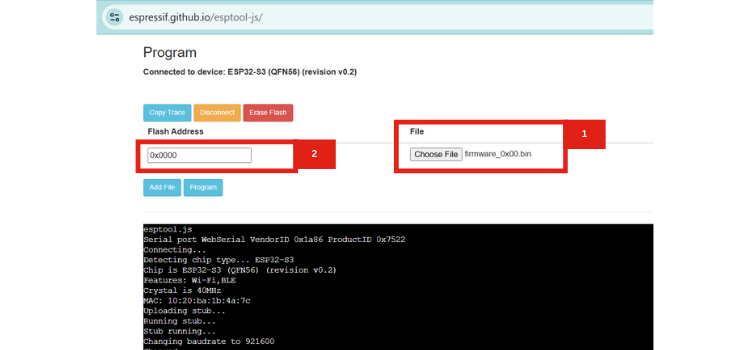
Upload the downloaded firmware file (firmware_0x00.bin) and set the flash address to 0x0000, verifying that both the correct file and address are selected. Click the Program button to begin flashing and wait until the process completes successfully, making sure not to disconnect the drone during programming. Once finished, the firmware will be successfully uploaded to the LiteWing drone, and you can now proceed to configure settings and tune the drone using Betaflight. Once the ESP32 Betaflight firmware upload completes successfully, your LiteWing drone is ready for configuration in Betaflight Configurator.
Flashing ESP32 Betaflight Firmware Using a Web-Based Tool
Step 2⇒ Installing Betaflight Configurator for ESP32 Configuration
To configure and tune the LiteWing ESP32 Betaflight drone, you need the Betaflight Configurator installed on your computer. This software allows you to connect to the drone and adjust flight settings.
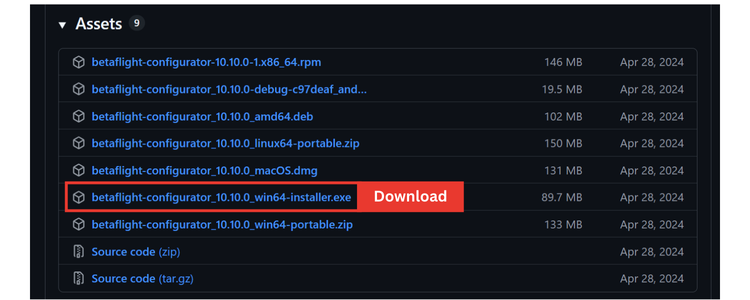
Downloading and Installing Betaflight Configurator
Visit the official GitHub release page for Betaflight Configurator Releases and download version 10.10.0 is recommended for easy setup. Choose the version compatible with your operating system: Windows, macOS, or Linux.
Configuring Betaflight Configurator Options
After installing and opening the ESP32 Betaflight configurator.
Before connecting the LiteWing ESP32 drone to Betaflight, you should adjust some settings in the Options tab as shown in the reference image. Make sure to enable “Show All Serial Devices” this ensures that the software can detect the drone even if it doesn’t appear by default.
These changes help the Betaflight Configurator communicate properly with the drone.
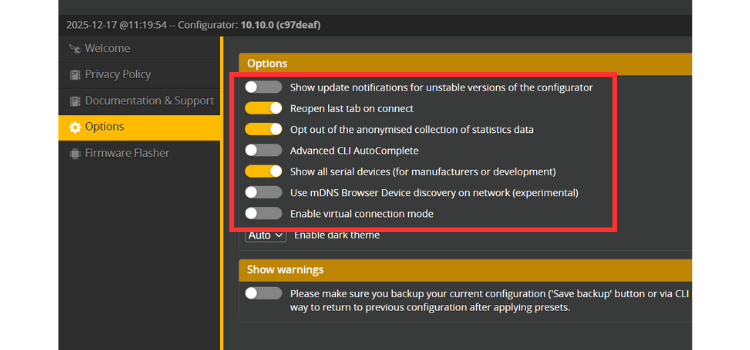
Once the settings are updated, manually select the COM port in the software and click the Connect button to establish communication between the software and the drone.
Step 3⇒ Configuring Hardware Pins via Betaflight CLI
When you first connect the LiteWing ESP32 drone to Betaflight, you may notice that the real-time updates and the 3D model in the setup tab do not respond correctly when the drone is moved. This happens because the default pin assignments in Betaflight do not match the LiteWing hardware. To fix this, you can update the pin assignments using the CLI tab in Betaflight Configurator. By entering the correct commands, you can map the pins according to LiteWing’s configuration, ensuring that all motors and sensors respond accurately during real-time updates.
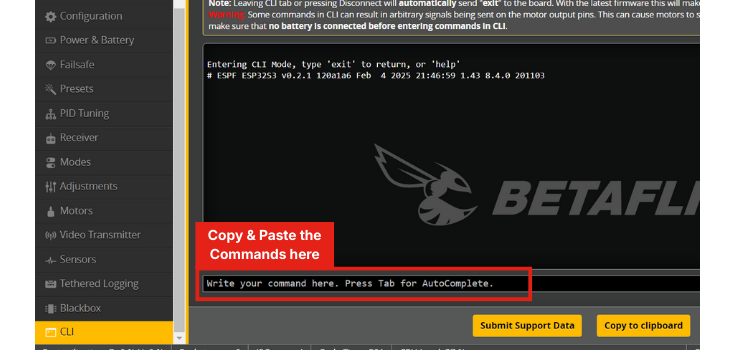
ESP32 Betaflight CLI Pin Configuration Commands
Navigate to the CLI tab in Betaflight Configurator and enter the following commands. These commands configure all necessary GPIO pins for the LiteWing ESP32 drone:
set pin_input_rx -1
set pin_output_0 6
set pin_output_1 5
set pin_output_2 3
set pin_output_3 4
set pin_buzzer 8
set pin_serial_0_tx 43
set pin_serial_0_rx 44
set pin_serial_1_tx 17
set pin_serial_1_rx 18
set pin_serial_2_tx -1
set pin_serial_2_rx -1
set pin_i2c_scl 10
set pin_i2c_sda 11
set pin_input_adc_0 2
set pin_input_adc_1 -1
set pin_spi_0_sck 12
set pin_spi_0_mosi 35
set pin_spi_0_miso 37
set pin_spi_cs_0 -1
set pin_spi_cs_1 7
set pin_spi_cs_2 -1
set pin_buzzer_invert -1
After pasting the commands, simply press Enter, then type save and press Enter again to save the changes. And then type reboot and press Enter again to apply the changes. This will update the pin configuration automatically, making the setup quick and easy without manually changing each assignment.
After the CLI commands are executed, simply disconnect and reconnect the LiteWing drone. This will allow the ESP32 drone to connect with Betaflight Configurator and to display real-time updates, reflecting the drone’s movements accurately.
Pin Configuration Changes Applied
The following pin configuration changes are implemented to match the LiteWing hardware setup.
| Pin Type | GPIO Assignment | Function |
|---|---|---|
| Motor Output 1 | GPIO 6 | Front-right motor PWM control |
| Motor Output 2 | GPIO 5 | Rear-right motor PWM control |
| Motor Output 3 | GPIO 3 | Rear-left motor PWM control |
| Motor Output 4 | GPIO 4 | Front-left motor PWM control |
| UART1 TX/RX | GPIO 17/18 | ExpressLRS receiver communication |
| I2C SCL/SDA | GPIO 10/11 | IMU sensor communication (MPU6050) |
| ADC Input | GPIO 2 | Battery voltage monitoring |
Step 4⇒Correcting IMU Orientation in LiteWing Betaflight Drone
After configuring the GPIO pins in your ESP32 Betaflight configurator, you may notice that the 3D model moves when the LiteWing drone is tilted or rotated, but the movements don't exactly match the actual drone orientation. The 3D model in Betaflight moves when the drone is tilted or rotated, but you may notice that its movements do not exactly match the actual drone. This happens because the IMU (Inertial Measurement Unit) on the LiteWing is placed in a different orientation. To correct this, go to the Configuration tab in Betaflight, scroll to Board and Sensor Alignment, and change the First Gyro setting from Default to CW 270°. This aligns the 3D model accurately with the real movements of the drone.

Step 5⇒ Battery Voltage Monitoring Configuration
To monitor the battery voltage in the software, make the necessary changes as shown in the reference image below, select Onboard ADC as the voltage meter source and then set the minimum and maximum cell voltage values, and adjust the warning cell voltage according to your requirements.
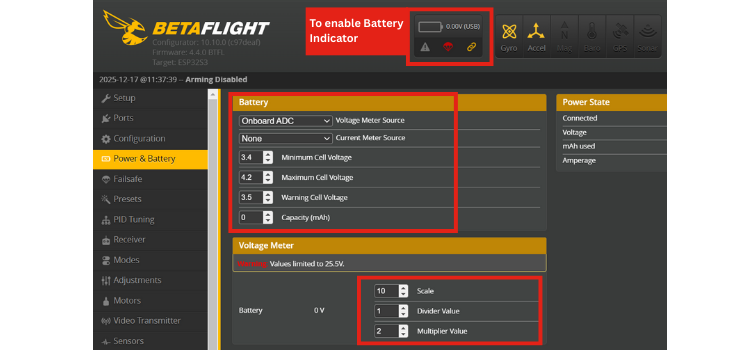
In the voltage meter settings, set the scale to 10, the divider value to 1, and the multiplier value to 2, as these values are calculated based on the voltage divider used in the LiteWing.
Voltage Divider Calibration for LiteWing ESP32 Drone
| Parameter | Value | Purpose |
|---|---|---|
| Voltage Scale | 10 | ADC reading multiplier for voltage calculation |
| Voltage Divider | 1 | Hardware divider ratio (pre-calculated in scale) |
| Voltage Multiplier | 2 | Correction factor for LiteWing's voltage divider circuit |
After entering these values, click Save and Reboot to apply the battery monitoring configuration to your ESP32 Betaflight firmware.
Step 6⇒Configuring Motor Protocol for Brushed DC Motors
LiteWing ESP32 drone uses brushed DC motors, so the motor protocol must be configured accordingly in Betaflight. In the Configuration tab of Betaflight Configurator, set the Motor Protocol to Brushed. Then set the Motor PWM Frequency to 8000 Hz. Keep the remaining motor and ESC-related parameters set as shown in the reference image, as these values are configured for the LiteWing hardware.
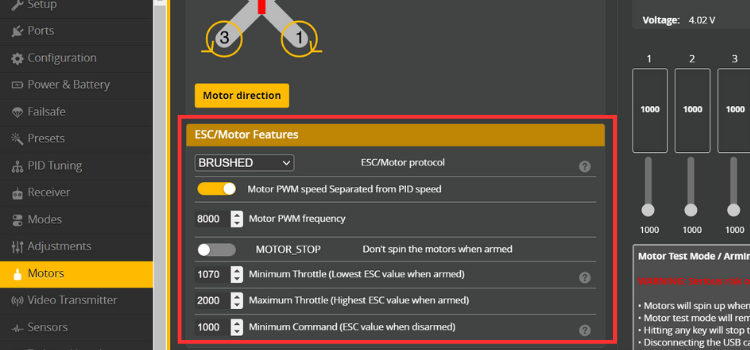
After making these changes, click Save and Reboot to apply the settings. Once completed, the motors will respond correctly and smoothly during operation.
Step 7⇒Connecting and Configuring ExpressLRS Receiver
In this setup, we are going to control the LiteWing drone using a radio transmitter and receiver. For this setup, we are using an ExpressLRS (ELRS) receiver due to its low-latency radio communication. ELRS is widely used due to its long range, fast response, and open-source support.
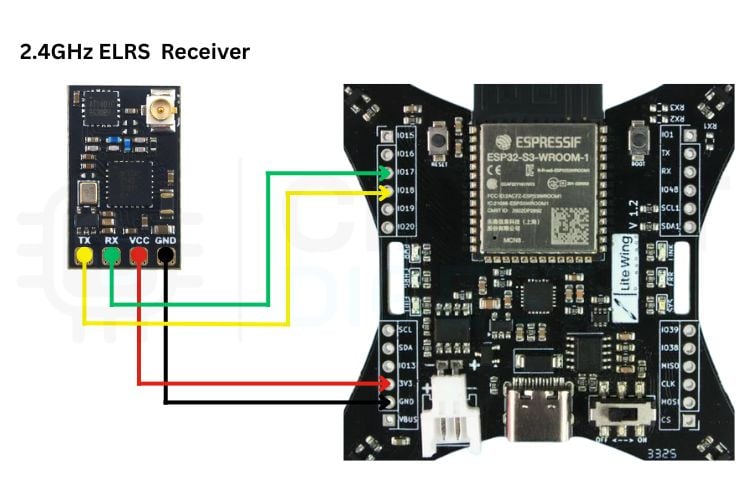
Connect the ELRS receiver to the LiteWing according to the UART wiring. Power the receiver using 3.3V and GND. Connect the receiver’s TX pin to the drone’s RX (GPIO18), and the receiver’s RX pin to the drone’s TX (GPIO17). Ensure all power, ground, and signal connections are properly made before proceeding.
Why Choose ExpressLRS for ESP32 Betaflight Drones?
Ideal for use within LiteWing Ctrl ESP32 Drone, ExpressLRS Receivers offer the following advantages:
∗ Ultra-low latency - Instantaneous feedback to commands and immediate changes to airframe attitude, with receipt of command inputs occurring at ultra-low latencies (as little as 5ms).
∗ Long distances - An excellent range of operation — several kilometres, assuming optimal use of antennas.
∗ Open Source Protocol - Firmware is open source; support from a community of users.
∗ CRSF Protocol - Fully compliant with the Betaflight CRSF Receiver Mode.
| ELRS Receiver Pin | LiteWing GPIO Pin | Connection Purpose |
|---|---|---|
| VCC (3.3V) | 3.3V Power | Receiver power supply |
| GND | GND | Common ground connection |
| TX | GPIO 18 (RX) | Receiver transmits data to drone |
| RX | GPIO 17 (TX) | Receiver receives data from drone |
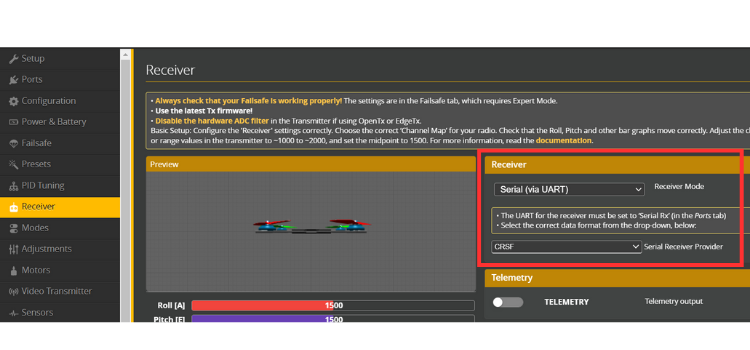
Next, open Betaflight Configurator and go to the Ports tab. Enable Serial RX on the UART 2, where the ELRS receiver is connected, and save the settings.
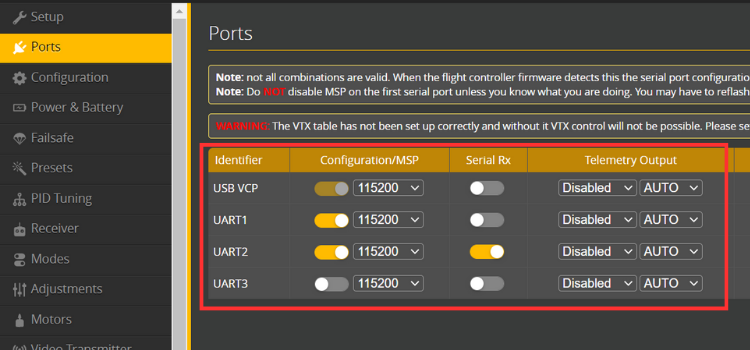
Then go to the Receiver tab, set the Receiver Mode to Serial-based receiver, and select CRSF as the protocol. Save and reboot the drone. After this, power on the transmitter if everything is configured correctly, and you will see real-time channel movements in the Receiver tab when you move the transmitter sticks.
Step 8⇒Configuring Flight Modes for LiteWing Betaflight Drone
Flight modes define how the LiteWing drone behaves during flight. In this setup, we will configure ARM, ANGLE, and BLACKBOX modes using Betaflight.
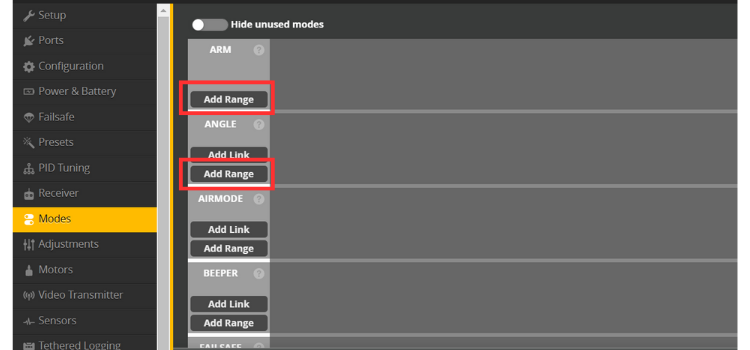
Understanding Flight Modes for ESP32 Drones
Open the Modes tab in Betaflight Configurator. Assign a switch on your transmitter to the ARM mode to enable and disable the motors safely. Next, assign another switch or position to ANGLE mode, which provides self-levelling and is ideal for stable and beginner-friendly flight. Enable BLACKBOX mode to record flight data for tuning and troubleshooting.
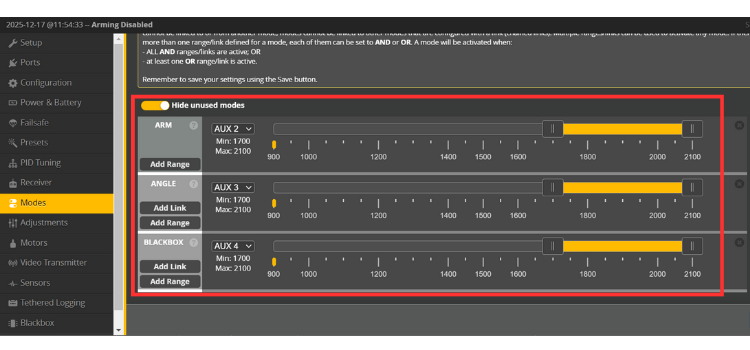
After assigning the switches, make sure the activation ranges are set correctly and click Save. These modes will allow you to arm the drone and switch between stable and aggressive flight behavior as needed.
Step 9⇒PID Tuning for LiteWing Brushed Motor Drone
The default PID values in the ESP32 Betaflight firmware are not suitable for the LiteWing drone and can result in unstable flight performance. Since LiteWing is a lightweight drone using brushed DC motors, custom PID values are required to achieve stable and smooth flight.
In the PID Tuning tab of Betaflight Configurator, replace the default values with the recommended LiteWing PID values provided in the reference configuration. These values have been tested and optimized specifically for LiteWing and help eliminate oscillations while improving control and responsiveness.
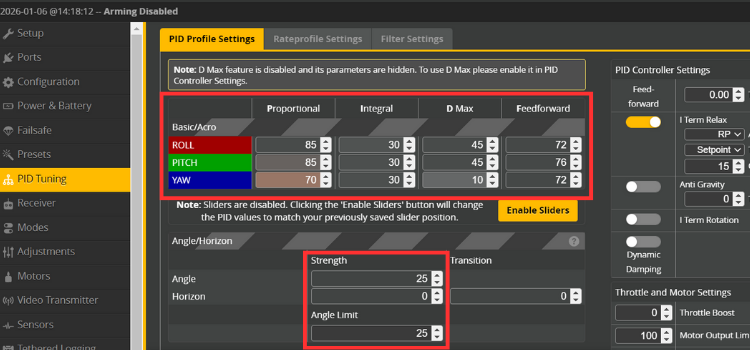
After entering the PID values, click Save and perform a short test flight. If required, minor adjustments can be made later, but the provided values should give a stable and reliable flying experience right away.
Why Custom PID Values for LiteWing ESP32 Drone?
The LiteWing drone requires custom PID tuning because:
∗ Low weight construction: The reduced weight necessitates changes to PID (proportional, integral and derivative) settings for the model.
∗ Brushed motor technology (coreless): Torque curves with different speed exponentials compared to the brushless motor.
∗ Small propellers: Lower inertia creates a need for different stabilization procedures than those required by larger props.
∗ Compact design: The shorter arm lengths between motors affect the rotational characteristics of the various components.
Step 10⇒ Blackbox Flight Data Recording and Analysis
Blackbox is a logging feature in Betaflight that records flight data such as gyro values, motor outputs, PID behavior, and receiver inputs. This data is useful for analyzing flight performance and troubleshooting issues like vibrations, oscillations, or unstable behavior.
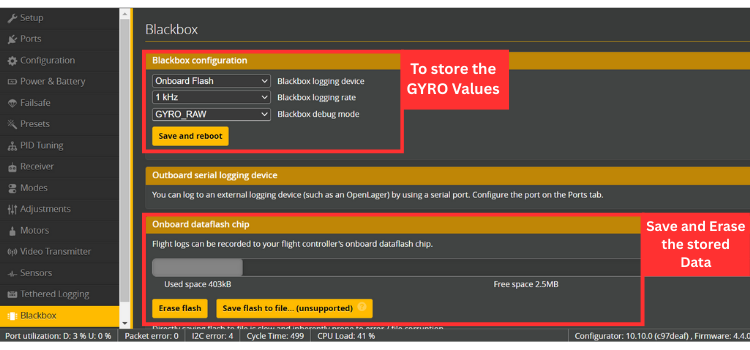
After enabling Blackbox in Betaflight, fly the LiteWing drone to record flight data. Once the flight is complete, connect the drone to Betaflight Configurator, go to the Blackbox tab, and download the log files. Open these logs in the Betaflight Blackbox Explorer to analyze gyro data, PID behavior, and vibrations, which help in improving stability and tuning performance.
After completing all the steps in this guide, your LiteWing drone configured with Betaflight is fully ready for flight. You can now safely test it, fine-tune settings if needed, and explore more advanced Betaflight features as you gain experience.
Troubleshooting Common ESP32 Betaflight Issues
Frequently Asked Questions About ESP32 Betaflight Tutorial
⇥ 1. How to calibrate the IMU?
To calibrate the IMU (Inertial Measurement Unit) in Betaflight, place the LiteWing drone on a flat and stable surface. Open Betaflight Configurator and connect the drone. Go to the Setup tab and click the Calibrate Accelerometer button. Keep the drone completely still during the calibration process. Once finished, the IMU will be calibrated, ensuring accurate orientation and stable flight behavior.
⇥ 2. Why is my LiteWing not connecting to Betaflight Configurator?
After flashing or making configuration changes, disconnect and reconnect the drone, and ensure that no other applications (such as Arduino IDE, serial monitor, or ESP tools) are using the same COM port.
⇥ 3. Do I need to calibrate the accelerometer every time?
No, you do not need to calibrate the accelerometer every time you power on the LiteWing drone. Accelerometer calibration is usually required only once during the initial setup or after making major changes.
⇥ 4. How do I enable FPV (Acro) mode on the LiteWing drone?
Assign a switch for ARM and do not enable ANGLE mode.
When the angle mode is off, the LiteWing drone flies in FPV (Acro) mode.
Other LiteWing ESP32 Drone Projects
Beginner-friendly LiteWing drone projects that explore different ways to program, control, and experiment with ESP32 based drones, focusing on practical learning and real-world applications.

DIY Gesture Control Drone using Python with LiteWing and ESP32
Build a gesture-controlled drone using ESP32 and LiteWing. This project explains how to track hand movements with MPU6050 and control the drone via Bluetooth and Python using UDP communication.

How to Use Height Hold Mode in LiteWing ESP32 Drone?
Learn how to add height hold to the LiteWing ESP32 drone using the VL53L1X ToF sensor. This tutorial explains sensor setup, PID control, and app integration for smooth indoor flights.

How to Program the LiteWing Drone using Python with Crazyflie Cflib Python SDK
Learn how to control the LiteWing drone using the Crazyflie cflib Python SDK. This guide covers installation, basic commands, and writing Python code to spin the drone's motors via Wi-Fi.
Yes it should work the same with the older version of the board.
Would it be possible to get battery telemetry via charge information so that it could be displayed on the boxer controller?

Thanks for the article, I see that you are using version1.2 board. Will this work the same with the older version of the board. Thanks