

A servo motor is a type of motor that is used to control the precise movement of a device. It typically consists of a DC motor, a control circuit, and a feedback mechanism. The feedback mechanism is used to provide information about the position of the motor shaft to the control circuit, which then adjusts the power to the motor accordingly. This feedback loop ensures that the motor shaft moves to its precise location specified by the control signal. Servo motors are used in a variety of applications where precise control of positioning is required, such as in robotics, CNC machines, and 3D printers. They are also used in aircraft to control surfaces such as elevators and ailerons.
So, in this article, we are going to interface a SG90 servo motor with ESP32 and in the process, we will let you know how a servo motor works with its internal circuitry. In the end, we will be making a hardware circuit and write a bit of code to give you a better understanding of the servo motor and its working. In one of our previous projects, we interfaced a Servo Motor Control with Arduino UNO and we have also built Servo Position Control with Weight (Force Sensor) and many other Servo Motor based Projects. You can check those out if you are interested.
How to Control the Angle of the Servo Motor?
The job of a servo motor is to control the angle of rotation in a closed-loop control system and use the feedback to adjust the speed and angle of the motor to the active desired result.

The SG90 servo motor we are using uses a closed-loop control system to control the shaft position of the motor. To change the position of the motor arm, you just need to provide a 50Hz PWM signal with a variable duty cycle.
To control the shaft angle of the servo motor, you need to send in a series of pulses to the servo motor; a conventional servo motor expects to receive a pulse every 20 milliseconds with a duty cycle of 50Hz. The control board inside the servo motor is so designed that the length of the pulse determines the angle of the servo shaft. If the pulse is high for 1ms, then the servo angle will be at a 0-degree position. The 1.5ms pulse will take the shat to a 90-degree position, and a high pulse of 2ms will send the servo arm to 180 degrees. A pulse ranging from 1ms to 2ms will move the servo shaft to a 180-degree position.
SG90 Servo Motor Parts
The S90G servo motor is a very low-cost low-power device that can be used in many applications. The Parts inside the S90G servo motor are shown below.

As you can see in the above image, we have opened a servo motor to expose all the parts inside it. And inside the motor, you can see the reduction gear, the Main Motor, the potentiometer, and the control board. The potentiometer provides position feedback to the servo control unit where the current position of the motor is compared to the target position.
SG90 Servo Motor Pinout
Most of the servo motors you find in the market will have three connections. The pinout of the SG90 servo is as follows.

GND Is a common ground for both the motor and microcontroller.
VCC is the supply voltage that powers the servo.
Control is the input from a microcontroller or any other control mechanism.
Commonly Asked Questions on Servo Motor
Why is it called a servo motor?
A servo motor is a general term used for a specific kind of linear or rotary actuator. Basically, the name servo motor is related to the term servomechanism, which means that the motor is constantly monitored to control its motion.
What is a servo motor used for?
Servo motors, or "servos," are electrical devices or linear actuators that can precisely rotate and can be used to push machine elements. Servos are most commonly employed for angular or linear positions.
Is a servo motor AC or DC?
There are two types of servo motors, AC servos and DC servos. The main difference between the two motors is their source of power. AC servo motors rely on an electric outlet, rather than batteries like DC servo motors.
What is a servo motor and its types?
Servo motors come in many sizes and in three basic types. The three types include positional rotation, continuous rotation, and linear. Positional Rotation servos rotate 180 degrees. They also have stops in the gear mechanism to protect the output shaft from over-rotating.
What is the difference between a DC motor and a Servo motor?
The Servo motor is a three-wire system known as power, ground, and control. It has an assembly of four DC motors, a gearing set, a control circuit, and a position sensor. A DC motor is an individual machine with no assembly. They are used in robotic arms, legs, or rudder control.
Interfacing Circuit Diagram of Servo Motor with ESP32
Now we know how the servo motor works. We can connect all the required wires to the ESP32, and we will write a bit of code to control the servo motor. Connecting the servo motor to ESP32 is very simple. You just need to connect the power pin and the servo motor to the ESP32 and we need to connect the control pin to any GPIO pin of the ESP332. The complete connection diagram for ESP32 servo motor control project is shown below.

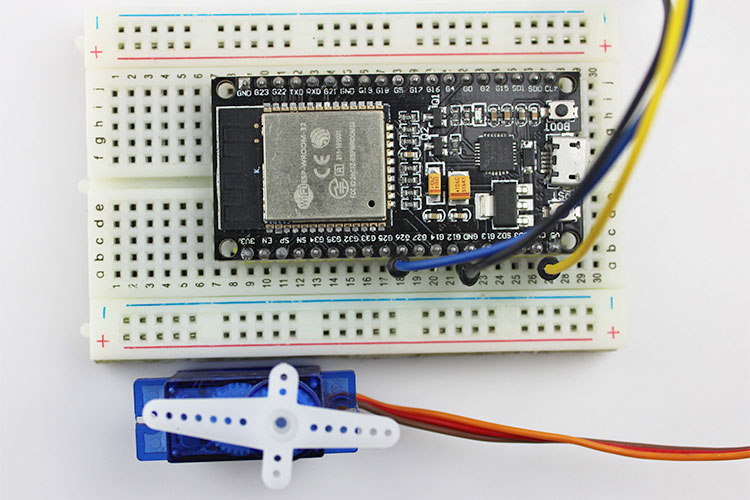
You can see the hardware image of the setup is given below. For the hardware, we have connected the ESP32 to a breadboard and we have connected the servo with some jumper wires.
Arduino Code for Interfacing Servo Motor with ESP32
The code to drive a servo with ESP32 is very simple and easy to understand. In the code, we just need to define a hardware pin and the rest will be handled by ESP32. But before that, we need to download the esp32 servo motor library. Once the library is downloaded and installed in the Arduino Library, we can start our coding process.
We start our code by including the Servo.h Library and we also declare the Servo instance. Next, we declare a variable named pos, the pos variable will hold the calculated position data for our servo.
#include <Servo.h>
Servo myservo;  // create servo object to control a servo
// twelve servo objects can be created on most boards
int pos = 0;
Next, we have our setup() function. In the setup function, we will use the attach method of the servo library to set the GPIO pin of the ESP32 as the control signal output.
void setup() {
  myservo.attach(26);  // attaches the servo on pin 13 to the servo object
}
In the void loop() section, we have our two for loops, the first for loop will rotate the motor from 0 degrees to 180 degrees and the second for loop will rotate the motor from 180 degrees to 0. This process will continue endlessly until the power is cut off.
void loop() {
  for (pos = 0; pos <= 180; pos += 1) { // goes from 0 degrees to 180 degrees
    // in steps of 1 degree
    myservo.write(pos);              // tell servo to go to position in variable 'pos'
    delay(15);                       // waits 15ms for the servo to reach the position
  }
  for (pos = 180; pos >= 0; pos -= 1) { // goes from 180 degrees to 0 degrees
    myservo.write(pos);              // tell servo to go to position in variable 'pos'
    delay(15);                       // waits 15ms for the servo to reach the position
  }
}
That's all for the code section for this project and we can now move on to the next portion.
Working of the Servo Module with ESP32
The video below shows the hardware circuitry of the controlling SG90 servo motor with ESP32. As mentioned earlier, we have programmed the ESP32 so that the motor arm continuously rotated from 0 to 180 and 180 to 0. And the video shown below is a representation of just that.
Errors in Interfacing Servo Motor? - Here is what you Should do
Sometimes the servo can misbehave when you are running your servo directly from the ESP32 power supply. Because at starting the motor draws high current spikes that can reset the microcontroller or can permanently damage it.
To solve this issue, you can add a fairly large electrolytic capacitor (470uF – 1000uF) between GND and 5V.
The capacitor acts as a reservoir and when the motor starts drawing huge amounts of current, the capacitor can provide the required current, that way your ESP will not misbehave. The capacitor has two legs: the longer one is connected to 5V and the other one is connected to the ground.
Projects using Arduino and Servo Motor

What is a Servo Motor? - Understanding the basics of Servo Motor Working
If you want to learn in-depth about a servo motor then this project is for you, because in this project we have gone through in detail about various types of servos and how they work.

Servo Motor Control using Arduino
If you want to learn in-depth about a servo motor then this project is for you, because in this project we have gone through in detail about various types of servos and how they work.

How to Control Servo Motor using FS-i6 Transmitter-Receiver
If you are interested in building your own RC plane and RC copter, you must check this project out because in this project we have gone to great length explaining on how a FS-i6 transceiver module works and how you can interface a SG90 servo with it.

Control a Servo Motor with Raspberry Pi Pico Using PWM in MicroPython
If you want to learn how you can control a servo motor with raspberry pi pico and python, then this is the project that you are looking for, because in this project we have done just that by interfacing a servo motor with raspberry pi pico.
Complete Project Code
#include <Servo.h>
Servo myservo;  // create servo object to control a servo
// twelve servo objects can be created on most boards
int pos = 0;    // variable to store the servo position
void setup() {
  myservo.attach(26);  // attaches the servo on pin 13 to the servo object
}
void loop() {
  for (pos = 0; pos <= 180; pos += 1) { // goes from 0 degrees to 180 degrees
    // in steps of 1 degree
    myservo.write(pos);              // tell servo to go to position in variable 'pos'
    delay(15);                       // waits 15ms for the servo to reach the position
  }
  for (pos = 180; pos >= 0; pos -= 1) { // goes from 180 degrees to 0 degrees
    myservo.write(pos);              // tell servo to go to position in variable 'pos'
    delay(15);                       // waits 15ms for the servo to reach the position
  }
}
