
Let's build a cool hand gesture-controlled robot that'll amaze your friends and family—it's like magic! This step-by-step guide helps you build a hand gesture-controlled robot using simple components like Arduino, MPU6050 Accelerometer, nRF24L01 Transmitter-Receiver Pair, and L293D motor driver module. We'll split the robot into two parts: the Transmitter and the Receiver.
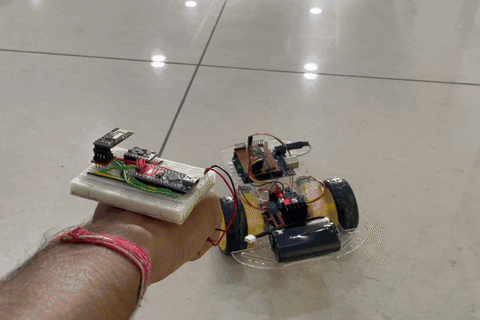
The Transmitter section comprises an Arduino Uno, MPU6050 Accelerometer, and Gyroscope, along with the nRF24L01 transceiver. On the other hand, the Receiver section includes an Arduino Uno, nRF24L01, two DC motors, and an L293D motor driver. The transmitter serves as the remote control, allowing the robot to respond to gestures and move accordingly. Impressively, the robot's movements are controlled by the gestures you make with your hands. This project combines sensor technology, wireless communication, and motor control to create a captivating and interactive experience. Follow the steps in this tutorial to bring this magical gesture-controlled robot to life and leave a lasting impression on your audience.
If you are interested in more gesture controlled projects, you can check out the below
1. Gesture based light control
2. Gesture controlled Robotic Arm
3. Gesture controlled Video Player
4. Gesture controlled Home Automation
How Does the Gesture Control Robot Work?
This project involves two circuits: a transmitter circuit and a receiver circuit. The MPU6050 accelerometer sensor translates hand gestures into electrical signals. The Arduino Nano processes these signals and transmits them via the RF transmitter. On the receiving end, the RF receiver picks up these signals and forwards them to the Arduino Uno for decoding. Upon receiving the signals, the Arduino Uno triggers the motors through the motor driver, directing the robot to move either "FORWARD," "BACKWARD," "LEFT," or "RIGHT."
If the value of acceleration along the x axis is less than 340, then the robot should move Forward.
If the value of acceleration along the x axis is more than 360, then the robot should move Backward.
If the value of acceleration along y axis is less than 140, then the robot should turn Left.
If the value of acceleration along y axis is more than 160, then the robot should turn Right.
If none of the above conditions are satisfied, then the robot should stop.
Required Components for the Gesture Control Robot
Arduino Uno
Arduino Nano
NRF24L01
MPU6050
2WD Acrylic Chassis kit
L298N Motor Driver Module
7.4V Li-ion battery/ 9V battery
Connecting Wires
MPU6050 Accelerometer and Gyroscope

The MPU6050 sensor module is like a tiny computer that can sense movement in 6 different ways: 3 for acceleration and 3 for rotation (gyroscope). It also has a built-in temperature sensor. This module can talk to other devices, like microcontrollers and sensors (e.g., magnetometer or pressure sensor), using an I2C bus and an Auxiliary I2C bus.
The main job of the MPU6050 is to measure how fast something is moving, its orientation, and other motion-related stuff. It's handy because it comes with a Digital Motion Processor, a mini-computer inside it that can do complex calculations. This makes the MPU6050 useful for analyzing and controlling motion in different applications.
NRF24L01 Transceiver Module

The nRF24L01 is a compact radio transceiver designed for the global 2.4 - 2.5 GHz ISM band. Packed into a single chip, it includes a fully integrated frequency synthesizer, a power amplifier, a crystal oscillator, a demodulator, modulator, and an Enhanced ShockBurst protocol engine. You can easily set its output power, frequency channels, and protocols using an SPI interface.
This Transceiver module operates in a voltage range of 1.9V to 3.6V. It comes with built-in Power Down and Standby modes, making it energy-efficient and straightforward to use.
Circuit Diagram of the Gesture Control Robot
This Gesture controlled Robot using Arduino hardware is divided into two sections.
Transmitter
Receivers
Transmitter Circuit for Arduino Gesture Controlled Robot

The transmitting part of this project includes the MPU6050 Accelerometer and Gyroscope, nRF24L01 Transceiver, and Arduino Uno. The Arduino keeps receiving information from the MPU6050 and then sends this data to the nRF Transmitter. The RF transmitter then broadcasts this data into the surroundings.

Receiver Circuit for Arduino Gesture Controlled Robot

The part of the gesture-controlled robot that receives signals includes the Arduino Uno, nRF24L01 Transceiver, 2 DC motors, and a L298N Motor driver module. The NRF24L01 receiver captures the data transmitted from the remote, relaying it to the Arduino. Subsequently, based on the received signals, the Arduino commands the movement of the DC motors. The circuit diagram for this Receiver section is provided below.

Gesture Controlled Robot Using Arduino Code Explanation
Complete code for this Gesture controlled robot using Arduino is given at the end of the document. Here we are explaining the program block by block.
Transmitter Side Program
The transmitter code utilizes an MPU6050 accelerometer and gyroscope, along with an nRF24L01 transceiver, to wirelessly communicate with the receiver. The MPU6050 sensor captures motion data, which is then mapped and transmitted to the receiver using the nRF24L01 module. The transmitted data represents hand gestures along the X and Y axes, allowing for control of the robot's movement.
Ensure that you have the necessary libraries installed. You can download the library files from the given links.
SPI.h library — Download
RF24.h library — Download
Wire.h library — Download
I2Cdev.h library — Download
MPU6050.h library — Download
#include <SPI.h>        //SPI library for communicate with the nRF24L01+
#include "RF24.h"       //The main library of the nRF24L01+
#include "Wire.h"       //For communicate
#include "I2Cdev.h"     //For communicate with MPU6050
#include "MPU6050.h"    //The main library of the MPU6050
Here, the necessary libraries are included. SPI is used for communication with the nRF24L01 module, RF24 is the main library for nRF24L01, Wire is used for general communication, and I2Cdev and MPU6050 are used for interfacing with the MPU6050 accelerometer and gyroscope.
//Define the object to access and cotrol the Gyro and Accelerometer (We don't use the Gyro data)
MPU6050 mpu;
int16_t ax, ay, az;
int16_t gx, gy, gz;
An instance of the MPU6050 class is created, and variables to store the accelerometer and gyroscope readings (ax, ay, az, gx, gy, gz) are declared.
//Define packet for the direction (X axis and Y axis)
int data[2];

//Define object from RF24 library - 8 and 9 are a digital pin numbers to which signals CE and CSN are connected.
RF24 radio(8,9);
An array data of size 2 is declared to store X and Y axis data. An RF24 object named radio is created with digital pins 8 and 9 as the CE and CSN pins.
//Create a pipe addresses for the communicate
const uint64_t pipe = 0xE8E8F0F0E1LL;
A unique address (pipe) is defined for communication between the transmitter and receiver.
void setup(void)
{
  Serial.begin(9600);
  Wire.begin();
  mpu.initialize();              //Initialize the MPU object
  radio.begin();                 //Start the nRF24 communicate
  radio.openWritingPipe(pipe);   //Sets the address of the receiver to which the program will send data.
}
The setup function initializes the serial communication, Wire library, MPU6050 object, and the nRF24 communication. It sets up the communication pipe for the transmitter.
void loop(void){

  //With this function, the acceleration and gyro values of the axes are taken.
  //If you want to control the car axis differently, you can change the axis name in the map command.
  mpu.getMotion6(&ax, &ay, &az, &gx, &gy, &gz);

  //In two-way control, the X axis (data [0]) of the MPU6050 allows the robot to move forward and backward.
  //Y axis (data [1]) allows the robot to right and left turn.
  data[0] = map(ax, -17000, 17000, 300, 400 ); //Send X axis data
  data[1] = map(ay, -17000, 17000, 100, 200);  //Send Y axis data
  radio.write(data, sizeof(data));
  Serial.print("X axix data = ");
  Serial.println(data[0]);
  Serial.print("Y axix data = ");
  Serial.println(data[1]);
}
In the main loop, the getMotion6 function reads the accelerometer and gyroscope values. The X and Y axis data is mapped to a specific range and stored in the data array. This data is then sent using the radio.write function. The X axis and Y axis data is printed to the Serial Monitor for debugging.
Receiver Side Program
On the receiver side, an Arduino Uno with an nRF24L01 module receives the transmitted data from the transmitter. Depending on the received signals representing hand gestures, the Arduino controls the direction of two DC motors using a motor driver module (L293D). The code includes logic for moving the robot forward, backward, left, right, or stopping based on the interpreted hand gestures.
#include <SPI.h>      //SPI library for communicate with the nRF24L01+
#include "RF24.h"     //The main library of the nRF24L01+
These lines include the necessary libraries for communication with the nRF24L01 module.
//Define enable pins of the Motors
const int enbA = 3;
const int enbB = 6;

//Define control pins of the Motors
//If the motors rotate in the opposite direction, you can change the positions of the following pin numbers
const int IN1 = 2;    //Right Motor (-)
const int IN2 = 4;    //Right Motor (+)
const int IN3 = 5;    //Left Motor (+)
const int IN4 = 7;    //Right Motor (-)

//Define variable for the motors speeds
//I have defined a variable for each of the two motors
//This way you can synchronize the rotation speed difference between the two motors
int RightSpd = 200;
int LeftSpd = 250;
These lines define the pins for motor control (enable and input pins) and set initial speeds for the right and left motors.
//Define packet for the direction (X axis and Y axis)
int data[2];

//Define object from RF24 library - 8 and 9 are a digital pin numbers to which signals CE and CSN are connected
RF24 radio(8,9);
An array data of size 2 is declared to store X and Y axis data received from the transmitter. An RF24 object named radio is created with digital pins 8 and 9 as the CE and CSN pins.
//Create a pipe addresses for the communicate
const uint64_t pipe = 0xE8E8F0F0E1LL;
A unique address (pipe) is defined for communication between the transmitter and receiver.
void setup()
{
  //Define the motor pins as OUTPUT
  pinMode(enbA, OUTPUT);
  pinMode(enbB, OUTPUT);
  pinMode(IN1, OUTPUT);
  pinMode(IN2, OUTPUT);
  pinMode(IN3, OUTPUT);
  pinMode(IN4, OUTPUT);

  Serial.begin(9600);
  radio.begin();                    //Start the nRF24 communicate
  radio.openReadingPipe(1, pipe);   //Sets the address of the transmitter to which the program will receive data.
  radio.startListening();
  }
The setup function initializes the motor control pins as OUTPUT, starts serial communication, initializes the nRF24 module, sets up the communication pipe for the receiver, and prepares it to listen for incoming data.
void loop(){
  if (radio.available()){
    radio.read(data, sizeof(data));

    if(data[0] < 340){
      //forward
      analogWrite(enbA, RightSpd);
      analogWrite(enbB, LeftSpd);
      digitalWrite(IN1, HIGH);
      digitalWrite(IN2, LOW);
      digitalWrite(IN3, HIGH);
      digitalWrite(IN4, LOW);
      Serial.println("forward");
    }

    if(data[0] > 360){
      //backward
      analogWrite(enbA, RightSpd);
      analogWrite(enbB, LeftSpd);
      digitalWrite(IN1, LOW);
      digitalWrite(IN2, HIGH);
      digitalWrite(IN3, LOW);
      digitalWrite(IN4, HIGH);
      Serial.println("backward");
    }

    if(data[1] > 160){
       //right
      analogWrite(enbA, RightSpd);
      analogWrite(enbB, LeftSpd);
      digitalWrite(IN1, LOW);
      digitalWrite(IN2, HIGH);
      digitalWrite(IN3, HIGH);
      digitalWrite(IN4, LOW);
      Serial.println("right");
    }

    if(data[1] < 140){
     //left
      analogWrite(enbA, RightSpd);
      analogWrite(enbB, LeftSpd);
      digitalWrite(IN1, HIGH);
      digitalWrite(IN2, LOW);
      digitalWrite(IN3, LOW);
      digitalWrite(IN4, HIGH);
      Serial.println("left");
    }

    if(data[0] > 340 && data[0] < 360 && data[1] > 140 && data[1] < 160){
      //stop car
      analogWrite(enbA, 0);
      analogWrite(enbB, 0);
      digitalWrite(IN1, LOW);
      digitalWrite(IN2, LOW);
      digitalWrite(IN3, LOW);
      digitalWrite(IN4, LOW);
      Serial.println("stop");
    }
  }
}
In the main loop, the program checks if there is data available from the transmitter. If data is available, it reads the X and Y axis values from the transmitter. Depending on the received values, specific motor control logic is executed to make the robot move forward, backward, right, left, or stop. The movement status is printed to the Serial Monitor for debugging.
Note: In the receiver code, the motor control logic is not fully implemented, and you may need to modify it based on your specific motor driver configuration and preferences. Also, Calibration of the MPU6050 may be necessary to ensure accurate readings. Ensure the wiring connections match the pin assignments in the code.
Testing the Gesture Controlled Robot Using Arduino

Once you have assembled the hardware components, connect both the transmitter and receiver Arduinos to your laptop and upload the provided code. Afterward, manipulate the MPU6050 accelerometer to influence the movements of the robot car.


Complete Project Code
//Arduino Code for gesture controlled robot
#include <SPI.h>        //SPI library for communicate with the nRF24L01+
#include "RF24.h"       //The main library of the nRF24L01+
#include "Wire.h"       //For communicate
#include "I2Cdev.h"     //For communicate with MPU6050
#include "MPU6050.h"    //The main library of the MPU6050

//Define the object to access and cotrol the Gyro and Accelerometer (We don't use the Gyro data)
MPU6050 mpu;
int16_t ax, ay, az;
int16_t gx, gy, gz;
//Define packet for the direction (X axis and Y axis)
int data[2];
//Define object from RF24 library - 8 and 9 are a digital pin numbers to which signals CE and CSN are connected.
RF24 radio(8,9);
//Create a pipe addresses for the communicate
const uint64_t pipe = 0xE8E8F0F0E1LL;
void setup(void){
  Serial.begin(9600);
  Wire.begin();
  mpu.initialize();              //Initialize the MPU object
  radio.begin();                 //Start the nRF24 communicate
  radio.openWritingPipe(pipe);   //Sets the address of the receiver to which the program will send data.
}
void loop(void){

  //With this function, the acceleration and gyro values of the axes are taken.
  //If you want to control the car axis differently, you can change the axis name in the map command.
  mpu.getMotion6(&ax, &ay, &az, &gx, &gy, &gz);
  //In two-way control, the X axis (data [0]) of the MPU6050 allows the robot to move forward and backward.
  //Y axis (data [1]) allows the robot to right and left turn.
  data[0] = map(ax, -17000, 17000, 300, 400 ); //Send X axis data
  data[1] = map(ay, -17000, 17000, 100, 200);  //Send Y axis data
  radio.write(data, sizeof(data));
  Serial.print("X axix data = ");
  Serial.println(data[0]);
  Serial.print("Y axix data = ");
  Serial.println(data[1]);
}

Nice work!