 Vedhathiri
Author

Think of a busy road where hundreds of riders pass every minute, some wearing helmets, many not, and imagine trying to monitor all of them manually. It’s almost impossible to keep track in real time. Now imagine a small device quietly watching the scene, capturing an image with a single trigger, and instantly telling you whether safety rules are being followed. That is exactly what this ESP32-CAM helmet detection project delivers.
Rather than relying on expensive hardware or complex on-device machine learning, this smart helmet detection system takes a cloud-first approach. A compact ESP32-CAM captures the image and sends it securely to the CircuitDigest Cloud, where powerful AI models do the real work, analyzing the image and detecting helmet usage within seconds. What feels like a high-end surveillance system is now reduced to a simple setup that anyone can build and deploy. We also built a smart Helmet with Arduino, spare some time and look at the project How to Build a Smart Helmet using Arduino for more details.
ESP32-CAM Helmet Detection Project at a Glance
| Feature | Detail |
| Primary microcontroller | ESP32-CAM (built-in camera + Wi-Fi) |
| AI inference location | CircuitDigest Cloud (server-side) |
| Detection output | Helmeted riders, unhelmeted riders, motorbike count |
| Alert method | WhatsApp notification (image + location + status) |
| API limit (free tier) | 15 requests/day · 100 requests/month |
| Model training required | None ready-to-use API endpoint |
| Source code | Available on Circuit Digest GitHub |
Table of Contents
How the Smart Helmet Detection System Works
The end-to-end workflow of this helmet detection using ESP32-CAM is straightforward and reliable.
Step-by-Step Detection Flow
√ Green LED phase (0 to 5 seconds): The green LED will turn ON after the power-up for five seconds to indicate that the system is ready to take an embedding picture, and it has also opened up the imaging window.
√ Red LED Phase (5 to 6 seconds): The Red LED will come on after the green LED has been switched off, so it looks like the picture will be snapped pretty shortly.
√ Image Capture (on 6th second): The ESP32-CAM will capture the image in JPEG format. Illumination matters for getting the images right; if you don’t have enough light or if the scene is too bright, it makes it much tougher for the cloud model to do the detection properly.
√ HTTP(S) Upload: The image is uploaded using HTTP(S) as a multi-part form-data file to the Circuitdigest Cloud helmet detection endpoint, and it also contains the value in the API key to authenticate.
√ Cloud AI Inference: The cloud server will perform an analysis of the image to then return JSON-formatted counts of riders with helmets, counts of riders without helmets, and the count of detected motor bikes.
√ Serial monitor output: Detection results appear on the Arduino Serial Monitor at a baud rate of 115200 to facilitate rapid debugging and verification, so they will be available for viewing immediately after an upload is completed.
√ WhatsApp Alert: A well-formatted WhatsApp message will be sent to the registered mobile phone number through the CircuitDigest WhatsApp API, including an annotated JPEG image, coordinates from GPS, timestamp, and whether helmeted or unhelmeted status of riders.
In this ESP32-CAM helmet detection project, there is no need for manual model training, image labelling, or model creation processes like those commonly done on platforms such as Edge Impulse. By eliminating these time-consuming steps, CircuitDigest Cloud helps save development time and allows us to focus more on improving other features and functionalities of the project. We have also built many similar AI projects and ESP32-CAM Projects previously here at Circuit Digest. You can also check them out if you wish to explore more.
Components Required for the Helmet Detection Project
The table below lists every component needed to build the hardware portion of this smart helmet detection system.
| S.No | Components | Purpose |
| 1. | ESP32-CAM | Used as a microcontroller and also to take photos. |
| 2. | Red & Green LED | Used to indicate the status of the System |
| 3. | Breadboard | Used to make the connections simple and neat |
*Important: If you are using the standard ESP32-CAM (without onboard USB), you will need a USB-to-Serial (FTDI) adapter for programming. Connect FTDI TX → ESP32-CAM RX (U0R), RX → TX (U0T), GND → GND, and hold GPIO0 LOW during upload to enter flash mode. If your board has a micro-USB port already, no adapter is required. If you are just getting started with the ESP32-CAM module, we recommend checking out our guide “How to Program the ESP32-CAM?
Circuit Diagram for the ESP32-CAM Helmet Detection System
The following circuit diagram shows the connection between the ESP32-Cam, green LED, red LED, and the breadboard. The LED shows the current status of the system.

Step-by-Step Setup Procedure for the Helmet Detection System
Let's see a step-by-step procedure on how to build the object detection system using the CircuitDigest Cloud Helmet detection API.
Step 1 ⇒ Create Your CircuitDigest Cloud Account
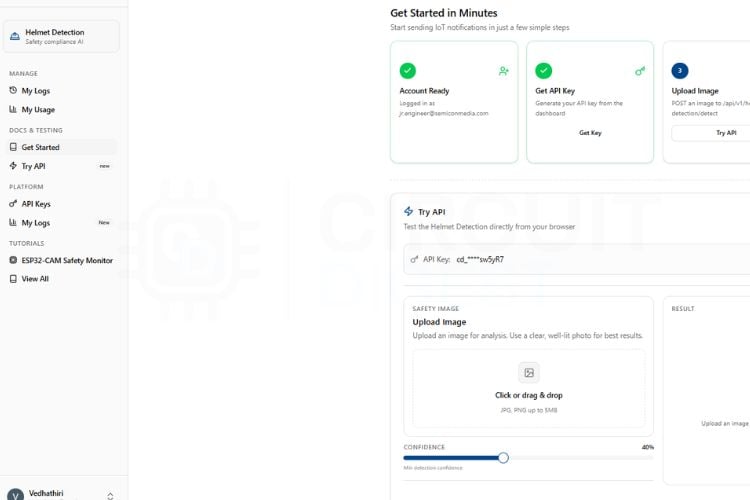
First, you need to make an account in the CircuitDigest Cloud. If you already have one, just go to the CircuitDigest Cloud website, scroll down, and you will see the helmet detection feature. Click it and enter.
.jpg)
Step 2 ⇒Test the API Using the Try API Feature
There, you will notice the try api section, where various options like image, classes, confidence, result, and board selection section with its required codes can be found. First, you can minimize and maximize the confidence level according to your needs because the confidence value sets the minimum probability threshold for detection.
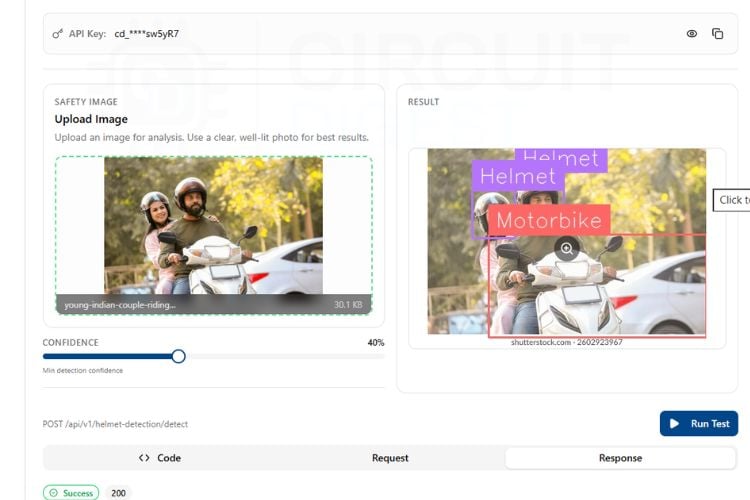
Within seconds, the system will process the image and display the number of people wearing helmets, those not wearing helmets, as well as the number of motorbikes. You can try different images to check the accuracy of detection, but keep in mind that each test consumes your API usage limit, which is restricted to 15 requests per day and 100 per month.
Step 3 ⇒ Assemble the Hardware Circuit
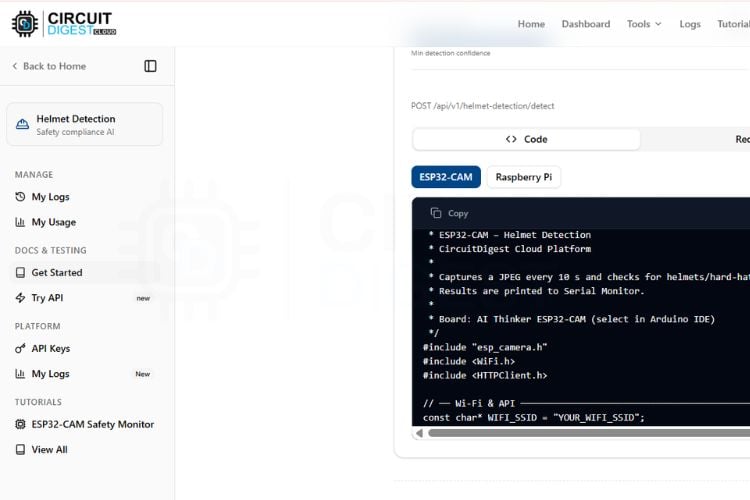
After testing virtually, you can move on to the real-time hardware setup. Connect the ESP32-CAM module according to the circuit diagram and upload the provided code from the ESP32-CAM section. Once the setup is ready, you can either use a sample image or capture a live image of people wearing and not wearing helmets. By powering on the setup, the system automatically captures the image by the ESP32-Cam and sends it to the Cloud. The server processes the image and returns the result, which is then displayed on the serial monitor, and the details will be sent to the registered WhatsApp number using the WhatsApp feature. This entire process, from capturing the image to displaying the people wearing helmet and not within a few seconds.
Step 4 ⇒ Run the Live Detection Test
The image below shows the captured image from the ESP32-CAM. Along with it, you can see the detection results of the image and detection output, which includes whether the person is wearing a helmet or not, with its details.

Code Explanation for Helmet Detection System
In the code, we start by including all necessary libraries, including the WiFi-related libraries and the esp_camera camera library. After that, we have defined the WiFi SSID and password along with the CircuitDigest Cloud API key. Make sure these are correct.
1. Wi-Fi Initialisation
const char* WIFI_SSID = "YOURWIFISSID";
const char* WIFI_PASS = "YOURWIFIPASSWORD";
WiFi.mode(WIFI_STA);
WiFi.setSleep(false);
WiFi.begin(WIFI_SSID, WIFI_PASS);
while (WiFi.status() != WL_CONNECTED) {
    delay(500);
    Serial.print(".");
}
2. Camera Initialisation and Image Capture
This section is responsible for connecting the ESP32-CAM to the Wi-Fi network using the provided SSID, password, number, and API key. The ESP32 continuously checks the connection status until a successful connection is established. Once connected, the device gains internet access, which is required for cloud communication and WhatsApp notifications. The Wi-Fi connection is very important because the entire helmet detection system depends on internet-based API communication.
camera_config_t cfg = {};
cfg.pixel_format = PIXFORMAT_JPEG;
cfg.frame_size = FRAMESIZE_VGA;
cfg.jpeg_quality = 12;
esp_camera_init(&cfg);
camera_fb_t* fb = esp_camera_fb_get();
3. Secure HTTPS Upload to the Helmet Detection API
This section initializes the ESP32-CAM module using the required camera configuration settings such as frame size, JPEG format, and image quality. After initialization, the camera captures an image frame and stores it temporarily in memory. The captured image will later be sent to the cloud API for helmet detection processing. Proper camera configuration and sufficient lighting improve image clarity and increase detection accuracy.
"POST /api/v1/helmet-detection/detect HTTP/1.1\r\n"
"Host: www.circuitdigest.cloud\r\n"
"X-API-Key: API_KEY\r\n"
"Content-Type: multipart/form-data\r\n";
tlsWriteAll(tls, g_imgBuf, g_imgLen);
This part of the code sends the captured image to the CircuitDigest Cloud Helmet Detection API using a secure HTTPS connection. The image is uploaded as multipart/form-data along with the API authentication key for verification. The cloud server processes the uploaded image and performs helmet detection analysis using its built-in AI model. After processing, the server returns the helmet detection results in JSON format back to the ESP32-CAM.
4. JSON Response Parsing
if (strstr(j,"\"helmet\":true"))
{
    strncpy(g_status,"Helmet Detected", sizeof(g_status));
}
if (strstr(j,"\"helmet\":false"))
{
    strncpy(g_status,"No Helmet Detected", sizeof(g_status));
}
This section analyses the JSON response received from the cloud server after image processing. The code checks whether a helmet is detected or not by searching specific keywords inside the returned JSON data. Based on the result, the program updates the helmet detection status message accordingly. These detection details are also displayed in the serial monitor for debugging and monitoring purposes.
5. WhatsApp Alert Dispatch
"template_id":"image_capture_alert",
"variables":{
   "event_type":"No Helmet Detected",
   "location":"CircuitDigest Office signal",
   "device_name":"ESP32-CAM Helmet"
}
This section sends the final detection alert to the registered WhatsApp number using the CircuitDigest WhatsApp API. The ESP32-CAM prepares a JSON payload containing important details such as helmet status, device name, location, captured time, and annotated image link. The alert message is then transmitted securely through HTTPS communication. As a result, the user receives an instant WhatsApp notification with complete helmet detection information for real-time monitoring.
ESP32-CAM AI Helmet Detection System - Complete Tutorial with Video
Troubleshooting of the Helmet Detection System
Issue 1: No output in Serial Monitor
If nothing is displayed, check the correct COM port and baud rate (115200). Also, verify the USB cable and board connection.
Issue 2: Camera not initializing
If the ESP32-CAM fails to initialize, it may be due to incorrect pin configuration or insufficient power supply. Ensure all connections match the circuit diagram and use a stable 5V supply, as low voltage can cause initialization failure.
Issue 3: Image capture failed
If the camera fails to capture an image, it may be due to loose connections or memory issues. Ensure the camera module is properly connected and try reducing the frame size (e.g., VGA) for better performance.
Issue 4: API connection error or timeout
If the system fails to send data or shows a timeout, verify your internet connection and server details. Also, ensure the API key is correct, and HTTPS communication is properly configured.
Issue 5: Incorrect helmet detection results
If the output is inaccurate, it may be due to poor lighting, unclear images, or improper camera angle. Ensure the image clearly shows the rider’s head and adjust the confidence level in the API settings.
Advantages and Limitations of the Helmet Detection System
The table below summarises the practical trade-offs of this cloud-based smart helmet detection system, useful context for deciding whether the architecture suits your deployment scenario.
| S.No | Advantages | Limitations |
| 1. | Real-time object detection within a few seconds | Cannot work without cloud API access |
| 2. | Low-cost system using ESP32-CAM with built-in camera and Wi-Fi | Requires an internet connection for object detection |
| 3. | No need for expensive hardware or powerful processors | Blurry images may give wrong results |
| 4. | Wireless communication without extra modules | Limited by daily or monthly API usage limits |
| 5. | Small size and portable design | Only captures single images, not fully live video detection |
Instead of running complex machine learning models on the ESP32-CAM, which has limited memory and processing power, the image is sent to the cloud, where advanced algorithms handle the detection accurately and quickly. Another key advantage is easy to use. The platform offers a ready-to-use API, a user-friendly interface, and quick testing options like the “Try API” feature, which makes development faster compared to building and training a custom model from scratch. It also reduces development time and complexity, allowing us to focus more on system integration rather than AI model design. We also built an interesting project related to object detection, spare some time and go through our Object Detection using ESP32-CAM and Edge Impulse project.
Frequently Asked Questions
⇥ Why is the cloud API used instead of local processing?
The ESP32-CAM has limited memory and processing power, which makes it difficult to run complex AI models locally. Cloud API performs heavy image processing on powerful servers, providing better accuracy and faster results.
⇥ What happens when the push button is pressed?
When the push button is pressed, the ESP32-CAM captures an image of the rider and sends it to the CircuitDigest Cloud API. The server processes the image and returns whether the person is wearing a helmet or not.
⇥ Can the system detect multiple riders at the same time?
Yes, if multiple riders are visible in the captured image, the cloud API can detect them and identify helmet usage for each person based on the object detection model.
⇥ Can this system work without an internet connection?
No, the system requires an active internet connection because the image processing and helmet detection are performed on the cloud server.
⇥ How can detection accuracy be improved?
Detection accuracy can be improved by ensuring proper lighting, a correct camera angle, clear image quality, and adjusting the confidence threshold in the API settings.
ESP32 CAM Helmet Detection GitHub
This ESP32-CAM helmet detection GitHub repository contains the complete source code, circuit diagram, and technical documentation for building an ESP32-CAM-based Helmet Detection system capable of helmet detection in real time.


Similar ESP32-CAM Based Projects
Explore innovative ESP32-CAM-based projects, including QR code scanners, smart CCTV security systems, and WiFi-controlled surveillance cars. These projects feature live video streaming, real-time monitoring, motion detection, and wireless connectivity, making them ideal for IoT, home security, and automation applications.

WiFi Controlled Surveillance Robot Car using ESP32-CAM Module
Build a WiFi-controlled ESP32-CAM surveillance car with live video streaming, web-based controls, and remote monitoring features.

Build your own Security Camera using ESP32
Build a low-cost DIY CCTV security camera using ESP32-CAM with live video streaming, WiFi connectivity, and remote monitoring features.

How to scan QR Codes using the ESP32-CAM module?
Build an ESP32-CAM QR code scanner with WiFi connectivity, OLED display output, and real-time QR detection using cloud API support.
Complete Project Code
#include "esp_camera.h"
#include "esp_tls.h"
#include "esp_crt_bundle.h"
#include "esp_sntp.h"
#include <WiFi.h>
#include <time.h>
#include "freertos/FreeRTOS.h"
#include "freertos/task.h"
#include "freertos/semphr.h"
// ─── Credentials ──────────────────────────────────────────────────
const char* WIFI_SSID = "Yourssid";
const char* WIFI_PASS = "yourwifipassowrd";
const char* API_KEY   = "yourapikey";
const char* PHONE     = "yourphonenumber";
// ─── Pins ─────────────────────────────────────────────────────────
#define GREEN_LED 15
#define RED_LED   14
// ─── Timing ───────────────────────────────────────────────────────
#define GREEN_MS      5000UL
#define RED_WAIT_MS   5000UL
#define RED_AFTER_MS   5000UL
// ─── Camera Pins (AI-Thinker ESP32-CAM) ───────────────────────────
#define PWDN_GPIO_NUM  32
#define RESET_GPIO_NUM -1
#define XCLK_GPIO_NUM   0
#define SIOD_GPIO_NUM  26
#define SIOC_GPIO_NUM  27
#define Y9_GPIO_NUM    35
#define Y8_GPIO_NUM    34
#define Y7_GPIO_NUM    39
#define Y6_GPIO_NUM    36
#define Y5_GPIO_NUM    21
#define Y4_GPIO_NUM    19
#define Y3_GPIO_NUM    18
#define Y2_GPIO_NUM     5
#define VSYNC_GPIO_NUM 25
#define HREF_GPIO_NUM  23
#define PCLK_GPIO_NUM  22
// ─── Shared state ─────────────────────────────────────────────────
static uint8_t* g_imgBuf  = nullptr;
static size_t   g_imgLen  = 0;
static char     g_status[64]   = "Unknown";
static char     g_imageUrl[256] = "";
static char     g_jsonBuf[2048] = {};
static SemaphoreHandle_t g_startSem = nullptr;
static SemaphoreHandle_t g_doneSem  = nullptr;
// ─── Utilities ────────────────────────────────────────────────────
static void printHeap(const char* tag) {
 Serial.printf("[HEAP] %s: free=%u largest=%u psram=%u\n", tag,
   (unsigned)ESP.getFreeHeap(),
   (unsigned)ESP.getMaxAllocHeap(),
   (unsigned)ESP.getFreePsram());
}
static void ensureWiFi() {
 if (WiFi.status() == WL_CONNECTED) return;
 Serial.print("[WiFi] reconnecting");
 WiFi.disconnect(true);
 vTaskDelay(pdMS_TO_TICKS(500));
 WiFi.begin(WIFI_SSID, WIFI_PASS);
 for (uint32_t t = millis(); WiFi.status() != WL_CONNECTED;) {
   if (millis() - t > 20000) { Serial.println("\n[WiFi] timeout→reboot"); ESP.restart(); }
   vTaskDelay(pdMS_TO_TICKS(500));
   Serial.print(".");
 }
 Serial.printf("\n[WiFi] %s\n", WiFi.localIP().toString().c_str());
}
// ─── Camera ───────────────────────────────────────────────────────
static bool initCam() {
 camera_config_t cfg = {};
 cfg.ledc_channel = LEDC_CHANNEL_0; cfg.ledc_timer = LEDC_TIMER_0;
 cfg.pin_d0=Y2_GPIO_NUM; cfg.pin_d1=Y3_GPIO_NUM; cfg.pin_d2=Y4_GPIO_NUM;
 cfg.pin_d3=Y5_GPIO_NUM; cfg.pin_d4=Y6_GPIO_NUM; cfg.pin_d5=Y7_GPIO_NUM;
 cfg.pin_d6=Y8_GPIO_NUM; cfg.pin_d7=Y9_GPIO_NUM;
 cfg.pin_xclk=XCLK_GPIO_NUM;   cfg.pin_pclk=PCLK_GPIO_NUM;
 cfg.pin_vsync=VSYNC_GPIO_NUM; cfg.pin_href=HREF_GPIO_NUM;
 cfg.pin_sscb_sda=SIOD_GPIO_NUM; cfg.pin_sscb_scl=SIOC_GPIO_NUM;
 cfg.pin_pwdn=PWDN_GPIO_NUM;   cfg.pin_reset=RESET_GPIO_NUM;
 cfg.xclk_freq_hz = 20000000;
 cfg.pixel_format = PIXFORMAT_JPEG;
 if (psramFound()) {
   cfg.frame_size=FRAMESIZE_VGA; cfg.jpeg_quality=12;
   cfg.fb_count=2; cfg.fb_location=CAMERA_FB_IN_PSRAM;
 } else {
   cfg.frame_size=FRAMESIZE_QVGA; cfg.jpeg_quality=15;
   cfg.fb_count=1; cfg.fb_location=CAMERA_FB_IN_DRAM;
 }
 esp_err_t e = esp_camera_init(&cfg);
 if (e != ESP_OK) { Serial.printf("[CAM] init fail 0x%x\n", e); return false; }
 sensor_t* s = esp_camera_sensor_get();
 if (s) {
   s->set_whitebal(s,1); s->set_awb_gain(s,1);
   s->set_exposure_ctrl(s,1); s->set_aec2(s,1);
 }
 return true;
}
// ─── esp_tls helpers ──────────────────────────────────────────────
static bool tlsWriteAll(esp_tls_t* tls, const uint8_t* buf, size_t len) {
 size_t sent = 0;
 while (sent < len) {
   int n = esp_tls_conn_write(tls, buf + sent, len - sent);
   if (n < 0) { Serial.printf("[TLS] write err %d\n", n); return false; }
   sent += n;
   if (sent % 4096 == 0) vTaskDelay(pdMS_TO_TICKS(5));
 }
 return true;
}
static size_t tlsReadAll(esp_tls_t* tls, char* buf, size_t maxLen) {
 size_t total = 0;
 uint32_t t = millis();
 while (total < maxLen - 1) {
   if (millis() - t > 10000) break;
   int n = esp_tls_conn_read(tls, buf + total, maxLen - 1 - total);
   if (n == 0) break;
   if (n == ESP_TLS_ERR_SSL_WANT_READ) { vTaskDelay(pdMS_TO_TICKS(10)); continue; }
   if (n < 0) break;
   total += n; t = millis();
 }
 buf[total] = '\0';
 return total;
}
static void skipHeaders(char* resp, size_t len, size_t* bodyStart) {
 *bodyStart = 0;
 for (size_t i = 0; i + 3 < len; i++) {
   if (resp[i]=='\r' && resp[i+1]=='\n' && resp[i+2]=='\r' && resp[i+3]=='\n') {
     *bodyStart = i + 4; return;
   }
 }
}
static esp_tls_t* openTLS(const char* host, int port) {
 esp_tls_cfg_t cfg = {};
 cfg.crt_bundle_attach = esp_crt_bundle_attach;
 cfg.non_block = false;
 for (int i = 0; i < 3; i++) {
   esp_tls_t* tls = esp_tls_init();
   if (!tls) { vTaskDelay(pdMS_TO_TICKS(1000)); continue; }
   if (esp_tls_conn_new_sync(host, strlen(host), port, &cfg, tls) == 1) return tls;
   Serial.printf("[TLS] attempt %d failed\n", i + 1);
   esp_tls_conn_destroy(tls);
   vTaskDelay(pdMS_TO_TICKS(1500));
 }
 return nullptr;
}
// ─── Helmet Detection ─────────────────────────────────────────────
static bool detectHelmet() {
 printHeap("detectHelmet");
 const char* host = "www.circuitdigest.cloud";
 const char* bnd  = "----ESP32Bound";
 char partHead[256];
 int phLen = snprintf(partHead, sizeof(partHead),
   "--%s\r\nContent-Disposition: form-data; name=\"imageFile\"; filename=\"snap.jpg\"\r\nContent-Type: image/jpeg\r\n\r\n", bnd);
 char partTail[64];
 int ptLen = snprintf(partTail, sizeof(partTail), "\r\n--%s--\r\n", bnd);
 size_t contentLen = phLen + g_imgLen + ptLen;
 char reqHdr[512];
 int reqLen = snprintf(reqHdr, sizeof(reqHdr),
   "POST /api/v1/helmet-detection/detect HTTP/1.1\r\n"
   "Host: %s\r\nX-API-Key: %s\r\n"
   "Content-Type: multipart/form-data; boundary=%s\r\n"
   "Content-Length: %u\r\nConnection: close\r\n\r\n",
   host, API_KEY, bnd, (unsigned)contentLen);
 esp_tls_t* tls = openTLS(host, 443);
 if (!tls) return false;
 bool ok =
   tlsWriteAll(tls, (const uint8_t*)reqHdr, reqLen) &&
   tlsWriteAll(tls, (const uint8_t*)partHead, phLen) &&
   tlsWriteAll(tls, g_imgBuf, g_imgLen) &&
   tlsWriteAll(tls, (const uint8_t*)partTail, ptLen);
 static char respBuf[3072];
 if (ok) tlsReadAll(tls, respBuf, sizeof(respBuf));
 esp_tls_conn_destroy(tls);
 if (!ok) return false;
 // Extract JSON body (handle chunked encoding)
 size_t bodyStart = 0, respLen = strlen(respBuf);
 skipHeaders(respBuf, respLen, &bodyStart);
 size_t bodyLen = respLen - bodyStart;
 if (bodyLen >= sizeof(g_jsonBuf)) bodyLen = sizeof(g_jsonBuf) - 1;
 memcpy(g_jsonBuf, respBuf + bodyStart, bodyLen);
 g_jsonBuf[bodyLen] = '\0';
 // Strip chunked transfer size prefix if present (hex digits + \r\n)
 char* s = g_jsonBuf;
 while (*s && ((*s>='0'&&*s<='9')||(*s>='a'&&*s<='f')||(*s>='A'&&*s<='F'))) s++;
 if (s != g_jsonBuf && *s == '\r') { s += 2; memmove(g_jsonBuf, s, strlen(s) + 1); }
 Serial.printf("[API] %s\n", g_jsonBuf);
 return g_jsonBuf[0] != '\0';
}
// ─── Parse Status ─────────────────────────────────────────────────
static void parseStatus() {
 const char* j = g_jsonBuf;
 // Extract image_url
 g_imageUrl[0] = '\0';
 const char* url_key = "\"image_url\":\"";
 const char* ui = strstr(j, url_key);
 if (ui) {
   const char* vs = ui + strlen(url_key);
   const char* ve = strchr(vs, '"');
   if (ve && ve > vs) {
     size_t len = ve - vs;
     if (len >= sizeof(g_imageUrl)) len = sizeof(g_imageUrl) - 1;
     strncpy(g_imageUrl, vs, len);
     g_imageUrl[len] = '\0';

     // Unescape forward slashes if any (e.g., '\/' -> '/')
     char* p = g_imageUrl;
     char* q = g_imageUrl;
     while(*p) {
       if(*p == '\\' && *(p+1) == '/') p++;
       *q++ = *p++;
     }
     *q = '\0';
     Serial.printf("[DEBUG] Extracted Image URL: %s\n", g_imageUrl);
   }
 }
 if (strstr(j,"\"helmet\":true") || strstr(j,"\"helmet_detected\":true"))
   { strncpy(g_status,"Helmet Detected",   sizeof(g_status)); return; }
 if (strstr(j,"\"helmet\":false") || strstr(j,"\"helmet_detected\":false"))
   { strncpy(g_status,"No Helmet Detected", sizeof(g_status)); return; }
 const char* si = strstr(j,"\"status\":\"");
 if (si) {
   const char* vs = si + 10, *ve = strchr(vs, '"');
   if (ve && ve > vs) {
     size_t vl = (size_t)(ve - vs);
     if (strncmp(vs,"helmet_detected",vl)==0) { strncpy(g_status,"Helmet Detected",   sizeof(g_status)); return; }
     if (strncmp(vs,"no_helmet",      vl)==0) { strncpy(g_status,"No Helmet Detected", sizeof(g_status)); return; }
     if (strncmp(vs,"no_detections",  vl)==0) { strncpy(g_status,"No Person/Helmet",   sizeof(g_status)); return; }
   }
 }
 strncpy(g_status,"Detection Complete", sizeof(g_status));
}
// ─── WhatsApp — plain JSON, no multipart ─────────────────────────
// Sends:
// POST /api/v1/whatsapp/send  (JSON only, no image)
// {
//   "phone_number": "91xxxxxxxxxx",
//   "template_id":  "image_capture_alert",
//   "variables": {
//     "event_type":    "<status>",
//     "location":      "Entrance",
//     "device_name":   "ESP32-CAM Helmet",
//     "captured_time": "<IST time>",
//     "image_link":    "annoted_image_link"
//   }
// }
static void sendWhatsApp() {
 printHeap("sendWhatsApp");
 const char* host = "www.circuitdigest.cloud";
 // Timestamp
 char ts[64] = "Time Unknown";
 struct tm ti;
 if (getLocalTime(&ti, 500)) strftime(ts, sizeof(ts), "%I:%M %p, %B %d, %Y", &ti);
 // ── Build JSON body ────────────────────────────────────────────
 char reqBody[1024];
 int bodyLen = snprintf(reqBody, sizeof(reqBody),
   "{"
     "\"phone_number\":\"%s\","
     "\"template_id\":\"image_capture_alert\","
     "\"variables\":{"
       "\"event_type\":\"%s\","
       "\"location\":\"CircuitDIgest Office signal\","
       "\"device_name\":\"ESP32-CAM Helmet\","
       "\"captured_time\":\"%s\","
       "\"image_link\":\"%s\""
     "}"
   "}",
   PHONE, g_status, ts, g_imageUrl);
 Serial.printf("[DEBUG] WA Payload: %s\n", reqBody);
 // HTTP request header
 char reqHdr[512];
 int reqLen = snprintf(reqHdr, sizeof(reqHdr),
   "POST /api/v1/whatsapp/send HTTP/1.1\r\n"
   "Host: %s\r\n"
   "Authorization: %s\r\n"
   "Content-Type: application/json\r\n"
   "Content-Length: %u\r\n"
   "Connection: close\r\n\r\n",
   host, API_KEY, (unsigned)bodyLen);
 // ── Open TLS and stream everything ────────────────────────────
 esp_tls_t* tls = openTLS(host, 443);
 if (!tls) { Serial.println("[WA] TLS open failed"); return; }
 // 1. HTTP headers
 tlsWriteAll(tls, (const uint8_t*)reqHdr, reqLen);
 // 2. JSON Body
 tlsWriteAll(tls, (const uint8_t*)reqBody, bodyLen);
 // ── Read response ──────────────────────────────────────────────
 static char respBuf[1024];
 tlsReadAll(tls, respBuf, sizeof(respBuf));
 esp_tls_conn_destroy(tls);
 // Log first line (HTTP status)
 char* nl = strchr(respBuf, '\n');
 if (nl) *nl = '\0';
 Serial.printf("[WA] %s\n", respBuf);
}
// ─── Network Task ─────────────────────────────────────────────────
static void networkTask(void* /*arg*/) {
 Serial.println("[NET] task started");
 for (;;) {
   xSemaphoreTake(g_startSem, portMAX_DELAY);
   ensureWiFi();
   bool ok = detectHelmet();
   if (ok) parseStatus();
   else strncpy(g_status, "Detection Failed", sizeof(g_status));
   Serial.printf("[STATUS] %s\n", g_status);
   sendWhatsApp();
   xSemaphoreGive(g_doneSem);
 }
}
// ─── Capture Frame ────────────────────────────────────────────────
static bool captureFrame() {
 camera_fb_t* wf = esp_camera_fb_get();
 if (wf) esp_camera_fb_return(wf);
 vTaskDelay(pdMS_TO_TICKS(400));
 camera_fb_t* fb = esp_camera_fb_get();
 if (!fb) { Serial.println("[CAM] capture failed"); return false; }
 Serial.printf("[CAM] frame %u bytes\n", (unsigned)fb->len);
 g_imgLen = fb->len;
 if (g_imgBuf) { free(g_imgBuf); g_imgBuf = nullptr; }
 if (psramFound() && ESP.getFreePsram() > g_imgLen + 8192)
   g_imgBuf = (uint8_t*)ps_malloc(g_imgLen);
 if (!g_imgBuf && ESP.getMaxAllocHeap() > g_imgLen + 32768)
   g_imgBuf = (uint8_t*)malloc(g_imgLen);
 if (!g_imgBuf) {
   Serial.printf("[CAM] no memory (len=%u free=%u psram=%u)\n",
     (unsigned)g_imgLen, (unsigned)ESP.getFreeHeap(), (unsigned)ESP.getFreePsram());
   esp_camera_fb_return(fb);
   return false;
 }
 memcpy(g_imgBuf, fb->buf, g_imgLen);
 esp_camera_fb_return(fb);
 return true;
}
// ─── Setup ────────────────────────────────────────────────────────
void setup() {
 Serial.begin(115200);
 vTaskDelay(pdMS_TO_TICKS(300));
 Serial.println("\n=== ESP32-CAM Helmet Detection v5 ===");
 pinMode(GREEN_LED, OUTPUT); digitalWrite(GREEN_LED, LOW);
 pinMode(RED_LED,   OUTPUT); digitalWrite(RED_LED,   LOW);
 if (!initCam()) { Serial.println("[CAM] fatal"); while(true) vTaskDelay(pdMS_TO_TICKS(1000)); }
 WiFi.mode(WIFI_STA);
 WiFi.setSleep(false);
 WiFi.begin(WIFI_SSID, WIFI_PASS);
 Serial.print("[WiFi] connecting");
 for (uint32_t t = millis(); WiFi.status() != WL_CONNECTED;) {
   if (millis() - t > 30000) { Serial.println("\ntimeout"); ESP.restart(); }
   vTaskDelay(pdMS_TO_TICKS(500)); Serial.print(".");
 }
 Serial.printf("\n[WiFi] Connected: %s\n", WiFi.localIP().toString().c_str());
 esp_sntp_setoperatingmode(SNTP_OPMODE_POLL);
 esp_sntp_setservername(0, "pool.ntp.org");
 esp_sntp_setservername(1, "time.nist.gov");
 esp_sntp_init();
 Serial.print("[NTP] syncing");
 for (int i = 0; i < 20 && sntp_get_sync_status() != SNTP_SYNC_STATUS_COMPLETED; i++) {
   vTaskDelay(pdMS_TO_TICKS(500)); Serial.print(".");
 }
 Serial.println(sntp_get_sync_status() == SNTP_SYNC_STATUS_COMPLETED ? " OK" : " (timeout)");
 g_startSem = xSemaphoreCreateBinary();
 g_doneSem  = xSemaphoreCreateBinary();
 xTaskCreatePinnedToCore(networkTask, "net_task", 8192, nullptr, 5, nullptr, 0);
 printHeap("setup complete");
 Serial.println("[READY]");
}
// ─── Main Loop ────────────────────────────────────────────────────
void loop() {
 Serial.println("[GREEN] 10 s");
 digitalWrite(GREEN_LED, HIGH); digitalWrite(RED_LED, LOW);
 for (uint32_t t = millis(); millis()-t < GREEN_MS;) vTaskDelay(pdMS_TO_TICKS(100));
 Serial.println("[RED] warning 10 s");
 digitalWrite(GREEN_LED, LOW); digitalWrite(RED_LED, HIGH);
 for (uint32_t t = millis(); millis()-t < RED_WAIT_MS;) vTaskDelay(pdMS_TO_TICKS(100));
 Serial.println("[RED] capturing...");
 printHeap("before capture");
 if (!captureFrame()) {
   for (uint32_t t = millis(); millis()-t < RED_AFTER_MS;) vTaskDelay(pdMS_TO_TICKS(100));
   return;
 }
 printHeap("after capture");
 esp_camera_deinit();
 vTaskDelay(pdMS_TO_TICKS(300));
 xSemaphoreGive(g_startSem);
 xSemaphoreTake(g_doneSem, portMAX_DELAY);
 if (g_imgBuf) { free(g_imgBuf); g_imgBuf = nullptr; }
 if (!initCam()) { Serial.println("[CAM] reinit failed"); ESP.restart(); }
 Serial.println("[RED] post-detect 5 s");
 for (uint32_t t = millis(); millis()-t < RED_AFTER_MS;) vTaskDelay(pdMS_TO_TICKS(100));
}
