 Vedhathiri
Author

Have you ever watched a movie where a system instantly detects a person’s face, like in security doors or smart targeting systems, and thought, “This looks too complex to build in real life?” It might seem like something only high-end systems can do, but the reality today is very different. With compact and powerful modules like the ESP32-CAM, building an ESP32-CAM face detection system has become surprisingly simple and accessible. In this project, we take that movie-like idea and turn it into a real working system using just a small ESP32-CAM module, no external camera, no bulky setup. By simply uploading the code, the device can capture images and detect human faces in real time. Here we show you exactly how to build a face detection system project with source code, step by step, using the ESP32-CAM and the ready-to-use CircuitDigest Cloud face detection API.
Table of Contents
How Does the ESP32-Cam Based Face Detection Work
The setup starts processing when we press the push button. When the push button is pressed, an image will be captured by the ESP32-CAM. For testing purposes, it is not necessary to take a real-time image, but any image from the web would also suffice. While taking an image, make sure there is sufficient lighting so that the image will have better clarity, which will improve the detection accuracy. After capturing a clear image, the image will then be sent to the CircuitDigest Cloud for face detection using the API. There, the image will be processed and analyzed by the face detection feature. The result will include the number of detected faces, and the confidence value of each face will be sent back, which will then be printed in the Serial Monitor. We don't want to train a model, the labelling part, and the model creation part, as we used to do on websites like Edge Impulse. By eliminating this work, CircuitDigest Cloud saves time to focus on other changes. We have also built many similar AI projects and ESP32-CAM Projects previously here at Circuit Digest; you can also check them out if you wish to explore more.
Components Required for the ESP32-CAM Face Detection Project
The table below lists every component needed to build this ESP32-CAM face detection camera system.
| S.No | Components | Purpose |
| 1. | ESP32-Cam | Used as a microcontroller and also to take photos. |
| 2. | Push Button | Used to give input from the user to the Microcontroller |
| 3. | Breadboard | Used to make the connections simple and neat |
*Important: If you are using the standard ESP32-CAM (without onboard USB), you will need a USB-to-Serial (FTDI) adapter for programming. Connect FTDI TX → ESP32-CAM RX (U0R), RX → TX (U0T), GND → GND, and hold GPIO0 LOW during upload to enter flash mode. If your board has a micro-USB port already, no adapter is required. If you are just getting started with the ESP32-CAM module, we recommend checking out our guide How to Program the ESP32-CAM?
Circuit Diagram - ESP32-CAM Face Detection System
The following circuit diagram shows the connection between the ESP32-CAM, push button, and Breadboard. The push button is connected to GPIO13 of the ESP32-CAM for triggering the photo capture.

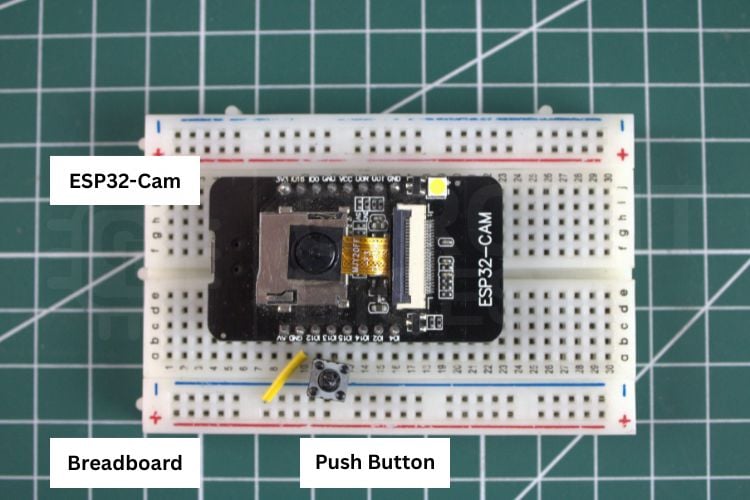
Hardware Setup - ESP32-CAM Face Detection Camera System
The image below shows the actual hardware connection, which gives a clear idea of how the components are connected in real life. To power the system, we are using the USB cable connected to the USB port of the laptop.
Step-by-Step Setup Guide for the ESP32-CAM Face Detection System
Let's see a step-by-step procedure on how to build the object detection system using the CircuitDigest Cloud object detection API. Follow the five steps below to go from a blank ESP32-CAM to a working face detection system project with source code running in under an hour.
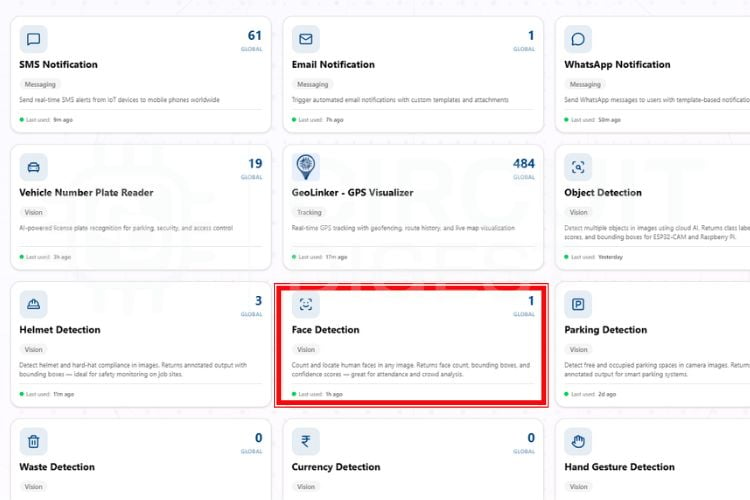
Step 1⇒ Create a CircuitDigest Cloud Account and Open Face Detection
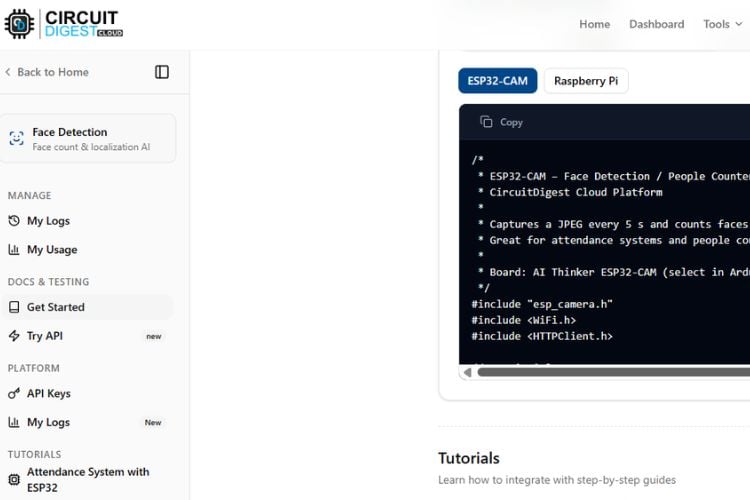
First, you need to make an account on the CircuitDigest Cloud. If you already have one, just go to the CircuitDigest Cloud website, scroll down, and there you will notice the face detection feature; click that, and enter.
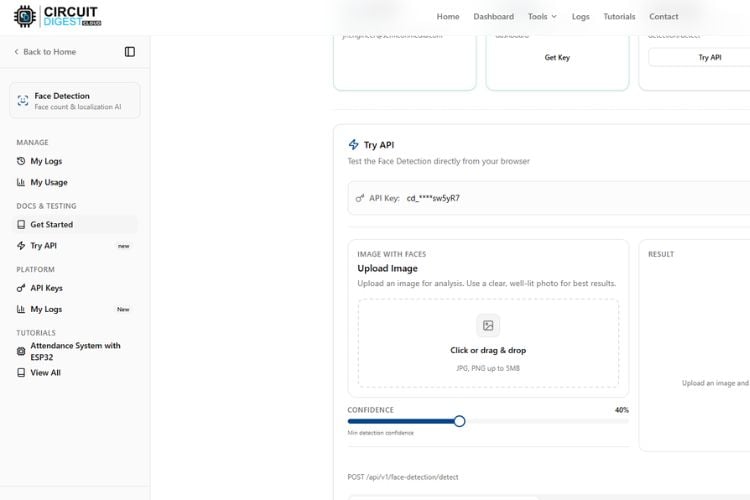
Step 2⇒ Test the API with a Sample Image Using Try API
Inside, you’ll notice various options on the left side, such as “Get Started” and “My Usage.” You can also adjust the confidence level based on your requirement, and your API key will be displayed there. Before connecting any hardware, you can test the system using the “Try API” feature. Simply upload an image that contains the people's faces that are visible, and click on “Run Test.”
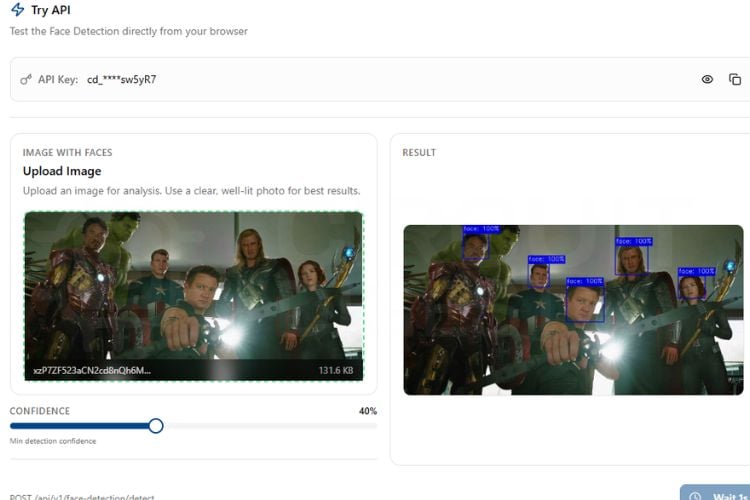
Step 3⇒ Review the API Detection Output
Within seconds, the system will process the image and display the detected faces and the detection count. You can try different images to check the accuracy of detection, but keep in mind that each test consumes your API usage limit, which is restricted to 15 requests per day and 100 per month.
Step 4⇒ Upload the Arduino Sketch to the ESP32-CAM
After testing virtually, you can move on to the real-time hardware setup. Connect the ESP32-CAM module according to the circuit diagram and upload the given code from the ESP32-CAM section. Once the setup is ready, you can either use a sample image or capture a live image of people. By pressing the push button connected to GPIO 13, the ESP32-CAM captures an image and immediately sends it to the CircuitDigest Face Detection API. The server processes the image and returns the result, which is then displayed on the serial monitor. This entire process, from capturing the image to displaying the parking status, happens within a few seconds, making the system fast and interactive.
Step 5 ⇒ Test Live Detection and View Serial Monitor Output
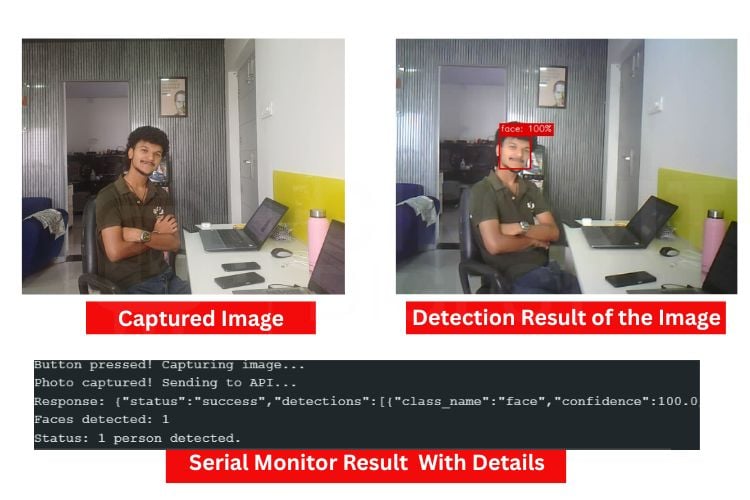
The image below shows the captured image from the ESP32-CAM. Along with it, you can see the detection results of the image. Below that, the Serial Monitor displays the detection output, with the detected face and its count.
ESP32-CAM Face Detection Source Code - Full Explanation
The complete face detection project source code is structured in four logical sections. In the code, we start by including all the necessary libraries, which include the Wi-Fi-related libraries and the esp_camera camera library. After that, we have defined the WiFi SSID and password along with the CircuitDigest Cloud API key. Make sure these are correct. We have also defined the GPIO pin used with the trigger button.
1. Library Includes and Configuration Constants
#include "esp_camera.h"
#include <WiFi.h>
#include <WiFiClientSecure.h>
const char* WIFI_SSID  = “yourssidname";
const char* WIFI_PASS  = "yourwifiname";
const char* API_KEY    = "cd_jre_140326_UkVdeG";
const char* serverName = "www.circuitdigest.cloud";
const char* serverPath = "/api/v1/face-detection/detect";
const int   serverPort = 443;
This section includes all required libraries for camera interfacing, WiFi communication, and secure HTTPS communication with the cloud server. It also stores the WiFi credentials and Face Detection API details required for connecting the ESP32-CAM to the internet and communicating with the AI-based face detection server.
2. Camera Initialisation and Image Quality Settings
cfg.pixel_format = PIXFORMAT_JPEG;
cfg.frame_size   = FRAMESIZE_VGA;
cfg.jpeg_quality = 10;
cfg.fb_count     = 1;
if (esp_camera_init(&cfg) != ESP_OK) {
  Serial.println("Camera init failed!");
}
sensor_t* s = esp_camera_sensor_get();
s->set_brightness(s, 1);
s->set_contrast(s, 1);
s->set_exposure_ctrl(s, 1);
This section initializes the ESP32-CAM module and configures the image capture settings. The camera captures JPEG images in VGA resolution with optimized quality settings for accurate face detection. Additional image tuning parameters such as brightness, contrast, and exposure control improve image clarity under different lighting conditions.
3. Frame Warm-Up and Image Capture
for (int i = 0; i < 3; i++) {
  camera_fb_t* fb = esp_camera_fb_get();
  esp_camera_fb_return(fb);
  delay(200);
}
camera_fb_t* fb = esp_camera_fb_get();
if (!fb) {
  Serial.println("Capture failed");
  return;
}
This section includes all required libraries for camera interfacing, WiFi communication, and secure HTTPS communication with the cloud server. It also stores the WiFi credentials and Face Detection API details required for connecting the ESP32-CAM to the internet and communicating with the AI-based face detection server.
4. HTTPS Upload and JSON Response Parsing
client.println("POST " + String(serverPath) + " HTTP/1.1");
client.println("Host: " + String(serverName));
client.println("X-API-Key: " + String(API_KEY));
client.write(fb->buf, fb->len);
esp_camera_fb_return(fb);
This section establishes a secure HTTPS connection with the cloud-based Face Detection API server. The captured image is uploaded using an HTTP POST request along with the API key for authentication. After transmission, the image buffer memory is released to prepare the camera for future captures.
int faceIdx = json.indexOf("\"face_count\":");
int faceCount = 0;
if (faceIdx != -1) {
  faceCount = json.substring(faceIdx + 13, faceIdx + 15).toInt();
}
Serial.println("Faces detected: " + String(faceCount));
After the cloud server processes the uploaded image, the ESP32-CAM receives the detection response in JSON format. This section extracts the detected face count from the response and displays the result in the Serial Monitor, indicating whether no face, a single face, or multiple faces were detected in the captured image.
Live Demo: Real-Time Face Detection with ESP32-CAM Using Cloud AI API
Troubleshooting the ESP32-CAM Face Detection System
Issue 1: ESP32 restarting continuously
If the board keeps restarting, it is usually due to an unstable power supply. Use a proper 5V regulated source and avoid powering only through weak USB connections.
Issue 2: No output in Serial Monitor
If nothing appears in the Serial Monitor, check the correct COM port and baud rate (115200). Also, ensure the USB cable and board connection are functioning properly.
Issue 3: Face detection is not working
If faces are not being detected, the issue may be due to poor image quality or unclear visibility. Make sure there is proper lighting and that faces are clearly visible in front of the camera.
Issue 4: API connection error or timeout
If the system fails to send data to the API or shows timeout errors, verify the internet connection and API endpoint details. Also, ensure the API key is valid, and HTTPS communication is properly configured.
Issue 5: Incorrect detection count
If the system shows an incorrect number of detected faces, it may be due to a low confidence level or image noise. Try adjusting the confidence settings and using clearer images for better accuracy.
Advantages and Limitations of the ESP32-CAM Face Detection System
The advantages and limitations of the Face detection system are as follows.
| S.No | Advantages | Limitations |
| 1. | Real-time face detection within a few seconds | Cannot work without cloud API access |
| 2. | Low-cost system using ESP32-CAM with built-in camera and Wi-Fi | Requires an internet connection for object detection |
| 3. | No need for expensive hardware or powerful processors | Blurry images may give wrong results |
| 4. | Wireless communication without extra modules | Limited by daily or monthly API usage limits |
| 5. | Small size and portable design | Only captures single images, not fully live video detection |
Instead of running complex machine learning models on the ESP32-CAM, which has limited memory and processing power, the image is sent to the cloud, where advanced algorithms handle the detection accurately and quickly. Another key advantage is its ease of use. The platform offers a ready-to-use API, a user-friendly interface, and quick testing options, such as the “Try API” feature, which make development faster than building and training a custom model from scratch. It also reduces development time and complexity, allowing us to focus more on system integration rather than AI model design.
Real-World Applications of the ESP32-CAM Face Detection Project
A practical understanding of the applications of this project can be gained by engineers or students through comparing them to larger projects. The examples listed below are some of the most practical examples.
» Smart Doorbell / Access Control System: Trigger Face Detect based on Motion Detect and also log Face Count and Time of Capture to either the Cloud, SD Card, or in memory before unlocking the Servo Lock.
» Attendance Management: Count the number of people present (by number of Faces) in a classroom or meeting room during specific time periods and integrate with Google Sheets via an HTTP GET so the Attendance records can be done automatically without having someone enter them manually.
» Visitor Counting System: Set up as a Visitor Counter at a Store entrance to count visitors (by Number of Faces) who enter through the Store entrance sensor when either pressing the button to enter or because a PIR sensor detected them as having entered from outside based upon the setup of the ESP32-CAM system.
» Security Alert Application: Use the ESP32-CAM system to send an SMS or WhatsApp alert via CircuitDigest Cloud Notification APIs when the system is in the Armed Mode and Face Count > 0.
» Research & Education: Utilise the ESP32-CAM system as a prototype for future experiments with other Object Detection that include the reading of license plates (ANPR) or QR codes.
Frequently Asked Questions - ESP32-CAM Face Detection System
⇥ Can this system work without the internet?
No, the system requires an active internet connection because the image processing is done on the cloud. Without the internet, the ESP32-CAM cannot send data to the API.
⇥ How accurate is the face detection system?
The accuracy depends on lighting conditions, camera angle, and image clarity. Better lighting and clear visibility of faces will improve detection performance.
⇥ What are the limitations of this system?
The system depends on internet connectivity and API usage limits. It may also produce incorrect results if faces are partially visible or the image quality is poor.
⇥ Can multiple faces be detected at the same time?
Yes, the system can detect multiple faces in a single image and return the total count. However, accuracy depends on how clearly the faces are visible.
⇥ Can this system be used for face recognition?
No, this project only performs face detection (detecting the presence of faces). Face recognition (identifying specific individuals) requires additional models and processing.
⇥ How can the system be improved?
The system can be enhanced by adding a display, mobile app, or cloud dashboard. Features like alerts, logging, or integration with security systems can also be implemented.
GitHub Repository
The complete source code, wiring details, and project files are available in the GitHub repository for reference and reuse.


Other ESP32-CAM Face Recognition Projects
ESP32-CAM based projects for face recognition, smart security, attendance monitoring, and AI-powered vision applications.

ESP32-CAM Face Recognition using Edge Impulse
Build a smart face recognition system using Edge Impulse and ESP32-CAM for real-time AI-based face detection.

ESP32-CAM Face Recognition Door Lock System
Build an AI-powered smart door lock using ESP32-CAM with real-time face recognition and automatic solenoid lock control.

Battery-Powered Attendance System Using Face Recognition on ESP32-CAM Board
Build a smart attendance system using ESP32-CAM with face recognition and automatic Google Sheets attendance logging.
Complete Project Code
#include "esp_camera.h"
#include <WiFi.h>
#include <WiFiClientSecure.h>
const char* WIFI_SSID  = "Yourssidname";
const char* WIFI_PASS  = "YourWifiPassword";
const char* API_KEY    = "Yourapikey";
const char* serverName = "www.circuitdigest.cloud";
const char* serverPath = "/api/v1/face-detection/detect";
const int   serverPort = 443;
#define TRIGGER_BTN 13
#define PWDN_GPIO_NUM  32
#define RESET_GPIO_NUM -1
#define XCLK_GPIO_NUM   0
#define SIOD_GPIO_NUM  26
#define SIOC_GPIO_NUM  27
#define Y9_GPIO_NUM    35
#define Y8_GPIO_NUM    34
#define Y7_GPIO_NUM    39
#define Y6_GPIO_NUM    36
#define Y5_GPIO_NUM    21
#define Y4_GPIO_NUM    19
#define Y3_GPIO_NUM    18
#define Y2_GPIO_NUM     5
#define VSYNC_GPIO_NUM 25
#define HREF_GPIO_NUM  23
#define PCLK_GPIO_NUM  22
WiFiClientSecure client;
unsigned long lastTrigger = 0;
void initCamera() {
 camera_config_t cfg = {};
 cfg.ledc_channel = LEDC_CHANNEL_0; cfg.ledc_timer = LEDC_TIMER_0;
 cfg.pin_d0 = Y2_GPIO_NUM; cfg.pin_d1 = Y3_GPIO_NUM;
 cfg.pin_d2 = Y4_GPIO_NUM; cfg.pin_d3 = Y5_GPIO_NUM;
 cfg.pin_d4 = Y6_GPIO_NUM; cfg.pin_d5 = Y7_GPIO_NUM;
 cfg.pin_d6 = Y8_GPIO_NUM; cfg.pin_d7 = Y9_GPIO_NUM;
 cfg.pin_xclk = XCLK_GPIO_NUM; cfg.pin_pclk = PCLK_GPIO_NUM;
 cfg.pin_vsync = VSYNC_GPIO_NUM; cfg.pin_href = HREF_GPIO_NUM;
 cfg.pin_sscb_sda = SIOD_GPIO_NUM; cfg.pin_sscb_scl = SIOC_GPIO_NUM;
 cfg.pin_pwdn = PWDN_GPIO_NUM; cfg.pin_reset = RESET_GPIO_NUM;
 cfg.xclk_freq_hz = 20000000;
 cfg.pixel_format = PIXFORMAT_JPEG;
 cfg.frame_size   = FRAMESIZE_VGA;
 cfg.jpeg_quality = 10;
 cfg.fb_count     = 1;
 if (esp_camera_init(&cfg) != ESP_OK) {
   Serial.println("Camera init failed!"); while (1);
 }
 sensor_t* s = esp_camera_sensor_get();
 s->set_brightness(s, 1);
 s->set_contrast(s, 1);
 s->set_saturation(s, 0);
 s->set_whitebal(s, 1);
 s->set_exposure_ctrl(s, 1);
 s->set_gain_ctrl(s, 1);
 Serial.println("Camera ready.");
}
void countFaces() {
 Serial.println("Photo captured! Sending to API...");
 // Warm-up frames
 for (int i = 0; i < 3; i++) {
   camera_fb_t* fb = esp_camera_fb_get();
   esp_camera_fb_return(fb);
   delay(200);
 }
 // Real frame
 camera_fb_t* fb = esp_camera_fb_get();
 if (!fb) { Serial.println("Capture failed"); return; }
 if (!client.connect(serverName, serverPort)) {
   Serial.println("Connection failed"); esp_camera_fb_return(fb); return;
 }
 String boundary = "----ESP32Boundary";
 String head = "--" + boundary + "\r\nContent-Disposition: form-data; name=\"imageFile\"; filename=\"snap.jpg\"\r\nContent-Type: image/jpeg\r\n\r\n";
 String tail = "\r\n--" + boundary + "--\r\n";
 int contentLen = head.length() + fb->len + tail.length();
 client.println("POST " + String(serverPath) + " HTTP/1.1");
 client.println("Host: " + String(serverName));
 client.println("X-API-Key: " + String(API_KEY));
 client.println("Content-Type: multipart/form-data; boundary=" + boundary);
 client.println("Content-Length: " + String(contentLen));
 client.println("Connection: close");
 client.println();
 client.print(head);
 client.write(fb->buf, fb->len);
 client.print(tail);
 esp_camera_fb_return(fb);
 // Wait & read response
 long t = millis();
 while (!client.available()) { if (millis() - t > 15000) { client.stop(); return; } }
 String res = "";
 while (client.available()) res += (char)client.read();
 client.stop();
 // Extract JSON
 int j = res.indexOf("\r\n\r\n");
 String json = (j != -1) ? res.substring(j + 4) : res;
 Serial.println("Response: " + json);
 // Parse face count
 int faceIdx = json.indexOf("\"face_count\":");
 int faceCount = 0;
 if (faceIdx != -1) {
   faceCount = json.substring(faceIdx + 13, faceIdx + 15).toInt();
 }
 Serial.println("Faces detected: " + String(faceCount));
 if      (faceCount == 0) Serial.println("Status: No faces detected.");
 else if (faceCount == 1) Serial.println("Status: 1 person detected.");
 else                     Serial.println("Status: " + String(faceCount) + " persons detected.");
}
void setup() {
 Serial.begin(115200);
 pinMode(TRIGGER_BTN, INPUT_PULLUP);
 initCamera();
 client.setInsecure();
 WiFi.begin(WIFI_SSID, WIFI_PASS);
 Serial.print("Connecting to WiFi");
 while (!WiFi.isConnected()) { delay(500); Serial.print("."); }
 Serial.println("\nConnected: " + WiFi.localIP().toString());
}
void loop() {
 if (digitalRead(TRIGGER_BTN) == LOW && millis() - lastTrigger > 500) {
   lastTrigger = millis();
   Serial.println("Button pressed! Capturing image...");
   countFaces();
 }
}
