
You must have seen automatic door openers in shopping malls and other commercial buildings. They open the door when someone comes near the entrance and close it after some time. A number of technologies are available to make such kinds of systems, like PIR sensors, Radar sensors, Laser sensors, Infrared sensors, etc. In this Arduino based automatic door opener project, we have tried to replicate the same system by using a PIR sensor.
This automatic door opening system using Arduino uses a motion-detecting sensor (PIR sensor) to open or close the door, which detects the infrared energy emitted from a human's body. When someone comes in front of the door, the infrared energy detected by the sensor changes, and it triggers the sensor to open the door whenever someone approaches the door. The signal is further sent to Arduino Uno, which controls the door in this automatic door opener system using Arduino and PIR sensor.
Table of Contents
- Circuit Components: Automatic Door Opener Using Arduino
- Understanding PIR Sensor for Automatic Door Opening System
- └ How PIR Sensor Works in Automatic Door Opener System
- Circuit Diagram and Explanation
- Code Explanation: Automatic Door Opening System Using Arduino
- Use Cases and Applications
- Future Enhancement
- Technical Summary and GitHub Repository
- Frequently Asked Questions
- Similar Automatic Door Opener Projects on Circuit Digest
Circuit Components: Automatic Door Opener Using Arduino
- Arduino UNO
- 16x2 LCD
- PIR Sensor
- Connecting wires
- Breadboard
- 1 k resistor
- Power supply
- Motor driver
- CD case (DVD Troly)
Understanding PIR Sensor for Automatic Door Opening System
PIR sensor detects any change in heat, and whenever it detects any change, its output PIN becomes HIGH. They are also referred to as Pyroelectric or IR motion sensors and are essential components in any automatic door opening system project.
Here we should note that every object emits some amount of infrared when heated. Human also emits infrared because of body heat. PIR sensors can detect a small amount of variation in infrared. Whenever an object passes through the sensor range, it produces infrared because of the friction between the air and the object, and gets caught by PIR.
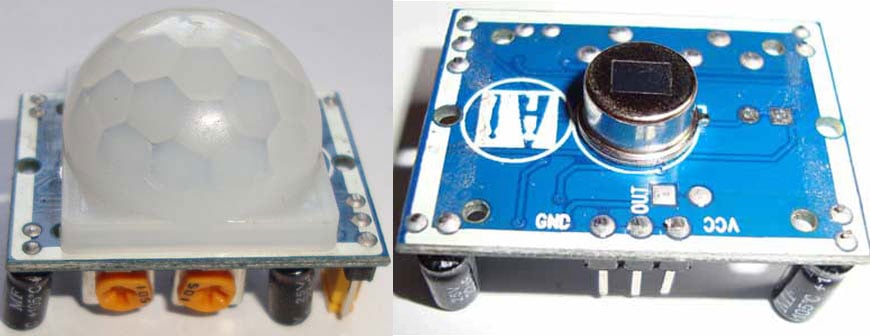
The main component of the PIR sensor is the Pyroelectric sensor shown in the figure (rectangular crystal behind the plastic cap). Along with BISS0001 ("Micro Power PIR Motion Detector IC"), some resistors, capacitors, and other components are used to build a PIR sensor. BISS0001 IC takes the input from the sensor and does processing to make the output pin HIGH or LOW accordingly.
How PIR Sensor Works in Automatic Door Opener System
The pyroelectric sensor is divided into two halves. When there is no motion, both halves remain in the same state, which means both senses the same level of infrared. As soon as somebody enters in the first half, the infrared level of one half becomes greater than the other, and this causes PIRs to react and makes the output pin high.
A pyroelectric sensor is covered by a plastic cap, which has an array of many Fresnel lenses inside. These lenses are curved in such a manner so that the sensor can cover a wide range.
Circuit Diagram and Explanation

Connections for the Arduino-based door opener circuit are shown in the above diagram. Here, a PIR sensor is used for sensing human motion, which has three terminals Vcc, GND, and Dout. Dout is directly connected to PIN 14 (A0) of Arduino Uno. A 16x2 LCD is used for displaying the status. RS, EN pins of LCD connected to Arduino pins 13 and 12 of Arduino, and data pins D0-D7 are connected to Arduino digital PINs 11, 10, 9, and 8. RW is directly connected to the ground. The L293D motor driver is connected to Arduino pins 0 and 1 for opening and closing the gate. Here in the circuit, we have used a motor for the gate.
Code Explanation: Automatic Door Opening System Using Arduino
The concept used here for programming the automatic door opener using Arduino is very simple. In the program, we have only used digital input and output.
DigitalRead is used for reading the output of the PIR sensor.

After that, if the PIR sensor senses any motion, then the program sends a command to open the gate, stop the gate, close the gate, and stop the gate.

Use Cases and Applications
This Arduino and PIR sensor-based automatic door opener system can be used in several situations:
- Home automation systems for people with disabilities or the elderly
- Clinics and small office buildings
- Utility rooms and storage rooms with pet doors that open when animals approach
- Educational initiatives in colleges and schools
- Development of commercial door system prototypes
Future Enhancement
Once you've successfully built your basic automatic door opener using Arduino, consider these upgrades:
» Wi-Fi connectivity: Add ESP8266 or ESP32 for remote monitoring
» Security features: Integrate with access control systems
» Multiple sensors: Use ultrasonic sensors for better accuracy
» Manual override: Add physical switches for emergencies
» Timer functions: Implement automatic closing after a set duration
Technical Summary and GitHub Repository
This Arduino project for an automatic door opener shows how motion detection and motor control can be used practically with basic parts. For simple replication, the entire source code, circuit schematics, and documentation are accessible on our GitHub repository. To construct your own automated door opening system and modify it to meet your unique needs, download the project files.


Frequently Asked Questions
⇥ How does an Arduino-powered automatic door opener operate?
An Arduino-powered automatic door opener detects motion using a PIR sensor. The Arduino receives a signal from the PIR sensor when someone approaches, and a motor driver is triggered to open the door.
⇥ How can I make my automatic door opening system more secure?
Consider incorporating keypad entry, smartphone app control, or RFID authentication into your automatic door opening system project to increase security.
⇥ Are heavy doors compatible with this automatic door opener system?
Lightweight doors are the focus of this simple Arduino and PIR sensor-based automatic door opener system. A stronger motor driver, a more potent motor, and perhaps a gear reduction system are required for heavy doors.
Similar Automatic Door Opener Projects on Circuit Digest
This project uses an RFID module and Arduino to unlock a door automatically when an authorized card is detected. Check out other DIY projects that automate doors using microcontrollers and smart technologies.

ESP32-CAM Face Recognition Door Lock System
In this tutorial, we build a Face ID-controlled Digital Door lock system using ESP32-CAM. The AI-Thinker ESP32-CAM module is a low-cost development board with a very small size OV2640 camera and a micro SD card slot. It has an ESP32 S chip with built-in Wi-Fi and Bluetooth connectivity, with 2 high-performance 32-bit LX6 CPUs, a 7-stage pipeline architecture.

How to Make an RFID Door Lock System Using Arduino?
In this article, we will learn how to build an RFID door lock system using Arduino. It’s a fun and secure way to unlock the door.

IoT Smart Garage Door Opener using Raspberry Pi
Here in this tutorial, we will build a Smart Garage Door Opener using a Raspberry Pi. Here a Raspberry Pi web server will be created to open and close the garage door using your smartphone.
See below the complete code for the Arduino-based automatic door opener.
Complete Project Code
#include <LiquidCrystal.h>
LiquidCrystal lcd(13, 12, 11, 10, 9, 8);
#define PIR_sensor 14
#define m11 0
#define m12 1
void setup()
{
  lcd.begin(16, 2);
  pinMode(m11, OUTPUT);
  pinMode(m12, OUTPUT);
  pinMode(PIR_sensor, INPUT);
  lcd.print("    Automatic    ");
  lcd.setCursor(0,1);
  lcd.print("   Door Opener   ");
  delay(3000);
  lcd.clear();
  lcd.print("CIRCUIT DEGEST ");
  delay(2000);
}
void loop()
{
  if(digitalRead(PIR_sensor))
  {
    lcd.setCursor(0,0);
    lcd.print("Movement Detected");
    lcd.setCursor(0, 1);
    lcd.print("    Gate Opened    ");
    digitalWrite(m11, HIGH);         // gate opening
    digitalWrite(m12, LOW);
    delay(1000);
    digitalWrite(m11, LOW);          // gate stop for a while
    digitalWrite(m12, LOW);
    delay(1000);
    lcd.clear();
    lcd.print("   Gate Closed    ");
    digitalWrite(m11, LOW);           // gate closing
    digitalWrite(m12, HIGH);
    delay(1000);
    digitalWrite(m11, LOW);            // gate closed
    digitalWrite(m12, LOW);
    delay(1000);
  }

  else
  {
    lcd.setCursor(0,0);
    lcd.print("   No Movement   ");
    lcd.setCursor(0,1);
    lcd.print("   Gate Closed   ");
    digitalWrite(m11, LOW);
    digitalWrite(m12, LOW);
  }
}
Comments
Is anyone getting that the door just loops and loops opening and closing but without detecting motion? After unplugging the sensor, the door continues to move? I checked the whole circuit they're all connected in the correct positions. The code is the same too. What could be wrong?
The sensor itself. Check of the sensor if working fine. Also use some Seial print statements inside the program to check where the problm is
This project good house room doors.i like it.thanks
Looking at this your code, implementing it I n a real life door will be problematic ,because according to code even when the sensor is sensing high that is, someone is standing close to door and maybe delays for more than 1second before entering, the next line of code after delay which is to close door will run and therefore shut the door even though the sensor is still sensing high

how can i store the updated password to eeprom? so that the system stores the updated password for next power up