
Shark Tank India - the show which has inspired many Indians to start their own enteprenual journey displayed a company called as torch it. This company is making electronic devices to help the visually impaired.
One such device of this company that caught our eyes was saarthi - a device that will help the visually impaired to find their way and to detect obstacles through sonar technology. This inspired us to build something very similar and check how it works, while the actual product would have taken a lot of RnD to perfect torch it, our DIY smart blind stick works well enough for a hobby project. We have also built a wireless Arduino blind stick and a smart blind stick using arduino nano previously on CircuitDigest, you can also check that out if you are interested.
To figure out the same, we decide to replicate it using common DIY parts.
The materials we used to make these products are:
Ultrasonic sensor
Arduino pro mini
Buzzer
Haptic motor
Lithium ion battery
Switch
3d printed enclosure
So, let’s check out the step by step procedure to make Saarthi
Circuit Diagram - Blind Stick using Arduino and Ultrasonic Sensor
The first and the most important step of the complete creation process was the electronics. Here’s the circuit diagram for reference. The main sensing part is the ultrasonic sensor in this complete project about which you can read more on circuit digest.

We used the Arduino pro mini because it had a small size. Haptic motors were used similar to the original product so the visually impaired person can get a feedback and a buzzer was also added. The complete stick was powered by a 3.7v li-ion battery.
Arduino Code for Blind Stick
Arduino IDE was used to program the main microcontroller (the Arduino Pro mini) and also, the complete project was done by tiny piece of code explained below. The whole code can be found at the absolute bottom of this blog.
Here’s the explanation of the code.
// Pin assignments
const int TRIGGER_PIN = 6;
const int ECHO_PIN = 5;
const int buzzer = 4;
const int MOTOR_PIN = 7;
This section defines the pin numbers used by various components in the circuit. TRIGGER_PIN is connected to the trigger pin of the ultrasonic sensor, ECHO_PIN is connected to the echo pin of the sensor, buzzer is connected to a piezo buzzer, and MOTOR_PIN is connected to a haptic motor.
// Threshold distances
const int ALERT_DISTANCE = 100; // Alert if object is within 30 cm
This line sets a threshold distance in centimeters. If the ultrasonic sensor detects an object closer than ALERT_DISTANCE, the buzzer and haptic motor will activate to alert the user.
// Timing constants
const int BUZZER_ON_TIME = 500; // Buzzer on time in milliseconds
const int MOTOR_ON_TIME = 200; // Haptic motor on time in milliseconds
const int LOOP_DELAY = 50; // Main loop delay in milliseconds
This section defines the timing constants used in the program. BUZZER_ON_TIME and MOTOR_ON_TIME are the durations for which the buzzer and haptic motor will remain on, respectively. LOOP_DELAY is the delay time between readings from the ultrasonic sensor.
void setup() {
  // Set up pins
  pinMode(TRIGGER_PIN, OUTPUT);
  pinMode(ECHO_PIN, INPUT);
  pinMode(buzzer, OUTPUT);
  pinMode(MOTOR_PIN, OUTPUT);
  // Start serial communication for debugging
  Serial.begin(9600);
}
This function runs only once at the beginning of the program. It sets the mode of each of the defined pins (TRIGGER_PIN, ECHO_PIN, buzzer, and MOTOR_PIN) to either INPUT or OUTPUT. It also starts serial communication at a baud rate of 9600, allowing for debugging messages to be sent via USB.
void loop() {
  // Send ultrasonic pulse
  digitalWrite(TRIGGER_PIN, LOW);
  delayMicroseconds(2);
  digitalWrite(TRIGGER_PIN, HIGH);
  delayMicroseconds(10);
  digitalWrite(TRIGGER_PIN, LOW);
  // Measure pulse duration
  long duration = pulseIn(ECHO_PIN, HIGH);
  // Calculate distance in cm
  int distance = duration / 58;
  // Debug output
  Serial.print("Distance: ");
  Serial.print(distance);
  Serial.println(" cm");
  // Check for alerts
  if (distance <= ALERT_DISTANCE) {
  // Turn on buzzer
    tone(buzzer, 1000, 1000); // 1KHz
    digitalWrite(MOTOR_PIN, HIGH);
    delay(BUZZER_ON_TIME);
    digitalWrite(MOTOR_PIN, LOW);
    noTone(buzzer); // 1KHz
}
noTone(buzzer); // 1KHz
  // Wait before taking another reading
  delay(LOOP_DELAY);
}
This is the main loop of the program, which continuously reads from the ultrasonic sensor and checks whether the measured distance is below the ALERT_DISTANCE threshold. The loop first sends a trigger signal to the ultrasonic sensor and measures the pulse duration of the resulting echo. It then calculates the distance based on the speed of sound and the time it took for the pulse to travel to the object and back.
If the measured distance is less than or equal to ALERT_DISTANCE, the program activates the buzzer and haptic motor for a set period of time. The buzzer is turned on using the tone() function, which generates a square
3D Printed Enclosure
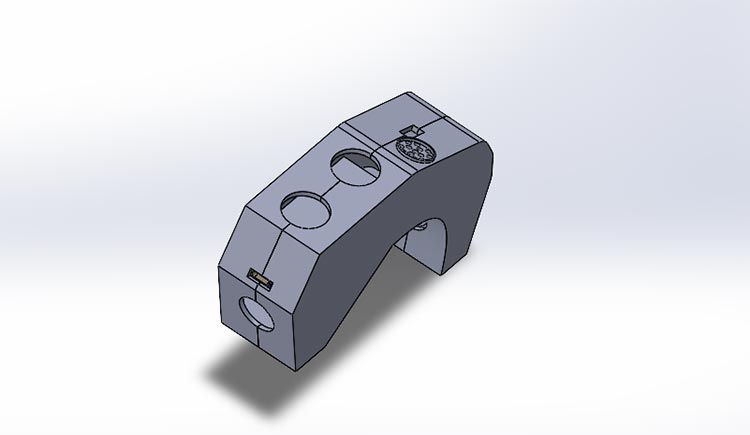
Making the 3d printed enclosure was probably the most difficult part in the complete process. We used solid works for the complete modeling process and ender pro for printing it. If you are new to 3D printing, follow our Getting started with 3D printing tutorial.
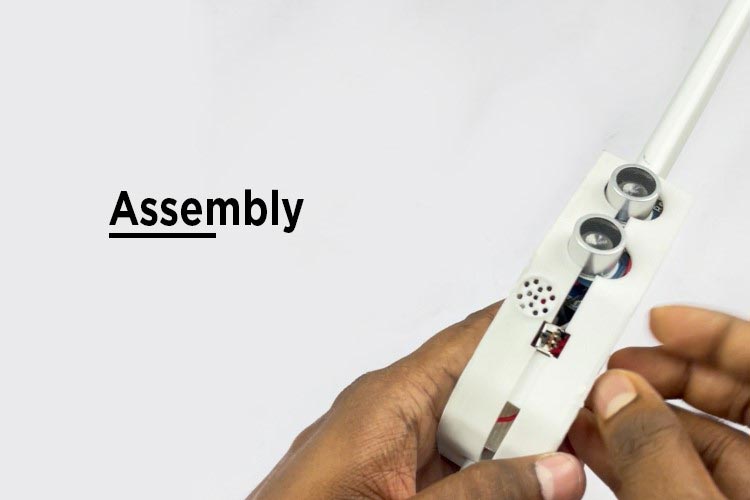
Assembly
After the parts are 3d printed, we assembled the electronics inside the 3d printed enclosure. We fixed it with the help of double tape and glue gun.
Testing and Conclusion
The project was tested and it was working accurately. Overall, we had fun making this project and will try to make more such projects in the future. If you want us to make more products from shark tank. Let us know in the comment section.
After everything is completed. We will test the project to see if it is working and that’s it.
The total cost to make this project for us was around Rs 1000 including the 3d printed parts. The original saathi was sold at amazon for around 2500 rs. Though we tried to replicate as best as I can, the prototype version needs a lot of improvements. Hope you like this project. If you did make sure to let us know in the comments section.

Project using Arduino Pro Mini
Here are some other Projects made using Arduino Pro Mini

Build Digital Cracker using Arduino and JQ6500 MP3 Module
Looking to add a musical touch to your projects? With Arduino and JQ6500 MP3 module, you can create your own digital cracker that plays festive sounds and tunes with just the push of a button. So, get your hands on the components and let's light up your celebrations with some musical magic!
Build A Low Power SMS Based Vehicle Tracking System with A9G GSM+GPS Module and Arduino
Track your vehicles with ease using the A9G GSM+GPS module and Arduino! Our low power SMS-based tracking system lets you monitor your fleet in real-time, even when you're on the move. Say goodbye to expensive GPS tracking systems and hello to a cost-effective solution that fits in the palm of your hand!

Fastest Arduino RC Car using Coreless DC Motors and nRF24L01 RF module
Get ready for the ride of your life with our fastest Arduino RC car yet! Equipped with powerful coreless DC motors and nRF24L01 RF module, this car is built for speed and precision control. Whether you're racing around the track or performing daring stunts, our RC car delivers unbeatable performance and excitement!
Complete Project Code
// Pin assignments
const int TRIGGER_PIN = 6;
const int ECHO_PIN = 5;
const int buzzer = 4;
const int MOTOR_PIN = 7;
// Threshold distances
const int ALERT_DISTANCE = 100; // Alert if object is within 30 cm
// Timing constants
const int BUZZER_ON_TIME = 500; // Buzzer on time in milliseconds
const int MOTOR_ON_TIME = 200; // Haptic motor on time in milliseconds
const int LOOP_DELAY = 50; // Main loop delay in milliseconds

void setup() {
  // Set up pins
  pinMode(TRIGGER_PIN, OUTPUT);
  pinMode(ECHO_PIN, INPUT);
  pinMode(buzzer, OUTPUT);
  pinMode(MOTOR_PIN, OUTPUT);

  // Start serial communication for debugging
  Serial.begin(9600);
}

void loop() {
  // Send ultrasonic pulse
  digitalWrite(TRIGGER_PIN, LOW);
  delayMicroseconds(2);
  digitalWrite(TRIGGER_PIN, HIGH);
  delayMicroseconds(10);
  digitalWrite(TRIGGER_PIN, LOW);

  // Measure pulse duration
  long duration = pulseIn(ECHO_PIN, HIGH);

  // Calculate distance in cm
  int distance = duration / 58;

  // Debug output
  Serial.print("Distance: ");
  Serial.print(distance);
  Serial.println(" cm");

  // Check for alerts
  if (distance <= ALERT_DISTANCE) {
    // Turn on buzzer

    tone(buzzer, 1000, 1000); // 1KHz
    digitalWrite(MOTOR_PIN, HIGH);
    delay(BUZZER_ON_TIME);
    digitalWrite(MOTOR_PIN, LOW);
    noTone(buzzer); // 1KHz

  }
noTone(buzzer); // 1KHz
  // Wait before taking another reading
  delay(LOOP_DELAY);
}

Brother, can you share the 3D printing file?
arduinokit.vn@gmail.com
Thank you