

Planning to buy a small voice recorder to record voices or sounds in an environment and store them in its memory? Think again! You can easily build your own voice recorder by following a few simple steps. This project focuses on building an Arduino Based Voice Recorder, which can also be abused as a spy bug. Our spy bug uses a small microphone to record the voice and it stores the recorded voice onto an SD card. It will able to record audio clips that are 2 minutes long, each 2 minutes long clip would be numbered serially. Once powered up, the recording process will continue until the battery is dead or there is no more space to store the recorded audio. We also attached an LED with the Arduino that indicates the recording process has started. All this sounds interesting, right? So, let's get started.
Important: The project discussed here is only intended for educational use. Respect other people’s privacy, any misuse of this device might be a punishable offense according to your state law. You have been warned.
List of Components - Arduino Based Spy Bug
The circuit for the spy recorder consists of very basic components that you will be able to find in your local hobby store, when you have accrued all the components, it can be easily built at home without any complexity.
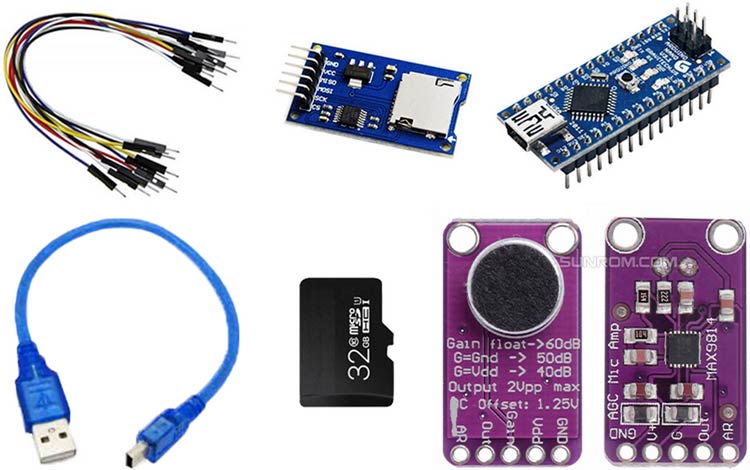
- Arduino NANO
- MAX9814 Amplifier board
- SD card module
- SD card
- 5V power supply unit (Can be a power bank or so)
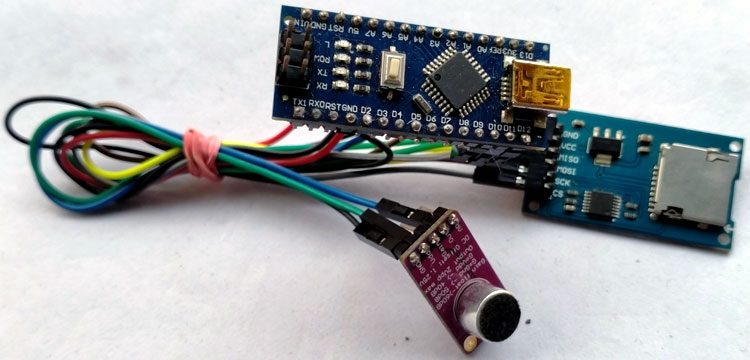
Arduino Based Spy Bug – Schematic Diagram
The complete Schematic diagram for the Arduino Based Spy Bug is shown below. The brain of the project is the Arduino Nano that you can see in the schematic.

The main component of this project is the MAX9814 which is a low-cost, high-performance microphone amplifier with automatic gain control (AGC) and low noise microphone bias. This device features a low-noise front-end amplifier, a variable gain amplifier (VGA), an output amplifier, a microphone bias voltage generator, and an AGC control circuit; all inside a single chip.

MAX9814 (shown in the image above) records the sound and transmits it to the Arduino. Then, the Arduino converts the sound into .wav format and stores it inside a MicroSD card module that is also connected with the Arduino.
There are many pins available in the MAX9814 module, but, majorly the VCC, GND, and out pins are used. There is also a gain pin that can be connected to the GND or VDD for a controlled gain of 50dB and 40dB. But we did not use gain control. By default, the module provides an uncompressed gain set to 60dB.
For the micro SD card, SPI (Serial Parallel Interface) is used. These SPI pins are connected with the following pins.
|
Arduino Pins |
SD Card Pins |
|
5V |
VCC |
|
GND |
GND |
|
D10 |
CS |
|
D11 |
MOSI |
|
D12 |
MISO |
|
D13 |
SCK |
For the MAX9814, Analog pins are used that are listed in the table given below.
|
Arduino Pins |
MAX9814 Pins |
|
3.3V |
VDD |
|
GND |
GND |
|
A0 |
OUT |
The audio stores in 2 minutes format and then starts to store in a new file. Thus each .wav file is of 2 minutes in length.
Arduino Based Spy Bug - code explanation
#include <TMRpcm.h>
#include <SD.h>
#include <SPI.h>
In the above lines, SPI, SD, and TMR based PCM libraries are included. To compile the code, kindly use this library. You can download the TMRpcm library from GitHub.
TMRpcm audio; // make instance variable
int file_number = 0;
char filePrefixname[50] = "spy";
char exten[10] = ".wav";
In the above codes file, name prefix and conversion file type are set along with the starting file number where the audio will be stored. The filename would be spyxxx.wav
const int recordLed = 2;
const int mic_pin = A0;
const int sample_rate = 16000;
In the above lines “recording is going on" notification LED is selected which is the available LED in the Arduino. The mic pin is available in the A0 pin with a sample rate of 16000 bits.
#define SD_CSPin 10 // defines the CS pin of the SD card.
// delay function for serial log.
void wait_min(int mins) {
  int count = 0;
  int secs = mins * 60;
  while (1) {
            Serial.print('.');
            delay(1000);
            count++;
            if (count == secs) {
            count = 0;
            break;
            }
  }
  Serial.println();
  return ;
}
The above code is used for printing the serial codes.
void setup() {
  // put your setup code here, to run once:
  //initializes the serial connection between the Arduino and any connected serial device(e.g. computer, phone, raspberry pi...)
  Serial.begin(9600);
  //Sets up the pins
  pinMode(mic_pin, INPUT);
  pinMode(recordLed, OUTPUT);
  Serial.println("loading... SD card");
  if (!SD.begin(SD_CSPin)) {
            Serial.println("An Error has occurred while mounting SD");
  }
  while (!SD.begin(SD_CSPin)) {
            Serial.print(".");
            delay(500);
  }
  audio.CSPin = SD_CSPin;
}
In the above codes, pin directions are set and the SD card is mounted. This section also gives you an error on the serial monitor if anything is wrong.
void loop() {
Serial.println("####################################################################################");
  char fileSlNum[20] = "";
  itoa(file_number, fileSlNum, 10);
  char file_name[50] = "";
  strcat(file_name, filePrefixname);
  strcat(file_name, fileSlNum);
  strcat(file_name, exten);
  Serial.print("New File Name: ");
  Serial.println(file_name);
  digitalWrite(recordLed, HIGH);
  audio.startRecording(file_name, sample_rate, mic_pin);
  Serial.println("startRecording ");
  // record audio for 2mins. means, in this loop process record 2mins of audio.
  // if you need more time duration recording audio then
  // pass higher value into the wait_min(int mins) function.
  wait_min(2); // This is the length of the audio file which is set to 2 minutes
  digitalWrite(recordLed, LOW);
  audio.stopRecording(file_name);
  Serial.println("stopRecording");
  file_number++;
  Serial.println("####################################################################################");
}
The above code is the infinite loop where the voice recorder records the voices. Then stores them in the SD card where the file number is increased every time writing in the file is completed.
Testing of the Arduino Based Spy Bug
All components are connected and flashed the code inside the Arduino. It is working as expected.
The Audio is recorded and tested using a mobile phone. Kindly check the video given for a full working video.
This marks the end of this project. If you liked the article, let me know in the comment section below or you can use our forum for quick response.
Complete Project Code
/*
   File Name: spy-recorder.ino
   Created on: 7-Jan-2021
   Author: Noyel Seth (noyelseth@gmail.com)
*/
/*
   Hardware Pinout Connection
   Arduino Nano        SD Pin
        5v ------------ VCC
        GND ----------- GND
        D10 ----------- CS
        D11 ----------- MOSI
        D12 ----------- MISO
        D13 ----------- SCK
  ________________________________________
   Arduino Nano         MAX9814
        3.3v ----------- VDD
        GND ------------ GND
        A0 -------------  Out
  ________________________________________
   Arduino Nano D2 pin user for Led to notify that record is in process.
*/
/*
   use Link: https://www.arduino.cc/reference/en/libraries/tmrpcm/ TMRpcm library for recording audio using MAX9814
   Recording a WAV file to an SD card is an advanced feature of the TMRpcm library so you must edit the library configuration file in order to use it.
   It simply searches the file "pcmConfig.h" using File Explorer and disables a few lines of code (then saves it).
    1. On Uno or non-mega boards uncomment the line #define buffSize 128
    2. Also uncomment #define ENABLE_RECORDING and #define BLOCK_COUNT 10000UL
*/
#include <TMRpcm.h>
#include <SD.h>
#include <SPI.h>
TMRpcm audio;
int file_number = 0;
char filePrefixname[50] = "spy";
char exten[10] = ".wav";
const int recordLed = 2;
const int mic_pin = A0;
const int sample_rate = 16000;
#define SD_CSPin 10
// delay function for with serial log.
void wait_min(int mins) {
  int count = 0;
  int secs = mins * 60;
  while (1) {
    Serial.print('.');
    delay(1000);
    count++;
    if (count == secs) {
      count = 0;
      break;
    }
  }
  Serial.println();
  return ;
}
void setup() {
  // put your setup code here, to run once:
  //initialises the serial connection between the arduino and any connected serial device(e.g. computer, phone, raspberry pi...)
  Serial.begin(9600);
  //Sets up the pins
  pinMode(mic_pin, INPUT);
  pinMode(recordLed, OUTPUT);
  Serial.println("loading... SD card");
  if (!SD.begin(SD_CSPin)) {
    Serial.println("An Error has occurred while mounting SD");
  }
  while (!SD.begin(SD_CSPin)) {
    Serial.print(".");
    delay(500);
  }
  audio.CSPin = SD_CSPin;
}
void loop() {
  Serial.println("####################################################################################");
  char fileSlNum[20] = "";
  itoa(file_number, fileSlNum, 10);
  char file_name[50] = "";
  strcat(file_name, filePrefixname);
  strcat(file_name, fileSlNum);
  strcat(file_name, exten);
  Serial.print("New File Name: ");
  Serial.println(file_name);
  digitalWrite(recordLed, HIGH);
  audio.startRecording(file_name, sample_rate, mic_pin);
  Serial.println("startRecording ");
  // record audio for 2mins. means , in this loop process record 2mins of audio.
  // if you need more time duration recording audio then
  // pass higher value into the wait_min(int mins) function.
  wait_min(2);
  digitalWrite(recordLed, LOW);
  audio.stopRecording(file_name);
  Serial.println("stopRecording");
  file_number++;
  Serial.println("####################################################################################");
}Comments
Error msg while compiling
Error msg while compiling
Arduino: 1.8.13 (Windows 10), Board: "Arduino Uno"
C:\Users\davew\Documents\Arduino\NANO_spy_bug\NANO_spy_bug.ino: In function 'void loop()':
NANO_spy_bug:64:9: error: 'class TMRpcm' has no member named 'startRecording'
audio.startRecording(file_name, sample_rate, mic_pin);
^~~~~~~~~~~~~~
NANO_spy_bug:71:9: error: 'class TMRpcm' has no member named 'stopRecording'
audio.stopRecording(file_name);
^~~~~~~~~~~~~
exit status 1
'class TMRpcm' has no member named 'startRecording'
This report would have more information with
"Show verbose output during compilation"
option enabled in File -> Preferences.
You need to go to pcmConfig
You need to go to pcmConfig in the library file and uncomment #define ENABLE_RECORDING and #define BLOCK_COUNT
Hi Sourav, Would it be…
Hi Sourav,
Would it be possible to modify the software such that once the SD card is full, it starts to rewrite over the oldest file? Dash cams do this. Thanks!
Tom
I like your project. It's…
I like your project. It's on my replicate list. What's your rationale for writing the audio to the microSD card in WAV file format? Wouldn't it be simpler to write on the SD card the analog voltage levels from the amplified microphone? The audio could be played back in the raw.

Nice project, thumbs up!