
In previous tutorial we have discussed about MQTT Protocol and installed local MQTT server on our Raspberry Pi for controlling the GPIO locally. But the drawback of local MQTT server is that we cannot control the GPIOs from anywhere in the world, it only provides services locally. But if this MQTT server is hosted on some cloud then any appliances connected to Raspberry Pi can be controlled globally.
Here, in this tutorial, we will use Adafruit IO as MQTT broker to control an AC appliance connected to Raspberry Pi GPIO. Also check other IoT controlled Home Automation tutorials:
- IOT based Voice Controlled Home Automation using ESP8266 and Android App
- Smart Phone Controlled Home Automation Using Arduino
- IoT based Web controlled Home Automation using PIC Microcontroller and Adafruit IO
- IoT based Web Controlled Home Automation using Raspberry Pi
- Google Assistant Based Voice Controlled Home Automation using DIY Arduino Wi-Fi Shield
Components Required
- Raspberry Pi with Raspbian Stretch installed in it.
- Relay Module
- Bulb
- Jumper Wires
Here, we will use SSH to access Raspberry Pi on the laptop. You can use VNC or Remote Desktop connection on the laptop, or can connect your Raspberry pi with a monitor. Learn more about setting up Raspberry Pi headlessly here without a monitor.
Circuit Diagram
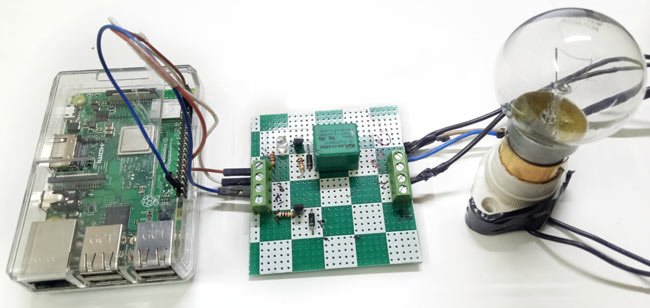
Circuit diagram for this IoT Controlled Home appliances with MQTT cloud and Raspberry Pi is simple, just connect a bulb with relay module on GPIO pin 35 of raspberry Pi.

Installing MQTT Cloud Libraries on Raspberry Pi
Here Adafruit IO platform is used with Raspberry Pi as MQTT broker. As we have used Adafruit IO platform many times in our previous tutorials similarly we can use it in Raspberry Pi.
Just make an account on Adafruit IO platform and make a feed, if you don’t know how to make feed and customize Adafruit dashboard then follow the link.
After making dashboard, install few libraries in Raspberry Pi to get start with MQTT.
1. First, update Your Pi and Python by issuing following commands
sudo apt-get update
sudo apt-get upgrade
sudo pip3 install --upgrade setuptools
2. Now, install Rpi.gpio and Adafruit blink libraries using below commands
sudo pip3 install RPI.GPIO
sudo pip3 install adafruit-blinka
3. Install Adafruit IO library using below command
sudo pip3 install adafruit-io
4. Clone the adafruit examples from github using below command
git clone https://github.com/adafruit/Adafruit_IO_Python.git
5. Then, navigate to the examples folder by entering the following command into the terminal:
cd Adafruit_IO_Python/examples/basics
If you're not sure which directory you're in, you can check this by running pwd.
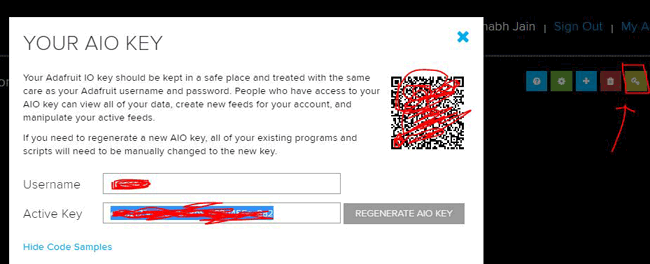
6. For all examples in this folder, you'll need to set the ADAFRUIT_IO_KEY and ADAFRUIT_IO_USERNAME, which can be found from the Adafruit dashboard. As shown below
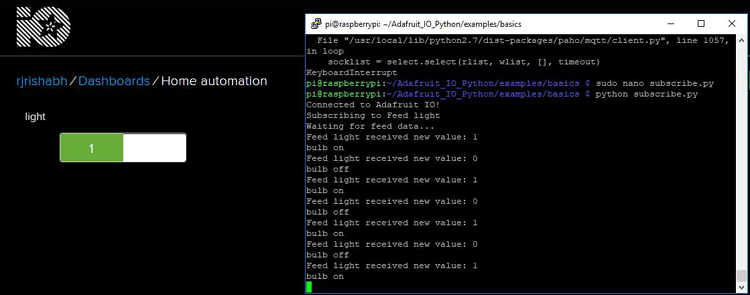
Toggle the button on Adafruit IO dashboard, and you should see the following in the terminal of your Pi.
7. Now, open the subscribe.py file using nano editor. Type following command to open it
sudo nano subscribe.py
We have to modify this program to control any GPIO from dashboard.
Coding Explanation for controlling Raspberry Pi GPIO with MQTT
First, import all the required libraries to use GPIO pins and Adafruit MQTT client.
import RPi.GPIO as GPIO
import sys
from Adafruit_IO import MQTTClient
Now, set GPIO mode and define LED pin number and set as output.
GPIO.setmode(GPIO.BOARD)
GPIO.setwarnings(False)
ledPin = 12
GPIO.setup(ledPin, GPIO.OUT)
Next, we have to set AIO key and Username that we have found while creating the dashboard.
ADAFRUIT_IO_KEY = 'YOUR_AIO_KEY'
ADAFRUIT_IO_USERNAME = 'YOUR_AIO_USERNAME'
Enter the feed name that you have given to turn on and off the light. Here, it is “light”.
FEED_ID = 'light'
Now, define a function that will be called when there will be an event happen. So, we will subscribe the Feed using client.subscribe(FEED_ID)
def connected(client):
    client.subscribe(FEED_ID)
    print('Waiting for feed data...')
After subscribing the feed, we have to check for the new value and store it into a payload variable. For this message function is called. So, whenever there is “1” in payload variable, make the led pin HIGH and for “0” make it LOW.
def message(client, feed_id, payload):
  print('Feed {0} received new value: {1}'.format(feed_id, payload))
  if payload == 1:
       GPIO.output(ledPin, GPIO.HIGH)
else:
      GPIO.output(ledPin, GPIO.LOW)
Now, create an MQTT client to connect with the Adafruit IO platform and send the messages to and fro.
client = MQTTClient(ADAFRUIT_IO_USERNAME, ADAFRUIT_IO_KEY)
client.on_connect = connected
client.on_disconnect = disconnected
Also, take care about proper indentation in the code else it will show an error. Complete python code is given at the end of the tutorial.
Finally, save the program using ctrl+x and hit the enter. Now, we have to run the script in order to subscribe the messages. So In the terminal type python subscribe.py and hit the enter.
python subscribe.py
You will see a message Waiting For Feed Data… as shown below snapshot.
Now, Make sure the relay module is connected with GPIO pin of Raspberry Pi and then go to Adafruit IO dashboard and change the light feed. The bulb should turn on when “1” is received and turned off when “0” is received as shown below.
In this way we can control any appliance from anywhere in world by using Raspberry Pi and MQTT cloud
Complete Project Code
import RPi.GPIO as GPIO

import sys

from Adafruit_IO import MQTTClient

GPIO.setmode(GPIO.BOARD)

GPIO.setwarnings(False)

ledPin = 12

GPIO.setup(ledPin, GPIO.OUT)

ADAFRUIT_IO_KEY = 'YOUR_AIO_KEY'

ADAFRUIT_IO_USERNAME = 'YOUR_AIO_USERNAME'

FEED_ID = 'light'

def connected(client):

    # Subscribe to changes on a feed named Counter.

    print('Subscribing to Feed {0}'.format(FEED_ID))

    client.subscribe(FEED_ID)

    print('Waiting for feed data...')
def disconnected(client):

    sys.exit(1)
def message(client, feed_id, payload):

    print('Feed {0} received new value: {1}'.format(feed_id, payload))

  if payload == 1:

       GPIO.output(ledPin, GPIO.HIGH)

else:

      GPIO.output(ledPin, GPIO.LOW)

# Create an MQTT client instance.

client = MQTTClient(ADAFRUIT_IO_USERNAME, ADAFRUIT_IO_KEY)

# Setup the callback functions defined above.

client.on_connect = connected

client.on_disconnect = disconnected

client.on_message = message
# Connect to the Adafruit IO server.

client.connect()

client.loop_blocking()
Comments
Hello!
I've a problem for controlling many switches.
How to program for many feed.

Hi Rishab Jain, Many thanks for step by step explanation. However, I would like to control the light from Google cloud platform IOT. Can I use the same procedure for GCP. What should I change inorder to work with GCP.
Thanks in advance.
Best regards,
Venugopal.