
Hi guys, welcome to today's tutorial, one of the good things about the Raspberry Pi is the great ability and ease with which it gives you the opportunity to connect devices to the internet especially for Home Automation Related Projects. Today we are going to explore the possibility of controlling AC appliances with the click of buttons on a webpage using internet. Using this IoT based home automation system, you can control your Home appliances from anywhere in the world. This web server can be run from any device which can run HTML applications, like Smart Phone, tablet, computer etc.
Required Components:
For this project, the requirements will fall under two categories, Hardware and Software:
I. Hardware Requirements:
- Raspberry Pi 3 (Any other Version will be nice)
- Memory card 8 or 16GB running Raspbian Jessie
- 5v Relays
- 2n222 transistors
- Diodes
- Jumper Wires
- Connection Blocks
- LEDs to test.
- AC lamp to Test
- Breadboard and jumper cables
- 220 or 100 ohms resistor
II. Software Requirements:
Asides the Raspbian Jessie operating system running on the raspberry pi, we will also be using the WebIOPi frame work, notepad++ running on your PC and filezila to copy files from the PC to the raspberry pi, especially the web app files.
Also you dont need to code in Python for this Home Automation Project, WebIOPi will do all the work.

Preparing the Raspberry Pi:
Its an habit of some sort for me and i think it’s a good one, the first thing I do each time i want to use the Raspberry Pi is to update the PI. For this project, this section will comprise of the Pi updating procedures and installing the WebIOPi framework which will help us handle communication from the webpage to the raspberry pi. I Should probably state that this can also be done in an arguably easier way using the python Flask frame work but one of the interesting thing about DIY is when you take a look under the hood and make the difficult work. Thats where all the joy of DIY comes.
To update the raspberry Pi below commands and then reboot the RPi;
sudo apt-get update
sudo apt-get upgrade
sudo reboot
With this done, the next thing is for us to install the webIOPi framework.
Make sure you are in home directory using;
cd ~
Use wget to get the file from their sourceforge page;
wget http://sourceforge.net/projects/webiopi/files/WebIOPi-0.7.1.tar.gz
When download is done, extract the file and go into the directory;
tar xvzf WebIOPi-0.7.1.tar.gz
cd WebIOPi-0.7.1/
At this point before running the setup, we need to install a patch as this version of the WebIOPi does not work with the raspberry pi 3 which I am using and I couldn’t find a version of the WebIOPi that works expressly with the Pi 3.
Below commands are used to install patch while still in the WebIOPi directory, run;
wget https://raw.githubusercontent.com/doublebind/raspi/master/webiopi-pi2bplus.patch
patch -p1 -i webiopi-pi2bplus.patch
Then we can run the setup installation for the WebIOPi using;
sudo ./setup.sh
Keep saying yes if asked to install any dependencies during setup installation. When done, reboot your pi;
sudo reboot
Test WebIOPi Installation:
Before jumping in to schematics and codes, With the Raspberry Pi back on, we will need to test our WebIOPi installation to be sure everything works fine as desired.
Run the command;
sudo webiopi -d -c /etc/webiopi/config
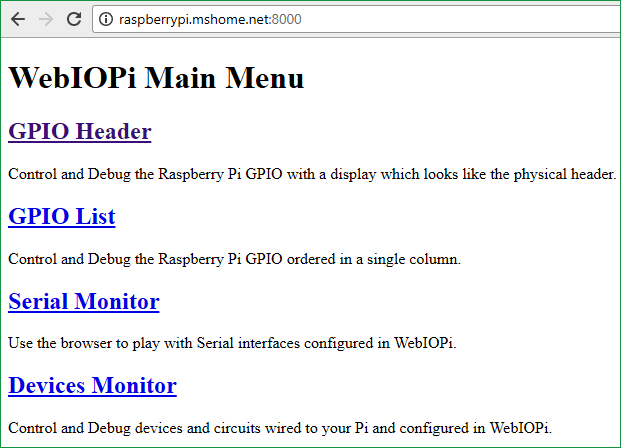
After issuing the command above on the pi, point the web browser of your computer connected to the raspberry pi to http://raspberrypi.mshome.net:8000 or http;//thepi’sIPaddress:8000. The system will prompt you for username and password.
Username is webiopi
Password is raspberry
This login can be removed later if desired but even your home automation system deserves some extra level of security to prevent just anyone with the IP controlling appliances and IOT devices in your home.
After the login, look around, and then click on the GPIO header link.
For this test, we will be connecting an LED to GPIO 17, so go on and set GPIO 17 as an output.
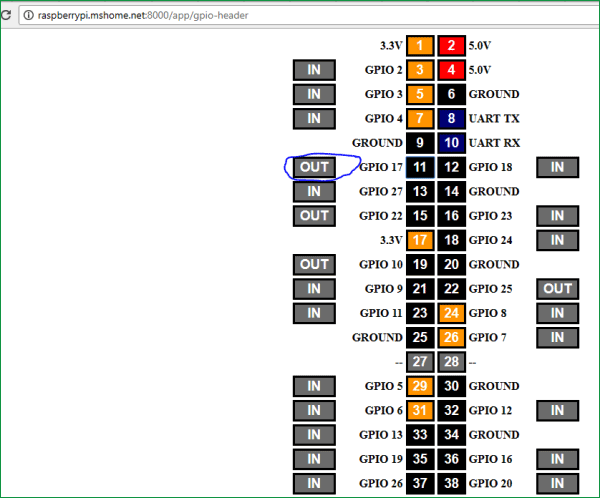
With this done, connect the led to your raspberry pi as shown in the schematics below.
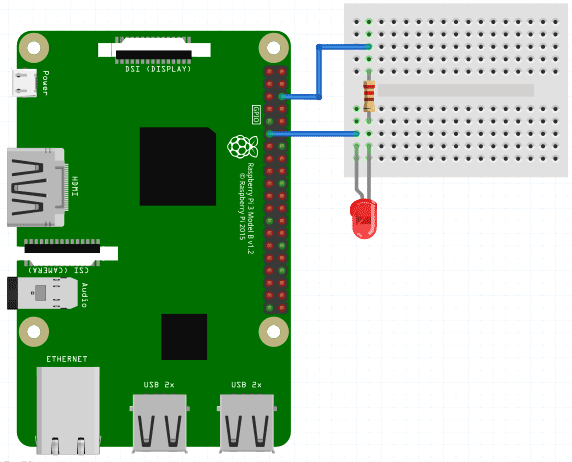
After the connection, go back to the webpage and click the pin 11 button to turn on or off the LED. This way we can control the Raspberry Pi GPIO using WebIOPi.
After the test, if everything worked as described, then we can go back to the terminal and stop the program with CTRL + C. If you have any issue with this setup, then hit me up via the comment section.
More info on Webiopi can be found on its Wiki page (http://webiopi.trouch.com/INSTALL.html)
With the test complete, we are then set to start the main project.
Building the Web Application for Raspberry Pi Home Automation:
Here we will be editing the default configuration of the WebIOPi service and add our own code to be run when called. The first thing we will do is get filezilla or anyother FTP/SCP copy software installed on our PC. You will agree with me that coding on the pi via the terminal is quite stressful, so filezilla or any other SCP software will come in handy at this stage. Before we start writing the html, css and java script codes for this IoT Home automation Web application and moving them to the Raspberry Pi, lets create the project folder where all our web files will be.
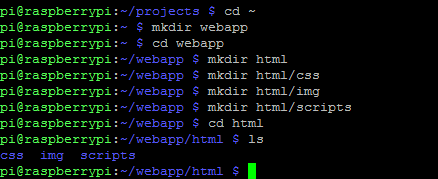
Make sure you are in home directory using, then create the folder, go into the created folder and create html folder in the directory:
cd ~
mkdir webapp
cd webapp
mkdir html
Create a folder for scripts, CSS and images inside the html folder
mkdir html/css
mkdir html/img
mkdir html/scripts
With our files created lets move to writing the codes on our PC and from then move to the Pi via filezilla.
The JavaScript Code:
The first piece of code we will write is that of the javascript. Its a simple script to communicate with the WebIOPi service.
Its important to note that for this project, our web app will consist of four buttons, which means we plan to control just four GPIO pins, although we will be controlling just two relays in our demonstration. Check the full Video at the end.
 webiopi().ready(function() {
                        webiopi().setFunction(17,"out");
                        webiopi().setFunction(18,"out");
                        webiopi().setFunction(22,"out");
                        webiopi().setFunction(23,"out");
                                                var content, button;
                        content = $("#content");
                                                button = webiopi().createGPIOButton(17," Relay 1");
                        content.append(button);
                                                button = webiopi().createGPIOButton(18,"Relay 2");
                        content.append(button);
                                                button = webiopi().createGPIOButton(22,"Relay 3");
                        content.append(button);
                                                button = webiopi().createGPIOButton(23,"Relay 4");
                        content.append(button);
                                });
The code above runs when the WebIOPi is ready.
Below we have explained the JavaScript code:
webiopi().ready(function(): This just instructs our system to create this function and run it when the webiopi is ready.
webiopi().setFunction(23,"out"); This helps us tell the WebIOPi service to set GPIO23 as output. We Have four buttons here, you could have more of it if you are implementing more buttons.
var content, button; This line tells our system to create a variable named content and make the variable a button.
content = $("#content"); The content variable is still going to be used across our html and css. So when we refer to #content, the WebIOPi framework creates everything associated with it.
button = webiopi().createGPIOButton(17,"Relay 1"); WebIOPi can create different kinds of buttons. The piece of code above helps us to tell the WebIOPi service to create a GPIO button that controls the GPIO pin in this case 17 labeled “Relay 1”. Same goes for the other ones.
content.append(button); Append this code to any other code for the button created either in the html file or elsewhere. More buttons can be created and will all have the same properties of this button. This is especially useful when writing the CSS or Script.
After creating the JS files, we save it and then copy it using filezilla to webapp/html/scripts if you created your files the same way I did mine.
With this done, we move to creating the CSS. You can whole download the code from the link given in the Code section in the end.
The CSS Code:
The CSS helps us make our IoT Raspberry Pi home automation webpage look pretty.
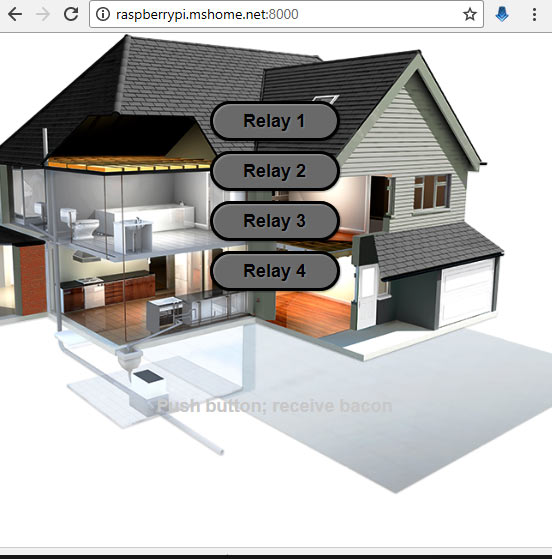
I wanted the webpage to look like the image below and thus had to write the smarthome.css style sheet to achieve it.
Ps: Building is an Image from google.
Below we have explained the CSS code:
The CSS script feels too bulky to include here so I will just pick part of it and use them for the breakdown. You can download the full CSS file from here. CSS is easy and you can understand it just by going through the CSS code. You can easily skit this part and use our CSS code straight away.
The first part of the script represent the stylesheet for the body of the web app and its shown below;
 body {
         background-color:#ffffff;
         background-image:url('/img/smart.png');
         background-repeat:no-repeat;
         background-position:center;
         background-size:cover;
         font: bold 18px/25px Arial, sans-serif;
         color:LightGray;
     }
I want to believe the code above is self-explanatory, we set the background color as #ffffff which is white, then we add a background image located at that folder location (Remember our earlier folder setup?), we ensure the image doesn’t repeat by setting the background-repeat property to no-repeat, then instruct the CSS to centralize the background. We then move to set the background size, font and color.
With the body done, we written the css for buttons to look pretty.
button {
         display: block;
         position: relative;
         margin: 10px;
         padding: 0 10px;
         text-align: center;
         text-decoration: none;
         width: 130px;
         height: 40px;
         font: bold 18px/25px Arial, sans-serif;  color: black;
         text-shadow: 1px 1px 1px rgba(255,255,255, .22);
         -webkit-border-radius: 30px;
          -moz-border-radius: 30px;
          border-radius: 30px;
To keep this brief, every other thing in the code was also done to make it look good. You can change them up see what happens, I think its called learning via trial and error but one good thing about CSS is things being expressed in plain English which means they are pretty easy to understand. The other part of the button block has few extras for text shadow on the button and button shadow. It also has a slight transition effect which helps it look nice and realistic when the button is pressed. These are defined separately for webkit, firefox, opera etc just to ensure the web page performs optimally across all platforms.
The next block of code is for the WebIOPi service to tell it that this is an input to the WebIOPi service.
input[type="range"] {
                                                display: block;
                                                width: 160px;
                                                height: 45px;
                        }
The last thing we want to do is give some sort of indication when button has been pressed. So you can sort of look at the screen and the color of the buttons let you know the current state. To do this, the line of code below was implemented for every single button.
                        #gpio17.LOW {
                                                background-color: Gray;
                                                color: Black;
                        }
                        #gpio17.HIGH {
                                                background-color: Red;
                                                color: LightGray;
                        }
The lines of codes above simply changes the color of the button based on its current state. When the button is off(LOW) the buttons background color becomes gray to show its inactive and when its on(HIGH) the background color of the button becomes RED.
CSS in the bag, lets save as smarthome.css, then move it via filezilla(or anyother SCP software you want to use) to the styles folder on our raspberry pi and fix the final piece, the html code. Remember to download full CSS from here.
HTML Code:
The html code pulls everything together, javascript and the style sheet.
<!DOCTYPE html PUBLIC "-//W3C//DTD HTML 4.01 Transitional//EN" "http://www.w3.org/TR/html4/loose.dtd">
<html>
<head>
        <meta http-equiv="Content-Type" content="text/html; charset=UTF-8">
        <meta name="mobile-web-app-capable" content="yes">
        <meta name="viewport" content = "height = device-height, width = device-width, user-scalable = no" />
        <title>Smart Home</title>
        <script type="text/javascript" src="/webiopi.js"></script>
        <script type="text/javascript" src="/scripts/smarthome.js"></script>
        <link rel="stylesheet" type="text/css" href="/styles/smarthome.css">
        <link rel="shortcut icon" sizes="196x196" href="/img/smart.png" />
</head>
<body>
                        </br>
                        </br>
                        <div id="content" align="center"></div>
                        </br>
                        </br>
                        </br>
                        <p align="center">Push button; receive bacon</p>
                        </br>
                        </br>
</body>
</html>
Within the head tag exist some very important features.
<meta name="mobile-web-app-capable" content="yes">
The line of code above enables the web app to be saved to a mobile desktop is using chrome or mobile safari. This can be done via the chrome menu. This gives the app an easy launch feel from the mobile desktop or home.
The next line of code below gives some sort of responsiveness to the web app. It enables it occupy the screen of any device on which its launched.
<meta name="viewport" content = "height = device-height, width = device-width, user-scalable = no" />
The next line of code declares the title shown on the title bar of the web page.
<title>Smart Home</title>
The next four line of codes each perform the function of linking the html code to several resources it needs to work as desired.
        <script type="text/javascript" src="/webiopi.js"></script>
        <script type="text/javascript" src="/scripts/smarthome.js"></script>
        <link rel="stylesheet" type="text/css" href="/styles/smarthome.css">
        <link rel="shortcut icon" sizes="196x196" href="/img/smart.png" />
The first line above calls the main WebIOPi framework JavaScript which is hard-coded in the server root. This needs to be called every time the WebIOPi is to be used.
The second line points the html page to our jQuery script, the third points it in the direction of our style sheet. Lastly the last line helps set up an icon to be used on the mobile desktop in case we decide to use it as a web app or as a favicon for the webpage.
The body section of the html code just contains break tags to ensure the buttons aligned properly with the line below telling our html code to display what is written in the JavaScript file. The id=”content” should remind you of the content declaration for our button earlier under the JavaScript code.
<div id="content" align="center"></div>
You know the drill, the html code as index.html and move to the html folder on the Pi via filezilla. You can download all the CSS, JS and HTML file from here.
WebIOPi Server Edits for Home Automation:
At this stage, we are ready to start creating our schematics and test our web app but before then we need to edit the config file of the webiopi service so its pointed to use data from our html folder instead of the config files that came with it.
To edit the configuration run the following with root permission;
sudo nano /etc/webiopi/config
Look for the http section of the config file, check under the section where you have something like, #Use doc-root to change default HTML and resource files location
Comment out anything under it using # then if your folder is setup like mine, point your doc-root to the path of your project file
doc-root = /home/pi/webapp/html
Save and exit. You can also change the port from 8000, in case you have another server running on the pi using that port. If not save and quit, as we move on.
Its Important to note that you can change the password of the WebIOPi service using the command;
sudo webiopi-passwd
It will prompt you for a new username and password. This can also be removed totally but security is important right?
Lastly run the WebIOPi service by issuing below command:
sudo /etc/init.d/webiopi start
The server status can be checked using;
sudo /etc/init.d/webiopi status
It can be stopped from running using;
sudo /etc/init.d/webiopi stop
To setup WebIOPi to run at boot, use;
sudo update-rc.d webiopi defaults
If you want to reverse and stop it from running at boot, use;
sudo update-rc.d webiopi remove
Circuit Diagram and Explanation:
With our software set up done, we are all set to start creating the schematics for this Web controlled Home Appliance project.

While I couldn’t lay my hands on relay modules, which I feel are easier to work with for hobbyists. So I am drawing here the schematics for ordinary standalone single 5v relays.
Connect your circuit as shown in the fritzing circuit above. You should note that COM, NO (normally open) and NC (normally Close) of your own relay may be located at different sides/points. Kindly use a millimeter to test it out. Learn more about relay here.
With our components connected, fire up your server, from a webpage, go to the IP of your Raspberry Pi and indicate the port as described earlier, login with your username and password, and you should see a webpage that looks exactly like the image below.
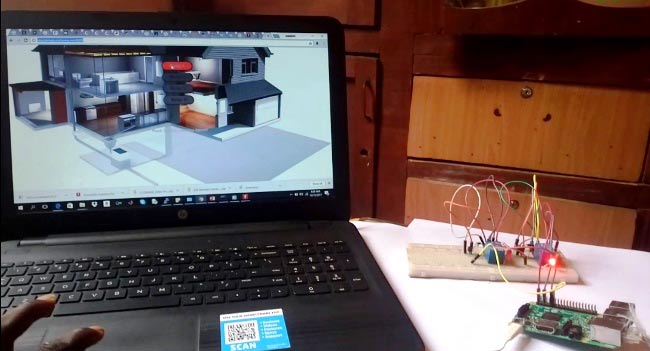
Now you can easily control four AC Home appliaces from anywhere wirelessly, just by clicking on the buttons. This will work from Mobilephone, tablet etc. and you can add more buttons and relays to control more devices. Check the full video below.
That’s It guys, thanks sticking around for this one. If you have any questions, drop them in the comment box.
Complete Project Code
Comments
I wanted step by step methods how you worked well with android and how did you start this project please can you help me out regarding this, because this is my project topic this semester.
I done steps up to webiopi installation.and also login on pi using lan but it shows garbage data on pc screen instead of going layout please help
I done all the Steps till Webiopi config and when I try to open web browser (Raspberry IP) I see error message on SSH screen "name GPIO not define.
Would you please help me?
everything works fine in PC but in mobile page says "The site can't be reached. and how can this page run anywhere in the world
Why we require notepad++ here?
Hello Sir.
I want to make home automation using arduino and esp8266 module. I want to control home appliances with app using wifi. Can u help in making this project. Please reply.
Thank you
Aman
How can we operate it from remote location? it works only on same wifi network.
dear sir, I tried to download the patch file before installing webiopi. At given link the code is available. Please help me how to install the patch file? or am I getting wrong with this. Should I copy the codes somewhere else? Please guide me.
Is there any other best development board for Home Automation rather than Raspberry pi?
Will you kindly suggest me what are the development boards are used for home automation projects.
Raspberry Pi, ESP8266, NodeMCU, ESP32, LoRa-Ra-02, NRF24L01, HM-10 these are the commonly used boards

Everything goes fine with mobile , i was able to run the automation website from my mobile without any difficulty , but when i tried to control the led from my pc the website opened but when i click on relay button it does not change to red and the led doesn't work !!
please advise