
MQTT is a protocol used to send and receive messages over internet. We previously used this protocol in Iot Electricity meter and Raspberry Pi Alexa to publish the data on internet. In this tutorial we will get to know more about the MQTT and the terms related to it. Here we will use the Raspberry Pi as local MQTT broker and control an LED connected to NodeMCU ESP12E through MQTT application dashboard. A DHT11 sensor is also connected to NodeMCU so we get the reading of temperature and humidity on MQTT dashboard, by again using the Raspberry Pi as local MQTT broker.
So, let’s start by understating the MQTT and the terms related to it.
What is MQTT?
MQTT stands for Message Queue Telemetry Transport which is designed by IBM. This protocol is simple and lightweight which is used to send and receive messages over internet and it is designed for the devices which have low bandwidth uses. Nowadays this protocol is frequently used in the IoT devices to send and receive the sensors data. Also, In IoT based home automation systems, this protocol can easily be used without using much of internet data.
There are few terms which are used frequently in MQTT:
- Subscribe and Publish
- Message
- Topic
- Broker
1. Subscribe and Publish: Subscribe means to get the data from other device, and publish means to send the data to other device.

When device1 sends the data to device2 then it is known as Publisher and another is Subscriber and vice-versa.
2. Message: Messages are the information that we are sending and receiving. It can be a data or any type of command. For example, if we are publishing the temperature data to the cloud then this temperature data is known as Message.
3. Topic: This is the way you register interest for incoming messages or how you specify where you want to publish the message. Topics are represented with strings separated by a forward slash. Data is published on the topics using MQTT and then MQTT device subscribe to the topic to get the data.
4. MQTT Broker: This thing is responsible for receiving all messages from publishers, filters the messages and then publishing the messages to the subscribers who are interested in them.
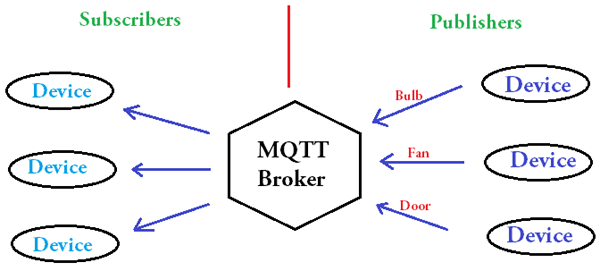
When this broker is hosted on the cloud then it is called MQTT cloud. There are many cloud based MQTT services like Adafruit IO, MQTT.IO, IBM bluemix, Microsoft Azure, etc. MQTT can also be used with popular Amazon AWS cloud, which we have explained in Getting Started with Amazon AWS tutorial.
We can make our own MQTT broker using the Raspberry Pi. This will be the local MQTT broker i.e. you can send and receive the data on your local network only not from anywhere. So here we will install Mosquitto MQTT broker in Raspberry Pi to make it local MQTT broker and will send the temperature data from the NodeMCU to MQTT dashboard application. Also, we will control an LED connected to NodeMCU using the broker.
Installing Mosquitto MQTT Broker on Raspberry Pi
Open the terminal in your Raspberry pi and type the following commands to install the broker
sudo apt update
sudo apt install -y mosquitto mosquitto-clients
Wait for the installation to finish. Now, to start the broker on startup of raspberry pi, Type the following command
sudo systemctl enable mosquitto.service
That’s it, we are all set to launch our MQTT broker. To check it is installed properly, enter the following command
mosquitto -v
This command will give you the version of your MQTT broker. It should be 1.4.x or above.
Testing the Raspberry Pi Mosquitto Broker
1. Run the Mosquitto broker in background using the below command
mosquitto -d
2. Now, we will subscribe a topic in exampleTopic using following command
mosquitto_sub -d -t exampleTopic
3. Now, we will publish some message to exampleTopic
mosquitto_pub -d -t exampleTopic -m "Hello world!"
You will receive the Hello world! Message in the subscriber terminal.
Now, it’s time to control and getting the data from another device in our case we are using NodeMCU and MQTT dashboard application.
- First we will control an LED by sending command using App so in this case NodeMCU behave as a subscriber and App as a publisher.
- Then ESP12E also has DHT11 sensor connected to it and it sends this temperature reading to Mobile MQTT application so in this case mobile will be the subscriber and NodeMCU will be the publisher. And to forward these messages on the respective Topics, the Mosquitto MQTT broker is used.
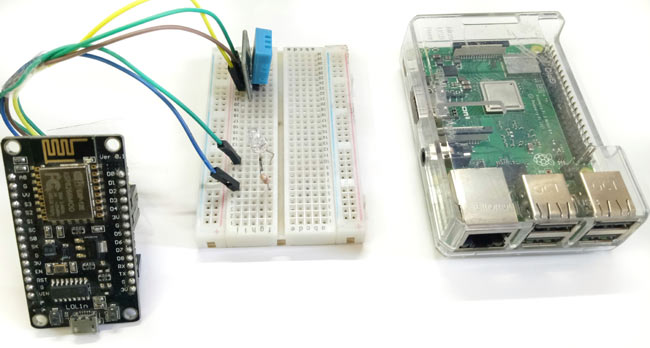
Circuit Diagram

Connect the circuit as shown in the diagram. Here the DHT11 is used for the temperature readings but a LM35 Temperature sensor can also be used. We already used DHT11 sensor in many of our projects including with NodeMCU to build a weather station.
Lets start writing the code for the NodeMCU to subscribe and publish the data.
Code and Explanation
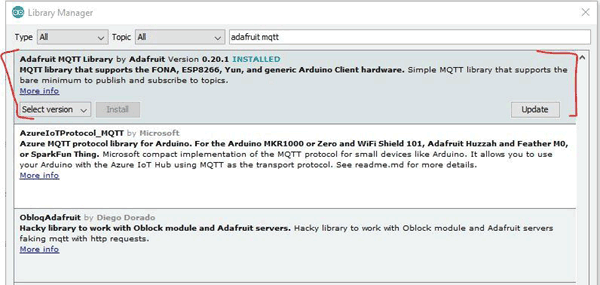
For this download the Adafruit MQTT library from Sketch -> Include Library -> Manage Libraries. Search for Adafruit MQTT and install it. After installing the library. Go to examples -> Adafruit mqtt library -> mqtt_esp8266

Then edit this code according to our Raspberry Pi IP address and Wi-Fi credentials.
Include all the libraries for ESP8266WIFI and Adafruit MQTT.
#include <ESP8266WiFi.h>
#include "Adafruit_MQTT.h"
#include "Adafruit_MQTT_Client.h"
#include "DHT.h"
Then define the SSID and Password for your Wi-Fi, from which you want to connect your ESP-12e. Make sure your RPi and NodeMCU connect with the same network.
#define WLAN_SSID       "xxxxxxxx"
#define WLAN_PASS       "xxxxxxxxxxx"
This section defines the Adafruit server, in this case the IP address of your Raspberry Pi and server port.
#define AIO_SERVER      "ip address of your Pi"
#define AIO_SERVERPORT  1883
Below fields will remain empty because we are not using the Adafruit cloud.
#define AIO_USERNAME    ""
#define AIO_KEY         ""
Then create an ESP8266 WiFiClient class to connect to the MQTT server.
WiFiClient client;
Setup the MQTT client class by passing in the WiFi client and MQTT server and login details.
Adafruit_MQTT_Client mqtt(&client, AIO_SERVER, AIO_SERVERPORT, AIO_USERNAME, AIO_KEY);
Setup a feed called 'Temperature' for publishing the temperature.
Adafruit_MQTT_Publish Temperature = Adafruit_MQTT_Publish(&mqtt, AIO_USERNAME "/feeds/temperature");
Setup a feed called 'led1' for subscribing to changes.
Adafruit_MQTT_Subscribe led1 = Adafruit_MQTT_Subscribe(&mqtt, AIO_USERNAME "/feeds/led");
In setup function, we declare PIN of NodeMCU on which you want to get output. Then, connect NodeMCU to Wi-fi access point.
void setup() {
  Serial.begin(115200);
  delay(10);
  pinMode(LED, OUTPUT);
  Serial.println(F("Adafruit MQTT demo"));
  // Connect to WiFi access point.
  Serial.println(); Serial.println();
  Serial.print("Connecting to ");
  Serial.println(WLAN_SSID);
  WiFi.begin(WLAN_SSID, WLAN_PASS);
  while (WiFi.status() != WL_CONNECTED) {
….
….
…
Setup MQTT subscription for led feed.
  mqtt.subscribe(&led1);
}
In loop function, we will ensure that the connection to the MQTT server is alive using MQTT_connect(); function.
void loop() {
  MQTT_connect();
Now, subscribe ‘led’ feed and get the string from MQTT broker and convert this string to number using atoi(); function and write this number to LED pin using digitalWrite(); function.
Adafruit_MQTT_Subscribe *subscription;

  while ((subscription = mqtt.readSubscription(20000))) {
    if (subscription == &led1) {
      Serial.print(F("Got: "));
      Serial.println((char *)led1.lastread);
      int led1_State = atoi((char *)led1.lastread);
      digitalWrite(LED, led1_State);
    }
Now, get the temperature in a variable and publish this value using Temperature.publish(t) function.
float t = dht.readTemperature();
…
..

  if (! Temperature.publish(t)) {
    Serial.println(F("Failed"));
  } else {
    Serial.println(F("OK!"));
  }
Full code with a demonstration video is given at the end of this tutorial. Upload the code to NodeMCU board and open the MQTT dashboard app that you have downloaded in the Smartphone.
You can also control Raspberry Pi GPIO from anywhere in world using MQTT cloud like Adafruit IO, MQTT.IO etc, which we will learn in next tutorial.
Complete Project Code
#include <ESP8266WiFi.h>

#include "Adafruit_MQTT.h"

#include "Adafruit_MQTT_Client.h"

#include "DHT.h"
#define LED            D5

#define DHTPIN            D4
#define WLAN_SSID       "awesome"

#define WLAN_PASS       "awesome12"
#define AIO_SERVER      "192.168.43.177"        //IP address of RPi

#define AIO_SERVERPORT  1883

#define AIO_USERNAME    ""

#define AIO_KEY         ""
WiFiClient client;

Adafruit_MQTT_Client mqtt(&client, AIO_SERVER, AIO_SERVERPORT, AIO_USERNAME, AIO_KEY);

Adafruit_MQTT_Publish Temperature = Adafruit_MQTT_Publish(&mqtt, AIO_USERNAME "/feeds/temperature");

Adafruit_MQTT_Subscribe led1 = Adafruit_MQTT_Subscribe(&mqtt, AIO_USERNAME "/feeds/led");

#define DHTTYPE           DHT11     // DHT 11
DHT dht(DHTPIN, DHTTYPE);

uint32_t delayMS;

/*************************** Sketch Code ************************************/
void MQTT_connect();
void setup() {

  Serial.begin(115200);
  delay(10);

  pinMode(LED, OUTPUT);

  Serial.println(F("Adafruit MQTT demo"));
  // Connect to WiFi access point.

  Serial.println(); Serial.println();

  Serial.print("Connecting to ");

  Serial.println(WLAN_SSID);
  WiFi.begin(WLAN_SSID, WLAN_PASS);

  while (WiFi.status() != WL_CONNECTED) {

    delay(500);

    Serial.print(".");

  }

  Serial.println();
  Serial.println("WiFi connected");

  Serial.println("IP address: "); Serial.println(WiFi.localIP());


  //Setting up DHT sensor

  dht.begin();
  // Setup MQTT subscription for onoff feed.

  mqtt.subscribe(&led1);


}
uint32_t x = 0;
void loop() {

  // Ensure the connection to the MQTT server is alive (this will make the first

  // connection and automatically reconnect when disconnected).  See the MQTT_connect

  // function definition further below.

  MQTT_connect();

  // this is our 'wait for incoming subscription packets' busy subloop

  // try to spend your time here
  Adafruit_MQTT_Subscribe *subscription;

  while ((subscription = mqtt.readSubscription(20000))) {

    if (subscription == &led1) {

      Serial.print(F("Got: "));

      Serial.println((char *)led1.lastread);

      int led1_State = atoi((char *)led1.lastread);

      digitalWrite(LED, led1_State);

      Serial.println("onnn");

    }


  }
  // Read temperature as Celsius (the default)

  float t = dht.readTemperature();

  // Check if any reads failed and exit early (to try again).

  if (isnan(t)) {

    Serial.println("Failed to read from DHT sensor!");

    return;

  }

  if (! Temperature.publish(t)) {

    Serial.println(F("Failed"));

  } else {

    Serial.println(F("OK!"));

  }
}
// Function to connect and reconnect as necessary to the MQTT server.

// Should be called in the loop function and it will take care if connecting.

  void MQTT_connect() {

  int8_t ret;
  // Stop if already connected.

  if (mqtt.connected()) {

    return;

  }
  Serial.print("Connecting to MQTT... ");

  uint8_t retries = 3;

  while ((ret = mqtt.connect()) != 0) { // connect will return 0 for connected

    Serial.println(mqtt.connectErrorString(ret));

    Serial.println("Retrying MQTT connection in 5 seconds...");

    mqtt.disconnect();

    delay(5000);  // wait 5 seconds

    retries--;

    if (retries == 0) {

      // basically die and wait for WDT to reset me

      while (1);

    }

  }

  Serial.println("MQTT Connected!");

}
